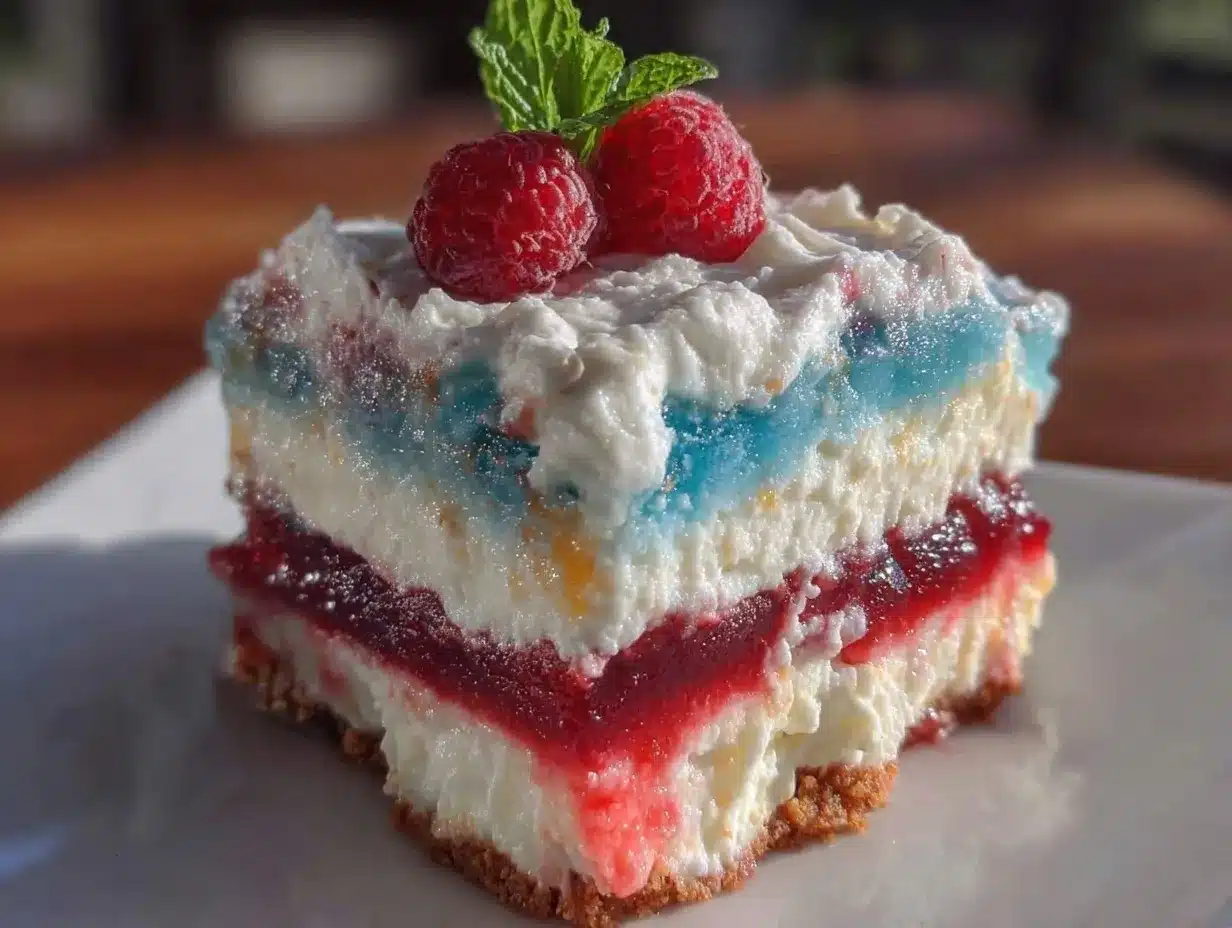
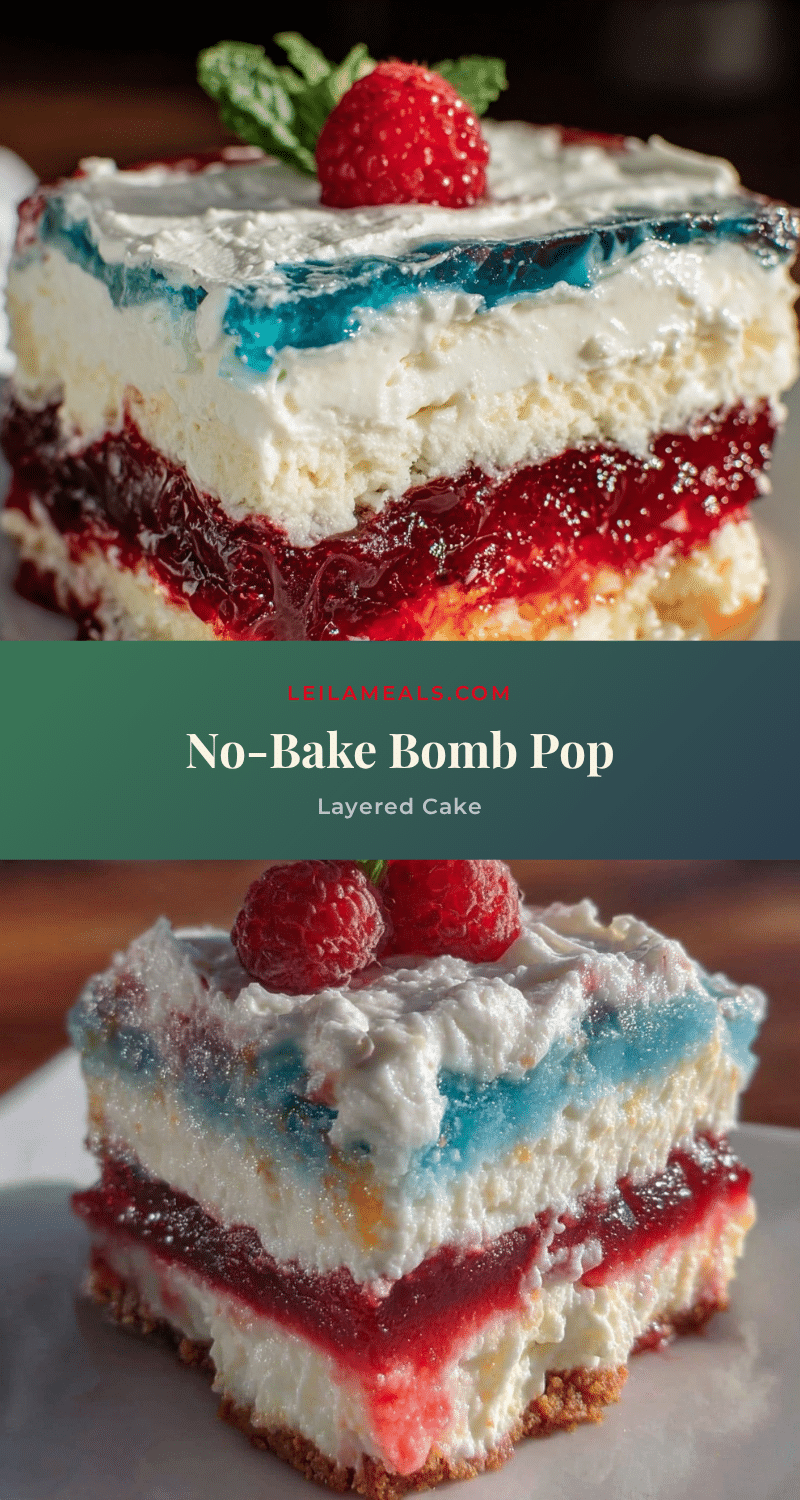
The last bite disappeared with a sigh — and then the texts started rolling in. “Can you send me the recipe?” “That popsicle cake was unreal!” Honestly, I wasn’t expecting the Easy No-Bake Bomb Pop Popsicle Cake to cause such a frenzy. It was meant as a silly little summer experiment, a playful twist on nostalgia, but it somehow ended up stealing the show at every gathering. The mix of red, white, and blue layers wasn’t just a feast for the eyes — it was a full-on celebration for the taste buds.
It all began on a sweltering afternoon when the thought of firing up the oven felt more like a punishment than a plan. I remembered those bomb pop popsicles from childhood — the kind you’d clutch tightly, licking away the melting sweetness on a hot day. Why not turn that into a cake? No baking, no mess, just pure refreshing fun layered into a dessert that makes you smile before you even take a bite.
What surprised me most was how the flavors melded without fuss and how the texture hit that perfect spot between creamy and icy. My friends were skeptical at first, but by the time the last slice was claimed, even the biggest dessert skeptics were asking for seconds. There’s a quiet joy in that—a reminder that sometimes the simplest ideas make the biggest impact.
That’s why this recipe stuck with me. It’s not just a summer treat; it’s a little nostalgic hug, a way to share something playful and cool without the stress. If you’re looking for a dessert that’s fuss-free but still has that wow factor, you might find yourself reaching for this Easy No-Bake Bomb Pop Popsicle Cake more often than you expect.
Why You’ll Love This Recipe
Honestly, I’ve tested plenty of no-bake desserts, but this popsicle cake has a charm all its own. It’s not only easy but somehow feels special — the kind of dessert that gets people talking without you breaking a sweat in the kitchen.
- Quick & Easy: Ready in under 30 minutes, perfect for those last-minute summer get-togethers or when the oven just can’t be bothered.
- Simple Ingredients: No fancy shopping required. You probably have most of the ingredients in your pantry or fridge already.
- Perfect for Summer Parties: Its vibrant red, white, and blue layers make it a perfect festive dessert for July 4th, pool parties, or any sunny afternoon.
- Crowd-Pleaser: Kids love the fun colors, and adults appreciate the light, refreshing flavors — a rare combo!
- Unbelievably Delicious: The creamy layers with a hint of fruity popsicle flavor create a texture that’s both smooth and slightly icy, mimicking the original treat but with a grown-up twist.
- Unique Twist: Unlike other no-bake cakes, this one uses a clever layering technique with a whipped cream and cream cheese base that perfectly balances sweetness and tang.
This recipe isn’t just another dessert; it’s a way to bring a little childhood magic back to the table without any hassle. You won’t find a simpler or more charming way to impress guests — or treat yourself — on a hot day. Plus, it pairs beautifully with light summer dishes like my zesty lemon garlic shrimp pasta, making for a complete easy summer meal.
What Ingredients You Will Need
This recipe uses simple, wholesome ingredients to deliver that bold popsicle flavor and creamy texture without any fuss. Most are pantry staples or easy to find in your local grocery store. Here’s the breakdown:
- For the Base:
- 1 ½ cups graham cracker crumbs (about 150g) — I like to use Honey Maid for that perfect sweet crunch
- 5 tablespoons unsalted butter, melted — gives the crust a rich, buttery taste
- 2 tablespoons granulated sugar (optional) — to add a touch of extra sweetness
- For the Filling:
- 8 ounces (225g) cream cheese, softened — the creamy foundation that adds tang
- 1 cup powdered sugar (125g) — for sweetness without grit
- 2 cups heavy whipping cream (475ml), chilled — whipped to fluffy perfection
- 1 teaspoon vanilla extract — for depth and warmth
- For the Popsicle Layers:
- 1 cup strawberry or cherry gelatin (prepared as per package instructions, cooled but not set) — for the red layer
- 1 cup coconut or vanilla pudding (prepared) — for the white creamy layer
- 1 cup blue raspberry gelatin (prepared, cooled but not set) — for the blue layer
- Optional Garnishes:
- Fresh berries (strawberries, blueberries) — adds freshness and color
- Mini popsicles or candy flags — for fun decoration
- 9×9-inch (23×23 cm) square baking pan or springform pan — I prefer a springform for easy removal without breaking the cake.
- Mixing bowls — one large for whipping cream, one medium for cream cheese mixture.
- Electric mixer or stand mixer — whipping the cream by hand is possible but takes patience.
- Rubber spatula — perfect for folding ingredients gently without deflating the whipped cream.
- Measuring cups and spoons — for accuracy.
- Whisk — handy for mixing the gelatin layers smoothly.
- Prepare the crust: In a medium bowl, combine 1 ½ cups graham cracker crumbs, 5 tablespoons melted butter, and 2 tablespoons sugar. Stir until the mixture resembles wet sand. Press firmly and evenly into the bottom of your 9×9-inch pan. Chill in the fridge while you prepare the filling (about 10 minutes).
- Make the cream cheese filling: Beat 8 ounces softened cream cheese with 1 cup powdered sugar until smooth and creamy. Add 1 teaspoon vanilla extract and mix well.
- Whip the cream: In a large bowl, whip 2 cups cold heavy cream until stiff peaks form — this usually takes 3-5 minutes on medium-high speed. Be careful not to overwhip, or it’ll turn into butter.
- Fold the whipped cream: Gently fold the whipped cream into the cream cheese mixture using a rubber spatula. Fold just enough to combine while keeping the mixture light and airy.
- Layer the cake: Pour the cream cheese-whipped cream mixture over the chilled crust and smooth the top with a spatula.
- Add the popsicle layers: Carefully spoon the prepared red gelatin over the cream layer and gently spread evenly. Freeze for about 20 minutes until slightly firm but not fully set.
- Next, spread the white pudding layer over the red gelatin and freeze for another 20 minutes.
- Finally, add the blue gelatin layer on top, smoothing it out, then freeze the entire cake for at least 2 hours or until fully set.
- Unmold and garnish: Run a warm knife around the edges before releasing the springform pan. Decorate with fresh berries or mini popsicles if you’re feeling fancy.
- Dairy-Free Version: Use vegan cream cheese and coconut cream whipped until fluffy. Substitute your favorite plant-based gelatin or agar agar for the layers.
- Flavor Twists: Swap the red and blue gelatin for other flavors like watermelon and blueberry or strawberry and blackberry for a more natural berry combo.
- Alcohol Infusion: Add a splash of vodka or rum to the gelatin layers for a boozy adult version — just reduce the liquid accordingly to keep the gelatin firm.
- Different Crust: Try crushed vanilla wafers or even pretzel crumbs for a salty-sweet crust alternative.
- Mini Popsicle Cake: Make individual portions using small silicone molds — perfect for parties or kid-friendly servings.
If you want to keep it dairy-free, you can swap cream cheese with a vegan alternative and use coconut cream instead of heavy whipping cream. For a gluten-free crust, almond flour works wonders as a substitute for graham crackers.
Equipment Needed
If you don’t have a springform pan, lining a regular pan with parchment paper works just fine. Also, a hand mixer can be a budget-friendly alternative to a stand mixer, and I’ve found it handles the cream just as well if you’re willing to hold it steady.
Preparation Method
Pro tip: Let the cake sit at room temperature for 5-10 minutes before slicing for cleaner cuts. If your gelatin layers feel too firm, a quick 30-second microwave zap can soften them just enough to slice without cracking.
Cooking Tips & Techniques
One of the trickiest parts is getting the gelatin layers just right — not too runny, not too firm. I learned the hard way that pouring the gelatin too warm melts the cream layer underneath, so always let it cool completely but don’t let it harden before layering.
Whipping the cream is another place where patience pays off. I usually chill my mixing bowl and beaters in the freezer for 10 minutes beforehand to help the cream whip faster and fluffier. It’s a small step, but it really makes a difference.
When folding the whipped cream into the cream cheese, slow and steady wins the race. Overmixing will deflate the air you just whipped in, making the filling dense instead of light and dreamy.
Multitasking helps — while one layer chills in the freezer, prep the next gelatin or pudding mixture so you’re not waiting around. This recipe is forgiving, but timing helps keep those layers distinct and visually striking.
If you want a sharper popsicle flavor, try adding a teaspoon of real fruit juice concentrate (like cherry or raspberry) to the gelatin. It gives a natural punch that’s hard to beat.
Variations & Adaptations
This recipe is flexible and easy to tweak depending on what you have or prefer.
Personally, I once made a version with fresh pureed berries folded into the cream layer instead of pudding, which gave it a fresher, less sweet profile. It was a hit at my summer BBQ and kept well overnight.
Serving & Storage Suggestions
This cake is best served chilled but not rock hard — pull it from the freezer about 10 minutes before slicing. Use a sharp knife dipped in warm water to get clean slices without cracking the layers.
It pairs beautifully with light beverages like sparkling lemonade or even a sparkling rosé for grown-up gatherings. For a fun summer menu, consider serving with light dishes such as fresh Thai cucumber noodle salad or my easy sheet pan honey mustard salmon with asparagus.
Store leftovers tightly wrapped in plastic wrap or in an airtight container in the freezer for up to one week. Avoid the fridge since the gelatin layers can soften too much and get watery. When reheating, just let it thaw in the fridge for a couple hours before serving again.
Interestingly, the flavors meld a bit overnight, making the cake taste even more harmonious the next day — if it lasts that long!
Nutritional Information & Benefits
This dessert is a reasonably light option for summer since it’s mostly made of whipped cream, cream cheese, and gelatin layers without heavy cake or frosting. One slice (about 1/9th of the cake) contains approximately:
| Calories | 250-300 kcal |
|---|---|
| Fat | 18g (mostly from cream and butter) |
| Carbohydrates | 22g (from sugar and graham crackers) |
| Protein | 4g |
Gelatin is a good source of collagen, which supports skin and joint health, while cream cheese provides calcium and vitamin A. This cake isn’t low-calorie, but it’s a refreshingly lighter alternative to dense, frosted cakes.
For those avoiding gluten or dairy, this recipe can be adapted to fit those needs without sacrificing flavor or texture, making it a versatile choice for many diets.
Conclusion
The Easy No-Bake Bomb Pop Popsicle Cake is one of those rare desserts that feels effortless but leaves a lasting impression. Its playful colors, nostalgic flavors, and creamy texture come together in a way that’s both fun and satisfying.
Feel free to experiment with the layers or crust to make it your own — that’s part of the charm. I love how it brings a bit of childhood joy back to the table, especially when paired with simple summer meals.
Give it a try and see how it becomes your go-to dessert for hot days and easy entertaining. And hey, if you end up loving it as much as I do, I’d be thrilled if you shared your version or thoughts in the comments below. Here’s to sweet, simple treats that make summer a little cooler.
FAQs About Easy No-Bake Bomb Pop Popsicle Cake
Can I make this cake ahead of time?
Absolutely. It actually tastes better after chilling overnight in the freezer. Just cover it tightly to prevent freezer odors.
What if I don’t have a springform pan?
No worries! Line a regular 9×9-inch pan with parchment paper so you can lift the cake out easily.
Can I use store-bought pudding for the white layer?
Yes, instant pudding works well and saves time. Just make sure to let it set slightly before layering.
How do I get clean slices when serving?
Dip your knife in hot water and wipe it dry before slicing. This prevents the layers from sticking or cracking.
Is this recipe kid-friendly?
Definitely! The colors and flavors are a hit with kids, and it’s a great way to sneak in some gelatin benefits too.
Pin This Recipe!
Easy No-Bake Bomb Pop Popsicle Cake
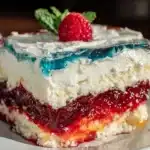
A playful, no-bake summer dessert inspired by nostalgic bomb pop popsicles, featuring vibrant red, white, and blue layers with a creamy and icy texture.
- Prep Time: 15 minutes
- Cook Time: 2 hours 40 minutes
- Total Time: 2 hours 55 minutes
- Yield: 9 servings 1x
- Category: Dessert
- Cuisine: American
Ingredients
- 1 ½ cups graham cracker crumbs (about 150g)
- 5 tablespoons unsalted butter, melted
- 2 tablespoons granulated sugar (optional)
- 8 ounces (225g) cream cheese, softened
- 1 cup powdered sugar (125g)
- 2 cups heavy whipping cream (475ml), chilled
- 1 teaspoon vanilla extract
- 1 cup strawberry or cherry gelatin (prepared as per package instructions, cooled but not set)
- 1 cup coconut or vanilla pudding (prepared)
- 1 cup blue raspberry gelatin (prepared, cooled but not set)
- Optional garnishes: fresh berries (strawberries, blueberries), mini popsicles or candy flags
Instructions
- Prepare the crust: In a medium bowl, combine graham cracker crumbs, melted butter, and sugar. Stir until mixture resembles wet sand. Press firmly and evenly into the bottom of a 9×9-inch pan. Chill in the fridge for about 10 minutes.
- Make the cream cheese filling: Beat softened cream cheese with powdered sugar until smooth and creamy. Add vanilla extract and mix well.
- Whip the cream: In a large bowl, whip cold heavy cream until stiff peaks form, about 3-5 minutes on medium-high speed. Avoid overwhipping.
- Fold the whipped cream: Gently fold whipped cream into the cream cheese mixture using a rubber spatula until combined and light.
- Layer the cake: Pour the cream cheese-whipped cream mixture over the chilled crust and smooth the top.
- Add the popsicle layers: Spoon the prepared red gelatin over the cream layer and spread evenly. Freeze for about 20 minutes until slightly firm but not fully set.
- Spread the white pudding layer over the red gelatin and freeze for another 20 minutes.
- Add the blue gelatin layer on top, smooth it out, then freeze the entire cake for at least 2 hours or until fully set.
- Unmold and garnish: Run a warm knife around the edges before releasing the springform pan. Decorate with fresh berries or mini popsicles if desired.
- Let the cake sit at room temperature for 5-10 minutes before slicing for cleaner cuts.
Notes
Let gelatin cool completely before layering to avoid melting the cream layer. Chill mixing bowl and beaters before whipping cream for better volume. Fold whipped cream gently to keep mixture airy. Use a warm knife dipped in hot water for clean slices. Cake tastes better after chilling overnight. For dairy-free, use vegan cream cheese and coconut cream; for gluten-free, substitute graham crackers with almond flour.
Nutrition
- Serving Size: 1 slice (1/9th of ca
- Calories: 275
- Fat: 18
- Carbohydrates: 22
- Protein: 4
Keywords: no-bake cake, popsicle cake, summer dessert, bomb pop, patriotic dessert, easy dessert, layered cake, gelatin dessert