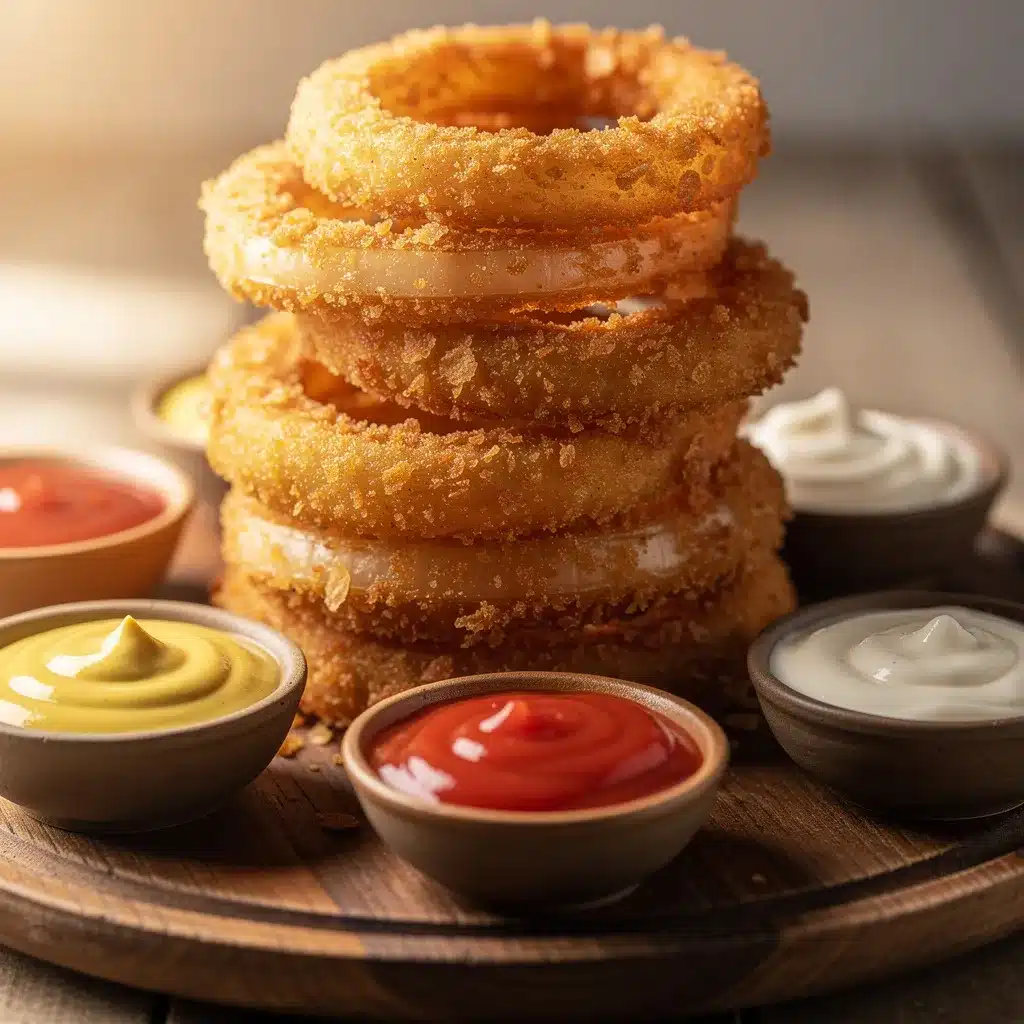
“Wait, are these homemade?” my friend gasped the first time I stacked these golden rings into a towering masterpiece. Honestly, I wasn’t expecting much when I pulled out some leftover onions and thought, “Why not try something different tonight?” I figured if I could nail that perfect crunch without a deep fryer, maybe it’d make for a fun snack. Turns out, the whole kitchen filled with this irresistible aroma of sizzling onions wrapped in a crispy coat that even my skeptical husband couldn’t resist. The dipping sauces? Oh, that’s where it got really interesting. I tossed together a few quick blends, and suddenly this simple onion ring tower became the centerpiece of our casual hangout.
It’s funny how such a humble snack can completely change the vibe of an evening. The sound of that first crunch, the way the batter clings just right, and the tangy, creamy dips alongside made me realize that sometimes, the best recipes come from those unplanned kitchen moments when you’re just playing around. Building this onion ring tower became a little obsession of mine—I found myself making it multiple times in a week, perfecting the batter and experimenting with sauces. It’s a recipe that’s easy enough for a solo late-night snack but impressive enough to bring out when friends drop by unexpectedly.
What stuck with me the most, though, was the simple joy of layering those crispy rings one on top of another, like a crunchy sculpture that’s begging to be demolished bite by bite. It’s comfort food that doesn’t pretend to be fancy, just honest and satisfying. Honestly, this crispy crunchy onion ring tower with dipping sauces isn’t just about the taste—it’s about the moments it creates around it. And if you ask me, that’s why it’s worth trying.
Why You’ll Love This Recipe
After countless tests, tweaks, and a few kitchen spills, this crispy crunchy onion ring tower recipe has become one of my favorite go-to snacks. Here’s why it might just become yours too:
- Quick & Easy: You can have these golden rings ready in about 30 minutes, perfect for those moments you crave a crunchy snack without hours of prep.
- Simple Ingredients: No need for fancy or hard-to-find items. Most of these are pantry staples you probably already have lurking in your kitchen.
- Perfect for Any Occasion: Whether it’s a casual movie night, a weekend hangout, or even a fun appetizer for guests, this onion ring tower fits right in.
- Crowd-Pleaser: Both kids and adults are usually clamoring for seconds—there’s just something about that crispy texture paired with punchy dipping sauces.
- Unbelievably Delicious: The batter’s secret mix of spices and the way it crisps up in oil makes these onion rings stand apart from any store-bought or frozen option.
This isn’t just another fried onion ring recipe, either. The batter blends a subtle hint of smoked paprika and garlic powder that wakes up the flavor without overpowering that natural sweetness of the onions. Plus, I’ve found layering the rings into a tower adds a playful, shareable vibe that turns a simple snack into a conversation starter. And if you’re someone who loves a bit of tangy, creamy dip on the side, the trio of homemade sauces brings that extra zing that makes you close your eyes after the first bite.
What Ingredients You Will Need
This crispy crunchy onion ring tower recipe keeps things straightforward but flavorful. Here’s what you’ll need to get started:
- For the Onion Rings:
- 2 large yellow onions, peeled and sliced into 1/2-inch thick rings
- 1 cup all-purpose flour (I like King Arthur brand for consistent results)
- 1 teaspoon smoked paprika (adds a subtle smoky warmth)
- 1/2 teaspoon garlic powder (boosts savory depth)
- 1 teaspoon salt
- 1/2 teaspoon black pepper, freshly ground
- 1 cup buttermilk (or milk with 1 tablespoon lemon juice as a quick substitute)
- 1 large egg, room temperature
- 1 cup panko breadcrumbs (for that extra crunch)
- Vegetable oil for frying (enough for at least 2 inches deep in your pan)
- For the Dipping Sauces:
- Garlic Aioli: 1/2 cup mayonnaise, 1 garlic clove minced, 1 teaspoon lemon juice, pinch of salt
- Spicy Sriracha Mayo: 1/3 cup mayonnaise, 1 tablespoon sriracha, 1 teaspoon honey
- Classic BBQ Dip: 1/2 cup BBQ sauce, 1 teaspoon apple cider vinegar (for a slight tang)
These ingredients are easy to swap around. For gluten-free options, use almond flour or gluten-free flour blends and gluten-free panko crumbs. If you prefer dairy-free, coconut or almond milk with lemon juice works well instead of buttermilk, and vegan mayo can replace the regular mayo in sauces. Onions are the star here, so choosing firm, fresh yellow onions gives the best sweetness and texture, but white or sweet Vidalia onions work great too. For something a little different, red onions add a sharper bite and vibrant color.
Equipment Needed
- Deep frying pan or heavy-bottomed skillet — I prefer a cast iron skillet because it holds heat evenly, but a deep nonstick pan works too.
- Cooking thermometer — to keep the oil between 350°F and 375°F (175°C to 190°C). This keeps the onion rings perfectly crispy without absorbing too much oil.
- Mixing bowls — one for batter, one for flour mixture, and one for breadcrumbs.
- Tongs or slotted spoon — for safely lowering and lifting onion rings from hot oil.
- Wire cooling rack — essential to drain excess oil and keep the onion rings crunchy. Placing them on paper towels tends to get soggy faster.
- Large plate or serving platter — for assembling your tower, something sturdy works best.
If you don’t have a thermometer, a small cube of bread dropped into the oil should brown in about 60 seconds at the right temperature. Also, if you’re short on mixing bowls, you can use large zip-top bags for dredging—just seal and shake. It’s a handy trick I picked up when the kitchen is already cluttered.
Preparation Method
- Prep the onions: Peel and slice your onions into thick 1/2-inch rings. Carefully separate the rings, trying not to break them. Set aside on a plate.
- Make the flour mix: In a shallow bowl, combine 1 cup flour, smoked paprika, garlic powder, salt, and black pepper. Whisk to blend evenly.
- Prepare the wet batter: In a separate bowl, whisk together the buttermilk and egg until smooth.
- Set up the breadcrumbs: Place the panko breadcrumbs in a third shallow bowl or plate.
- Coat the onion rings: Take one onion ring at a time. First, dredge it in the seasoned flour, shaking off excess. Then dip it into the wet batter, letting any extra drip off. Finally, press it firmly into the panko breadcrumbs until fully coated. Place the coated rings on a tray while you work through all the onions.
- Heat the oil: Pour vegetable oil into your skillet to a depth of about 2 inches. Heat the oil over medium-high heat until it reaches 350°F to 375°F (175°C to 190°C). Use a thermometer if you can. If the oil’s too cool, rings absorb more oil and get greasy; too hot, and they burn quickly.
- Fry the onion rings: Carefully add a few rings at a time, don’t overcrowd the pan. Fry for about 2-3 minutes per side, turning once, until golden brown and crispy. Use tongs or a slotted spoon to flip.
- Drain and cool: Transfer fried rings to a wire rack set over a baking sheet to drain excess oil. This keeps them crispier than paper towels.
- Build your tower: Once all rings are fried, stack them on your serving platter in descending size order for a fun presentation.
- Mix dipping sauces: Whisk together the garlic aioli, spicy sriracha mayo, and BBQ dip ingredients in separate small bowls or ramekins.
Pro Tip: Keep the oil temperature steady by adjusting the heat as you fry batches. If you notice the rings getting soggy, your oil might be too cool. Also, don’t rush flipping; patience here means a more even golden crust.
Cooking Tips & Techniques
Getting that perfect crunch with onion rings can be tricky, but I’ve learned a few tricks over time that make all the difference:
- Multiple Coatings Matter: The three-step dredge—flour, wet batter, then panko—is key. It creates layers that crisp up beautifully instead of soggy or bare spots.
- Oil Temperature Is Everything: Too hot and your rings burn on the outside but stay raw inside; too cool and they soak up oil, becoming greasy. I swear by using a thermometer to keep it steady around 350°F (175°C).
- Dry Onions Work Best: After slicing, pat your onion rings dry with paper towels before coating. Moisture is the enemy of crispiness.
- Don’t Crowd the Pan: Frying too many at once drops the oil temperature quickly. Smaller batches give you that crunch and even browning.
- Rest on a Wire Rack: Paper towels are tempting but can trap steam and soften the crust. A wire rack lets air circulate and keeps the crunch longer.
- Experiment with Spice: Adding smoked paprika and garlic powder in the flour mix really amps up the flavor without any extra effort.
One time, I got a little impatient and stacked the rings right after frying on a paper towel. The bottom rings turned limp fast, and the tower collapsed before anyone could enjoy it. Lesson learned—always use a wire rack and build just before serving.
Variations & Adaptations
This recipe is super flexible, so you can tweak it to match your taste or dietary needs. Here are some ideas I’ve tried or thought up:
- Gluten-Free Option: Swap the all-purpose flour with a gluten-free blend and use gluten-free panko crumbs. The texture remains satisfyingly crispy.
- Spicy Kick: Add cayenne pepper or chili flakes to the flour mix if you like more heat. For dipping, mix some hot sauce into the aioli for a fiery dip.
- Baked Version: If frying isn’t your thing, brush the coated rings lightly with oil and bake at 425°F (220°C) on a wire rack for 20 minutes, flipping halfway. They won’t be quite as crunchy but still delicious.
- Sweet Onion Rings: Use sweet Vidalia onions and toss the batter with a pinch of sugar for a slightly sweet twist that pairs beautifully with a honey mustard dip.
- Herb-Infused Batter: Stir fresh chopped parsley, thyme, or rosemary into the batter for an herby aroma. I once paired this with a rosemary-garlic aioli that was a total game-changer.
If you’re interested in other crispy snacks, you might enjoy my crispy sweet potato fries air fryer recipe as a sidekick to these onion rings for a colorful, crunchy combo.
Serving & Storage Suggestions
These onion rings are best served fresh and hot, right after frying when that crunch is at its peak. Building the tower just before serving keeps it looking impressive and prevents sogginess. Pair the tower with your dipping sauces arranged around the base or on the side for easy grabbing.
For a meal, consider serving alongside a fresh salad or something light like my fresh Mediterranean quinoa bowl to balance out the richness. A cold beer or sparkling lemonade also pairs wonderfully.
If you have leftovers (though rare!), store cooled onion rings in an airtight container in the refrigerator for up to 2 days. To reheat and keep some crisp, pop them in a preheated 400°F (205°C) oven or air fryer for 5-7 minutes. Avoid microwaving as it tends to make them soggy.
Fun fact: letting the onion rings rest on a wire rack at room temperature for 10 minutes before stacking can help any residual steam escape and keep them crunchier longer.
Nutritional Information & Benefits
While onion rings are definitely a treat, this homemade version is a bit lighter than typical fast-food varieties thanks to the fresh ingredients and controlled frying. Here’s an estimate per serving (about 6-8 rings):
| Calories | 250-300 kcal |
|---|---|
| Fat | 15g (mostly from frying oil) |
| Carbohydrates | 30g |
| Protein | 5g |
| Fiber | 2g |
Onions bring antioxidants and vitamin C to the table, and by making your own batter, you can control the salt and fat levels. Using panko breadcrumbs instead of denser ones helps keep the coating lighter. If you want to boost nutrition, pairing the onion rings with dips made from Greek yogurt or avocado adds protein and healthy fats.
For those mindful of allergens, this recipe contains gluten, eggs, and dairy (in traditional buttermilk and mayo). However, simple substitutions like almond milk, vegan mayo, and gluten-free flour can make it accessible for many diets.
Conclusion
This crispy crunchy onion ring tower with dipping sauces is one of those recipes that turns a simple snack into a shared experience. It’s easy enough for a spontaneous kitchen experiment but impressive enough to make guests smile. I love how it brings a little fun and crunch to the table, whether it’s a laid-back Friday night or an unexpected visit. Plus, the trio of dipping sauces lets you mix and match flavors, keeping every bite interesting.
Feel free to make it your own—experiment with spices, try different onions, or add your favorite dips. When I first made it, I never imagined it would become a mini obsession, but here we are, stacking rings and dipping happily ever after. I’d love to hear how you customize your tower or what unexpected moments it brings to your kitchen.
FAQs About Crispy Crunchy Onion Ring Tower
How do I keep onion rings crispy after frying?
Drain them on a wire rack instead of paper towels to avoid steam making them soggy. Serve immediately or reheat in the oven or air fryer for best crispness.
Can I bake onion rings instead of frying?
Yes! Brush the coated rings with oil and bake at 425°F (220°C) for about 20 minutes, flipping halfway. They’ll be slightly less crunchy but still tasty.
What type of onions work best for onion rings?
Yellow onions are classic for their balance of sweetness and firmness. Sweet Vidalias or white onions can also be great alternatives.
Can I prepare the dipping sauces ahead of time?
Absolutely! Most sauces keep well in the fridge for 2-3 days. Just give them a quick stir before serving.
Is it possible to make this recipe gluten-free?
Yes, by substituting gluten-free flour and panko breadcrumbs, and ensuring your other ingredients like sauces are gluten-free, this recipe works well for gluten-sensitive diets.
Pin This Recipe!
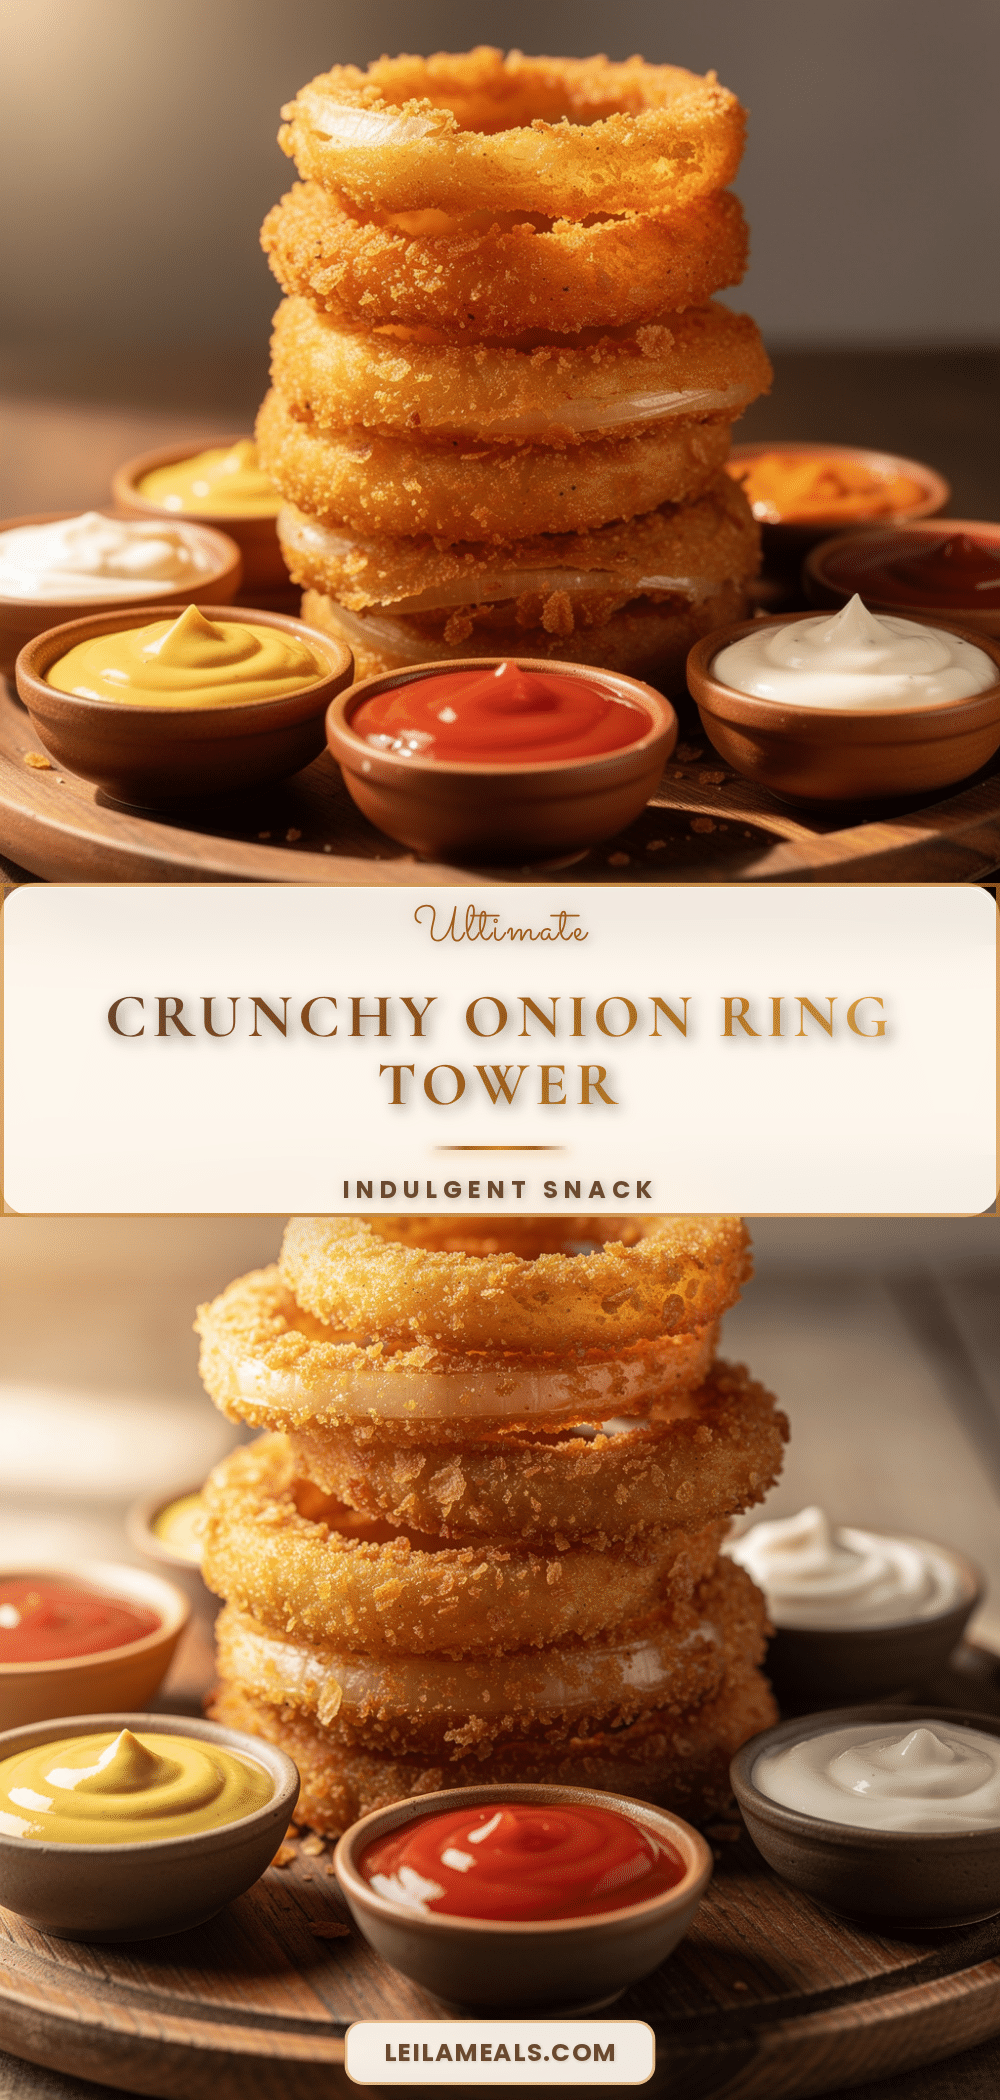
Crispy Crunchy Onion Ring Tower Recipe Easy Homemade with Best Dipping Sauces

A quick and easy homemade onion ring recipe that delivers a perfect crispy crunch without a deep fryer, served with three flavorful dipping sauces. Perfect for snacks or appetizers that impress guests.
- Prep Time: 15 minutes
- Cook Time: 15 minutes
- Total Time: 30 minutes
- Yield: 4 servings 1x
- Category: Appetizer
- Cuisine: American
Ingredients
- 2 large yellow onions, peeled and sliced into 1/2-inch thick rings
- 1 cup all-purpose flour
- 1 teaspoon smoked paprika
- 1/2 teaspoon garlic powder
- 1 teaspoon salt
- 1/2 teaspoon black pepper, freshly ground
- 1 cup buttermilk (or milk with 1 tablespoon lemon juice as a substitute)
- 1 large egg, room temperature
- 1 cup panko breadcrumbs
- Vegetable oil for frying (enough for at least 2 inches deep in pan)
- For Garlic Aioli: 1/2 cup mayonnaise, 1 garlic clove minced, 1 teaspoon lemon juice, pinch of salt
- For Spicy Sriracha Mayo: 1/3 cup mayonnaise, 1 tablespoon sriracha, 1 teaspoon honey
- For Classic BBQ Dip: 1/2 cup BBQ sauce, 1 teaspoon apple cider vinegar
Instructions
- Peel and slice onions into 1/2-inch thick rings. Separate rings carefully and set aside.
- In a shallow bowl, combine flour, smoked paprika, garlic powder, salt, and black pepper. Whisk to blend.
- In a separate bowl, whisk together buttermilk and egg until smooth.
- Place panko breadcrumbs in a third shallow bowl or plate.
- Dredge each onion ring first in the flour mixture, shaking off excess, then dip into wet batter, letting excess drip off, and finally press into panko breadcrumbs until fully coated. Place coated rings on a tray.
- Pour vegetable oil into skillet to a depth of about 2 inches and heat over medium-high heat to 350°F to 375°F (175°C to 190°C).
- Fry onion rings in batches, 2-3 minutes per side, turning once, until golden brown and crispy. Use tongs or slotted spoon to flip.
- Transfer fried rings to a wire cooling rack set over a baking sheet to drain excess oil.
- Stack the onion rings on a serving platter in descending size order to build the tower.
- Whisk together ingredients for garlic aioli, spicy sriracha mayo, and classic BBQ dip in separate small bowls or ramekins.
- Serve onion ring tower immediately with dipping sauces.
Notes
Keep oil temperature steady between 350°F and 375°F to avoid greasy or burnt rings. Use a wire rack to drain excess oil and keep rings crispy. Do not overcrowd the pan when frying. For gluten-free, substitute flour and panko with gluten-free versions. For dairy-free, use almond or coconut milk with lemon juice and vegan mayo.
Nutrition
- Serving Size: About 6-8 onion ring
- Calories: 275
- Sugar: 3
- Sodium: 600
- Fat: 15
- Saturated Fat: 2
- Carbohydrates: 30
- Fiber: 2
- Protein: 5
Keywords: onion rings, crispy onion rings, homemade onion rings, dipping sauces, appetizer, snack, fried onion rings