I was standing in the middle of the spice aisle at our local grocery store last October — a Tuesday, I think — when the smell of cinnamon and nutmeg from a broken jar hit me, and suddenly I was seven years old in my Aunt Carol’s tiny yellow kitchen. She was pulling a tray of cookies out of her ancient oven, the ones she always made for our annual leaf-raking party. The kitchen was foggy with steam, and she’d let me lick the spatula even though my mom said no. That smell — warm, sweet, somehow both sharp and soft — stayed with me for years, but I could never quite find it again. Not in the store-bought versions, not in my own attempts. I mean, I tried. A lot. Honestly, I probably made five different batches that first fall, and each one was either too cakey or not spiced enough or just… wrong. You know that feeling when you’re chasing a memory and you can’t quite catch it? That was me, elbow-deep in flour, muttering at my mixer. Then it hit me — maybe the problem was I was trying to make a pumpkin cookie, not a snickerdoodle. So I mashed them together. And let me tell you, that first bite of these Chewy Pumpkin Snickerdoodle Cookies? I closed my eyes, and for just a second, I was back in that yellow kitchen.
Why You’ll Love This Recipe
These aren’t just another pumpkin cookie. I’ve tested this recipe seven times — yes, seven — to get the texture just right. My kids were my official taste testers, and they were ruthless. Too soft? Back to the drawing board. Not enough cinnamon sugar? They let me know. This version is the one that got two thumbs up from my picky eight-year-old and a “can you make these every week, Mom?” from my teenager. That’s when I knew I had something special.
- Quick & Easy: From start to finish, these come together in about 30 minutes. No chilling the dough, no fancy techniques. Just mix, roll, bake.
- Simple Ingredients: You probably have most of these in your pantry right now. No trips to specialty stores or hunting for obscure flours.
- Perfect for Family Baking: This is the kind of recipe you can make with kids on a rainy Saturday. It’s forgiving, it’s fun, and the mess is worth it.
- Crowd-Pleaser: I brought these to a school bake sale, and they sold out in twenty minutes. Parents kept asking for the recipe.
- Unbelievably Chewy: The secret is a little trick I learned from a pastry chef friend — using a specific ratio of pumpkin to butter that keeps the cookies soft without making them cakey. They stay chewy for days, if they last that long.
What makes these different from the hundreds of pumpkin cookie recipes out there? It’s the texture, plain and simple. Most pumpkin cookies turn out like little orange cakes. These have that classic snickerdoodle chew — the kind that makes you take a second bite before you’ve finished the first. And the cinnamon-sugar coating? It’s not just for show. It creates that crackly, slightly crisp exterior that gives way to a soft, spiced center. This isn’t just another version of a pumpkin cookie. It’s the one you’ll make every fall, and then you’ll find yourself making it in January too, because why should pumpkin season end in December?
What Ingredients You Will Need
This recipe uses simple, wholesome ingredients to deliver that perfect chewy texture and warm spiced flavor. Most of these are pantry staples, and the ones that aren’t are easy to find and keep well.
- 1 ¾ cups (220g) all-purpose flour — I use Gold Medal for consistent results. Spoon and level it into your measuring cup; don’t scoop directly or you’ll end up with too much flour and dry cookies.
- ½ teaspoon baking soda — Make sure it’s fresh. If you’re not sure, drop a pinch into some vinegar — if it fizzes, you’re good.
- ½ teaspoon cream of tartar — This is the secret to that classic snickerdoodle tang. Don’t skip it. You can find it in the spice aisle.
- 1 teaspoon pumpkin pie spice — Store-bought is fine, but I make my own with ½ teaspoon cinnamon, ¼ teaspoon ginger, ⅛ teaspoon nutmeg, and a pinch of cloves.
- ½ teaspoon ground cinnamon — For extra warmth. I prefer Saigon cinnamon for its bold flavor.
- ¼ teaspoon salt — Fine sea salt works best. It balances the sweetness.
- ½ cup (113g) unsalted butter, softened — Let it sit on the counter for about an hour. If you’re in a hurry, cut it into small cubes and microwave for 10 seconds at a time — but be careful not to melt it.
- ¾ cup (150g) granulated sugar — Regular white sugar. No need for anything fancy.
- ¼ cup (50g) packed light brown sugar — This adds moisture and a hint of molasses flavor. Pack it firmly into your measuring cup.
- ½ cup (120g) pumpkin puree — Not pumpkin pie filling. I use Libby’s. If you use homemade, make sure to drain it well — extra water will make your cookies spread too much.
- 1 large egg, room temperature — Cold eggs can make the batter seize up. If you forgot to take it out, place it in a bowl of warm water for 5 minutes.
- 1 teaspoon vanilla extract — Pure vanilla extract, not imitation. It makes a difference.
For the cinnamon-sugar coating:
- ¼ cup (50g) granulated sugar
- 1 tablespoon ground cinnamon
Substitution notes: For a dairy-free version, use plant-based butter sticks (not the spreadable kind in a tub). I’ve tried it with coconut oil, and it works, but the texture is slightly less chewy. For a gluten-free option, use a 1:1 gluten-free flour blend that contains xanthan gum. I’ve had good luck with Bob’s Red Mill. The cookies will be a bit more delicate, so handle them gently.
Equipment Needed
You don’t need much for these cookies, which is part of the beauty. Here’s what I use:
- Two large baking sheets — I prefer light-colored aluminum sheets. Dark ones can cause the bottoms to brown too quickly. If that’s all you have, reduce the oven temperature by 25°F.
- Parchment paper or silicone baking mats — Parchment is my go-to. Silicone mats work too, but the cookies might spread a tiny bit more.
- Electric mixer (hand or stand) — A hand mixer is fine. I actually prefer it for this recipe because the batch is small and I can control the mixing better. If you’re mixing by hand, make sure your butter is really soft and be prepared to work those arm muscles.
- Medium and large mixing bowls — One for dry ingredients, one for wet.
- Measuring cups and spoons — The ones with the flat edge are best for leveling flour.
- Cookie scoop (about 1.5 tablespoons) — Not essential, but it makes the cookies uniform and saves time. I use a #40 scoop. If you don’t have one, use two spoons.
- Small bowl for the cinnamon-sugar coating
- Wire cooling rack — For letting the cookies cool properly. If you leave them on the hot pan, they’ll continue to cook and can get overdone.
I’ve made these with just a wooden spoon and a bowl before, and they turned out fine. The mixer just makes it easier. If you’re on a budget, skip the cookie scoop and use a regular spoon — just try to make them all about the same size so they bake evenly.
Preparation Method
Preheat your oven to 350°F (175°C). Line two baking sheets with parchment paper. This is important — don’t skip the parchment unless you want to spend twenty minutes scrubbing caramelized sugar off your pans.
- Mix the dry ingredients. In a medium bowl, whisk together the flour, baking soda, cream of tartar, pumpkin pie spice, cinnamon, and salt. Whisk for about 20 seconds to make sure everything is evenly distributed. I used to skip this step and just dump everything in, but I ended up with pockets of baking soda that tasted metallic. Not fun.
- Cream the butter and sugars. In a large bowl, beat the softened butter, granulated sugar, and brown sugar together on medium speed until light and fluffy — about 2-3 minutes. You want it to look pale and slightly aerated. Scrape down the sides of the bowl halfway through. Don’t rush this step; proper creaming is what gives the cookies structure.
- Add the wet ingredients. Beat in the pumpkin puree, egg, and vanilla extract on low speed until just combined. The mixture might look a little curdled at this point — that’s okay. It’s just the pumpkin and butter doing their thing. Don’t overmix or the cookies will be tough.
- Combine wet and dry. Gradually add the dry ingredients to the wet mixture, mixing on low speed just until no streaks of flour remain. You might see a few tiny lumps — that’s fine. Overmixing develops gluten, which makes cookies tough instead of tender. I learned this the hard way after making hockey pucks for an entire afternoon.
- Make the coating. In a small bowl, stir together the ¼ cup sugar and 1 tablespoon cinnamon until well combined.
- Shape and coat the cookies. Using a cookie scoop or two spoons, portion out rounded tablespoons of dough. Roll each portion into a ball between your palms — the dough will be slightly sticky, so wash your hands if needed. Drop each ball into the cinnamon-sugar mixture and roll to coat completely. Place on the prepared baking sheets about 2 inches apart. I fit 12 per sheet.
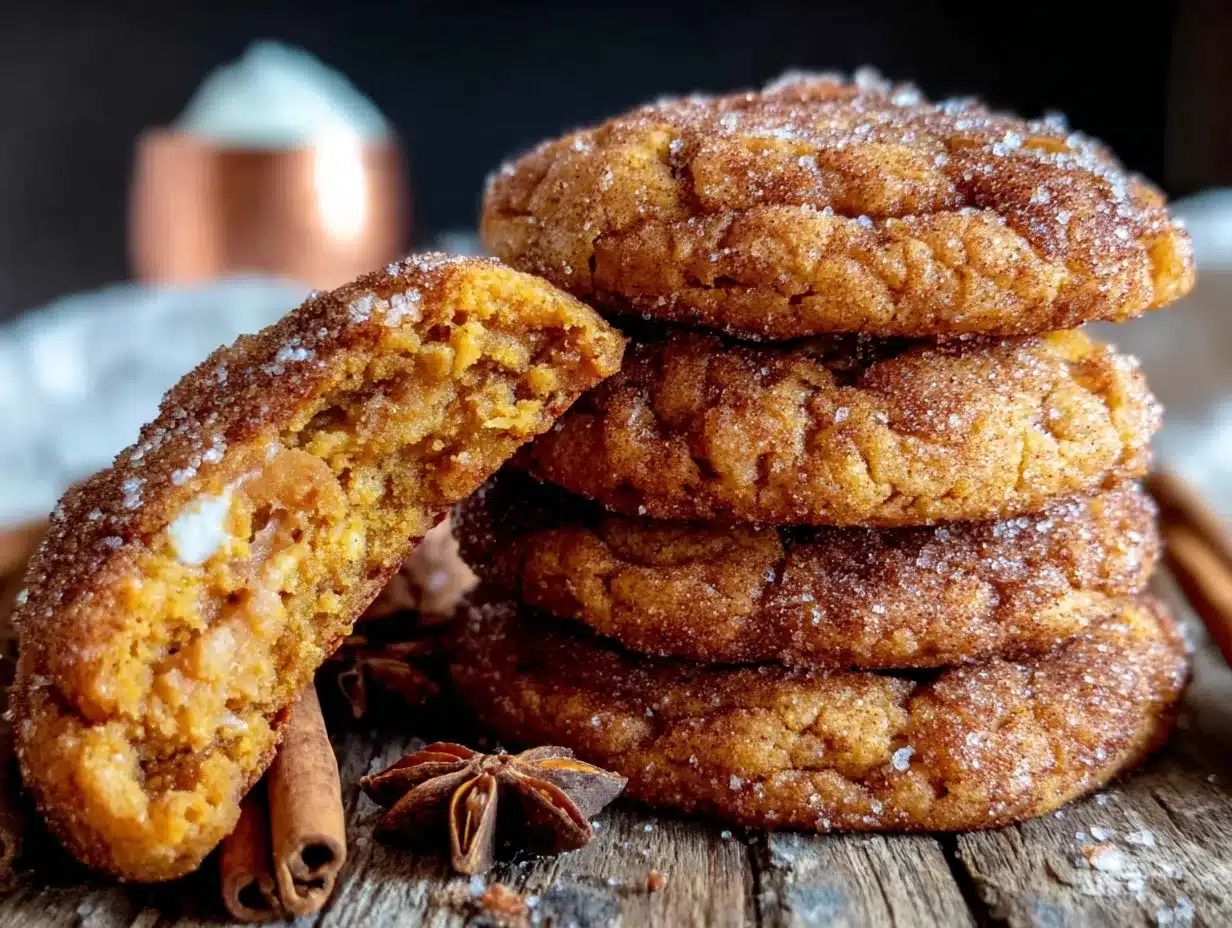
- Bake. Bake one sheet at a time in the center of the oven for 10-12 minutes. The cookies should look puffed and slightly cracked on top, with the edges just starting to set. The centers will look soft and underdone — that’s what you want. They’ll continue to set as they cool. If you overbake them, you’ll lose that chewy texture.
- Cool. Let the cookies rest on the baking sheet for 5 minutes. This is crucial — they’re too fragile to move right away. After 5 minutes, transfer them to a wire cooling rack to cool completely. If you try to move them too soon, they’ll fall apart. Trust me, I’ve done it. Twice.
Visual cue: When they’re done, the cookies will have a matte, slightly crackly surface with a few small cracks on top. The edges will be set but not brown. If the edges are golden, you’ve gone too far.
Cooking Tips & Techniques
I’ve made enough mistakes with these cookies to fill a small book. Here’s what I’ve learned so you don’t have to make the same ones.
Don’t skip the cream of tartar. I know it’s one of those ingredients that sits in your cabinet for years, but it’s essential for that chewy texture and slight tang. If you don’t have it, you can substitute with 1 teaspoon of lemon juice or white vinegar added to the wet ingredients, but the texture won’t be quite the same.
Drain your pumpkin puree. If you’re using canned pumpkin, give it a quick stir in the can before measuring. If you’re using homemade, wrap it in a clean kitchen towel and squeeze out some of the liquid. Too much moisture = flat, spread-out cookies. I learned this when I made a batch that looked more like pumpkin pancakes.
Use room temperature ingredients. This is one of those rules that actually matters. Cold butter won’t cream properly, and cold egg can seize up the batter. Set everything out about an hour before you start. If you forgot, place the egg in warm water for 5 minutes and microwave the butter in 5-second bursts until it’s soft but not melted.
Measure flour correctly. Spoon the flour into your measuring cup and level it off with a flat edge. Scooping directly from the bag packs the flour down and can add up to 25% more flour than you need. That’s the difference between a chewy cookie and a dry one.
Bake one sheet at a time. I know it’s tempting to throw both sheets in at once, but the uneven heat will cause one batch to overbake while the other underbakes. Plus, the steam from two sheets can make the cookies spread too much. Just be patient. It’s an extra 12 minutes.
Let them cool completely. I know the smell is intoxicating and you want to eat one right away. But the cookies are fragile when warm, and they need that time on the baking sheet to set properly. If you can’t wait — and I get it — sacrifice one cookie to the immediate-gratification gods and let the rest cool.
Variations & Adaptations
One of the best things about this recipe is how flexible it is. Here are some variations I’ve tried and loved.
Pumpkin Chocolate Chip Snickerdoodles. Add ½ cup of semi-sweet chocolate chips to the dough after mixing. The chocolate pairs beautifully with the pumpkin spice. My kids voted this their favorite version, and they’re pretty serious about their cookie opinions.
Vegan Version. Substitute the butter with plant-based butter sticks and the egg with a flax egg (1 tablespoon ground flaxseed mixed with 3 tablespoons water, let sit for 5 minutes). The texture is slightly less tender, but still delicious. I made these for a friend’s vegan birthday party, and nobody guessed they were vegan.
Gluten-Free Version. Use a 1:1 gluten-free flour blend with xanthan gum. Add an extra tablespoon of pumpkin puree to compensate for the drier flour. The cookies will be a bit more crumbly, so handle them gently. My gluten-free neighbor said these were the best cookies she’d had in years.
Spiced-Up Version. Add ¼ teaspoon of cardamom and a pinch of black pepper to the dry ingredients. The pepper adds a subtle warmth that’s surprisingly good. I was skeptical the first time I tried it, but now I make this version for fall dinner parties.
Pumpkin Cream Cheese Frosting. If you want to take these over the top, make a simple cream cheese frosting (4 oz cream cheese, 2 tablespoons butter, 1 cup powdered sugar, ½ teaspoon vanilla) and spread it on cooled cookies. It turns them into something closer to a cookie-cake hybrid. Perfect for when you want to impress.
Serving & Storage Suggestions
These cookies are best served slightly warm, when the edges are still a little soft and the cinnamon-sugar coating is at its crackliest. But let’s be real — they’re pretty amazing at room temperature too.
How to serve: Arrange them on a pretty plate or a wooden board. They’re perfect with a cold glass of milk (my kids’ preferred method) or a hot cup of coffee or tea. For a fun fall treat, serve them alongside a mug of hot apple cider. I once brought them to a Thanksgiving potluck, and they disappeared before the turkey came out.
Storage: Store these in an airtight container at room temperature for up to 5 days. I like to put a slice of bread in the container — it absorbs excess moisture and keeps the cookies soft. Change the bread every couple of days. Don’t refrigerate them; the cold air will dry them out.
Freezing: These freeze beautifully. Let the cookies cool completely, then place them in a single layer in a freezer-safe container or bag, with parchment paper between layers. They’ll keep for up to 3 months. To thaw, just leave them on the counter for about 30 minutes. You can also reheat frozen cookies in a 300°F oven for 5 minutes to bring back that fresh-baked feel.
Reheating: For that just-baked experience, pop a cookie in the microwave for 10 seconds. Or, if you’re doing a batch, warm them in a 300°F oven for 3-5 minutes. The cinnamon-sugar coating will crisp up again beautifully.
Flavor development: Here’s something interesting — these cookies actually taste even better the next day. The spices meld together, and the texture evens out. So if you can resist eating them all on day one, you’re in for a treat on day two.
Nutritional Information & Benefits
Each cookie (based on 24 cookies per batch) contains approximately:
- Calories: 120
- Fat: 5g
- Carbohydrates: 18g
- Fiber: 1g
- Sugar: 11g
- Protein: 2g
These numbers are estimates and will vary based on your specific ingredients and portion sizes.
Health highlights: Pumpkin is packed with vitamin A, which supports eye health and immune function. It’s also a good source of fiber, which helps with digestion and keeps you feeling full. The cinnamon in these cookies has anti-inflammatory properties and can help regulate blood sugar. I’m not saying these are health food — they’re cookies, after all — but they’re a little more nutritious than your average sweet treat.
Dietary considerations: This recipe is vegetarian and can be made dairy-free or gluten-free with the substitutions mentioned above. It contains wheat, dairy, and eggs in the original version. The vegan variation removes all animal products.
My take: I believe in balance. These cookies are for the days when you want something special, when you’re making memories with your kids, or when you just need a little comfort. They’re not an everyday snack, but they’re a wonderful occasional treat that doesn’t leave you feeling guilty.
Conclusion
These Chewy Pumpkin Snickerdoodle Cookies are everything I hoped they would be when I was standing in that spice aisle, chasing a memory. They’re the cookies that make your kitchen smell like October, that bring your family running to the counter, that disappear before you’ve had a chance to have one yourself. I’ve made them for school events, for Thanksgiving, for lazy Sunday afternoons, and they never disappoint.
What I love most about this recipe is how forgiving it is. You can tweak the spices, add chocolate chips, make them gluten-free — they’ll still turn out delicious. It’s the kind of recipe that becomes a family favorite, the one your kids ask for by name. “Mom, can you make those pumpkin snickerdoodle things?”
And the best part? You don’t need a special occasion. A rainy afternoon, a homework session that needs a break, a Tuesday that feels a little flat — these cookies make any moment better. So go ahead, preheat that oven, and let me know how they turn out. I’d love to hear about your version, your kids’ reactions, your own cookie memories. Drop a comment below or tag me in your photos. Happy baking!
Frequently Asked Questions
Can I make the dough ahead of time and bake later?
Yes, you can! Shape the dough into balls, coat them in cinnamon sugar, and place them on a parchment-lined baking sheet. Freeze until solid, then transfer to a freezer bag. When you’re ready to bake, place the frozen dough balls on a baking sheet and add 2-3 minutes to the baking time. No need to thaw.
Why did my cookies turn out flat and spread out?
This usually happens for a few reasons: your butter was too soft or melted, your pumpkin puree had too much water, or your baking soda was old. Make sure your butter is softened, not melted, and drain any excess liquid from your pumpkin puree. Also, check that your baking soda is fresh — it should fizz when dropped in vinegar.
Can I use pumpkin pie filling instead of pumpkin puree?
No, please don’t. Pumpkin pie filling is already sweetened and spiced, and it contains other ingredients that will throw off the texture and flavor of these cookies. Stick with 100% pure pumpkin puree. Libby’s is my go-to brand.
How do I know when the cookies are done baking?
Look for these signs: the edges are set but not brown, the tops look puffed and slightly crackled, and the centers are still soft and a little underdone. They’ll continue to set as they cool on the baking sheet. If you wait until the centers look fully set, you’ve overbaked them.
Can I double this recipe?
Absolutely. This recipe doubles beautifully. Just make sure you have enough baking sheets and oven space. I recommend baking one sheet at a time for the best results, even if it takes a little longer. The extra wait is worth it for evenly baked cookies.
Pin This Recipe!

Quick & Easy Chewy Pumpkin Snickerdoodle Cookies
These chewy pumpkin snickerdoodle cookies combine the classic snickerdoodle texture with warm pumpkin spice. They’re quick, easy, and perfect for fall baking.
- Prep Time: 15 minutes
- Cook Time: 12 minutes
- Total Time: 27 minutes
- Yield: 24 cookies 1x
- Category: Dessert
- Cuisine: American
Ingredients
- 1 ¾ cups (220g) all-purpose flour
- ½ teaspoon baking soda
- ½ teaspoon cream of tartar
- 1 teaspoon pumpkin pie spice
- ½ teaspoon ground cinnamon
- ¼ teaspoon salt
- ½ cup (113g) unsalted butter, softened
- ¾ cup (150g) granulated sugar
- ¼ cup (50g) packed light brown sugar
- ½ cup (120g) pumpkin puree
- 1 large egg, room temperature
- 1 teaspoon vanilla extract
- ¼ cup (50g) granulated sugar (for coating)
- 1 tablespoon ground cinnamon (for coating)
Instructions
- Preheat oven to 350°F (175°C). Line two baking sheets with parchment paper.
- In a medium bowl, whisk together flour, baking soda, cream of tartar, pumpkin pie spice, cinnamon, and salt.
- In a large bowl, beat softened butter, granulated sugar, and brown sugar on medium speed until light and fluffy, about 2-3 minutes.
- Beat in pumpkin puree, egg, and vanilla extract on low speed until just combined.
- Gradually add dry ingredients to wet mixture, mixing on low speed just until no streaks of flour remain.
- In a small bowl, stir together ¼ cup sugar and 1 tablespoon cinnamon for coating.
- Using a cookie scoop or spoons, portion out rounded tablespoons of dough. Roll into balls, then coat in cinnamon-sugar mixture. Place on prepared baking sheets about 2 inches apart.
- Bake one sheet at a time for 10-12 minutes, until puffed and slightly cracked on top with edges just set.
- Let cookies rest on baking sheet for 5 minutes, then transfer to a wire cooling rack to cool completely.
Notes
Don’t skip the cream of tartar; it’s essential for chewy texture. Drain homemade pumpkin puree to avoid excess moisture. Use room temperature ingredients for best results. Bake one sheet at a time for even baking. Cookies taste even better the next day.
Nutrition
- Serving Size: 1 cookie
- Calories: 120
- Sugar: 11
- Sodium: 95
- Fat: 5
- Saturated Fat: 3
- Carbohydrates: 18
- Fiber: 1
- Protein: 2
Keywords: pumpkin snickerdoodle, chewy pumpkin cookies, fall cookies, easy pumpkin recipe, snickerdoodle cookies