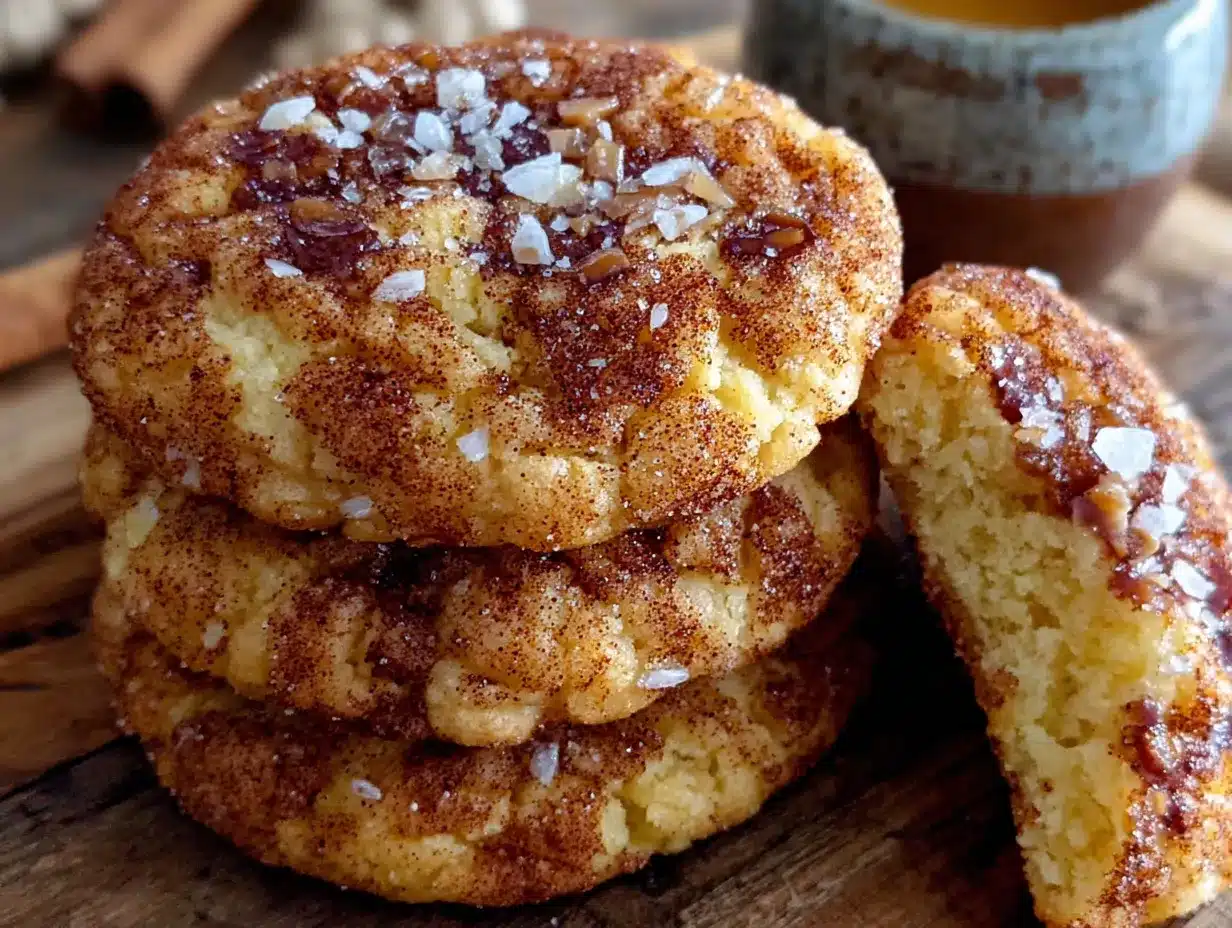
I did not think apple cider had any business being in a cookie. To me, apple cider was a tall, cold glass you drank on a hayride or a warm mug you held with both hands while standing around a fire pit. It was a beverage, period. So when a friend handed me a container of these soft, cinnamon-sugar-dusted cookies and said, “They’re apple cider snickerdoodles,” I nodded politely while internally rolling my eyes. I took a bite mostly to be nice. And then I took another bite because my brain was trying to figure out what just happened. The texture was impossibly soft—almost like a cloud had been dusted with cinnamon and pressed into a cookie shape. And the flavor? It tasted like the first sip of hot cider on a chilly October afternoon, but somehow concentrated into a chewy, buttery cookie. I asked for the recipe before I even finished the first one. That was three falls ago, and these cookies have become my official kickoff-to-autumn bake ever since. They are the recipe I make when I want the house to smell like a candle aisle but actually be edible. And honestly? They are better than any pumpkin cookie I have ever made.
Why You’ll Love This Recipe
These are not your average snickerdoodles. I have tested this recipe about six times to get the texture just right—soft centers, slightly crisp edges, and that signature crackly top. Here is why these cookies deserve a permanent spot in your fall baking rotation:
- Incredibly Soft Texture: The apple cider concentrate makes these cookies unbelievably tender. They stay soft for days, which is rare for a snickerdoodle.
- Real Apple Cider Flavor: No artificial extracts here. You reduce the cider down to a syrup that packs a punch of concentrated apple flavor without making the dough watery.
- Simple Pantry Ingredients: Butter, sugar, flour, cinnamon, and apple cider. That is basically it. You probably have everything except maybe the cider itself.
- Perfect for Fall Gatherings: These are a hit at Thanksgiving, Friendsgiving, or just a cozy weekend baking session. They pair beautifully with a cup of coffee or a copycat Starbucks pumpkin cream cold foam coffee.
- Foolproof Method: Even if you are not a confident baker, the steps here are straightforward. The trick is in the chilling and the cider reduction, and I will walk you through both.
I will be honest—I have had my share of baking fails. I once forgot the sugar in a batch of regular snickerdoodles and ended up with sad, bland pucks. These cookies are forgiving. The dough is forgiving. And the reward is a cookie that makes people close their eyes when they bite into it.
What Ingredients You Will Need
This recipe relies on a few key components that work together to create that signature soft, spiced cookie. The ingredients are simple, but each one plays a specific role.
- Apple Cider (2 cups, or 480 ml): Do not use apple juice. You need real, unfiltered apple cider. It has more flavor and body, which matters when you reduce it down. I usually buy a half-gallon and use the rest for drinking or making a cozy spiced pumpkin chai latte.
- Unsalted Butter (1 cup, or 226 grams), softened: Use good quality butter here. I prefer Kerrygold for the richness, but any unsalted butter works. Salted butter will make the cookies too salty since we add salt separately.
- Granulated Sugar (1 ½ cups, or 300 grams): This is for both the dough and the cinnamon-sugar coating. Do not reduce the sugar—it affects the texture and spread of the cookies.
- Light Brown Sugar (¼ cup, or 50 grams), packed: Adds a touch of molasses flavor and helps keep the cookies moist. You can substitute dark brown sugar for a deeper flavor.
- Large Egg (1, plus 1 egg yolk): The extra yolk adds richness and tenderness. Save the egg white for an omelet or breakfast scramble.
- Vanilla Extract (2 teaspoons): Use pure vanilla extract, not imitation. It rounds out the apple flavor beautifully.
- All-Purpose Flour (2 ¾ cups, or 345 grams): Spoon and level your flour. Scooping directly from the bag packs in too much flour and makes the cookies dense.
- Cream of Tartar (2 teaspoons): This is the secret to the classic snickerdoodle tang and chewy texture. Do not skip it. You can substitute with 1 teaspoon of lemon juice or white vinegar in a pinch, but the texture will be slightly different.
- Baking Soda (1 teaspoon): Helps the cookies spread and rise just enough.
- Ground Cinnamon (2 teaspoons for dough, plus 3 tablespoons for coating): Use fresh cinnamon. Old cinnamon loses its punch and the coating will taste flat.
- Ground Nutmeg (¼ teaspoon): Optional but recommended. It adds warmth that complements the apple cider.
- Salt (½ teaspoon): Balances the sweetness and enhances the spice flavors.
- For the Coating: ¼ cup (50 grams) granulated sugar mixed with 3 tablespoons ground cinnamon. Roll the dough balls generously in this mixture before baking.
Ingredient Selection Tip: Look for apple cider that is cloudy and unfiltered. The sediment at the bottom of the jug is where the flavor lives. I have used store-brand cider and local orchard cider—both work, but the orchard cider gives a more robust apple taste after reduction.
Equipment Needed
You do not need fancy equipment for these cookies, but a few tools make the process smoother.
- Medium Saucepan: For reducing the apple cider. A wide saucepan works faster because more surface area means quicker evaporation.
- Fine-Mesh Strainer: Optional, but helpful if your cider has pulp or sediment you want to remove after reduction.
- Stand Mixer or Hand Mixer: A stand mixer with the paddle attachment is easiest, but a hand mixer and a large bowl work perfectly fine.
- Large Baking Sheets (2): I recommend light-colored, rimmed baking sheets. Dark sheets cause the bottoms to brown too quickly.
- Parchment Paper or Silicone Baking Mats: Parchment paper is my preference because it prevents sticking and makes cleanup a breeze.
- Medium Cookie Scoop (about 1.5 tablespoons): Ensures uniform cookies that bake evenly. A spoon works too, but the scoop is worth the investment.
- Cooling Rack: Lets air circulate around the cookies so they cool evenly without soggy bottoms.
- Plastic Wrap: For chilling the dough. You can also use a reusable beeswax wrap if you are eco-conscious.
I have made these cookies with a cheap hand mixer and a warped baking sheet, and they still turned out great. The most important tool is patience—specifically for the chilling step.
Preparation Method
- Reduce the Apple Cider: Pour 2 cups of apple cider into a medium saucepan. Bring it to a boil over medium-high heat, then reduce the heat to medium-low and let it simmer. Stir occasionally. You want to reduce it down to about ¼ cup of thick, syrupy liquid. This takes about 15 to 20 minutes. Watch it closely toward the end—it can burn quickly. Once it is syrupy and coats the back of a spoon, remove it from the heat and let it cool completely. You can speed this up by placing the saucepan in a bowl of cold water, stirring occasionally.
- Cream the Butter and Sugars: In the bowl of a stand mixer fitted with the paddle attachment, beat 1 cup of softened unsalted butter, 1 ½ cups of granulated sugar, and ¼ cup of packed light brown sugar together on medium speed. Beat for about 3 minutes, until the mixture is light, fluffy, and pale in color. Scrape down the sides and bottom of the bowl with a spatula halfway through.
- Add the Wet Ingredients: Add the egg and the extra egg yolk, one at a time, beating well after each addition. Then add 2 teaspoons of vanilla extract and the cooled apple cider syrup. Beat on low speed until just combined. The mixture might look slightly curdled at this point—that is normal. Do not panic.
- Whisk the Dry Ingredients: In a separate medium bowl, whisk together 2 ¾ cups of all-purpose flour, 2 teaspoons of cream of tartar, 1 teaspoon of baking soda, 2 teaspoons of ground cinnamon, ¼ teaspoon of ground nutmeg, and ½ teaspoon of salt. Whisking ensures the leavening agents and spices are evenly distributed.
- Combine Wet and Dry: Gradually add the dry ingredients to the wet mixture, mixing on low speed. Stop as soon as the flour disappears. Overmixing at this stage develops gluten and makes the cookies tough. The dough will be soft and slightly sticky—that is exactly what you want.
- Chill the Dough: Cover the bowl with plastic wrap and refrigerate for at least 2 hours, or up to 48 hours. Chilling is non-negotiable here. It firms up the butter, prevents the cookies from spreading into flat puddles, and allows the flavors to meld. I have baked these after 30 minutes of chilling and they spread too much. Trust the 2-hour minimum.
- Preheat and Prepare: When you are ready to bake, preheat your oven to 350°F (175°C). Line two large baking sheets with parchment paper. In a small bowl, mix ¼ cup of granulated sugar with 3 tablespoons of ground cinnamon for the coating.
- Shape and Coat: Using a medium cookie scoop or a tablespoon, scoop out rounded balls of dough (about 1.5 tablespoons each). Roll each ball between your palms until smooth, then roll generously in the cinnamon-sugar mixture. Place the coated dough balls on the prepared baking sheets, spacing them about 2 inches apart. I usually fit 8 to 9 cookies per sheet.
- Bake: Bake one sheet at a time for 10 to 12 minutes. The cookies should look puffed, set around the edges, and slightly soft in the center. They will look underdone—that is the goal. Overbaking gives you dry, crumbly cookies. Let them cool on the baking sheet for 5 minutes, then transfer to a cooling rack to cool completely.
- Repeat: Let the baking sheets cool completely between batches. If you place dough on a hot sheet, the butter melts too fast and the cookies spread into thin, crispy disks.
Sensory Cue: When the cookies are done, the kitchen should smell like a warm apple orchard wrapped in cinnamon. The edges will be lightly golden, and the centers will still look soft and puffy. Do not be tempted to bake them longer for that golden-brown look—you will lose the soft texture.
Cooking Tips & Techniques
I learned most of these tips the hard way—through batches that spread too much, burned on the bottom, or came out dry. Here is what I wish someone had told me before my first attempt.
- Do Not Skip the Cream of Tartar: This is what gives snickerdoodles their signature tang and chewy texture. Without it, you basically have a sugar cookie with cinnamon on top. If you do not have cream of tartar, substitute with 1 teaspoon of lemon juice mixed into the wet ingredients, but the texture will be slightly softer and less chewy.
- Chill the Dough Thoroughly: I know I said this already, but I will say it again. The dough needs to be cold when it hits the oven. Warm dough spreads. Cold dough holds its shape. If you are in a rush, scoop the dough balls first, then chill them on a plate for 45 minutes in the freezer.
- Use a Light-Colored Baking Sheet: Dark baking sheets absorb more heat and cause the bottoms of the cookies to brown too fast. If you only have dark sheets, reduce the oven temperature by 25°F and check the cookies at 8 minutes.
- Rotate the Pan Halfway Through: About 5 minutes into baking, rotate the pan 180 degrees. This ensures even baking, especially if your oven has hot spots.
- Let Them Cool on the Pan: The cookies continue to set as they cool on the hot baking sheet. If you move them too soon, they will fall apart. Five minutes is the sweet spot.
- Underbake Slightly: I pull my cookies out of the oven when the centers still look slightly soft and puffy. They continue to bake from residual heat. This guarantees a soft, chewy center every time.
I once forgot the cream of tartar entirely and ended up with flat, crispy cookies that tasted like cinnamon toast. They were still edible, but they were not snickerdoodles. Learn from my mistake.
Variations & Adaptations
One of the best things about this recipe is how adaptable it is. Here are a few ways I have tweaked it over the years.
- Gluten-Free Version: Substitute the all-purpose flour with a 1:1 gluten-free baking flour that contains xanthan gum. I have used Bob’s Red Mill 1:1 Baking Flour with great results. Chill the dough for an extra 30 minutes, as gluten-free dough tends to be softer.
- Dairy-Free Version: Use vegan butter sticks (I like Miyoko’s or Country Crock Plant Butter) in place of regular butter. Make sure your cinnamon-sugar coating is also dairy-free—most are, but some pre-mixed cinnamon sugars contain anti-caking agents.
- Spiced-Up Version: Add ¼ teaspoon of ground cloves and ¼ teaspoon of ground ginger to the dough along with the cinnamon and nutmeg. This gives the cookies a chai-like warmth that pairs beautifully with the apple cider.
- Apple Cider Caramel Drizzle: After the cookies have cooled, drizzle them with a simple caramel sauce made by melting 10 soft caramel candies with 2 tablespoons of heavy cream. The combination of apple, cinnamon, and caramel is next-level.
- Brown Butter Twist: Brown the butter before creaming it with the sugars. Let it cool completely (it needs to be solid, not liquid) before using. Brown butter adds a nutty depth that complements the apple cider syrup beautifully.
- Air Fryer Method: Preheat your air fryer to 325°F (160°C). Place chilled dough balls in the basket, leaving 2 inches of space between each. Bake for 6 to 8 minutes, checking at the 6-minute mark. The cookies will be slightly smaller but just as soft.
I have tried the brown butter version twice, and honestly, it is my favorite variation for holiday baking. It adds a layer of richness that makes the cookies taste even more special.
Serving & Storage Suggestions
These cookies are best served slightly warm, when the centers are still soft and the cinnamon-sugar coating is fragrant. I like to serve them on a rustic wooden board alongside a bowl of simple fall harvest charcuterie board for a cozy dessert spread.
Serving Temperature: Room temperature is ideal. If you want to reheat them, pop a cookie in the microwave for 10 seconds. It will taste freshly baked.
Pairing Suggestions: These cookies pair beautifully with a hot mug of apple cider, a cup of chai tea, or a homemade pumpkin spice latte. For a dessert board, serve them alongside vanilla ice cream, caramel sauce, and fresh apple slices.
Storage Instructions: Store the cookies in an airtight container at room temperature for up to 5 days. Place a slice of bread in the container to keep them soft—the cookies will absorb the moisture from the bread. Replace the bread slice every 2 days.
Freezer Instructions: You can freeze the baked cookies for up to 3 months. Place them in a single layer in a freezer-safe bag or container, with parchment paper between layers. Thaw at room temperature for 30 minutes before serving. Alternatively, freeze the unbaked dough balls on a baking sheet until solid, then transfer to a freezer bag. Bake directly from frozen, adding 2 to 3 minutes to the baking time.
Flavor Development: These cookies actually taste better on day two. The cinnamon and apple flavors meld together overnight, creating a more rounded, deeper taste. If you can resist eating them all on day one, you will be rewarded.
Nutritional Information & Benefits
Let us be real—these are cookies, not health food. But they are made with real ingredients, and there are a few bright spots worth mentioning.
| Nutrient | Per Cookie (based on 24 cookies) |
|---|---|
| Calories | 185 |
| Total Fat | 8g |
| Saturated Fat | 5g |
| Cholesterol | 35mg |
| Sodium | 95mg |
| Total Carbohydrates | 27g |
| Dietary Fiber | 1g |
| Sugars | 17g |
| Protein | 2g |
Health Benefits of Key Ingredients: Apple cider contains antioxidants called polyphenols, which may help reduce inflammation and support heart health. Cinnamon is known for its anti-inflammatory properties and can help regulate blood sugar levels. Butter provides fat-soluble vitamins A, D, E, and K. That said, these cookies are a treat, not a daily staple. Enjoy them in moderation as part of a balanced diet.
Dietary Considerations: This recipe contains gluten, dairy, and eggs. For gluten-free and dairy-free options, see the Variations section above. The cookies are nut-free as written, making them safe for school bake sales and nut-free households.
Personal Wellness Note: I believe in the 80/20 rule—eat nourishing whole foods 80 percent of the time, and enjoy treats like these cookies the other 20 percent. Baking and sharing cookies is a form of connection and joy. That has its own health benefits.
Frequently Asked Questions
Can I use apple juice instead of apple cider?
Technically yes, but the flavor will be much milder. Apple juice is thinner and less concentrated in flavor than apple cider. If you use apple juice, reduce it down to a syrup just like you would with cider, but expect a lighter apple taste. The cookies will still be good, just not as intensely apple-flavored.
Why did my cookies spread too much?
The most common reason is that the dough was not chilled long enough. The butter needs to be solid when the dough hits the oven. If the butter is too soft, it melts immediately and the cookies spread into flat disks. Other possible causes include too much sugar, not enough flour, or a baking sheet that was still warm from a previous batch.
Can I make the dough ahead of time?
Absolutely. The dough can be refrigerated for up to 48 hours before baking. In fact, the cookies taste better if the dough rests overnight because the flavors have time to meld. You can also freeze the dough balls for up to 3 months. Bake directly from frozen, adding 2 to 3 minutes to the baking time.
How do I know when the cookies are done?
Look for cookies that are puffed, set around the edges, and still soft in the center. The centers will look slightly underdone—that is exactly what you want. If the edges are golden brown, the cookies are overbaked. Remember, they continue to bake on the hot sheet for 5 minutes after you pull them out of the oven.
Can I double this recipe?
Yes. The recipe doubles beautifully. Just make sure your mixer bowl is large enough to hold the doubled dough. If you are using a hand mixer, you may need to mix in batches. The chilling time remains the same, but you will need more baking sheets or you will need to bake in multiple batches.
Conclusion
These Cozy Apple Cider Snickerdoodle Cookies have become my favorite fall tradition. They are the cookies I make when I want the house to smell like autumn. They are the cookies I bring to Friendsgiving when I want to impress without stress. And honestly, they are the cookies I hide in the freezer so I can have one with my morning coffee long after apple season is over.
The combination of soft, chewy texture and concentrated apple cider flavor is something you have to taste to believe. It is not a gimmick—it is a genuinely better cookie. The cinnamon-sugar coating gives you that classic snickerdoodle crackle, while the apple cider syrup adds a fruity warmth that lingers on your tongue.
I would love to hear how these turn out for you. Did you try any of the variations? Did you serve them with something delicious? Drop a comment below and let me know. And if you share a photo on social media, tag me so I can see your beautiful cookies. Happy fall baking, friend.
Pin This Recipe!
Cozy Apple Cider Snickerdoodle Cookies: Easy Fall Recipe
These impossibly soft, cinnamon-sugar-dusted cookies taste like the first sip of hot apple cider on a chilly October afternoon. Made with real reduced apple cider, they have a concentrated apple flavor and a chewy, buttery texture that stays soft for days.
- Prep Time: 20 minutes
- Cook Time: 12 minutes
- Total Time: 2 hours 32 minutes (includes 2 hours chilling)
- Yield: 24 cookies 1x
- Category: Dessert
- Cuisine: American
Ingredients
- 2 cups (480 ml) apple cider (unfiltered)
- 1 cup (226 g) unsalted butter, softened
- 1 ½ cups (300 g) granulated sugar
- ¼ cup (50 g) light brown sugar, packed
- 1 large egg plus 1 egg yolk
- 2 teaspoons vanilla extract
- 2 ¾ cups (345 g) all-purpose flour
- 2 teaspoons cream of tartar
- 1 teaspoon baking soda
- 2 teaspoons ground cinnamon
- ¼ teaspoon ground nutmeg (optional)
- ½ teaspoon salt
- For the coating: ¼ cup (50 g) granulated sugar mixed with 3 tablespoons ground cinnamon
Instructions
- Reduce the apple cider: Pour 2 cups of apple cider into a medium saucepan. Bring to a boil over medium-high heat, then reduce heat to medium-low and simmer, stirring occasionally, until reduced to about ¼ cup of thick syrup (15-20 minutes). Watch closely toward the end to prevent burning. Remove from heat and let cool completely.
- Cream the butter and sugars: In a stand mixer fitted with the paddle attachment, beat 1 cup softened unsalted butter, 1 ½ cups granulated sugar, and ¼ cup packed light brown sugar on medium speed until light, fluffy, and pale (about 3 minutes). Scrape down the bowl halfway through.
- Add the wet ingredients: Add the egg and extra egg yolk one at a time, beating well after each addition. Add 2 teaspoons vanilla extract and the cooled apple cider syrup. Beat on low speed until just combined (mixture may look slightly curdled).
- Whisk the dry ingredients: In a separate bowl, whisk together 2 ¾ cups all-purpose flour, 2 teaspoons cream of tartar, 1 teaspoon baking soda, 2 teaspoons ground cinnamon, ¼ teaspoon ground nutmeg, and ½ teaspoon salt.
- Combine wet and dry: Gradually add the dry ingredients to the wet mixture, mixing on low speed until just combined. Do not overmix. The dough will be soft and slightly sticky.
- Chill the dough: Cover the bowl with plastic wrap and refrigerate for at least 2 hours, or up to 48 hours.
- Preheat and prepare: When ready to bake, preheat oven to 350°F (175°C). Line two large baking sheets with parchment paper. In a small bowl, mix ¼ cup granulated sugar with 3 tablespoons ground cinnamon for coating.
- Shape and coat: Using a medium cookie scoop (about 1.5 tablespoons), scoop dough and roll into smooth balls. Roll generously in the cinnamon-sugar mixture. Place on prepared baking sheets, spacing 2 inches apart (8-9 cookies per sheet).
- Bake: Bake one sheet at a time for 10-12 minutes. Cookies should look puffed, set around edges, and slightly soft in the center. Let cool on baking sheet for 5 minutes, then transfer to a cooling rack to cool completely.
- Repeat: Let baking sheets cool completely between batches.
Notes
Do not skip the cream of tartar—it gives snickerdoodles their signature tang and chewy texture. Chilling the dough is non-negotiable for preventing spread. For best results, use unfiltered apple cider. Cookies taste even better on day two as flavors meld. Store in an airtight container at room temperature for up to 5 days; place a slice of bread in the container to keep them soft. Freeze baked cookies for up to 3 months or unbaked dough balls for up to 3 months.
Nutrition
- Serving Size: 1 cookie
- Calories: 185
- Sugar: 17
- Sodium: 95
- Fat: 8
- Saturated Fat: 5
- Carbohydrates: 27
- Fiber: 1
- Protein: 2
Keywords: apple cider snickerdoodles, fall cookies, soft snickerdoodles, apple cider cookies, cinnamon sugar cookies, autumn baking, easy cookie recipe