Pushing a wooden stick into an apple while trying not to drop my phone, the cream cheese mixture, and my sanity all at once. That’s how this whole thing started. I was supposed to bring a dessert to a fall gathering, and I’d promised something “fun and on a stick.” Classic over-commitment, right? I had a block of cream cheese softening on the counter, a bag of caramel candies melting in a double boiler, and a pile of Honeycrisp apples staring at me like I was the one who needed help.
Honestly, I was just trying to avoid the same old caramel apple situation. You know the one—where you bite in and the apple slides right off the caramel coating, leaving you with a sticky mess and zero cream cheese filling. I wanted something different. Something where the tangy cream cheese and the sweet caramel actually got to hang out together, not just awkwardly sit next to each other.
So I did what any reasonable person would do: I hollowed out the center of the apples, stuffed them with a sweetened cream cheese mixture, and then dunked the whole thing in warm caramel. The first bite was a revelation. It was like the inside of a cheesecake had moved into an apple and decided to throw a party with caramel. That moment—when the flavors actually worked together instead of fighting—is why this recipe stuck. It’s not just a dessert; it’s a trust-building exercise between you and your snack.
Why You’ll Love This Recipe
This Creamy Cream Cheese Stuffed Caramel Apples on a Stick recipe is the kind of dessert that makes people stop mid-bite and just look at you. I’ve tested this with my family (who are brutally honest about food), and the silence after the first bite says everything. Here is why this version stands out from every other caramel apple you’ve tried:
- Quick & Easy: From start to finish, you’re looking at about 30 minutes of active prep time. The hardest part is waiting for the caramel to set, and honestly, that’s a good thing—it builds anticipation.
- Simple Ingredients: You need apples, cream cheese, caramel candies, and a few pantry staples. No weird extracts or specialty stores required. I’ve made these with ingredients from a regular grocery run and they turned out perfect.
- Perfect for Fall Gatherings: These are the life of the party at Halloween parties, Thanksgiving dinners, or even a cozy movie night. They look impressive but take way less effort than a pie.
- Crowd-Pleaser: Kids love the stick factor, adults love the cream cheese surprise inside. Everyone wins. I brought these to a potluck once and they disappeared before the main course was even served.
- Unbelievably Delicious: The combination of tart apple, tangy cream cheese, and sweet caramel is next-level comfort food. It’s like eating a caramel cheesecake but with a built-in apple crunch.
What makes this recipe different is the technique—hollowing out the center and stuffing it creates a creamy core that stays put. No sliding caramel, no separation anxiety. It’s the version I wish I’d had at every fall festival growing up. This is comfort food reimagined—faster, more fun, and with the same soul-soothing satisfaction that makes you close your eyes after the first bite.
What Ingredients You Will Need
This recipe uses simple, wholesome ingredients to deliver bold flavor and satisfying texture without the fuss. Most of these are pantry staples or easy to find at any grocery store. Here is what you need:
For the Apples
- 6 medium apples (Honeycrisp or Granny Smith work best—firm and tart)
- 6 wooden craft sticks (or lollipop sticks)
- 1 tablespoon lemon juice (to prevent browning, mixed with water)
For the Cream Cheese Filling
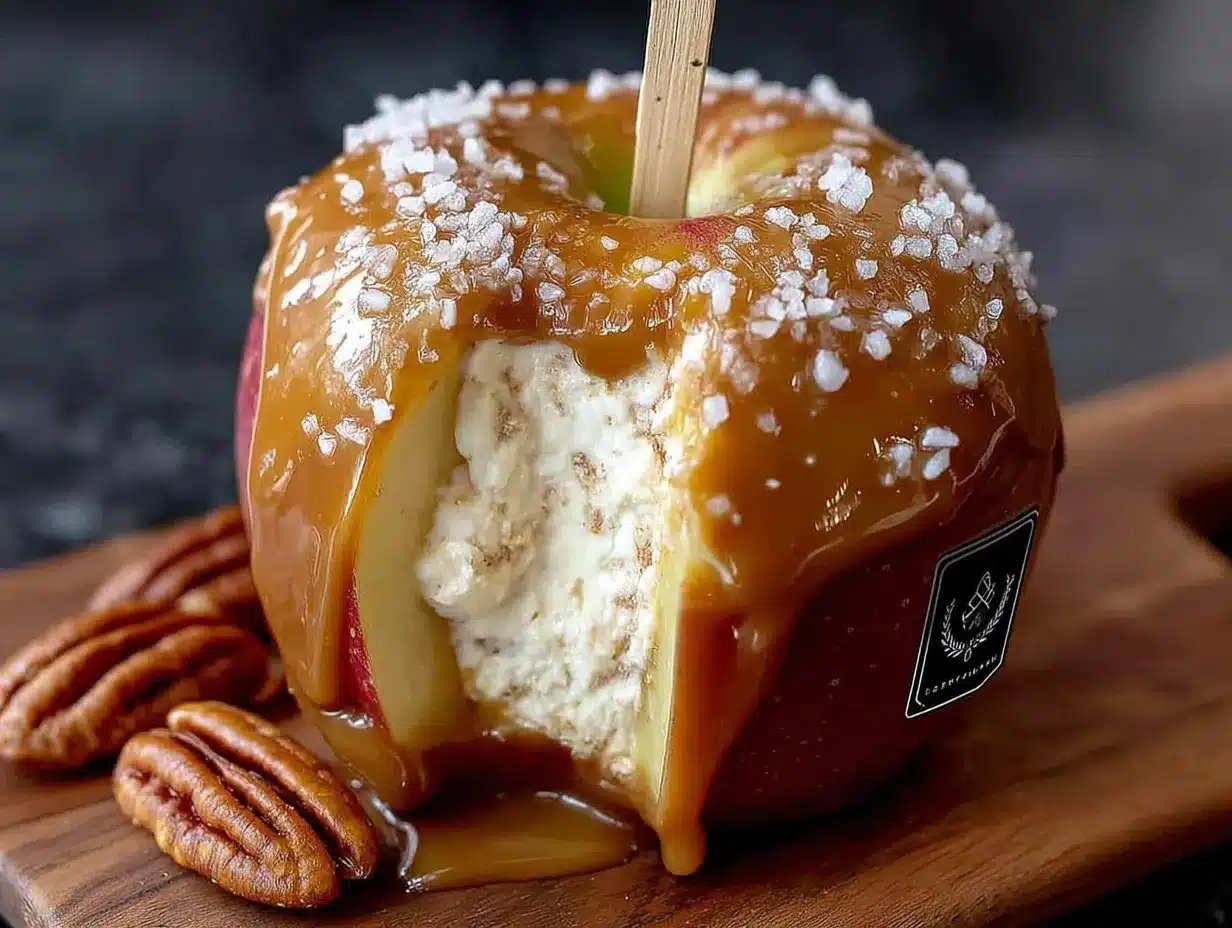
- 8 ounces cream cheese, softened (full-fat gives the best texture, but reduced-fat works too)
- 1/4 cup powdered sugar (adds sweetness without graininess)
- 1/2 teaspoon vanilla extract (pure vanilla makes a difference here)
- 1/4 cup crushed graham crackers or shortbread cookies (adds texture—optional but highly recommended)
For the Caramel Coating
- 14 ounces caramel candies, unwrapped (I recommend Kraft or Werther’s for consistent melting)
- 2 tablespoons heavy cream (helps the caramel stay smooth and pourable)
- 1/2 teaspoon sea salt (optional, but balances the sweetness beautifully)
For Toppings (Optional)
- 1/2 cup chopped pecans or peanuts
- 1/4 cup mini chocolate chips
- 2 tablespoons melted white chocolate (for drizzling)
- 1/4 cup sprinkles (for fun—kids love this)
A few ingredient notes from personal experience: Use full-fat cream cheese if you can—the lower-fat versions can get a bit grainy when mixed with sugar. I’ve tried both, and the full-fat version gives that silky, cheesecake-like texture you’re after. For the apples, Honeycrisp apples are my go-to because they stay crisp even after being hollowed out. Granny Smith works great too if you want a tarter contrast to the sweet caramel. If you’re using a different variety, just make sure they’re firm—soft apples will fall apart.
For the caramel, avoid the pre-made caramel sauce in a jar—it’s too thin and won’t coat the apples properly. You want those firm caramel candies that you melt yourself. Trust me on this one. I learned the hard way when my first batch slid right off the apples and pooled on the wax paper like a sad puddle.
Equipment Needed
You don’t need a professional kitchen for this, but having the right tools makes the process smoother. Here is what I use:
- Apple corer or melon baller: For hollowing out the center. A melon baller gives you more control and creates a neat cavity.
- Small paring knife: For trimming the apple openings and making precise cuts.
- Wooden craft sticks: These are thicker than lollipop sticks and hold up better to the weight of the apple and caramel.
- Double boiler or microwave-safe bowl: For melting the caramel. A double boiler gives you more control, but a microwave works in a pinch—just stir every 30 seconds.
- Wax paper or parchment paper: For setting the finished apples. Parchment paper is non-stick and makes cleanup easier.
- Small piping bag or zip-top bag: For filling the apples with cream cheese mixture. A zip-top bag with the corner snipped off works perfectly.
- Baking sheet: To hold the apples while the caramel sets. Line it with wax paper first.
If you don’t have a melon baller, a small spoon works fine—just take your time and scoop gently. I’ve also used a grapefruit spoon with serrated edges, which actually worked better for scraping out the last bits of apple core. For budget-friendly options, dollar stores often carry wooden sticks and basic melon ballers that do the job. And if you’re like me and lose your piping bags regularly, a sturdy zip-top bag is your best friend.
Preparation Method
This is where the magic happens. Follow these steps, and you’ll have a batch of Creamy Cream Cheese Stuffed Caramel Apples on a Stick that look like they came from a fancy dessert shop.
- Prepare the apples. Wash and dry the apples thoroughly. Any moisture on the surface will make the caramel slide off later. Insert a wooden stick into the top of each apple, pushing about halfway through. Set them aside on a baking sheet lined with wax paper.
- Hollow out the center. Using a melon baller or small spoon, scoop out the core from the top of each apple, working around the stick. Leave about 1/2 inch of apple flesh around the edges so the apple stays sturdy. You want a cavity about the size of a tablespoon. Save the scooped-out apple pieces for snacking or add them to oatmeal. Don’t throw them away—that’s good apple wasted.
- Prevent browning. In a small bowl, mix 1 tablespoon lemon juice with 1 cup cold water. Dip a pastry brush into the mixture and lightly brush the inside of the hollowed apples. This keeps them from turning brown while you work. Pat dry gently with a paper towel afterward.
- Make the cream cheese filling. In a medium bowl, beat the softened cream cheese with an electric mixer until smooth and fluffy—about 2 minutes. Add the powdered sugar and vanilla extract, then beat for another minute until well combined. Fold in the crushed graham crackers if using. The mixture should be thick but spreadable. Taste it. Yes, right now. Adjust sweetness if needed.
- Fill the apples. Transfer the cream cheese mixture to a piping bag or a zip-top bag with a small corner snipped off. Pipe the filling into the hollowed center of each apple, filling it completely. Smooth the top with a small spatula or your finger. Don’t overfill—you want the filling flush with the apple surface, not mounded.
- Chill the apples. Place the filled apples on the baking sheet and refrigerate for at least 20 minutes. This firms up the cream cheese filling so it doesn’t melt into the caramel later. I usually do this step while I’m melting the caramel, which saves time.
- Melt the caramel. In a double boiler or a heatproof bowl set over simmering water, combine the unwrapped caramel candies and heavy cream. Stir frequently until completely smooth and melted—about 5-7 minutes. If using a microwave, heat in 30-second bursts, stirring between each, until smooth. Add the sea salt if using and stir to combine.
- Dip the apples. Remove the chilled apples from the refrigerator. Working quickly, hold each apple by the stick and dip it into the warm caramel, tilting the bowl to coat the apple completely. Let any excess caramel drip off back into the bowl. Use a spoon to help coat the sides if needed. The caramel should be warm but not hot—if it’s too hot, it will melt the cream cheese filling.
- Add toppings. While the caramel is still wet, roll the bottom of each apple in chopped nuts, sprinkles, or chocolate chips if desired. Place the dipped apples on the wax paper-lined baking sheet. If you want a drizzle, wait 5 minutes for the caramel to set slightly, then drizzle melted white chocolate on top.
- Let them set. Allow the apples to set at room temperature for about 30 minutes, or refrigerate for 15 minutes if you’re impatient like me. The caramel should be firm but still give slightly when you press it. Serve immediately or store as directed below.
A few sensory cues: When you dip the apple, the caramel should coat it in a smooth, even layer without pooling at the bottom. The cream cheese filling should feel cold and firm when you pipe it in, not runny. And when you bite into the finished apple, you should hear a crisp snap from the apple, feel the creamy filling, and taste the rich caramel all in one bite. That’s the goal.
Cooking Tips & Techniques
I’ve made these Creamy Cream Cheese Stuffed Caramel Apples on a Stick more times than I care to admit, and I’ve learned a few things the hard way. Here are the tips that actually matter:
Dry your apples completely. This is the number one rule. Even a tiny bit of moisture on the apple skin will make the caramel slide off like a bad toupee. After washing, let them air dry for 10 minutes, then pat them down with a paper towel. I once skipped this step and ended up with caramel puddles at the bottom of every apple. Not cute.
Don’t overheat the caramel. If the caramel gets too hot, it becomes thin and runny, and it won’t stick to the apple properly. Keep the heat low and stir constantly. If you’re using a microwave, go slow—30 seconds at a time. I’ve burned caramel more times than I want to admit, and burnt caramel tastes bitter and sad.
Chill the filled apples before dipping. This is non-negotiable. The cold cream cheese filling acts as a barrier that keeps the caramel from melting into the filling. If you skip this step, you’ll end up with a caramel-and-cream-cheese soup inside your apple. Still tasty, but not what we’re going for.
Use a deep bowl for dipping. A narrow, deep bowl works better than a wide shallow one because you can tilt it and get full coverage without wasting caramel. I use a small glass measuring cup—it’s the perfect size for dipping apples one at a time.
Work quickly when dipping. The caramel starts to set as soon as it leaves the heat, so have your toppings ready and lined up before you start dipping. I lay out a sheet of wax paper with chopped nuts, sprinkles, and chocolate chips in separate piles so I can roll the apples immediately.
If the caramel gets too thick while you’re working, add a splash of heavy cream and stir it back over low heat. Don’t add water—it will make the caramel grainy. Cream is your friend here.
One mistake I made early on: I used a double boiler with too much water, and the steam made the caramel watery. Keep the water level low so it doesn’t touch the bottom of the bowl. And if you’re using a microwave, cover the bowl with a paper towel to catch any splatters—caramel burns are no joke.
Variations & Adaptations
This recipe is surprisingly flexible. Here are a few ways to change it up based on what you have on hand or what you’re craving:
Dairy-Free Version: Use dairy-free cream cheese (like Kite Hill or Tofutti) and coconut cream instead of heavy cream in the caramel. The texture will be slightly softer, but the flavor is still amazing. I tested this with a friend who’s dairy-free, and she said it was the best caramel apple she’d ever had.
Gluten-Free Option: Skip the graham crackers in the filling, or use gluten-free graham crackers. The apples and caramel are naturally gluten-free, so this is an easy swap. Just double-check your caramel candies—some brands use wheat-based stabilizers.
Chocolate Lover’s Version: After dipping in caramel, let the apples set for 10 minutes, then drizzle with melted dark chocolate and sprinkle with sea salt. It’s like a salted caramel chocolate bar on a stick. I’ve made these for Christmas parties and they disappear fast.
Spiced Fall Version: Add 1/2 teaspoon pumpkin pie spice to the cream cheese filling and roll the finished apples in crushed cinnamon graham crackers. The warm spices pair beautifully with the apple and caramel. This is my personal favorite for Thanksgiving.
Mini Version: Use smaller apples (like Gala or Fuji) and cut them into wedges before stuffing and dipping. Insert a toothpick into each wedge instead of a stick. These are perfect for parties where people want to grab and go without committing to a whole apple.
Peanut Butter Twist: Mix 2 tablespoons creamy peanut butter into the cream cheese filling before piping. The peanut butter adds a savory note that balances the sweetness. I’ve also used almond butter and cashew butter—both work great.
One variation I tried that surprised me: I added a layer of crushed pretzels on top of the caramel before the toppings. The salty crunch was incredible. It’s now my go-to version for game day snacks.
Serving & Storage Suggestions
These Creamy Cream Cheese Stuffed Caramel Apples on a Stick are best served at room temperature or slightly chilled. If you’ve refrigerated them, let them sit out for about 10 minutes before serving—the caramel gets too hard when cold and can crack when you bite into it.
How to Serve: Arrange the apples on a platter or cake stand for a beautiful presentation. You can also stand them upright in a glass jar filled with popcorn kernels or dried beans for a fun, rustic look. For parties, I like to place them on a bed of autumn leaves or mini pumpkins for that Pinterest-worthy vibe.
What to Pair Them With: These apples go great with a warm cup of apple cider, a mug of hot chocolate, or even a glass of cold milk. For an adult twist, serve them alongside a bourbon-spiked hot cider or a pumpkin beer. The creamy filling balances the boozy notes beautifully.
Storage Instructions: Store any leftover apples in an airtight container in the refrigerator for up to 3 days. Separate layers with wax paper to prevent sticking. The caramel may soften slightly over time, but the flavor stays amazing.
Freezing Tips: You can freeze these apples for up to 2 months. Wrap each apple individually in plastic wrap, then place them in a freezer-safe bag. To thaw, move them to the refrigerator overnight. Don’t microwave them—the caramel will melt and the apple will get mushy.
Reheating: If you want to refresh the caramel coating, place the apples on a baking sheet and warm them in a 300°F oven for about 5 minutes. Keep an eye on them—you just want to soften the caramel, not melt it completely. Let them cool for a few minutes before serving.
One thing I’ve noticed: the flavors actually get better after a day in the fridge. The cream cheese filling absorbs some of the caramel flavor, and the apple softens just slightly. They’re still good on day three, but the apple starts to lose its crunch. So eat them within two days for the best texture.
Nutritional Information & Benefits
Here’s the honest truth: these are not health food, but they’re not a nutritional disaster either. Each apple (with full toppings) contains approximately:
- Calories: 380-450 (depending on toppings)
- Fat: 18-22g (mostly from cream cheese and caramel)
- Carbohydrates: 55-65g (from apples, caramel, and sugar)
- Protein: 5-7g (thanks to the cream cheese)
- Fiber: 4-5g (from the apple)
- Sugar: 40-50g (natural and added)
Health Benefits: Apples are rich in fiber and vitamin C, and the skin contains antioxidants like quercetin that support heart health. Cream cheese provides calcium and protein, though it’s high in saturated fat. The nuts add healthy fats and vitamin E if you choose to include them.
Dietary Considerations: This recipe can be made gluten-free (use gluten-free graham crackers) and dairy-free (use plant-based cream cheese and coconut cream). It is not suitable for low-carb or keto diets due to the caramel and apple. If you have nut allergies, skip the toppings or use seeds like sunflower seeds instead.
My personal perspective: I don’t make these every week, but when I do, I enjoy every single bite without guilt. Life is about balance, and sometimes balance means eating a caramel apple with cream cheese inside. The fiber from the apple and the protein from the cream cheese actually make this more satisfying than a candy bar, so you’re less likely to reach for a second one. That’s my story, and I’m sticking to it.
Conclusion
These Creamy Cream Cheese Stuffed Caramel Apples on a Stick are the dessert you didn’t know you needed—until you bite into one and realize you’ve been missing out your whole life. They’re fun to make, even more fun to eat, and they always get that “wow” reaction from people. Whether you’re making them for a Halloween party, a fall gathering, or just because you deserve a treat, they deliver every time.
I love this recipe because it feels like a cheat code for dessert. It looks impressive but takes way less effort than a pie or cake. And honestly, the combination of tart apple, tangy cream cheese, and sweet caramel is just unbeatable. It’s comfort food that makes people smile—and that’s the whole point of cooking, right?
Now I want to hear from you. Have you tried making stuffed caramel apples before? What’s your favorite topping combination? Drop a comment below and let me know—I’m always looking for new ideas to test in my kitchen. And if you make these, tag me in your photos. I love seeing your creations almost as much as I love eating these apples. Happy cooking, friends!
Frequently Asked Questions
Can I use any type of apple for this recipe?
Yes, but firm apples like Honeycrisp, Granny Smith, or Fuji work best. Soft apples like Red Delicious or McIntosh can fall apart when you hollow them out. I recommend Honeycrisp for the perfect balance of sweetness and crunch.
How do I prevent the caramel from sliding off the apples?
The key is to make sure your apples are completely dry before dipping. Any moisture on the surface will cause the caramel to slide. Also, chilling the filled apples for 20 minutes before dipping helps the caramel stick better. If the caramel is too thin, add a bit more heavy cream and let it cool slightly before dipping.
Can I make these ahead of time for a party?
Absolutely! You can make them up to 2 days in advance. Store them in an airtight container in the refrigerator. Let them sit at room temperature for 10-15 minutes before serving so the caramel softens slightly. The apple will stay crisp for about 2 days.
What can I use instead of cream cheese?
If you don’t have cream cheese, you can use mascarpone cheese for a richer filling, or Greek yogurt mixed with a bit of powdered sugar for a lighter version. For a dairy-free option, use plant-based cream cheese. The texture will be slightly different, but the flavor will still be delicious.
How do I keep the apples from turning brown after hollowing them out?
Brush the inside of the hollowed apples with a mixture of lemon juice and water (about 1 tablespoon lemon juice to 1 cup water). This prevents oxidation without adding a strong lemon flavor. Pat the inside dry with a paper towel before filling. You can also use a commercial fruit preserver like Fruit Fresh if you prefer.
Pin This Recipe!
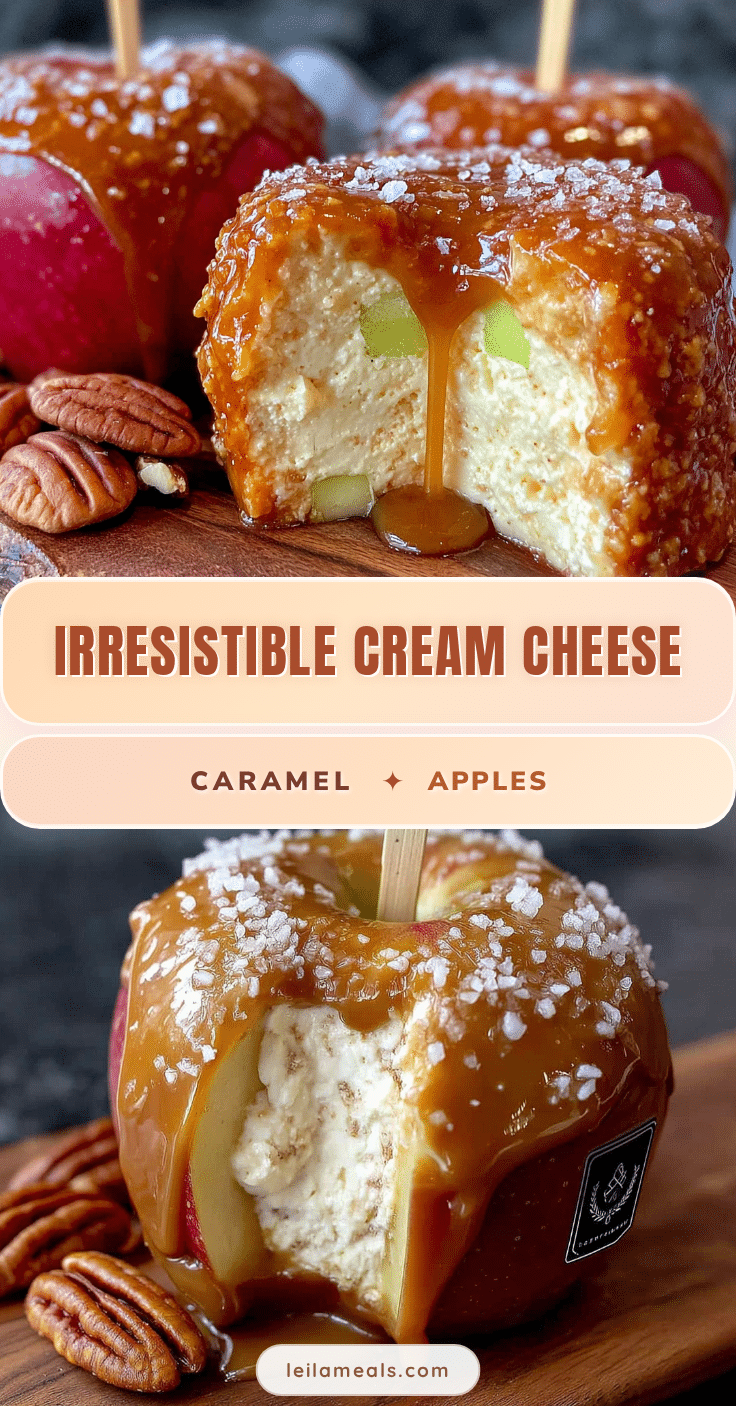
Best Easy Cream Cheese Stuffed Caramel Apples Recipe

These Creamy Cream Cheese Stuffed Caramel Apples on a Stick are the perfect fall dessert. Hollowed apples are filled with a sweetened cream cheese mixture, dipped in warm caramel, and topped with your favorite toppings for a fun and delicious treat.
- Prep Time: 30 minutes
- Cook Time: 10 minutes
- Total Time: 1 hour 10 minutes (including chilling and setting time)
- Yield: 6 servings 1x
- Category: Dessert
- Cuisine: American
Ingredients
- 6 medium apples (Honeycrisp or Granny Smith work best—firm and tart)
- 6 wooden craft sticks (or lollipop sticks)
- 1 tablespoon lemon juice (to prevent browning, mixed with water)
- 8 ounces cream cheese, softened (full-fat gives the best texture, but reduced-fat works too)
- 1/4 cup powdered sugar (adds sweetness without graininess)
- 1/2 teaspoon vanilla extract (pure vanilla makes a difference here)
- 1/4 cup crushed graham crackers or shortbread cookies (adds texture—optional but highly recommended)
- 14 ounces caramel candies, unwrapped (I recommend Kraft or Werther’s for consistent melting)
- 2 tablespoons heavy cream (helps the caramel stay smooth and pourable)
- 1/2 teaspoon sea salt (optional, but balances the sweetness beautifully)
- 1/2 cup chopped pecans or peanuts (optional topping)
- 1/4 cup mini chocolate chips (optional topping)
- 2 tablespoons melted white chocolate (for drizzling, optional)
- 1/4 cup sprinkles (for fun—kids love this, optional)
Instructions
- Prepare the apples. Wash and dry the apples thoroughly. Any moisture on the surface will make the caramel slide off later. Insert a wooden stick into the top of each apple, pushing about halfway through. Set them aside on a baking sheet lined with wax paper.
- Hollow out the center. Using a melon baller or small spoon, scoop out the core from the top of each apple, working around the stick. Leave about 1/2 inch of apple flesh around the edges so the apple stays sturdy. You want a cavity about the size of a tablespoon. Save the scooped-out apple pieces for snacking or add them to oatmeal.
- Prevent browning. In a small bowl, mix 1 tablespoon lemon juice with 1 cup cold water. Dip a pastry brush into the mixture and lightly brush the inside of the hollowed apples. This keeps them from turning brown while you work. Pat dry gently with a paper towel afterward.
- Make the cream cheese filling. In a medium bowl, beat the softened cream cheese with an electric mixer until smooth and fluffy—about 2 minutes. Add the powdered sugar and vanilla extract, then beat for another minute until well combined. Fold in the crushed graham crackers if using. The mixture should be thick but spreadable. Taste it and adjust sweetness if needed.
- Fill the apples. Transfer the cream cheese mixture to a piping bag or a zip-top bag with a small corner snipped off. Pipe the filling into the hollowed center of each apple, filling it completely. Smooth the top with a small spatula or your finger. Don’t overfill—you want the filling flush with the apple surface, not mounded.
- Chill the apples. Place the filled apples on the baking sheet and refrigerate for at least 20 minutes. This firms up the cream cheese filling so it doesn’t melt into the caramel later.
- Melt the caramel. In a double boiler or a heatproof bowl set over simmering water, combine the unwrapped caramel candies and heavy cream. Stir frequently until completely smooth and melted—about 5-7 minutes. If using a microwave, heat in 30-second bursts, stirring between each, until smooth. Add the sea salt if using and stir to combine.
- Dip the apples. Remove the chilled apples from the refrigerator. Working quickly, hold each apple by the stick and dip it into the warm caramel, tilting the bowl to coat the apple completely. Let any excess caramel drip off back into the bowl. Use a spoon to help coat the sides if needed. The caramel should be warm but not hot—if it’s too hot, it will melt the cream cheese filling.
- Add toppings. While the caramel is still wet, roll the bottom of each apple in chopped nuts, sprinkles, or chocolate chips if desired. Place the dipped apples on the wax paper-lined baking sheet. If you want a drizzle, wait 5 minutes for the caramel to set slightly, then drizzle melted white chocolate on top.
- Let them set. Allow the apples to set at room temperature for about 30 minutes, or refrigerate for 15 minutes if you’re impatient. The caramel should be firm but still give slightly when you press it. Serve immediately or store as directed.
Notes
Dry apples completely to prevent caramel from sliding off. Chill filled apples before dipping to keep cream cheese filling from melting into caramel. Work quickly when dipping as caramel starts to set immediately. If caramel gets too thick, add a splash of heavy cream and stir over low heat. Do not add water as it will make caramel grainy.
Nutrition
- Serving Size: 1 stuffed apple
- Calories: 380450
- Sugar: 4050
- Sodium: 250350
- Fat: 1822
- Saturated Fat: 1014
- Carbohydrates: 5565
- Fiber: 45
- Protein: 57
Keywords: caramel apples, cream cheese stuffed apples, fall dessert, Halloween treats, easy caramel apples, stuffed apples on a stick