It was one of those quiet Sunday afternoons when I found myself rifling through my baking supplies, aiming to whip up something special for my niece’s graduation party. Honestly, I wasn’t planning anything fancy—just a quick sweet treat to add a little sparkle to the day. But then I stumbled on a bag of leftover cake crumbs from a previous bake, a jar of shimmering edible gold dust, and some white chocolate melting wafers. The idea hit me: why not craft these Perfect Gold Sparkle Graduation Cake Pops for Elegant Celebrations? At first, I was a bit skeptical. Cake pops always looked a bit tricky to me—like you needed a whole candy-making setup to pull them off. But as I mixed, rolled, and decorated, the magic unfolded right in my kitchen.
You know, those cake pops didn’t just turn out pretty—they became the highlight of the party. People kept asking, “Where did you get these?” and “Can you make more?” It was one of those moments when a simple, accidental creation turns into a beloved tradition. The gold sparkle on each pop caught the light perfectly, lending a touch of elegance that made the celebration feel truly special. It’s funny how a few humble ingredients and a little patience can turn into something so memorable. These cake pops stuck with me—not just because they’re delicious, but because they bring that little extra shine to a milestone worth celebrating.
Why You’ll Love This Recipe
From my experience testing these cake pops several times (let’s just say, I made way too many during one graduation season), this recipe stands out for a bunch of reasons:
- Quick & Easy: You can have these glittering treats ready in under 2 hours, making them perfect for last-minute celebrations or when you’re juggling a million things.
- Simple Ingredients: No need to hunt down exotic items—just cake crumbs, frosting, white chocolate, and edible gold sparkle. I usually keep these on hand because, well, you never know when you’ll need a little sparkle.
- Perfect for Elegant Celebrations: Graduation parties, bridal showers, or any event where you want classy, bite-sized desserts that impress without stress.
- Crowd-Pleaser: Kids and adults alike can’t resist these. The moist cake center paired with the crisp chocolate shell is just the right combo.
- Unbelievably Delicious: The texture is dreamy—soft cake with just enough chocolate coating to give a satisfying snap.
What sets this recipe apart is the way the gold sparkle isn’t just decoration—it’s a subtle, shimmering finish that feels upscale without being over the top. Plus, I’ve perfected the balance so the cake pops aren’t dry or crumbly but hold together beautifully. Honestly, these aren’t your average cake pops; they’re a little celebration in every bite.
What Ingredients You Will Need
This recipe uses simple, wholesome ingredients to deliver bold flavor and a satisfying texture without the fuss. Most of these are pantry staples or easy to find at your local grocery store.
- Cake Crumbs: About 4 cups (560g) of your favorite baked cake, crumbled finely. I recommend using a moist yellow or vanilla cake for the best flavor and texture.
- Frosting: 1 cup (240g) of classic buttercream or cream cheese frosting, softened (helps bind the crumbs together). I prefer a homemade buttercream for its smoothness, but store-bought works fine too.
- White Chocolate Melting Wafers: 12 ounces (340g) for coating; I like Ghirardelli or Wilton brand for smooth melting.
- Edible Gold Luster Dust: 1-2 teaspoons for that signature sparkle. You can find this at baking specialty stores or online.
- Short Lollipop Sticks: About 20-25 sticks, depending on your batch size.
- Optional: A pinch of salt to balance sweetness if your frosting is very sweet.
Tip: If you’re making this recipe gluten-free, use a gluten-free cake mix or homemade gluten-free cake crumbs. For a dairy-free twist, swap the frosting with coconut cream frosting and use dairy-free white chocolate wafers.
Equipment Needed
- Mixing Bowls: Medium and large bowls for combining cake crumbs and frosting.
- Baking Sheet or Tray: For chilling the cake pops before dipping.
- Parchment Paper or Silicone Mat: To keep the cake pops from sticking while they set.
- Microwave-Safe Bowl: For melting the chocolate wafers smoothly.
- Candy Thermometer (Optional): Useful if you want to be precise with chocolate temperature, but not necessary.
- Lollipop Sticks: Essential for holding your cake pops.
If you don’t have lollipop sticks, you can use sturdy wooden skewers trimmed to size. When it comes to melting chocolate, a double boiler works well if you’re not comfortable with microwaving. I’ve found that a simple microwave method works fine as long as you stir every 20 seconds to avoid burning.
Preparation Method
- Prepare the Cake Crumbs: Break your cake into small pieces and pulse in a food processor or crumble by hand until fine and even. You want a sandy texture without large chunks. This should take about 5 minutes.
- Mix with Frosting: In a large bowl, combine the cake crumbs and softened frosting. Start with ¾ cup (180g) of frosting and add more if needed. Mix with a spoon or your hands until the mixture holds together when pressed. This step usually takes 5-7 minutes. If it feels too dry, add a little more frosting, but don’t overdo it.
- Form Cake Balls: Scoop about 1.5 tablespoons (20g) of the mixture and roll into smooth balls. Place each ball on a parchment-lined baking sheet. Aim for uniform sizes to ensure even coating and setting. This can take about 15 minutes depending on batch size.
- Chill the Cake Balls: Refrigerate the balls for at least 1 hour or freeze for 20-30 minutes. This helps them firm up and reduces the chance of crumbling when dipped.
- Melt the Chocolate: Heat the white chocolate wafers in a microwave-safe bowl in 20-second bursts, stirring well each time until smooth. Be careful not to overheat—burnt chocolate won’t set nicely. This takes about 3-5 minutes total.
- Insert Sticks: Dip the tip of each lollipop stick into the melted chocolate, then gently push it halfway into each chilled cake ball. This acts like glue to hold the stick in place. Freeze again for 10 minutes to set.
- Dip the Cake Pops: Holding the stick, dip each cake ball into the melted white chocolate, covering it completely. Gently tap off excess chocolate and place the pop upright on parchment. This step requires a steady hand but gets easier with practice.
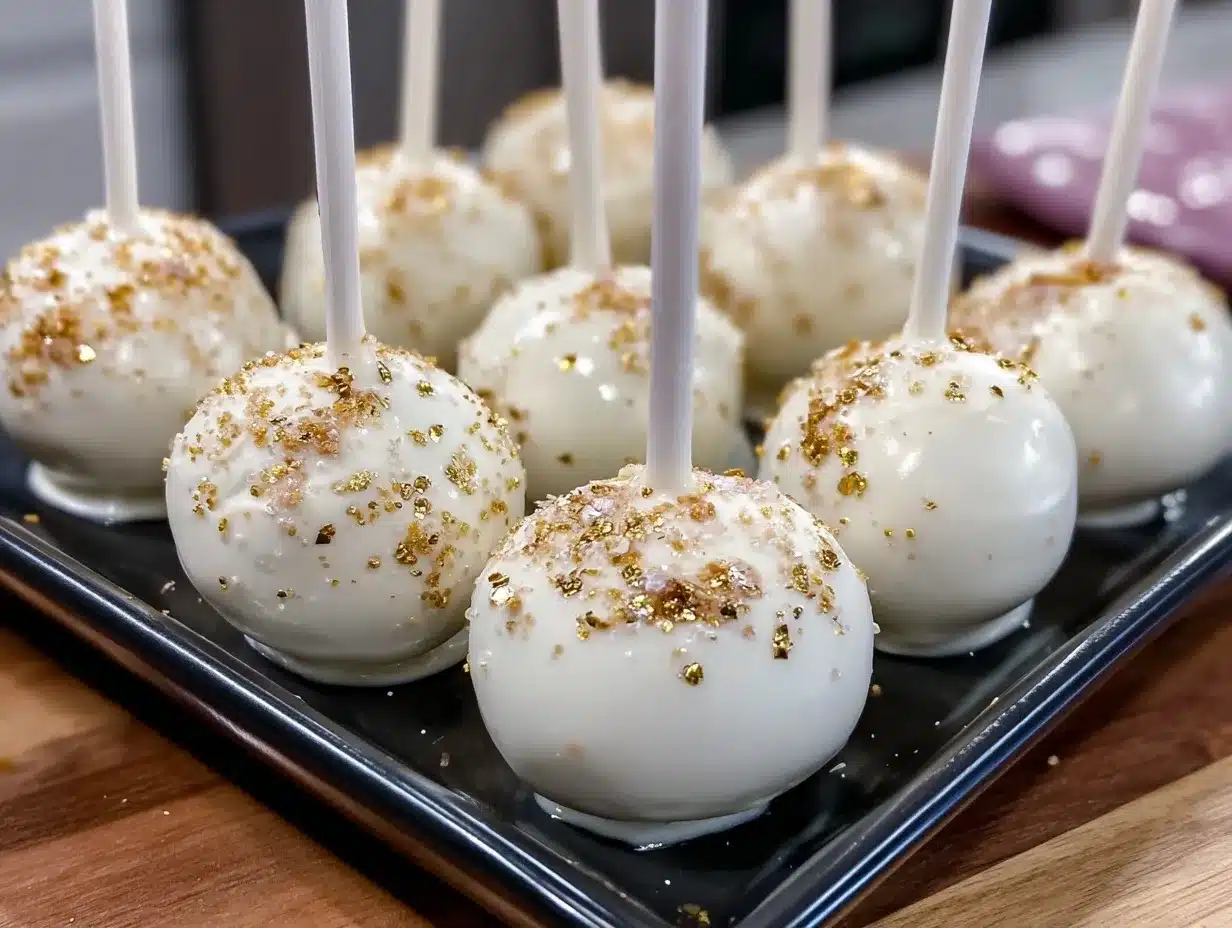
- Add the Gold Sparkle: While the coating is still wet, use a small, clean brush or a light sprinkle to dust the edible gold luster over the pops. The shimmer adds instant elegance and a little wow factor.
- Let Them Set: Allow the cake pops to sit at room temperature or refrigerate until fully set, about 30 minutes. Avoid stacking or moving them until firm.
Pro tip: If the cake balls start to crumble, it usually means the mixture needs more frosting or more chilling time. Also, if the chocolate thickens before you finish dipping, gently reheat it in short bursts.
Cooking Tips & Techniques
Making cake pops can be a bit fiddly, but a few tricks help keep things smooth:
- Use Room Temperature Ingredients: Both the cake and frosting should be at room temp for easier mixing and smoother texture.
- Chill Thoroughly: Don’t skip the chilling steps—they keep the cake balls firm and prevent them from falling apart during dipping.
- Don’t Overmix: When combining crumbs and frosting, mix just until combined. Overworking can make the balls dense and tough.
- Temper Your Chocolate: If you want a glossy finish that doesn’t crack, temper the white chocolate. But if you’re short on time, melting and stirring carefully works fine.
- Keep Your Hands Cool: Warm hands can soften the cake balls too much. Rolling with cool hands or wearing food-safe gloves helps.
- Practice Makes Perfect: The first few pops might be a little messy, but patience pays off. I still have a few “abstract art” pops from early attempts!
Multitasking tip: While the cake balls chill, prep your dipping station and melt the chocolate. Having everything ready speeds up the process and keeps the coating smooth.
Variations & Adaptations
Feel free to tweak these cake pops to fit your style and dietary needs:
- Flavor Twists: Mix cocoa powder into the cake crumbs for a chocolate version, or add a teaspoon of espresso powder to the frosting for a mocha kick.
- Seasonal Flavors: Swap edible gold dust for silver or colored shimmer to match different celebrations, like silver for winter graduations or pastels for spring.
- Dietary Swaps: Use gluten-free cake crumbs and dairy-free frosting/melting wafers for allergy-friendly options.
- Decorative Add-ons: Try drizzling dark chocolate over the white coating or adding tiny edible pearls for extra texture.
- Personal Favorite: I once added crushed pistachios into the coating for a subtle crunch and color contrast—the guests loved the unexpected twist.
Adjust cooking times slightly if using thicker coatings or different chocolates. Remember, the key is to keep the cake balls chilled and the coating smooth.
Serving & Storage Suggestions
Serve these cake pops at room temperature for the best flavor and texture. They look stunning arranged upright in a decorated vase or foam block—makes for a great centerpiece and easy grabbing.
They pair wonderfully with coffee, sparkling cider, or even a light dessert wine for grown-up celebrations. For a full dessert table, place them alongside fresh fruit, mini tarts, or macarons.
To store, keep them in an airtight container in the refrigerator for up to 5 days. If you want to keep them longer, freeze them in a single layer, then transfer to a sealed bag—thaw in the fridge before serving.
When reheating, avoid microwaving as it can melt the coating unevenly. Instead, bring them to room temp by leaving out for 15-20 minutes. Flavors tend to deepen and meld nicely after a day, so they’re perfect made a day ahead.
Nutritional Information & Benefits
Per cake pop (approximate): 150-180 calories, 6g fat, 25g carbohydrates, 2g protein.
The main ingredients—cake and frosting—are indulgent, but these pops are bite-sized, so portion control is easy. Using homemade or lightly sweetened frosting can reduce added sugars.
White chocolate provides some calcium, and you can boost nutrition by choosing cakes made with whole ingredients or adding nuts.
For dietary considerations, this recipe can be adapted gluten-free or dairy-free as mentioned. Be mindful of allergies to nuts or dairy depending on your toppings and coatings.
From a wellness perspective, these cake pops are a treat best enjoyed mindfully, but their small size means you can share the joy without overdoing it.
Conclusion
These Perfect Gold Sparkle Graduation Cake Pops for Elegant Celebrations are more than just dessert—they’re a little piece of joy on a stick. Whether you’re celebrating a milestone or just want to add a dash of glamour to your party, this recipe offers a reliable, delicious, and visually stunning option. I love how easy they are to customize and how they never fail to impress guests.
Go ahead and make them your own—try different flavors, coatings, or decorations to match your vibe. And don’t worry if your first batch isn’t flawless; the beauty is in the effort and the smiles they bring.
If you give this recipe a spin, I’d love to hear how you made it yours or any tips you picked up along the way. Sharing these moments and tweaks is what makes cooking fun and keeps these recipes alive.
Here’s to your next celebration shining bright!
FAQs
How long do cake pops stay fresh?
Cake pops stay fresh for about 5 days in the refrigerator when stored in an airtight container. They can be frozen for up to 2 months if wrapped well.
Can I use store-bought cake for the crumbs?
Yes! Store-bought cake works fine, just make sure it’s moist and not dry. Adjust the frosting amount if needed to achieve the right consistency.
What if my cake pops fall off the sticks?
Try dipping the stick tip in melted chocolate before inserting it into the cake ball—this acts as glue. Also, chilling the cake balls well before dipping helps keep them firm.
Can I use dark or milk chocolate instead of white chocolate?
Absolutely! Dark or milk chocolate can be used for coating. Keep in mind the flavor and color will change, and melting times may vary slightly.
How do I make the gold sparkle stay on better?
Apply the edible gold dust while the chocolate coating is still wet. Using a small brush to gently press the dust onto the surface helps it adhere better and look more vibrant.
Pin This Recipe!
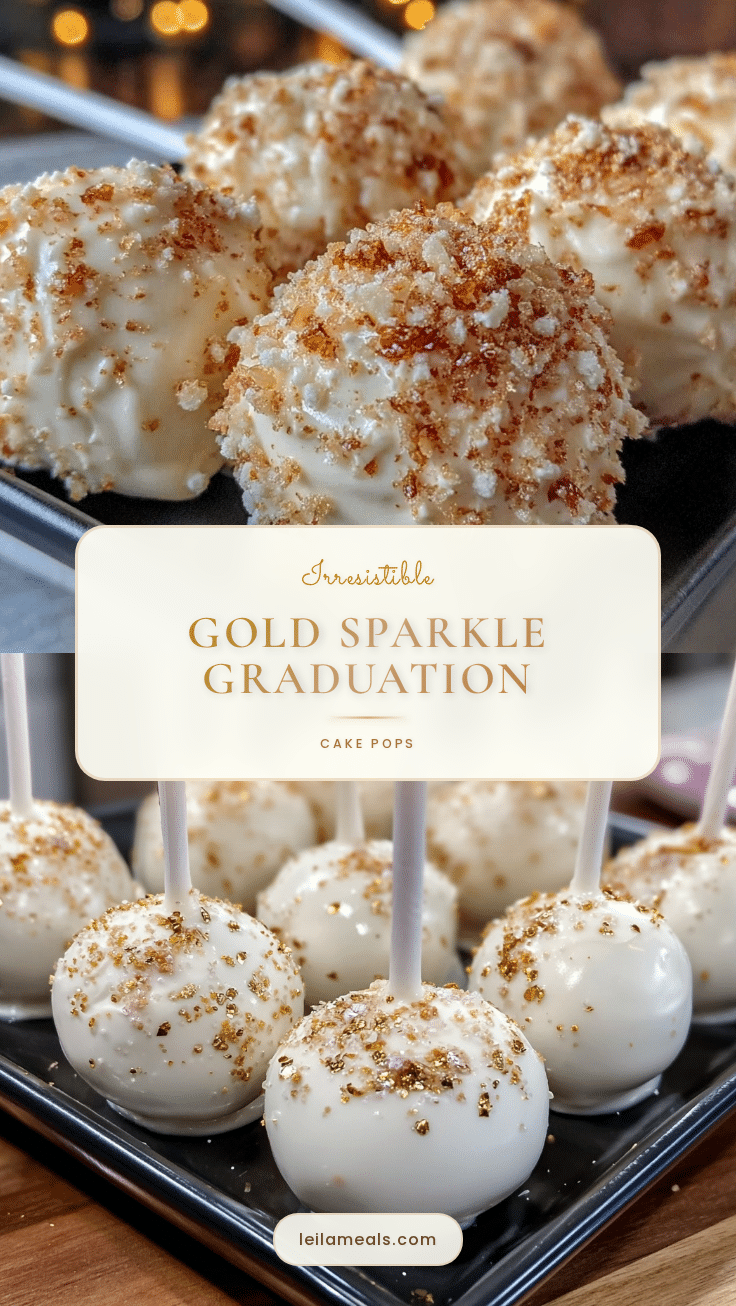
Perfect Gold Sparkle Graduation Cake Pops

Elegant and easy cake pops with a shimmering gold sparkle, perfect for graduation parties and celebrations. Moist cake centers coated in white chocolate with a subtle, upscale finish.
- Prep Time: 30 minutes
- Cook Time: 1 hour 30 minutes
- Total Time: 2 hours
- Yield: 20-25 cake pops 1x
- Category: Dessert
- Cuisine: American
Ingredients
- 4 cups (560g) cake crumbs (moist yellow or vanilla cake recommended)
- 1 cup (240g) buttercream or cream cheese frosting, softened
- 12 ounces (340g) white chocolate melting wafers
- 1–2 teaspoons edible gold luster dust
- 20–25 short lollipop sticks
- Optional: pinch of salt
Instructions
- Break cake into small pieces and pulse in a food processor or crumble by hand until fine and even (about 5 minutes).
- In a large bowl, combine cake crumbs and ¾ cup (180g) frosting; add more if needed. Mix until mixture holds together when pressed (5-7 minutes).
- Scoop about 1.5 tablespoons (20g) of mixture and roll into smooth balls. Place on parchment-lined baking sheet (about 15 minutes).
- Refrigerate cake balls for at least 1 hour or freeze for 20-30 minutes to firm up.
- Melt white chocolate wafers in microwave-safe bowl in 20-second bursts, stirring until smooth (3-5 minutes).
- Dip tip of each lollipop stick into melted chocolate, then insert halfway into each chilled cake ball. Freeze for 10 minutes to set.
- Dip each cake ball into melted white chocolate, covering completely. Tap off excess and place upright on parchment.
- While coating is wet, dust edible gold luster over cake pops using a small brush or sprinkle.
- Let cake pops set at room temperature or refrigerate until firm, about 30 minutes.
Notes
Use room temperature cake and frosting for easier mixing. Chill cake balls thoroughly to prevent crumbling. Temper chocolate for a glossy finish or melt carefully in microwave. If chocolate thickens, reheat gently. For gluten-free or dairy-free versions, use appropriate substitutions. Store cake pops in airtight container in refrigerator up to 5 days or freeze up to 2 months.
Nutrition
- Serving Size: 1 cake pop
- Calories: 150180
- Fat: 6
- Carbohydrates: 25
- Protein: 2
Keywords: cake pops, graduation cake pops, gold sparkle cake pops, white chocolate cake pops, elegant desserts, celebration treats