“Are these the little pumpkin ones?” my neighbor called over the fence, pointing at the container in my hand. I’d just walked outside to grab the mail, and there I was, caught red-handed with a batch of mini pumpkin whoopie pies I’d made that morning. She didn’t even wait for an answer — she just walked over, and I handed her one. That’s the thing about these little guys. They have a way of making people drop whatever they’re doing and come closer.
I first made these mini pumpkin whoopie pies a few falls ago, purely out of desperation for something that tasted like October but didn’t require a ton of effort. I wanted the cozy pumpkin spice vibe without the fuss of layer cakes or complicated frosting piping. And honestly? These little sandwich cookies deliver exactly that. They’re soft, they’re spiced, and that cream cheese filling in the middle? It’s the kind of creamy that makes you close your eyes for a second.
Every time I make them, someone asks for the recipe. I’ve brought them to pumpkin carving nights, fall brunches, and even a Halloween party where they disappeared faster than the candy bowl. There’s something about the combination of tender pumpkin cake and tangy-sweet filling that just works. No one can eat just one. And I say that from experience — I’ve tested that theory more times than I’d like to admit.
Why You’ll Love This Recipe
Let me tell you why these mini pumpkin whoopie pies have earned a permanent spot in my fall baking rotation. It’s not just because they’re cute (though they definitely are).
- Quick & Easy : From start to finish, you’re looking at about 30 minutes of active time. No chilling dough, no rolling pins, no fuss. Just mix, scoop, bake, and fill.
- Simple Ingredients : You probably already have most of these in your pantry. Canned pumpkin, flour, butter, cream cheese — nothing weird or hard to find.
- Perfect for Fall Gatherings : These are the kind of dessert that shows up at a potluck and immediately gets noticed. They’re festive without being over-the-top.
- Crowd-Pleaser : Kids love them because they’re basically little cake sandwiches. Adults love them because the cream cheese filling balances the sweetness perfectly.
- Unbelievably Delicious : The texture is what gets me every time. The pumpkin cakes come out soft and almost muffin-like, and that filling is pure silk.
What makes this recipe different from the dozens of other pumpkin whoopie pie recipes out there? I spent a solid three weekends tweaking the ratios to get the perfect balance. The cakes need to be sturdy enough to hold the filling without falling apart, but tender enough that they practically melt. And that cream cheese filling? I found that using a little bit of heavy cream instead of milk gives it a richness that’s just unreal. This isn’t just another version — it’s the one I’d serve to anyone who says they don’t like pumpkin desserts.
What Ingredients You Will Need
This recipe uses simple, wholesome ingredients to create those perfect little pumpkin cakes and that dreamy cream cheese filling. Most of these are pantry staples, especially if you’re already in fall baking mode.
For the Pumpkin Cakes
- All-purpose flour — 1 ¾ cups (210g). Spoon and level it for best results. Too much flour makes them dense.
- Baking soda — 1 teaspoon. Helps them rise and stay soft.
- Baking powder — ½ teaspoon. Extra lift for a lighter texture.
- Ground cinnamon — 1 ½ teaspoons. The backbone of the spice blend.
- Ground ginger — ½ teaspoon. Adds warmth without being spicy.
- Ground nutmeg — ¼ teaspoon. Freshly grated if you have it.
- Ground cloves — ¼ teaspoon. Just a tiny pinch goes a long way.
- Salt — ½ teaspoon. Balances the sweetness.
- Unsalted butter — ½ cup (113g), softened to room temperature.
- Light brown sugar — 1 cup (200g), packed. I like Domino brand for consistent moisture.
- Large egg — 1, room temperature. Cold eggs can seize the batter.
- Vanilla extract — 1 teaspoon. Pure, not imitation.
- Canned pumpkin puree — ¾ cup (180g). Not pumpkin pie filling! Make sure it’s 100% pure pumpkin.
- Buttermilk — ¼ cup (60ml). Adds tenderness. If you don’t have it, add 1 teaspoon of lemon juice to regular milk and let it sit for 5 minutes.
For the Cream Cheese Filling
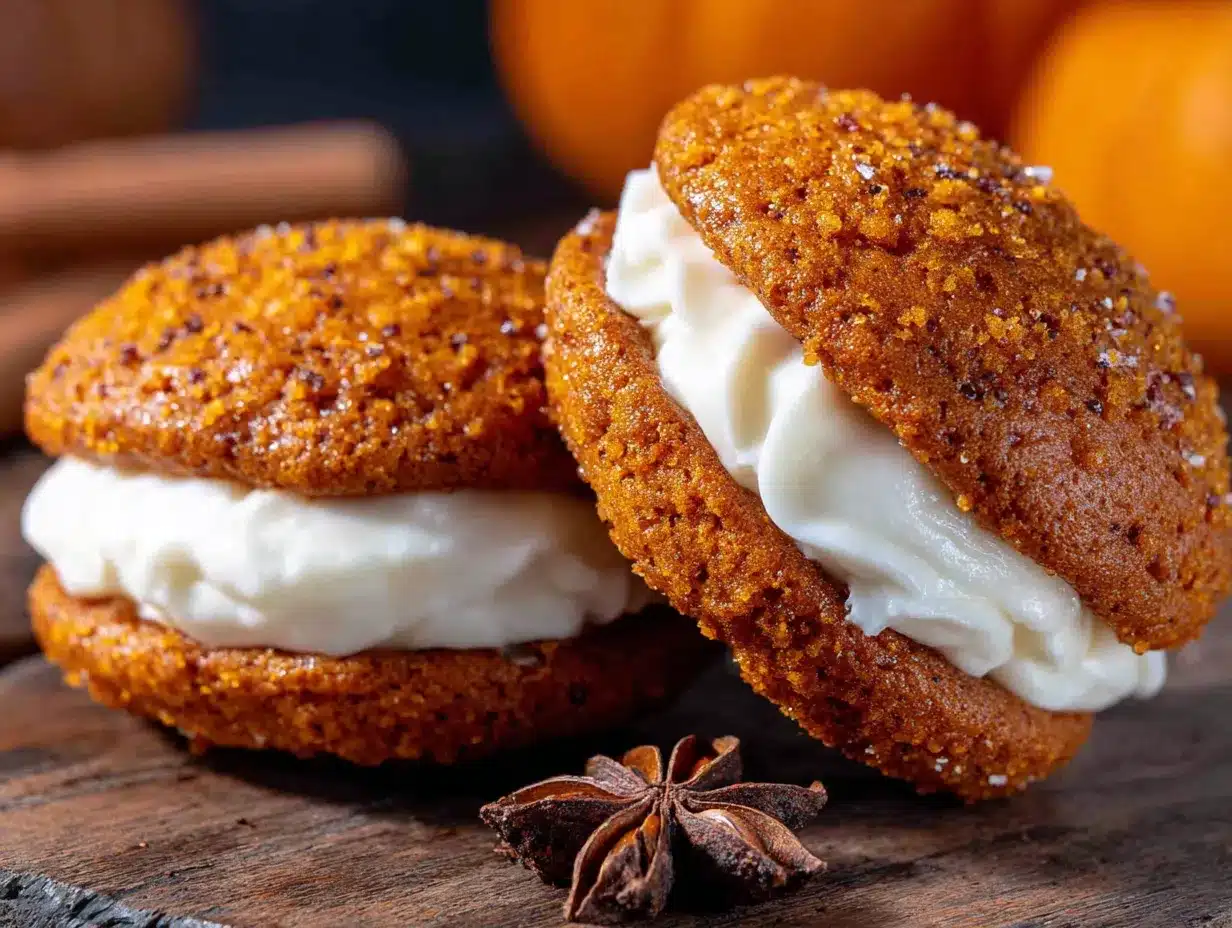
- Cream cheese — 8 ounces (226g), softened. Full-fat is best here — low-fat can make the filling runny.
- Unsalted butter — ¼ cup (56g), softened.
- Powdered sugar — 2 cups (240g), sifted if it’s lumpy.
- Vanilla extract — 1 teaspoon.
- Heavy cream — 2 tablespoons (30ml). This is my secret for a silky, pipeable filling.
- Pinch of salt — Just a tiny one to cut the sweetness.
Equipment Needed
You don’t need a fancy kitchen to make these mini pumpkin whoopie pies. Here’s what I use:
- Two baking sheets — Standard half-sheet pans work perfectly. I use Nordic Ware because they don’t warp in the oven.
- Parchment paper or silicone baking mats — Keeps the cakes from sticking and makes cleanup a breeze.
- Medium cookie scoop (about 1.5 tablespoons) — This is key for getting evenly sized cakes. A small ice cream scoop works too.
- Electric hand mixer or stand mixer — You can do this by hand, but a mixer makes the filling much smoother.
- Mixing bowls — One medium for dry ingredients, one large for wet ingredients.
- Whisk and rubber spatula — For combining everything without overmixing.
- Cooling rack — Let those cakes cool completely before filling, or the filling will melt right off.
- Piping bag with a round tip (or a zip-top bag with the corner snipped off) — Makes filling the pies so much neater.
If you don’t have a cookie scoop, just use two spoons — one to scoop and one to scrape. It’s a little messier, but it works. And honestly, I’ve used a butter knife to spread the filling in a pinch when I couldn’t find my piping bag. The pies still tasted amazing.
Preparation Method
Alright, let’s make these mini pumpkin whoopie pies. I promise it’s easier than it sounds.
Step 1: Preheat and Prep
Preheat your oven to 350°F (175°C). Line two baking sheets with parchment paper or silicone mats. This is non-negotiable — without parchment, the cakes will stick and you’ll be sad.
Step 2: Mix the Dry Ingredients
In a medium bowl, whisk together the flour, baking soda, baking powder, cinnamon, ginger, nutmeg, cloves, and salt. Set this aside. Whisking ensures everything is evenly distributed — nobody wants a bite with a pocket of baking soda.
Step 3: Cream the Butter and Sugar
In a large bowl, beat the softened butter and brown sugar together with an electric mixer on medium speed until light and fluffy, about 2 to 3 minutes. Scrape down the sides of the bowl halfway through. The mixture should look pale and slightly airy.
Step 4: Add the Wet Ingredients
Add the egg and vanilla extract to the butter mixture and beat until combined. Then add the pumpkin puree and buttermilk and mix on low speed until just incorporated. The batter might look a little curdled at this point — that’s totally normal. Don’t panic.
Step 5: Combine Wet and Dry
Gradually add the dry ingredients to the wet ingredients, mixing on low speed until just combined. Use a rubber spatula to give it a few final stirs from the bottom up. Do not overmix! Overmixing develops gluten and makes the cakes tough. A few small lumps are fine.
Step 6: Scoop and Bake
Using your cookie scoop, drop rounded scoops of batter onto the prepared baking sheets, spacing them about 2 inches apart. You should get about 24 to 28 scoops total. Bake one sheet at a time for 10 to 12 minutes, or until the cakes are set on top and a toothpick inserted into the center comes out clean. They should be slightly springy to the touch.
Step 7: Cool Completely
Let the cakes cool on the baking sheets for 5 minutes, then transfer them to a wire cooling rack. Let them cool completely before filling. I know it’s tempting, but warm cakes will turn your filling into a melty mess.
Step 8: Make the Filling
While the cakes are cooling, make the cream cheese filling. In a large bowl, beat the softened cream cheese and butter together on medium speed until smooth and creamy, about 2 minutes. Gradually add the powdered sugar, beating on low speed to avoid a sugar cloud. Add the vanilla extract, heavy cream, and a pinch of salt, then beat on medium-high speed for another 2 minutes until the filling is light, fluffy, and spreadable.
Step 9: Assemble the Whoopie Pies
Pair up the cooled cakes by size, matching them as closely as possible. Transfer the filling to a piping bag fitted with a round tip (or a zip-top bag with a corner snipped off). Pipe about 1 to 2 tablespoons of filling onto the flat side of one cake, then gently press another cake on top, flat side down. Don’t squish too hard — you want the filling to stay visible around the edges.
Step 10: Chill Before Serving
Place the assembled whoopie pies on a baking sheet and refrigerate for at least 30 minutes before serving. This helps the filling set and makes them easier to handle. Trust me on this one.
Cooking Tips & Techniques
Over the years, I’ve made plenty of mistakes with pumpkin whoopie pies so you don’t have to. Here’s what I’ve learned:
Don’t overbake the cakes. Pumpkin can make baked goods dry very quickly. Pull them out the minute a toothpick comes out clean. If you wait too long, you’ll end up with hockey pucks instead of soft cakes.
Use room temperature ingredients. This is huge. Cold cream cheese and butter won’t cream properly, and cold egg can make the batter seize. Set everything out on the counter about 30 minutes before you start baking.
Weigh your flour if you can. I know it’s an extra step, but flour is so easy to over-measure with cups. If you don’t have a scale, fluff the flour with a spoon, then spoon it into your measuring cup and level it off with a knife. No scooping directly into the bag.
Let the filling sit for a minute. After you beat the cream cheese filling, let it rest for 5 minutes before piping. This lets the air bubbles settle and gives you a smoother finish.
Chill between batches. If you’re making a double batch, pop the unfilled cakes in the fridge while you finish baking. They’re easier to pair and fill when they’re all completely cool.
Variations & Adaptations
One of the best things about this recipe is how easy it is to switch things up. Here are a few ways I’ve played with it:
Gluten-Free Version : Swap the all-purpose flour with a 1:1 gluten-free baking blend. I’ve had great results with Bob’s Red Mill. Add an extra tablespoon of buttermilk since gluten-free flours tend to absorb more moisture.
Dairy-Free Version : Use vegan butter and dairy-free cream cheese. Miyoko’s and Violife are my go-to brands. The filling won’t be quite as firm, so chill the pies for a full hour before serving.
Spice It Up : Add a pinch of cayenne pepper or chipotle powder to the dry ingredients. The heat plays beautifully with the pumpkin and cream cheese. I tried this on a whim last Halloween and it was a hit.
Chocolate Drizzle : Melt ½ cup of semisweet chocolate chips with 1 teaspoon of coconut oil and drizzle it over the assembled whoopie pies. It adds a nice crunch and looks gorgeous.
Maple Cream Filling : Replace the vanilla extract in the filling with 1 teaspoon of maple extract and reduce the powdered sugar by ¼ cup. Add 2 tablespoons of pure maple syrup instead. It’s a whole different vibe — very cozy.
Serving & Storage Suggestions
These mini pumpkin whoopie pies are best served chilled, straight from the fridge. The filling firms up beautifully and the cakes stay soft. If you’re serving them at a party, take them out about 10 minutes before you want to serve so they soften just a touch.
For a pretty presentation, arrange them on a cake stand or a wooden board with some fresh sage leaves or cinnamon sticks around them. They also look adorable stacked in a little pyramid.
These pair wonderfully with a warm cup of coffee or a creamy pumpkin chai latte for a cozy fall afternoon treat. If you’re planning a dessert spread, they go great alongside brown butter pumpkin snickerdoodles for a full pumpkin-themed table.
Storage : Keep the whoopie pies in an airtight container in the refrigerator for up to 5 days. Layer them with parchment paper between each layer so they don’t stick together.
Freezing : You can freeze the unfilled cakes for up to 3 months. Wrap them tightly in plastic wrap and then foil. When you’re ready, thaw them at room temperature, make fresh filling, and assemble. The filling doesn’t freeze well, so don’t freeze assembled pies.
Reheating : Honestly, I prefer them cold. But if you want a warm treat, pop an assembled whoopie pie in the microwave for about 8 seconds. Just 8 seconds — any longer and the filling gets too soft.
Nutritional Information & Benefits
Here’s the estimated nutritional breakdown for one mini pumpkin whoopie pie (based on 24 servings):
| Nutrient | Amount Per Serving |
|---|---|
| Calories | 185 |
| Total Fat | 9g |
| Saturated Fat | 5g |
| Cholesterol | 35mg |
| Sodium | 155mg |
| Total Carbohydrates | 25g |
| Dietary Fiber | 1g |
| Sugars | 17g |
| Protein | 3g |
Pumpkin is packed with vitamin A, fiber, and antioxidants. It’s also naturally low in calories, which means these whoopie pies are a little more forgiving than your average dessert. The cream cheese adds calcium and a bit of protein, too.
If you’re watching your sugar intake, you can reduce the brown sugar to ¾ cup and use a sugar substitute in the filling. Just note that the texture will be slightly different.
These are not gluten-free or dairy-free in their standard form, but the variations above cover both options. They do contain eggs and dairy, so keep that in mind for any allergies.
Conclusion
These mini pumpkin whoopie pies have become my go-to fall dessert for a reason. They’re simple enough for a weekday baking project but impressive enough to bring to a party. The combination of soft, spiced pumpkin cake and creamy, tangy filling is just unbeatable. Every time I make them, I’m reminded why fall is the best season for baking.
I’d love to hear how yours turn out. Did you try any of the variations? Did you add a chocolate drizzle or go with the maple cream filling? Drop a comment below and let me know. And if you share a photo on social media, tag me — I always love seeing your creations.
Go ahead, make a batch. Your kitchen is about to smell amazing. And trust me, once you pop one of these little guys in your mouth, you’ll understand why I can’t stop making them.
Frequently Asked Questions
Can I use fresh pumpkin instead of canned?
Yes, you can! Just make sure to roast and puree the pumpkin first, then drain it in a fine-mesh strainer lined with cheesecloth for at least an hour. Fresh pumpkin has more water than canned, so draining is crucial to avoid soggy cakes.
Why did my whoopie pies turn out flat?
This usually happens if your baking soda or baking powder is old. Check the expiration dates! Also, make sure your butter and sugar are creamed properly — that step adds the air that helps the cakes rise.
Can I make these ahead of time?
Absolutely. You can bake the cakes up to 2 days in advance and store them in an airtight container at room temperature. Make the filling and assemble the day you plan to serve them for the best texture.
How do I keep the filling from sliding out?
Make sure your cakes are completely cool before filling, and don’t overfill them. About 1 to 2 tablespoons of filling per pie is plenty. Chilling the assembled pies for at least 30 minutes also helps the filling set.
Can I double this recipe?
Yes, and I do it all the time. Just make sure you bake one sheet at a time so the oven temperature stays consistent. You can also freeze the extra unfilled cakes for later — just wrap them well and thaw before filling.
PrintPerfect Mini Pumpkin Whoopie Pies with Cream Cheese Filling
Soft, spiced pumpkin cakes sandwiched with a silky cream cheese filling. These mini whoopie pies are quick to make, perfect for fall gatherings, and absolutely irresistible.
- Prep Time: 30 minutes
- Cook Time: 12 minutes
- Total Time: 1 hour 12 minutes
- Yield: 12 servings (24 mini whoopie pies) 1x
- Category: Dessert
- Cuisine: American
Ingredients
- 1 ¾ cups (210g) all-purpose flour
- 1 teaspoon baking soda
- ½ teaspoon baking powder
- 1 ½ teaspoons ground cinnamon
- ½ teaspoon ground ginger
- ¼ teaspoon ground nutmeg
- ¼ teaspoon ground cloves
- ½ teaspoon salt
- ½ cup (113g) unsalted butter, softened
- 1 cup (200g) light brown sugar, packed
- 1 large egg, room temperature
- 1 teaspoon vanilla extract
- ¾ cup (180g) canned pumpkin puree (not pumpkin pie filling)
- ¼ cup (60ml) buttermilk
- 8 ounces (226g) cream cheese, softened
- ¼ cup (56g) unsalted butter, softened
- 2 cups (240g) powdered sugar, sifted
- 1 teaspoon vanilla extract
- 2 tablespoons (30ml) heavy cream
- Pinch of salt
Instructions
- Preheat oven to 350°F (175°C). Line two baking sheets with parchment paper or silicone mats.
- In a medium bowl, whisk together flour, baking soda, baking powder, cinnamon, ginger, nutmeg, cloves, and salt. Set aside.
- In a large bowl, beat softened butter and brown sugar with an electric mixer on medium speed until light and fluffy, about 2-3 minutes. Scrape down sides halfway through.
- Add egg and vanilla extract to butter mixture; beat until combined. Add pumpkin puree and buttermilk; mix on low until just incorporated. Batter may look curdled.
- Gradually add dry ingredients to wet ingredients, mixing on low until just combined. Use a rubber spatula to fold a few times. Do not overmix.
- Using a medium cookie scoop (about 1.5 tablespoons), drop rounded scoops of batter onto prepared baking sheets, spacing 2 inches apart. You should get 24-28 scoops.
- Bake one sheet at a time for 10-12 minutes, until cakes are set on top and a toothpick inserted in center comes out clean. Cool on baking sheets for 5 minutes, then transfer to a wire rack to cool completely.
- While cakes cool, make filling: In a large bowl, beat softened cream cheese and butter on medium speed until smooth and creamy, about 2 minutes. Gradually add powdered sugar, beating on low. Add vanilla extract, heavy cream, and pinch of salt; beat on medium-high for 2 minutes until light and fluffy.
- Pair cooled cakes by size. Transfer filling to a piping bag fitted with a round tip (or zip-top bag with corner snipped). Pipe about 1-2 tablespoons of filling onto flat side of one cake; gently press another cake on top, flat side down.
- Place assembled whoopie pies on a baking sheet and refrigerate for at least 30 minutes before serving.
Notes
Use room temperature ingredients for best results. Do not overbake the cakes. Chill assembled pies for at least 30 minutes before serving. For gluten-free, use a 1:1 gluten-free flour blend and add an extra tablespoon of buttermilk. For dairy-free, use vegan butter and dairy-free cream cheese. The filling does not freeze well, so freeze unfilled cakes only.
Nutrition
- Serving Size: 1 mini whoopie pie
- Calories: 185
- Sugar: 17
- Sodium: 155
- Fat: 9
- Saturated Fat: 5
- Carbohydrates: 25
- Fiber: 1
- Protein: 3
Keywords: pumpkin whoopie pies, mini whoopie pies, cream cheese filling, fall dessert, pumpkin dessert, whoopie pie recipe


