“Hey, are you bringing dessert tomorrow?” my friend texted out of the blue one evening, just as I was contemplating what to whip up for the weekend barbecue. Honestly, I was about to pull a classic move—grab something from the store—but that nagging feeling of wanting to make something homemade nudged me away from the easy route. I scanned my fridge and pantry, looking for inspiration, and there they were: fresh strawberries and blueberries, leftover from a quick breakfast. Suddenly, the idea of a Perfect Berry Flag Cheesecake Bars with Cream Cheese Frosting popped into my head.
I was skeptical at first—could a simple dessert like this really wow a crowd? But as I pulled out my trusty baking pan and started layering the cream cheese mixture with the berries in that iconic flag pattern, something about the process felt calming. There’s a quiet satisfaction in frosting the bars just right, seeing the red and blue berries pop against the creamy white layer. By the time the bars cooled and I took the first bite, it was clear this recipe wasn’t just a last-minute fix—it was going to be a staple.
It’s funny how a spontaneous text and a few humble ingredients turned into something that people kept asking about well after the party ended. I guess nothing beats a dessert that’s both easy and visually impressive, especially when the flavors deliver that perfect balance of sweet, tangy, and creamy. That’s why these berry flag cheesecake bars stick around in my recipe box—they’re more than just a dessert; they’re a little piece of summer and celebration that you can make anytime.
Why You’ll Love This Recipe
Making these Perfect Berry Flag Cheesecake Bars with Cream Cheese Frosting has been one of those kitchen wins I keep going back to, and here’s why:
- Quick & Easy: The whole recipe comes together in under an hour, making it perfect for those last-minute get-togethers or when you just want something sweet without fuss.
- Simple Ingredients: No need for specialty stores—everything comes from your pantry or local market. I usually grab my cream cheese from Philadelphia for that classic creamy texture.
- Perfect for Celebrations: Whether it’s Independence Day, family brunches, or casual barbecues, the flag design adds a festive touch without extra effort.
- Crowd-Pleaser: Kids and adults alike love these bars—maybe because of the creamy base, or the juicy burst from fresh berries, but they’re always a hit.
- Unbelievably Delicious: The cream cheese frosting isn’t overly sweet, just smooth and tangy, which pairs beautifully with the fresh berries and buttery crust.
What makes this recipe stand out? It’s the layering technique—spreading the cream cheese frosting smoothly, then thoughtfully placing berries to create that iconic flag pattern. It’s not just a dessert, it’s a little edible art that tastes as good as it looks. Plus, swapping out traditional heavy cream for a lighter version in the frosting keeps it from feeling too dense.
Honestly, this recipe captures that comforting vibe of cheesecake but in a bar form that’s super shareable and easy to serve. I’ve found it’s also a fun way to bring a bit of joy to any occasion, even if it’s just a quiet afternoon treat. And if you’re curious about other crowd-pleasing, easy-to-make recipes, the stuffed sweet potatoes with black beans are a fantastic savory side you might enjoy alongside your dessert.
What Ingredients You Will Need
This recipe uses simple, wholesome ingredients that come together to give a bold flavor and satisfying texture without much fuss. Most of these are pantry staples, and the fresh berries add just the right pop of color and freshness.
- For the crust:
- 1 ½ cups graham cracker crumbs (about 12 full sheets, finely crushed)
- ⅓ cup unsalted butter, melted (adds richness and helps bind the crust)
- ¼ cup granulated sugar (balances the buttery flavor)
- For the cheesecake layer:
- 16 oz (450 g) cream cheese, softened (Philadelphia brand works well for smooth texture)
- ⅓ cup granulated sugar
- 1 large egg, room temperature
- 1 tsp vanilla extract (adds a warm, sweet aroma)
- ½ cup sour cream (for extra creaminess and a slight tang)
- For the cream cheese frosting:
- 8 oz (225 g) cream cheese, softened
- ¼ cup unsalted butter, softened
- 1 ½ cups powdered sugar, sifted (for smooth, lump-free frosting)
- 1 tsp vanilla extract
- 1-2 tbsp milk (optional, to adjust frosting consistency)
- For the berry flag topping:
- 1 cup fresh strawberries, sliced (choose firm, ripe berries)
- 1 cup fresh blueberries (washed and dried carefully)
- Optional: fresh raspberries for added red color or texture
Pro tip: If fresh berries are out of season, frozen works too—just thaw and drain excess liquid to avoid soggy topping. For a gluten-free crust, swapping graham crackers with almond flour or gluten-free cookie crumbs works nicely. And if you want a dairy-free alternative, try using a vegan cream cheese substitute and coconut oil for the crust.
Equipment Needed
- 9×13 inch (23×33 cm) baking pan – glass or metal; I prefer glass because it heats evenly and lets me check the crust’s browning
- Mixing bowls – one large for the batter, one medium for the frosting
- Electric mixer or stand mixer – helps get that smooth, creamy texture in the cheesecake and frosting
- Spatula – for spreading the batter and frosting evenly
- Measuring cups and spoons – accuracy matters for balance in the crust and filling
- Knife – to slice strawberries evenly
- Wire rack – for cooling the cheesecake bars after baking
If you don’t have an electric mixer, a sturdy whisk and some arm power can get the job done, but it’ll take a bit longer. For budget-friendly options, silicone spatulas are great because they’re easy to clean and flexible for scraping every bit of batter or frosting out of the bowl.
Preparation Method
- Prepare the crust: Preheat your oven to 350°F (175°C). In a medium bowl, combine 1 ½ cups graham cracker crumbs, ⅓ cup melted unsalted butter, and ¼ cup granulated sugar. Mix until the crumbs are evenly coated and feel like wet sand. Press this mixture firmly and evenly into the bottom of your 9×13 inch baking pan. Use the back of a measuring cup for a smooth, compact crust layer. Bake for 8-10 minutes until it’s just starting to turn golden. Remove from oven and let cool slightly while you prepare the filling.
- Make the cheesecake filling: In a large bowl, beat 16 oz softened cream cheese with ⅓ cup granulated sugar until smooth and creamy—no lumps! Add 1 large egg and 1 teaspoon vanilla extract, continuing to beat until fully incorporated. Fold in ½ cup sour cream by hand, mixing gently to maintain that silky texture. Pour the filling over the warm crust, smoothing the top with a spatula. Bake for 25-30 minutes, until the edges are set but the center still jiggles slightly when you shake the pan.
- Cool the cheesecake: Let the cheesecake bars cool completely at room temperature, then pop them into the fridge for at least 3 hours (or overnight) to firm up. This chilling step is crucial for clean slices and that perfect creamy bite.
- Prepare the cream cheese frosting: In a medium bowl, beat 8 oz softened cream cheese with ¼ cup softened butter until fluffy. Gradually add 1 ½ cups sifted powdered sugar and 1 teaspoon vanilla extract. Beat until smooth and spreadable. Add milk 1 teaspoon at a time if the frosting feels too thick.
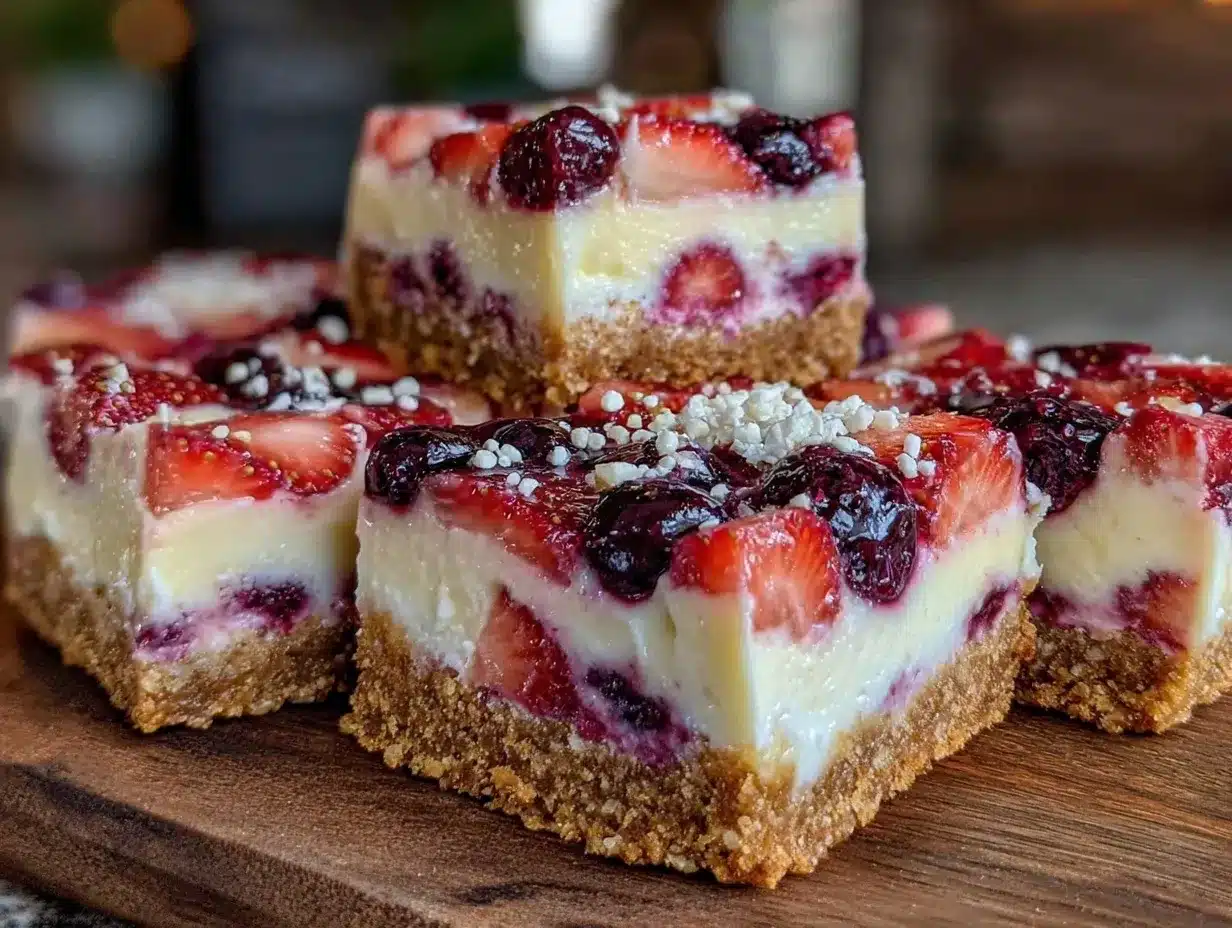
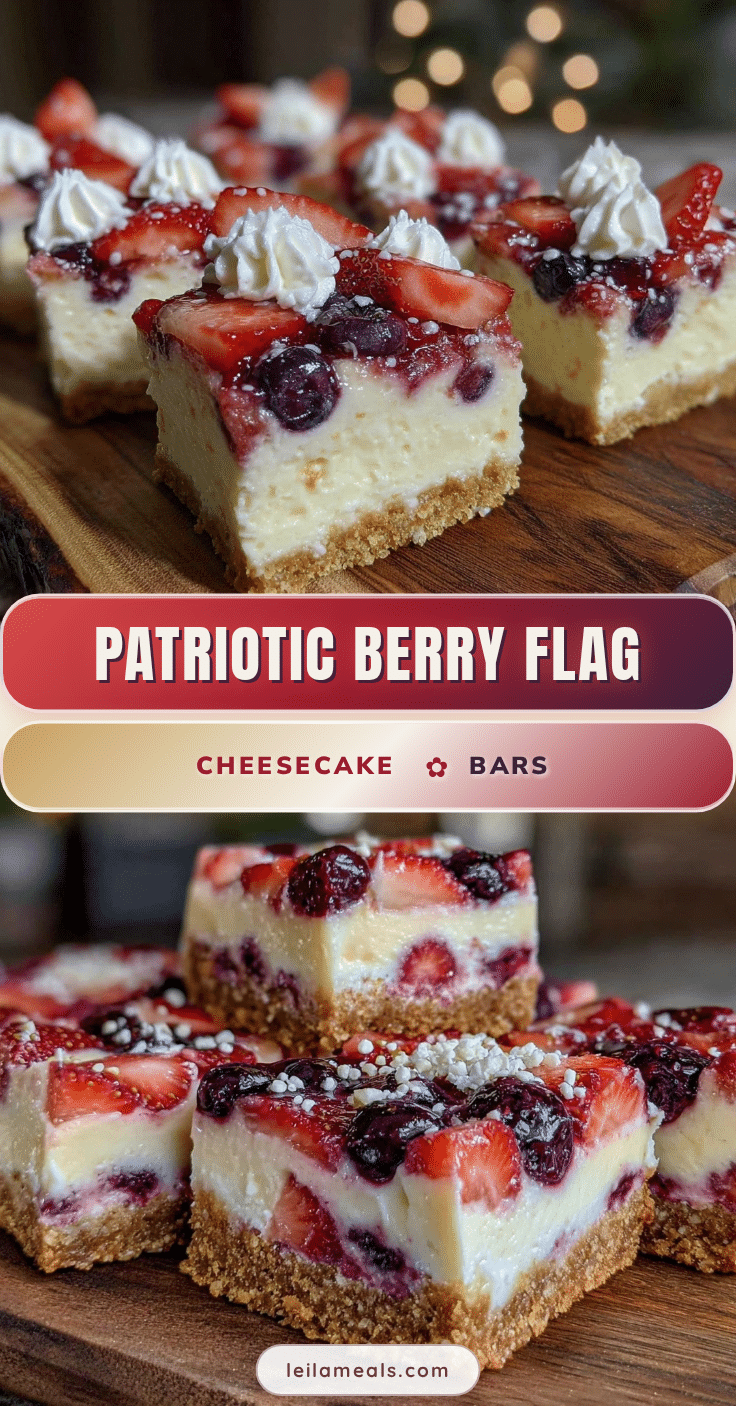
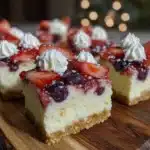
- Assemble the berry flag: Spread the cream cheese frosting evenly over the chilled cheesecake bars. Arrange sliced strawberries in three horizontal rows on one side, then create a block of blueberries in the top left corner to mimic the star field of the flag. Finish with a bottom row of strawberries. Take your time here—the visual appeal is part of the charm.
- Chill again before serving: Place the assembled bars back in the fridge for at least 30 minutes to let the frosting set. This will also help the berries stay fresh and vibrant.
- Slice and serve: Use a sharp knife dipped in warm water and wiped dry between cuts for clean slices. Expect about 12-16 bars depending on size.
Watch for common pitfalls like overbaking the cheesecake—it shouldn’t be fully firm when you take it out, or it’ll dry out. And don’t skip chilling; trust me, it makes all the difference. If you want a faster dessert, you might like this decadent lava chocolate fondant recipe I recently perfected—it’s quick and impressively gooey!
Cooking Tips & Techniques
There’s a few little tricks I’ve picked up making these berry flag cheesecake bars that might save you some headaches:
- Softened cream cheese is key: Try to have your cream cheese at room temperature for at least 30 minutes before mixing. This avoids lumps and gives a smoother filling.
- Don’t overmix: Once you add the egg, mix just until combined. Overbeating can cause cracks in the cheesecake.
- Bake in the center of the oven: This avoids hot spots and uneven cooking. I usually rotate the pan halfway through baking for even browning.
- Use a water bath (optional): If you want ultra-smooth cheesecake, place your baking pan inside a larger pan with a little hot water. It helps prevent cracks but isn’t necessary for bars.
- Chill thoroughly: I learned the hard way that slicing warm cheesecake bars results in messy edges. Patience here pays off.
- Arrange berries gently: Rinsing and drying berries carefully prevents sogginess. I also slice strawberries evenly so they lay flat and look neat.
Once, I tried to rush the frosting step and spread it on warm cheesecake—big mistake. The frosting softened and slid right off. Lesson learned: always chill first! If you’re juggling multiple dishes, like prepping a quick creamy coconut curry shrimp for dinner, make these bars ahead of time—they keep beautifully in the fridge for a day or two.
Variations & Adaptations
This recipe is pretty flexible, so you can tweak it to suit different dietary needs or flavor preferences:
- Gluten-Free: Swap graham cracker crumbs for almond flour or gluten-free cookie crumbs for the crust. It tastes just as good, maybe even better if you like nutty flavors.
- Vegan Option: Use vegan cream cheese and butter substitutes, plus a flax egg (1 tbsp ground flaxseed mixed with 3 tbsp water) instead of a real egg. The texture will be slightly different but still satisfying.
- Seasonal Fruits: In fall or winter, swap berries for sliced kiwi, mango, or pomegranate seeds for a colorful twist. I once added a swirl of peach preserves under the frosting for a summer variation that was a hit.
- Flavor Boost: Add a teaspoon of lemon zest to the cheesecake filling for a fresh zing. It brightens the flavor and pairs beautifully with the berries.
- Alternative Frosting: If you want something lighter, try whipped cream mixed with cream cheese instead of the full frosting. It’s less sweet but still creamy and delicious.
Serving & Storage Suggestions
These cheesecake bars are best served chilled but taken out of the fridge about 10 minutes before slicing to soften slightly. That little window lets the flavors bloom and makes cutting easier.
They look fabulous on a festive platter, especially with a few extra berries scattered around for color. Pair them with a cup of coffee or a glass of sparkling lemonade for a refreshing combo.
Store leftovers in an airtight container in the refrigerator for up to 4 days. Because of the fresh berries, freezing isn’t recommended—they tend to get mushy when thawed. When reheating just a slice, a few seconds in the microwave (about 10-15 seconds) softens the frosting without melting it completely.
Interestingly, the flavors meld beautifully after a day in the fridge, so sometimes I make them a day ahead and let the cream cheese and berries hang out together overnight. It’s a subtle but lovely change.
Nutritional Information & Benefits
Each bar is a modest indulgence, approximately 250-300 calories depending on size. The cream cheese and butter contribute richness and fat, while the berries add fiber, antioxidants, and vitamin C.
This dessert is gluten-friendly if you use gluten-free crumbs, and can be adapted to be lower sugar by reducing the powdered sugar in the frosting or using a sugar substitute. The fresh berries keep it feeling lighter and less heavy than traditional cheesecakes.
From a wellness perspective, I appreciate that this recipe balances indulgence with real fruit, so you get a hit of sweetness plus some nutrition in every bite. Plus, because it’s homemade, you can control the ingredients and avoid preservatives found in many store-bought desserts.
Conclusion
Making these Perfect Berry Flag Cheesecake Bars with Cream Cheese Frosting has become one of those simple pleasures that feels special every time. The bright berries, creamy frosting, and buttery crust come together in a way that’s both comforting and festive—without hours in the kitchen.
Feel free to play around with your favorite berries or try the variations to make the recipe your own. I love how this dessert brings people together, whether for holiday gatherings or casual weekend treats. It’s proof that a few quality ingredients and a bit of care can yield impressive results.
If you give this recipe a try, I’d love to hear how it went—drop a comment or share your own berry flag creations! And if you’re looking for a savory dish to balance this sweet treat, the crispy sweet potato hash is a fantastic side you can make any time.
Happy baking, and here’s to many more delicious moments in your kitchen!
FAQs
Can I make these cheesecake bars ahead of time?
Yes! They actually taste better after chilling overnight, which helps the flavors meld and makes slicing cleaner.
What’s the best way to store leftover bars?
Keep them in an airtight container in the fridge for up to 4 days. Avoid freezing because the berries can get mushy after thawing.
Can I use frozen berries for the flag topping?
Absolutely. Just thaw and drain them well to remove excess moisture before arranging on the frosting.
Is there a way to make this recipe dairy-free?
Yes, use vegan cream cheese and butter substitutes and a flax egg in place of the regular egg for a dairy-free and vegan-friendly version.
How do I get clean slices when cutting the bars?
Use a sharp knife dipped in warm water and wiped dry between slices. This helps cut through the creamy layers smoothly without dragging.
Pin This Recipe!
Perfect Berry Flag Cheesecake Bars Easy Homemade Recipe with Cream Cheese Frosting
These cheesecake bars feature a buttery graham cracker crust, creamy cheesecake layer, smooth cream cheese frosting, and a festive berry flag topping. Perfect for celebrations and easy to make in under an hour.
- Prep Time: 20 minutes
- Cook Time: 35 minutes
- Total Time: 4 hours 5 minutes
- Yield: 12-16 bars 1x
- Category: Dessert
- Cuisine: American
Ingredients
- 1 ½ cups graham cracker crumbs (about 12 full sheets, finely crushed)
- ⅓ cup unsalted butter, melted
- ¼ cup granulated sugar
- 16 oz cream cheese, softened
- ⅓ cup granulated sugar
- 1 large egg, room temperature
- 1 tsp vanilla extract
- ½ cup sour cream
- 8 oz cream cheese, softened
- ¼ cup unsalted butter, softened
- 1 ½ cups powdered sugar, sifted
- 1 tsp vanilla extract
- 1–2 tbsp milk (optional)
- 1 cup fresh strawberries, sliced
- 1 cup fresh blueberries
- Optional: fresh raspberries
Instructions
- Preheat oven to 350°F (175°C). In a medium bowl, combine graham cracker crumbs, melted butter, and granulated sugar. Mix until crumbs are evenly coated and feel like wet sand. Press firmly and evenly into the bottom of a 9×13 inch baking pan. Bake for 8-10 minutes until golden. Remove and let cool slightly.
- In a large bowl, beat softened cream cheese with granulated sugar until smooth and creamy. Add egg and vanilla extract, beat until incorporated. Fold in sour cream gently. Pour filling over warm crust and smooth the top. Bake for 25-30 minutes until edges are set but center jiggles slightly.
- Let cheesecake bars cool completely at room temperature, then refrigerate for at least 3 hours or overnight to firm up.
- In a medium bowl, beat softened cream cheese with softened butter until fluffy. Gradually add powdered sugar and vanilla extract, beat until smooth and spreadable. Add milk 1 teaspoon at a time if frosting is too thick.
- Spread cream cheese frosting evenly over chilled cheesecake bars. Arrange sliced strawberries in three horizontal rows on one side, create a block of blueberries in the top left corner, and finish with a bottom row of strawberries to mimic a flag.
- Chill assembled bars in the fridge for at least 30 minutes to set frosting and keep berries fresh.
- Use a sharp knife dipped in warm water and wiped dry between cuts to slice into 12-16 bars depending on size. Serve chilled.
Notes
Use softened cream cheese at room temperature to avoid lumps. Do not overmix after adding the egg to prevent cracks. Bake in the center of the oven and rotate pan halfway for even browning. Chill thoroughly before frosting and slicing for clean cuts. Frozen berries can be used if thawed and drained well. For gluten-free crust, substitute graham crackers with almond flour or gluten-free crumbs. For dairy-free, use vegan cream cheese and butter substitutes and a flax egg.
Nutrition
- Serving Size: 1 bar (approximate)
- Calories: 275
- Sugar: 18
- Sodium: 220
- Fat: 18
- Saturated Fat: 10
- Carbohydrates: 25
- Fiber: 2
- Protein: 5
Keywords: cheesecake bars, berry flag dessert, cream cheese frosting, easy cheesecake, patriotic dessert, summer dessert, berry cheesecake bars