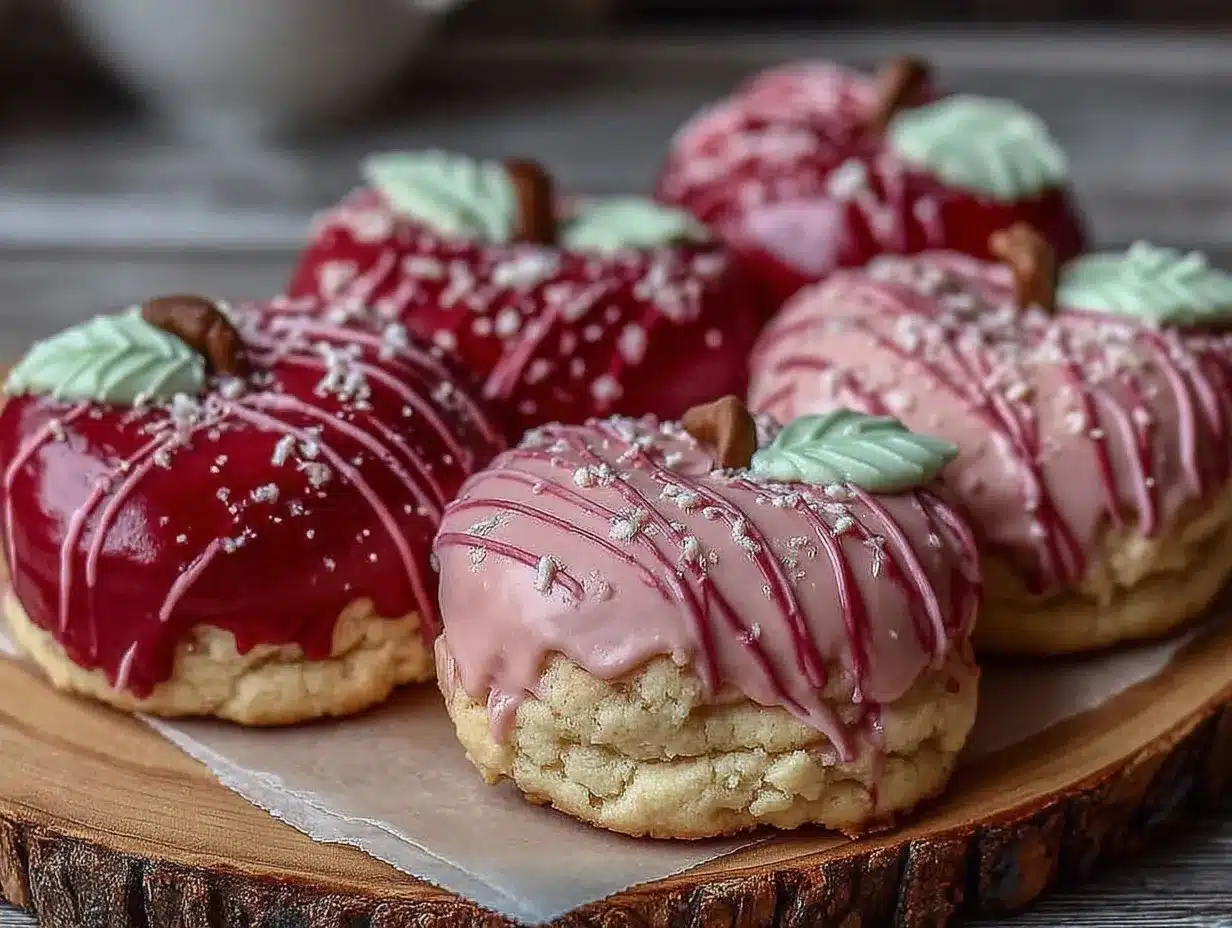
“Are you sure these are store-bought?” my coworker asked, eyes wide as she eyed the basket I’d brought to the office potluck. Honestly, I wasn’t expecting much when I first tried this recipe for perfect apple shaped sugar cookies with royal icing. It was one of those afternoons when I just wanted something sweet but simple, and well, I messed up the dough measurements a bit. Instead of throwing it out, I rolled with it—and somehow, these charming apple-shaped cookies emerged.
The crisp edges, the gentle sweetness of the cookie, and that smooth, glossy royal icing that I had nervously piped on made the whole batch disappear faster than I anticipated. I mean, I’m not really a baker, so the fact that these turned out looking almost professional was a surprise—even to me. The whole kitchen smelled faintly of vanilla and sugar as I decorated them late into the evening, and that quiet moment made me realize these cookies weren’t just treats; they were little pockets of joy shaped like apples.
Since then, I’ve made these cookies countless times, tweaking the icing consistency and perfecting the dough so that the results are reliably delightful. It’s become my go-to when I want to impress without stress—plus, they add a cute touch to any gathering, especially when paired with a warm cup of tea or cider. This recipe stuck because it’s approachable, forgiving, and honestly, a bit addictive. Once you get the hang of the icing, you’ll see what I mean.
Why You’ll Love This Recipe
Making perfect apple shaped sugar cookies with royal icing isn’t just about baking; it’s about creating something that feels special without requiring a full day in the kitchen. Here’s why this recipe has earned a spot in my rotation:
- Quick & Easy: The dough comes together in under 20 minutes, and the cookies bake in just 10 minutes—a perfect combo for busy afternoons or last-minute celebrations.
- Simple Ingredients: No obscure baking supplies here. You’ll mostly find these in your pantry already, like all-purpose flour, powdered sugar, and classic vanilla extract.
- Perfect for Seasonal Celebrations: Whether it’s back-to-school, fall parties, or teacher appreciation days, these apple-shaped cookies fit right in with the vibe.
- Crowd-Pleaser: From kids who love the fun shapes to adults who appreciate the balance of sweet and buttery, these cookies always get rave reviews.
- Unbelievably Delicious: The buttery, tender crumb paired with smooth royal icing hits that nostalgic spot—like a classic sugar cookie but with a polished finish.
What sets this recipe apart is the royal icing tutorial that’s tailored for beginners. You don’t need fancy piping bags or years of experience to get that smooth, shiny look on your cookies. I’ve included tips that helped me go from “yikes” to “wow” after just a few tries. Plus, the subtle apple shape is a fun twist without being overly complicated—making these cookies both charming and approachable.
These cookies aren’t just sweets; they’re little moments of pride you can share, whether you’re gifting them or simply enjoying a quiet break. The combination of buttery dough and glossy icing makes every bite feel like a small celebration.
What Ingredients You Will Need
This recipe uses simple, wholesome ingredients to deliver bold flavor and satisfying texture without fuss. Most of these are pantry staples, and substitutions are easy if you need them.
- For the Sugar Cookie Dough:
- 2 ¾ cups (345 g) all-purpose flour, sifted (I prefer King Arthur Flour for consistent results)
- 1 tsp baking powder
- ½ tsp salt
- 1 cup (227 g) unsalted butter, softened (use European-style butter if you want extra richness)
- 1 ½ cups (300 g) granulated sugar
- 1 large egg, room temperature
- 2 tsp pure vanilla extract
- 2 tbsp whole milk (or almond milk for dairy-free)
- For the Royal Icing:
- 3 cups (360 g) powdered sugar, sifted
- 2 large egg whites (or 4 tbsp meringue powder mixed with 6 tbsp water for safer option)
- 1 tsp lemon juice (helps with consistency and flavor)
- Gel food coloring: red, green, and brown (optional, for apple and stem colors)
- 1 tsp vanilla or almond extract (optional, for flavor)
For the apple shape, I recommend using a sturdy, medium-sized cookie cutter—nothing too flimsy, so the edges stay crisp during baking. If you don’t have an apple cutter, you can use a simple round cutter and carve the stem with a small knife after cutting.
Substitution tips: Feel free to swap all-purpose flour for a gluten-free blend if needed, but expect a slightly different texture. For the royal icing, meringue powder is a great alternative to raw egg whites, especially if you’re cautious about food safety.
Equipment Needed
- Stand mixer or hand mixer – makes creaming the butter and sugar much easier
- Mixing bowls – at least two, one for dough and one for icing
- Rolling pin – essential for evenly rolling out the cookie dough
- Apple-shaped cookie cutter (or a small knife for shaping)
- Baking sheets lined with parchment paper or silicone baking mats
- Cooling racks – to prevent soggy bottoms and help cookies cool evenly
- Piping bags with small round tips (or zip-top bags with a tiny corner cut) for royal icing
- Small bowls or cups for mixing food coloring into icing
For budget-friendly options, you can skip a stand mixer and use a sturdy hand whisk or wooden spoon, but it’ll take more elbow grease. I’ve tried both, and while the stand mixer saves time, the hand mixer gets the job done just fine.
Keep your rolling pin well-floured and clean the cookie cutter between uses to maintain sharp edges on your apple shapes. Also, if you don’t have piping bags, plastic sandwich bags work surprisingly well with a tiny snip of the corner.
Preparation Method
- Mix Dry Ingredients: In a medium bowl, whisk together 2 ¾ cups (345 g) sifted flour, 1 tsp baking powder, and ½ tsp salt. Set aside.
- Cream Butter and Sugar: In a large bowl, beat 1 cup (227 g) softened unsalted butter and 1 ½ cups (300 g) granulated sugar on medium speed until light and fluffy, about 3-4 minutes. This step is key for tender cookies.
- Add Wet Ingredients: Beat in 1 large egg, 2 tsp vanilla extract, and 2 tbsp milk until fully combined. The mixture should look smooth and creamy.
- Combine Dry and Wet: Gradually add the flour mixture to the butter mixture on low speed, mixing until just combined. Don’t overmix or the cookies will be tough.
- Chill Dough: Form dough into a disc, wrap in plastic, and chill for at least 1 hour (or up to overnight). This helps the dough firm up and prevents spreading during baking.
- Preheat Oven: Set to 350°F (175°C). Line baking sheets with parchment paper or silicone mats.
- Roll and Cut: On a lightly floured surface, roll chilled dough to about ¼ inch (6 mm) thickness. Use your apple-shaped cookie cutter to cut out shapes. Transfer carefully to baking sheets, spacing about 1 inch (2.5 cm) apart.
- Bake: Bake cookies for 8-10 minutes until edges are set and just starting to turn golden. They’ll firm up more as they cool.
- Cool Completely: Move cookies to wire racks and cool fully before decorating.
- Prepare Royal Icing: In a clean bowl, beat 3 cups (360 g) powdered sugar, 2 egg whites, 1 tsp lemon juice, and 1 tsp vanilla extract until stiff peaks form (about 5-7 minutes). Divide into smaller bowls and tint with gel food coloring as desired.
- Decorate: Transfer icing to piping bags. Outline each apple cookie with red icing, then flood the center with a thinner consistency (add small amounts of water to thin). Use green icing to pipe leaves and brown for stems. Let dry completely, ideally overnight.
Tip: If your icing is too thick to flood, add a few drops of water, but go slow—you want it to spread smoothly without running off the edges. Also, keep the unused icing covered with a damp cloth to prevent drying out.
Cooking Tips & Techniques
Royal icing can be intimidating, but a few tricks make it manageable even if you’re a beginner. First, always sift your powdered sugar to avoid lumps. When mixing the icing, start slow and increase speed once the sugar incorporates—it helps build structure.
Timing is everything: let your cookies cool completely before applying icing. Otherwise, the icing can melt or slide off. I’ve learned this the hard way, especially when rushing a party prep.
When piping, practice on parchment paper before decorating cookies. This helps steady your hand and gauge icing flow. If your icing crusts too fast, cover it with a damp cloth during breaks to keep it workable.
Multitasking tip: You can bake a batch of cookies while prepping icing for another, making the whole process feel less like a marathon and more like a fun project. And if your icing cracks after it dries, it might have been too thick—next time, add a touch more water for flood consistency.
Lastly, don’t stress imperfections. A few uneven lines or color bleeds add character and remind everyone these are homemade treats made with care.
Variations & Adaptations
You can easily customize these perfect apple shaped sugar cookies with royal icing to suit different occasions or dietary needs:
- Seasonal Flavors: Add a teaspoon of ground cinnamon or apple pie spice to the dough for a cozy fall twist. I love this subtle warmth, especially when paired with a warm drink.
- Dietary Adjustments: Use almond flour or a gluten-free blend to make these cookies gluten-free. For dairy-free, swap butter for coconut oil or vegan butter, and use a plant-based milk alternative.
- Color Variations: Change up the icing colors to match holidays or themes—think pink and green for spring or gold and red for festive occasions.
- Alternate Shapes: If you don’t have an apple cutter, use a leaf or heart cutter for a different look but same royal icing technique.
- Personal Touch: Once, I piped tiny initials on the cookies as party favors, which was a hit! It’s a simple way to make these cookies feel extra special.
Serving & Storage Suggestions
These cookies are best served at room temperature, allowing the buttery flavors to shine through. They make a charming addition to any snack table, especially alongside a hot cup of spiced tea or warm apple cider. For a fun twist, serve with a platter of fresh fruit or a cheese board for a balanced snack.
Store your decorated cookies in an airtight container at room temperature for up to 5 days. If you want to keep them longer, layer parchment paper between cookies and freeze for up to 3 months. Thaw at room temperature before serving.
When reheating, avoid the microwave as it can soften the royal icing too much. Instead, let them warm gently on the counter. The flavors actually develop nicely over a day or two, so making them ahead of time can be a real convenience.
Nutritional Information & Benefits
These perfect apple shaped sugar cookies with royal icing offer a classic treat feel with moderate calories—about 150-180 calories per cookie depending on size and icing thickness. The recipe uses real butter for a natural fat source and pure vanilla for flavor without additives.
While these cookies are not low in sugar, they’re free from artificial preservatives or colors when you use natural gel food coloring. For those watching carbs, swapping regular sugar for a low-glycemic sweetener isn’t recommended here as it changes texture, but the portion-controlled size helps keep indulgence reasonable.
For anyone avoiding raw egg whites in the royal icing, meringue powder is a safe, allergen-friendly option that still produces that smooth finish. Overall, these cookies fit well into a balanced diet as an occasional sweet treat, made with quality ingredients you can trust.
Conclusion
Why fuss with complicated desserts when you can make these perfect apple shaped sugar cookies with royal icing that look impressive but are surprisingly easy? They offer the perfect blend of buttery sweetness and smooth, glossy icing that feels both classic and a little special.
Adjust the colors and flavors to fit your mood or occasion, and don’t be afraid to make these your own. I keep coming back to this recipe because it’s forgiving, fun, and always a hit whether I’m gifting them or sneaking one late at night.
If you decide to try them, I’d love to hear how your apple cookies turn out or what creative twists you’ve added. Baking is more fun when shared, and these cookies definitely bring a little extra joy to any kitchen.
FAQs
- Can I use store-bought royal icing instead of making my own? Yes, but homemade royal icing tends to have better texture and flavor. Store-bought can be more runny or overly sweet.
- How do I prevent royal icing from cracking? Make sure your icing is the right consistency; too thick can crack when dry. Also, avoid sudden temperature changes during drying.
- Can I make the dough ahead of time? Absolutely! The dough can be chilled for up to 48 hours before rolling and baking.
- Is it safe to use raw egg whites in royal icing? If you’re concerned, use meringue powder as a safe alternative that mimics whipped egg whites.
- How should I store decorated cookies to keep icing from smudging? Store in a single layer in an airtight container. If stacking is necessary, place parchment paper between layers once the icing is fully dry.
For more quick and tasty recipes that fit a busy lifestyle, you might enjoy my easy garlic butter shrimp and grits recipe or the flavorful creamy cajun chicken pasta recipe—both come together fast and never disappoint.
Pin This Recipe!
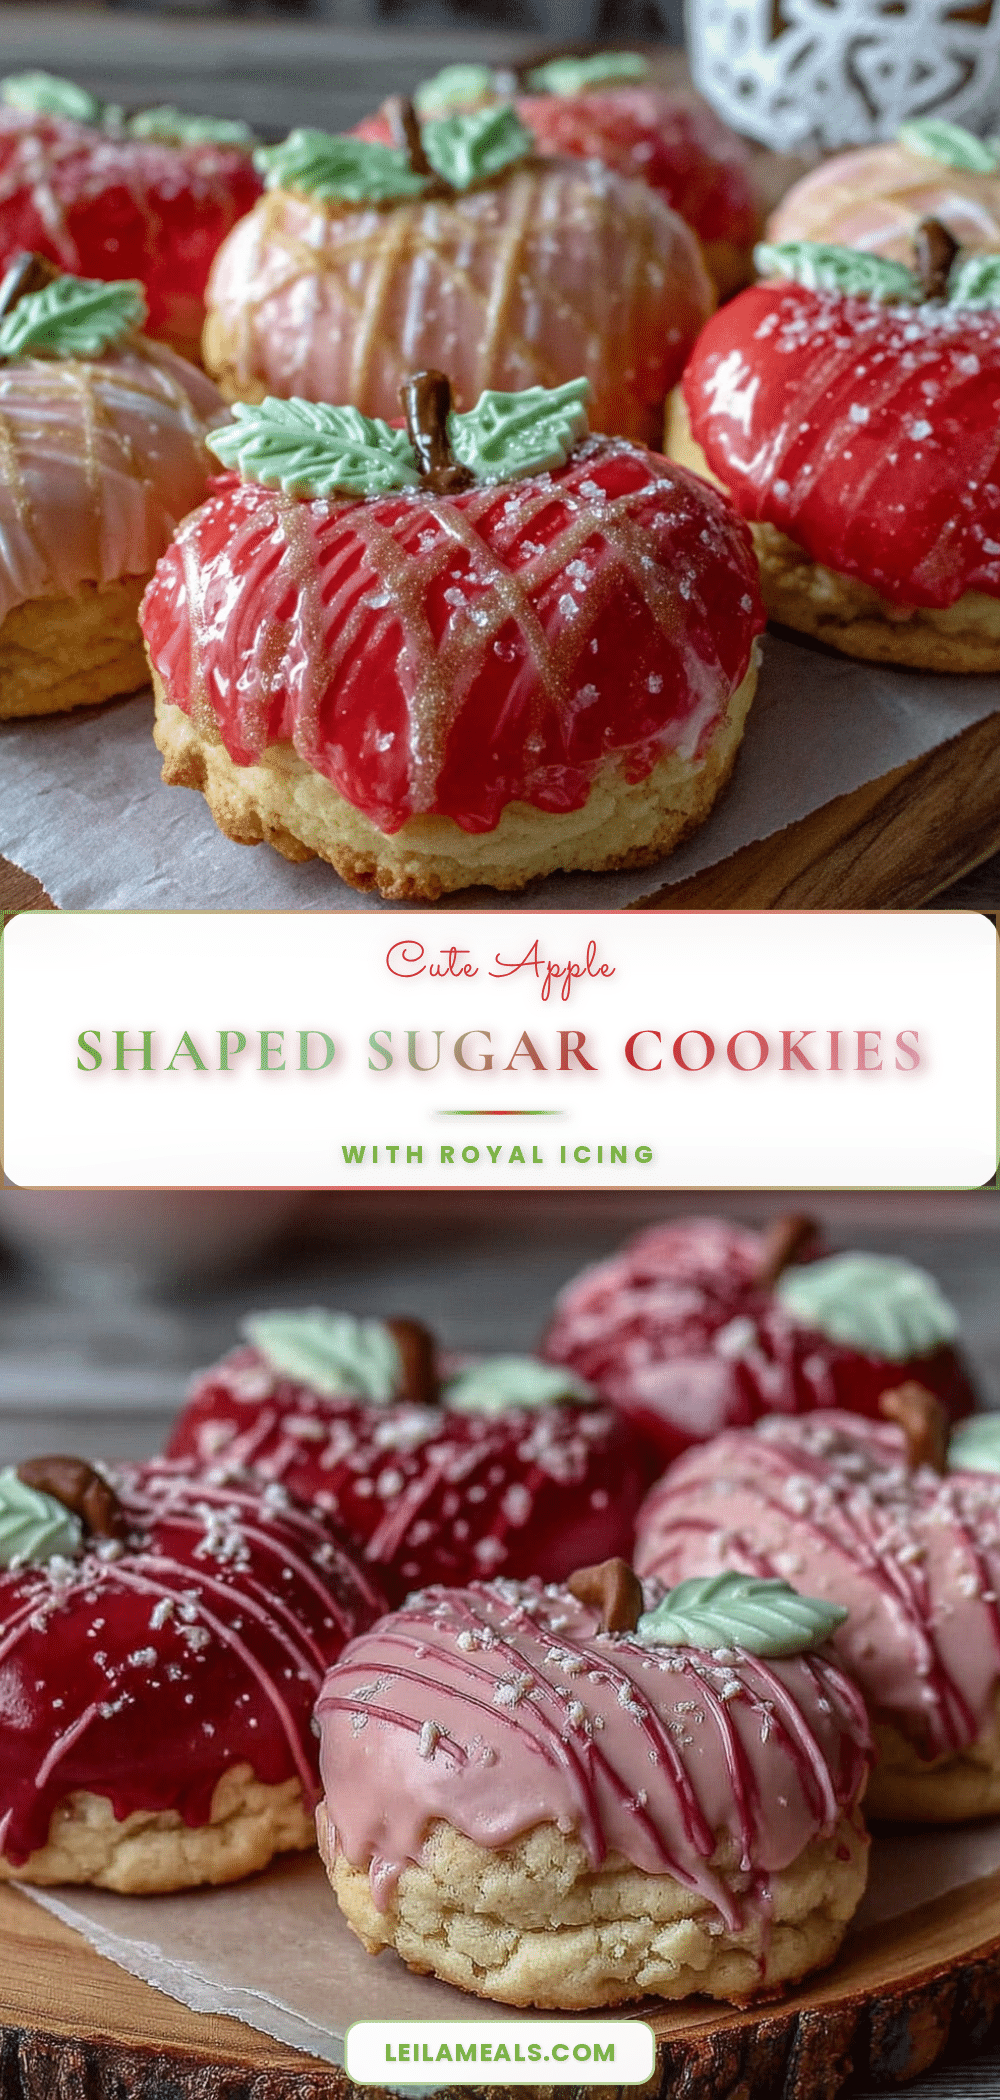
Perfect Apple Shaped Sugar Cookies Easy Royal Icing Tutorial for Beginners

These charming apple-shaped sugar cookies feature a tender buttery crumb and smooth, glossy royal icing. Perfect for seasonal celebrations and beginner bakers looking for a fun, approachable treat.
- Prep Time: 20 minutes
- Cook Time: 10 minutes
- Total Time: 1 hour 30 minutes
- Yield: 24 cookies 1x
- Category: Dessert
- Cuisine: American
Ingredients
- 2 ¾ cups (345 g) all-purpose flour, sifted
- 1 tsp baking powder
- ½ tsp salt
- 1 cup (227 g) unsalted butter, softened
- 1 ½ cups (300 g) granulated sugar
- 1 large egg, room temperature
- 2 tsp pure vanilla extract
- 2 tbsp whole milk (or almond milk for dairy-free)
- 3 cups (360 g) powdered sugar, sifted
- 2 large egg whites (or 4 tbsp meringue powder mixed with 6 tbsp water)
- 1 tsp lemon juice
- Gel food coloring: red, green, and brown (optional)
- 1 tsp vanilla or almond extract (optional)
Instructions
- Mix Dry Ingredients: In a medium bowl, whisk together 2 ¾ cups sifted flour, 1 tsp baking powder, and ½ tsp salt. Set aside.
- Cream Butter and Sugar: In a large bowl, beat 1 cup softened unsalted butter and 1 ½ cups granulated sugar on medium speed until light and fluffy, about 3-4 minutes.
- Add Wet Ingredients: Beat in 1 large egg, 2 tsp vanilla extract, and 2 tbsp milk until fully combined.
- Combine Dry and Wet: Gradually add the flour mixture to the butter mixture on low speed, mixing until just combined. Do not overmix.
- Chill Dough: Form dough into a disc, wrap in plastic, and chill for at least 1 hour or up to overnight.
- Preheat Oven: Set oven to 350°F (175°C). Line baking sheets with parchment paper or silicone mats.
- Roll and Cut: On a lightly floured surface, roll chilled dough to about ¼ inch thickness. Use an apple-shaped cookie cutter to cut out shapes. Transfer to baking sheets, spacing about 1 inch apart.
- Bake: Bake cookies for 8-10 minutes until edges are set and just starting to turn golden.
- Cool Completely: Move cookies to wire racks and cool fully before decorating.
- Prepare Royal Icing: In a clean bowl, beat 3 cups powdered sugar, 2 egg whites, 1 tsp lemon juice, and 1 tsp vanilla extract until stiff peaks form (about 5-7 minutes). Divide into smaller bowls and tint with gel food coloring as desired.
- Decorate: Transfer icing to piping bags. Outline each apple cookie with red icing, then flood the center with thinner consistency icing. Use green icing to pipe leaves and brown for stems. Let dry completely, ideally overnight.
Notes
If icing is too thick to flood, add a few drops of water slowly. Keep unused icing covered with a damp cloth to prevent drying. Chill dough for at least 1 hour or up to overnight for best results. Use meringue powder instead of raw egg whites for safer royal icing. Practice piping on parchment paper before decorating cookies. Store decorated cookies in an airtight container at room temperature for up to 5 days or freeze for up to 3 months.
Nutrition
- Serving Size: 1 cookie
- Calories: 165
- Sugar: 15
- Sodium: 80
- Fat: 7
- Saturated Fat: 4
- Carbohydrates: 25
- Protein: 1
Keywords: apple shaped sugar cookies, royal icing, beginner cookie recipe, easy sugar cookies, holiday cookies, apple cookies, decorated cookies