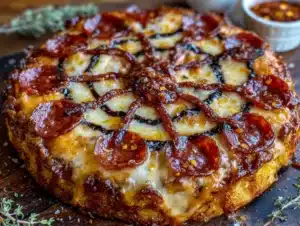
My neighbor Jen wasn’t trying to impress anyone. I’d stopped by to borrow a cup of sugar—cliché, I know—and the smell of garlic and melting cheese hit me before I even knocked. It was a Tuesday, not a party, not a holiday. Just a regular night. She opened the door with flour on her cheek and this pizza in her hands, and I honestly forgot why I was there for a second.
“Oh, it’s nothing,” she said when I asked about the spiderweb design on top. “Just a thing I do for the kids.” She shrugged like she’d just thrown together a grilled cheese. But let me tell you, that pizza was a work of art. The pepperoni legs were perfectly crispy at the tips, and the sour cream web was so delicate I almost felt bad cutting into it. Almost. The first bite was pure chaos—salty, cheesy, with that little tang from the sour cream. I stood in her kitchen eating a slice over the sink like a gremlin.
Maybe you’ve been there, right? You see something simple and brilliant, and you think, Why didn’t I think of that? That’s exactly how I felt. I went home that night and recreated it the very next day. And now, years later, this Easy Spooky Spiderweb Pizza with Pepperoni Legs has become my go-to for Halloween parties, movie nights, and honestly, any Tuesday that needs a little fun. It’s proof that you don’t need fancy skills or expensive ingredients to make something that stops people in their tracks. You just need a little imagination—and maybe a neighbor who doesn’t realize how talented she is.
Why You’ll Love This Recipe
Let’s be real—Halloween food can be a total letdown. You spend hours carving something cute, and it tastes like cardboard. Not this pizza. This is the kind of recipe that makes people forget they’re eating something themed. They’re too busy grabbing another slice.
- Quick & Easy: From fridge to table in under 30 minutes. No marinating, no complicated steps. Perfect for those nights when you want to be festive but also want to eat before 8 PM.
- Simple Ingredients: You probably have everything already. Pizza dough, sauce, cheese, pepperoni, sour cream. That’s it. No weird gelatin molds or black food coloring staining your fingers.
- Perfect for Halloween: Whether it’s a spooky party, a classroom treat, or just a fun dinner before trick-or-treating, this pizza delivers on theme without sacrificing flavor.
- Crowd-Pleaser: Kids love the spider design. Adults love that it actually tastes like real pizza. Everyone wins.
- Unbelievably Delicious: The pepperoni gets crispy in the oven, the cheese bubbles up perfectly, and the sour cream web adds this cool, creamy contrast. It’s next-level comfort food disguised as a craft project.
What makes this different from every other Halloween pizza out there? It’s not just a gimmick. I tested this recipe at least six times to get the spiderweb just right—not too thick, not too runny, something that holds its shape while baking. The pepperoni legs need to be arranged just so, or they curl up into little cups instead of looking like spindly spider legs. Trust me, I learned that the hard way. This version is foolproof, and it tastes like the best pizza you’ve ever made at home.
This is the recipe that makes you close your eyes after the first bite. It’s comfort food reimagined—fun, festive, but with the same soul-soothing satisfaction of a classic pepperoni pizza. Perfect for impressing guests without any stress, or turning a simple Tuesday into something memorable.
What Ingredients You Will Need
This recipe uses simple, wholesome ingredients to deliver bold flavor and a spooky presentation without any fuss. Most of these are pantry staples, which is exactly what you want when you’re putting together a last-minute Halloween dinner.
For the Pizza Base
- 1 pound (450g) store-bought or homemade pizza dough — I recommend a refrigerated dough from the grocery store for convenience. If you’re feeling ambitious, homemade works beautifully too. Let it sit at room temperature for 20 minutes before rolling so it’s easier to stretch.
- ½ cup (120ml) pizza sauce — Use your favorite jarred sauce or make a quick one with crushed tomatoes, garlic powder, and dried oregano.
- 2 cups (200g) shredded mozzarella cheese — Low-moisture, part-skim mozzarella melts best. Avoid fresh mozzarella balls here; they release too much water and make the pizza soggy.
- 1 tablespoon olive oil — For brushing the crust. Adds color and crispiness.
For the Spider Design

- 12 to 16 slices of pepperoni — You’ll need about 4 slices per spider leg. Regular-sized pepperoni works better than mini. Look for a brand like Hormel or Applegate for consistent shape and crispiness.
- ¼ cup (60ml) sour cream — Full-fat sour cream holds its shape best. If you’re dairy-free, use a thick coconut cream instead, but test it first—some brands are too runny.
- 2 to 3 black olives — For the spider bodies. Canned, pitted black olives are perfect. Slice them in half lengthwise for a rounder shape.
Substitution Guidance
- Gluten-free: Use a gluten-free pizza dough. The design works the same way.
- Dairy-free: Swap mozzarella with a dairy-free shredding cheese. Use coconut cream instead of sour cream for the web.
- No pepperoni? Use turkey pepperoni or even thin slices of cooked sausage. For a vegetarian version, use strips of roasted red bell pepper for the spider legs.
Equipment Needed
You don’t need anything fancy for this recipe. I’ve made it in a standard oven and even on a pizza stone, and both work great. Here’s what you’ll need:
- Baking sheet or pizza pan (12 to 14 inches) — A standard round pizza pan works perfectly. If you only have a rectangular baking sheet, shape the dough into a rectangle. It’ll still look spooky.
- Rolling pin — Or just use your hands to stretch the dough. I actually prefer using my hands—it’s easier to feel when the dough is even.
- Small piping bag or zip-top bag — For the sour cream web. A zip-top bag with a tiny corner snipped off works just as well as a piping bag. I’ve used both, and honestly, the zip-top bag is less fussy to clean.
- Sharp knife or pizza cutter — For slicing the finished pizza. A pizza cutter is faster, but a sharp chef’s knife works fine.
- Pastry brush — For brushing olive oil on the crust. If you don’t have one, just use a paper towel dipped in oil.
- Oven preheated to 475°F (245°C) — High heat is key for a crispy crust. Let it preheat for at least 20 minutes.
Budget-friendly tip: You don’t need a pizza stone. A regular baking sheet turned upside down works almost as well. I learned that trick from a pizzeria owner, and I’ve never looked back.
Preparation Method
Follow these steps carefully, and you’ll have a spiderweb pizza that looks like it came from a haunted pizzeria. Take your time with the web design—it’s easier than it looks.
- Preheat your oven to 475°F (245°C). Place a rack in the middle position. If you have a pizza stone, put it in the oven now to heat up. Let it preheat for at least 20 minutes. A hot oven is non-negotiable for a crispy crust.
- Prepare your work surface. Lightly flour a clean counter or large cutting board. Place the pizza dough on the floured surface. If the dough is cold, let it sit at room temperature for 20 minutes first—cold dough is hard to stretch and snaps back.
- Stretch or roll the dough. Using your hands or a rolling pin, shape the dough into a 12-inch circle. Don’t worry if it’s not perfectly round—rustic shapes add character. Aim for even thickness, about ¼ inch. If the dough springs back, let it rest for 5 minutes and try again. Pro tip: Use your knuckles to gently stretch the dough from the center outward. This creates a thicker edge for the crust.
- Transfer the dough to your baking sheet. Carefully lift the dough and place it on a lightly oiled or parchment-lined baking sheet. Gently press it out to the edges. If using parchment, trim the excess so it doesn’t burn in the oven.
- Brush the crust with olive oil. Use your pastry brush to coat the outer inch of the dough. This gives the crust a golden, crispy finish. Don’t skip this step—it makes a huge difference.
- Spread the pizza sauce. Spoon the sauce onto the center of the dough. Use the back of the spoon to spread it evenly, leaving a 1-inch border around the edges for the crust. You don’t need a thick layer—just enough to cover the dough.
- Sprinkle the mozzarella cheese. Distribute the cheese evenly over the sauce. Don’t pile it too high, or the spiderweb won’t show. A single layer is perfect.
- Arrange the pepperoni legs. This is the fun part. Place 4 pepperoni slices in a cluster near the center of the pizza, pointing outward like spider legs. Space them evenly around the pizza—you’ll have 4 clusters total, one for each spider. Each cluster should have 3 to 4 pepperoni slices. Press them gently into the cheese so they stay in place. Warning: If you place them too close to the edge, they’ll fall off when you cut the pizza. Keep them within the inner two-thirds of the pizza.
- Add the olive spider bodies. Place one black olive half in the center of each pepperoni cluster. This is the spider’s body. Press it lightly into the cheese. You should have 4 spiders total, evenly spaced around the pizza.
- Bake the pizza. Place the baking sheet in the preheated oven. Bake for 12 to 15 minutes, or until the crust is golden brown and the cheese is bubbly. The pepperoni should be crispy at the edges. Sensory cue: You’ll know it’s ready when the kitchen smells like a pizzeria and the cheese is lightly browned in spots.
- Let the pizza cool for 2 minutes. Remove the pizza from the oven and place it on a wire rack or cutting board. Let it cool slightly—this helps the sour cream web hold its shape.
- Make the sour cream web. While the pizza cools, spoon the sour cream into a small piping bag or zip-top bag. If using a zip-top bag, snip off a tiny corner—smaller than you think you need. You can always make the hole bigger, but you can’t undo a cut that’s too large. Personal tip: I once cut the corner too big and ended up with sour cream blobs instead of a web. Start small!
- Pipe the spiderweb. Starting from the center of the pizza, pipe a small circle of sour cream. Then pipe a larger circle around it, then another, until you have 3 to 4 concentric circles. You don’t need to be perfect—spiderwebs are naturally irregular. Visual cue: Think of it like drawing a target.
- Create the web lines. Using a toothpick or the tip of a knife, gently drag the sour cream from the center outward, like pulling a line through the circles. Do this in 6 to 8 places around the pizza, spacing them evenly. This creates the classic web pattern. Wipe the toothpick clean between each line for a cleaner look.
- Slice and serve. Use a sharp pizza cutter or knife to slice the pizza into 8 wedges. Be careful not to disturb the spider design too much. Serve immediately while the cheese is still gooey.
Cooking Tips & Techniques
I’ve made this pizza at least a dozen times, and I’ve learned a few things the hard way. Here’s what I wish someone had told me before my first attempt.
Don’t overload the cheese. I know it’s tempting, but too much cheese will bury your spiderweb. You want the sour cream design to be visible against the red sauce and melted cheese. A moderate layer is all you need.
Watch the pepperoni placement. Pepperoni shrinks as it cooks. If you place the slices too close together, they’ll merge into a blob instead of looking like spider legs. Leave a little space between each slice. Also, avoid putting them too close to the edge—they’ll curl up and fall off when you cut the pizza.
Use full-fat sour cream. Low-fat or nonfat sour cream is too watery. It won’t hold its shape when piped, and it’ll melt into the cheese instead of forming a distinct web. Trust me on this one. I tried it with Greek yogurt once, and it was a disaster—the web disappeared within minutes.
Let the pizza cool before piping. If you pipe the sour cream onto a piping-hot pizza, it’ll melt immediately. Wait 2 to 3 minutes. The cheese should still be warm but not molten. This gives you a clean, defined web that stays put.
Practice the web on a plate first. If you’re nervous about the design, pipe a practice web onto a plate or piece of parchment paper. It takes 30 seconds and saves you from ruining your pizza. I did this the first time, and it made the real thing so much easier.
Multitasking strategy: While the pizza bakes, prep your sour cream bag and gather your serving plates. This way, you can pipe the web as soon as the pizza comes out of the oven. The whole process flows smoothly.
Variations & Adaptations
This recipe is endlessly customizable. Here are a few variations I’ve tried and loved:
Vegetarian Spiderweb Pizza
Skip the pepperoni and use thin strips of roasted red bell pepper for the spider legs. They curl up nicely in the oven and add a sweet, smoky flavor. Use the same olive bodies and sour cream web. It’s just as spooky and totally plant-based.
Spicy Sausage Spider Legs
Swap the pepperoni for crumbled spicy Italian sausage. Cook the sausage first, then arrange it in leg-shaped clusters before baking. The extra heat pairs beautifully with the cool sour cream web. I made this for a Halloween party, and it was gone in 10 minutes.
White Pizza Spiderweb
Skip the red sauce and use a garlic cream sauce instead. Mix ½ cup ricotta cheese with 1 clove minced garlic, salt, and pepper. Spread it on the dough, then top with mozzarella. The sour cream web blends in more, but the flavor is incredible—rich, garlicky, and indulgent.
Gluten-Free Version
Use your favorite gluten-free pizza dough. I’ve tested this with a store-bought cauliflower crust, and it works well. Just note that the crust will be thinner, so reduce the baking time by 2 to 3 minutes. The design holds up perfectly.
Serving & Storage Suggestions
This pizza is best served immediately, while the cheese is still gooey and the pepperoni is crispy. The sour cream web will soften as it sits, so don’t let it cool too long before serving.
Serving temperature: Hot from the oven. I recommend letting it rest for exactly 2 to 3 minutes before slicing—just enough time to pipe the web and grab your plates.
What to serve with it: A simple green salad with a tangy vinaigrette balances the richness of the pizza. For a full Halloween spread, serve alongside crispy garlic chicken wings or a bowl of creamy pumpkin soup. For drinks, a cold apple cider or a dark beer like a stout pairs beautifully with the smoky pepperoni.
Storage: Leftover pizza can be stored in an airtight container in the refrigerator for up to 3 days. The sour cream web will fade, but the flavor is still fantastic. To reheat, place slices on a baking sheet in a 350°F (175°C) oven for 5 to 7 minutes. Avoid the microwave—it makes the crust soggy and the pepperoni rubbery.
Freezing: You can freeze the baked pizza (without the sour cream web) for up to 2 months. Wrap it tightly in plastic wrap and then foil. When ready to serve, thaw in the refrigerator overnight, reheat in the oven, and pipe the web fresh. The web does not freeze well—it becomes watery and loses its shape.
Flavor development: Honestly, this pizza is best fresh. The magic is in the contrast between the hot, crispy crust and the cool, creamy sour cream. That said, cold pizza the next morning is a guilty pleasure I fully support.
Nutritional Information & Benefits
Here’s the thing—this is pizza. It’s not a health food, and it doesn’t pretend to be. But it’s made with real ingredients, and that counts for something. Each slice (based on 8 slices) contains approximately:
| Nutrient | Amount per slice |
|---|---|
| Calories | 285 |
| Total Fat | 12g |
| Saturated Fat | 5g |
| Carbohydrates | 30g |
| Protein | 13g |
| Fiber | 2g |
| Sodium | 620mg |
Health benefits of key ingredients: The tomatoes in the pizza sauce are rich in lycopene, an antioxidant linked to heart health. Mozzarella provides calcium and protein. Olive oil offers healthy monounsaturated fats. And hey, the sour cream adds a little probiotics—every bit counts, right?
Dietary considerations: This recipe can be made gluten-free and dairy-free with the substitutions listed above. It is not suitable for a low-sodium diet due to the pepperoni and cheese. If you’re watching your salt intake, use low-sodium pepperoni and reduced-sodium cheese.
Potential allergens: Contains dairy (cheese, sour cream) and gluten (pizza dough). Pepperoni may contain nitrates and preservatives—look for uncured options if that’s a concern.
My personal take? This pizza is about joy, not nutrition. It’s the kind of food that brings people together, makes kids laugh, and turns an ordinary night into a memory. And sometimes, that’s the healthiest thing you can eat.
Conclusion
This Easy Spooky Spiderweb Pizza with Pepperoni Legs is more than just a Halloween gimmick. It’s a genuinely delicious pizza that happens to look amazing. The crispy pepperoni, the gooey cheese, the cool sour cream web—every bite is a little adventure. And the best part? It’s so simple that anyone can make it, even on a busy Tuesday night.
I love this recipe because it reminds me that cooking doesn’t have to be serious. Sometimes the best dishes come from a place of playfulness—from a neighbor who didn’t think she was doing anything special, from a Tuesday that turned into something magical. I hope this pizza brings that same joy to your kitchen.
Now I want to hear from you! Did you try this recipe? Did your spiderweb turn out perfect, or did you have a sour cream mishap like I did? Share your photos and stories in the comments below. And if you came up with a fun variation, tell me about it—I’m always looking for new ideas. Happy Halloween, and happy cooking!
Frequently Asked Questions
Can I make this pizza ahead of time?
You can prep the dough, sauce, and toppings ahead of time, but I recommend baking the pizza and piping the web just before serving. The sour cream web doesn’t hold up well in the refrigerator, and the pizza is best enjoyed fresh and hot.
What if I don’t have a piping bag for the sour cream?
No problem! Use a zip-top plastic bag instead. Spoon the sour cream into one corner, squeeze out the air, seal the bag, and snip off a tiny corner. It works just as well as a piping bag and is easier to clean.
Can I use a different type of cheese?
Absolutely. While mozzarella is classic, you can use provolone, fontina, or a blend of Italian cheeses. Just avoid fresh mozzarella—it releases too much water and makes the pizza soggy. A low-moisture cheese is best for this recipe.
How do I keep the pepperoni legs from curling up too much?
Pepperoni naturally curls as it cooks. To minimize curling, press the slices gently into the cheese before baking. You can also use larger slices of pepperoni, which tend to curl less than small ones. If you want perfectly flat legs, try turkey pepperoni—it doesn’t curl as much.
Can I make this pizza on a grill?
Yes, you can! Preheat your grill to medium-high heat (about 450°F or 230°C). Place the pizza directly on the grill grates or on a pizza stone. Cook for 10 to 12 minutes, checking frequently to prevent burning. The sour cream web should be piped after grilling, just like in the oven method.
Pin This Recipe!

Easy Spooky Spiderweb Pizza with Pepperoni Legs
A fun and festive Halloween pizza featuring a spiderweb design made with sour cream, pepperoni legs, and olive spider bodies. Quick to prepare and delicious, it’s perfect for parties or a themed dinner.
- Prep Time: 15 minutes
- Cook Time: 15 minutes
- Total Time: 30 minutes
- Yield: 8 servings 1x
- Category: Main Course
- Cuisine: American
Ingredients
- 1 pound (450g) store-bought or homemade pizza dough
- ½ cup (120ml) pizza sauce
- 2 cups (200g) shredded mozzarella cheese
- 1 tablespoon olive oil
- 12 to 16 slices of pepperoni
- ¼ cup (60ml) sour cream
- 2 to 3 black olives, pitted and halved lengthwise
Instructions
- Preheat your oven to 475°F (245°C). Place a rack in the middle position. If using a pizza stone, put it in the oven now to heat up for at least 20 minutes.
- Lightly flour a clean counter or large cutting board. Place the pizza dough on the floured surface. If cold, let it sit at room temperature for 20 minutes.
- Stretch or roll the dough into a 12-inch circle, about ¼ inch thick. If the dough springs back, let it rest for 5 minutes and try again.
- Transfer the dough to a lightly oiled or parchment-lined baking sheet. Gently press it out to the edges.
- Brush the outer inch of the dough with olive oil.
- Spread the pizza sauce evenly over the dough, leaving a 1-inch border for the crust.
- Sprinkle the mozzarella cheese evenly over the sauce.
- Arrange 4 pepperoni slices in a cluster near the center of the pizza, pointing outward like spider legs. Repeat to make 4 clusters total, spaced evenly around the pizza. Press them gently into the cheese.
- Place one black olive half in the center of each pepperoni cluster to form the spider’s body. Press lightly into the cheese.
- Bake for 12 to 15 minutes, until the crust is golden brown and the cheese is bubbly. The pepperoni should be crispy at the edges.
- Remove the pizza from the oven and let it cool for 2 minutes.
- Spoon the sour cream into a small piping bag or zip-top bag. If using a zip-top bag, snip off a tiny corner.
- Pipe concentric circles of sour cream on the pizza, starting from the center and working outward (3 to 4 circles).
- Using a toothpick or the tip of a knife, gently drag the sour cream from the center outward in 6 to 8 evenly spaced places to create a web pattern. Wipe the toothpick clean between each line.
- Slice the pizza into 8 wedges using a sharp pizza cutter or knife. Serve immediately.
Notes
Use full-fat sour cream for best results. Let the pizza cool 2-3 minutes before piping the web to prevent melting. Practice the web on a plate first if nervous. Avoid overloading cheese to keep the web visible.
Nutrition
- Serving Size: 1 slice
- Calories: 285
- Sodium: 620
- Fat: 12
- Saturated Fat: 5
- Carbohydrates: 30
- Fiber: 2
- Protein: 13
Keywords: Halloween pizza, spiderweb pizza, pepperoni pizza, easy pizza recipe, spooky pizza, kid-friendly Halloween recipe