My niece popped over unexpectedly one rainy afternoon, clutching a colorful box of cookie cutters shaped like letters of the alphabet. The fridge was practically empty except for a few eggs and some butter that was just starting to soften. Normally, I’d panic — you know, what to make when the cupboards look like they’ve been picked over by a tornado? But then I thought, why not turn this into a little kitchen adventure? The idea of baking easy fun ABC alphabet sugar cookies with royal icing came to life right then and there, fueled by whatever I had on hand and a stubborn streak to make it work.
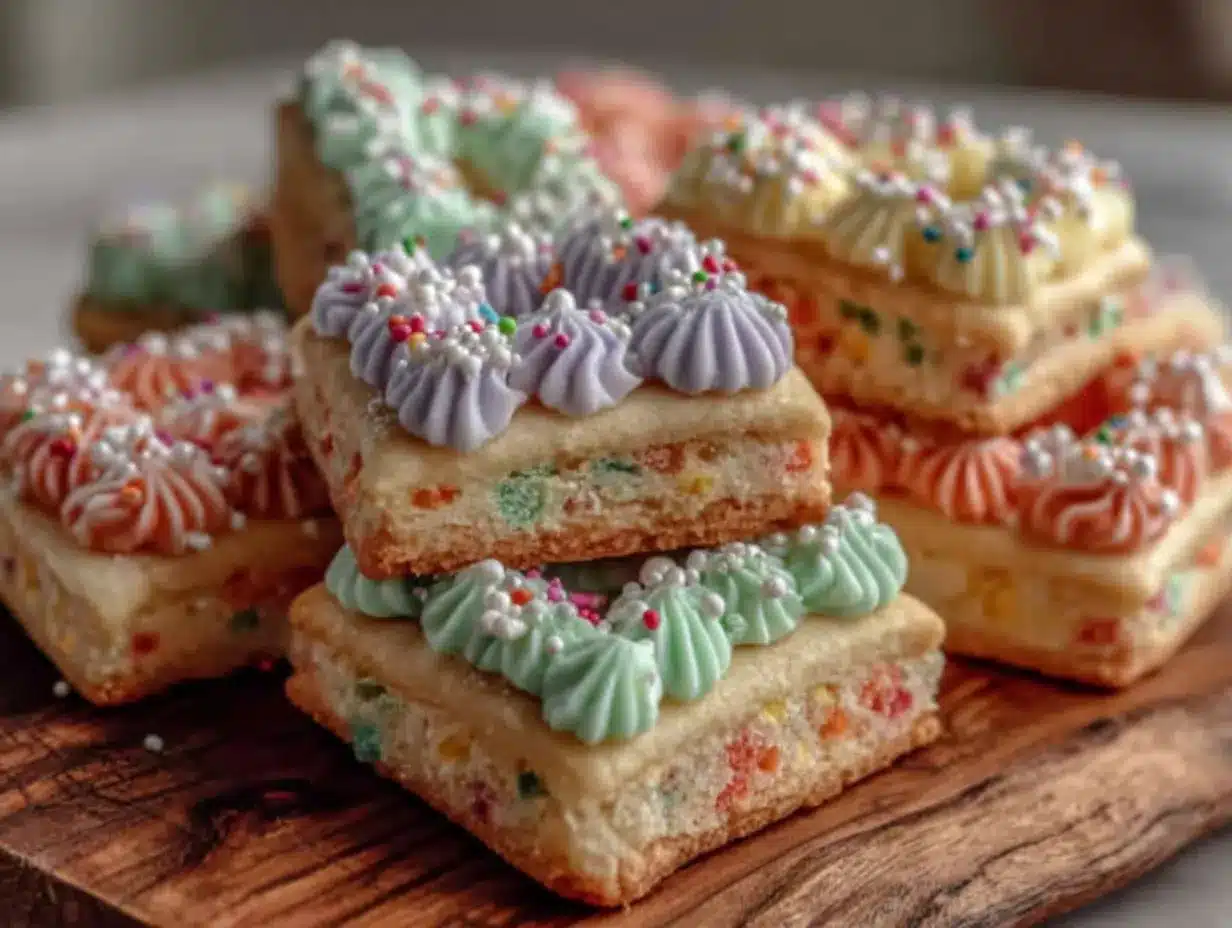
Flour dusted the countertops, and the scent of vanilla filled the air as I mixed the dough. The royal icing, a bit of a messy undertaking, ended up being the real star — so glossy and smooth, perfect for decorating each letter. Honestly, it was a bit chaotic, with icing dripping and colors blending in unexpected ways, but that’s part of the charm. Watching those simple sugar cookies turn into little edible letters was oddly satisfying.
It wasn’t just about making cookies; it became a spontaneous lesson in creativity and patience. That afternoon, those alphabet cookies weren’t just treats; they were a way to spell out fun, to celebrate the unexpected, and to remind me how sometimes, the best recipes come from a little improvisation and a lot of heart. This recipe stuck with me because it’s easy enough to whip up on a whim, fun for all ages, and somehow comforting in its simplicity and sweetness.
Why You’ll Love This Recipe
These easy fun ABC alphabet sugar cookies with royal icing aren’t just another cookie recipe — they’re a playful way to bring some whimsy into your kitchen, and I’ve tested this recipe enough times to know it delivers every single time. Here’s why it’s a keeper:
- Quick & Easy: You can have the dough ready in under 15 minutes, and the whole batch baked in about 20 more, which makes it perfect for those last-minute creative baking sessions.
- Simple Ingredients: No need for specialty items — most are pantry staples like flour, sugar, butter, and eggs.
- Perfect for All Occasions: Whether it’s a birthday party, a rainy day activity, or a classroom treat, these cookies add a fun, personalized touch.
- Crowd-Pleaser: Kids love spelling out words and decorating their own, while adults appreciate the buttery sweetness and smooth royal icing finish.
- Unbelievably Delicious: The cookie texture strikes just the right balance between crisp edges and tender centers, complemented by icing that’s sweet but not overpowering.
What sets this recipe apart is the royal icing technique I use — it’s smooth, glossy, and sets up perfectly without cracking. Plus, I’ve included tips on coloring and piping so that even beginners can make these look like a pro’s work. This isn’t just about baking; it’s about creating little moments of joy and pride in your kitchen.
What Ingredients You Will Need
This recipe uses simple, wholesome ingredients to deliver bold flavor and a satisfying texture without the fuss. Most of these are pantry basics, so you likely have them on hand already. Here’s the breakdown:
- For the Sugar Cookie Dough:
- 2 ¾ cups (345 g) all-purpose flour, sifted (I like King Arthur for consistent texture)
- 1 teaspoon baking powder
- ½ teaspoon salt
- 1 cup (227 g) unsalted butter, softened (room temperature but not melted)
- 1 ½ cups (300 g) granulated sugar
- 1 large egg, room temperature
- 1 teaspoon pure vanilla extract (fresh vanilla makes a noticeable difference)
- 2 tablespoons milk (adds moisture and tenderness)
- For the Royal Icing:
- 3 cups (360 g) powdered sugar, sifted
- 2 tablespoons meringue powder (essential for stability)
- 5–6 tablespoons warm water (adjust for desired consistency)
- Food coloring gels or natural dyes (I recommend AmeriColor for vibrant results)
- Optional: ½ teaspoon vanilla or almond extract for flavor in icing
If you want to keep this gluten-free, swapping the all-purpose flour for a trusted gluten-free blend works well, though texture varies slightly. For dairy-free, use a vegan butter substitute and plant-based milk. The meringue powder is key to getting that perfect royal icing consistency that dries hard but isn’t brittle.
Equipment Needed
- Mixing bowls — a large one for the dough and a medium one for the icing
- Electric hand mixer or stand mixer with paddle attachment (makes creaming butter and sugar much easier)
- Rolling pin (a non-stick one helps prevent dough sticking)
- Alphabet cookie cutters set (these are a must for that perfect letter shape)
- Baking sheets lined with parchment paper or silicone mats
- Piping bags or plastic sandwich bags with the corner snipped for icing
- Small bowls for mixing food coloring
- Wire rack for cooling cookies
If you don’t have a stand mixer, no worries — a good hand mixer or even a sturdy whisk and some elbow grease can do the job. I usually grab silicone mats to avoid greasing pans, but parchment paper is an easy alternative. For piping, I’ve found plastic bags with tips cut off work fine when you don’t want to invest in specialized tools.
Preparation Method
- Mix Dry Ingredients: In a medium bowl, whisk together the sifted flour, baking powder, and salt. This ensures even distribution and prevents clumps. (About 5 minutes)
- Cream Butter and Sugar: In a large bowl, beat the softened butter and granulated sugar with an electric mixer until light and fluffy — about 3-4 minutes. You’ll notice the mixture turn pale and creamy, which is a good sign you’re on the right track.
- Add Wet Ingredients: Beat in the egg and vanilla extract until fully combined. Then add the milk and stir just until incorporated — don’t overmix here.
- Combine Dough: Gradually add the dry ingredients to the wet mixture, mixing on low speed until the dough comes together. The dough will be soft but not sticky — if it feels too sticky, add a tablespoon more flour.
- Chill the Dough: Wrap the dough in plastic wrap and refrigerate for at least 1 hour. This step makes it easier to roll out and helps the cookies hold their shape during baking.
- Preheat Oven & Prepare Baking Sheet: Preheat your oven to 350°F (175°C). Line baking sheets with parchment paper or silicone mats.
- Roll Out Dough: Lightly flour your work surface and rolling pin. Roll the dough to about ¼ inch (6 mm) thick. Keep it even to ensure uniform baking.
- Cut Cookies: Use your alphabet cookie cutters to press out letters. Transfer them carefully to the baking sheet, spacing cookies about 1 inch apart.
- Bake: Bake for 8-10 minutes or until edges are just starting to turn golden. Keep a close eye — we want crisp edges but not browned cookies.
- Cool Completely: Let cookies cool on the baking sheet for 5 minutes before transferring to a wire rack to cool fully. This prevents breakage.
- Prepare Royal Icing: In a bowl, combine powdered sugar and meringue powder. Add warm water one tablespoon at a time, mixing until stiff peaks form. Adjust water to get a smooth, pipeable consistency. Divide icing into small bowls and tint with food coloring as desired.
- Decorate: Fill piping bags with colored icing. Outline each letter cookie first, then flood the center with icing using a toothpick or small spatula to spread. Let the icing set at room temperature for several hours or overnight for the best finish.
Pro tip: If your icing is too runny, add more powdered sugar. If too thick, a few drops of water will loosen it. Don’t rush the drying — patience here means flawless, shiny letters.
Cooking Tips & Techniques
Royal icing can be intimidating, but with a few tricks, you’ll find it manageable and fun. One thing I learned the hard way is to avoid overmixing the icing once you add water — it can get runny fast. Start with less water and add slowly. Another tip is to use gel food coloring instead of liquid — it keeps the icing from thinning out. I’ve had batches crack because I rushed the drying process; letting the cookies rest uncovered overnight is the best way to get that perfect hard finish.
When rolling your dough, chill it well — warm dough sticks and loses shape. Also, flour your surface lightly but avoid over-flouring, which can dry out cookies. For decorating, piping outlines first creates a barrier so the flooding icing doesn’t run off the edges.
Multitasking helps — while cookies bake and cool, mix and color your icing. If you’ve got little helpers, this recipe is a fun way to teach patience and creativity. I often find myself humming along to a playlist while decorating, which keeps the vibe light and enjoyable.
Variations & Adaptations
- Gluten-Free Version: Swap all-purpose flour with a 1:1 gluten-free blend. Add a teaspoon of xanthan gum if your blend doesn’t already have it for better texture.
- Vegan Option: Use vegan butter and a flax egg (1 tablespoon ground flaxseed + 3 tablespoons water) instead of a chicken egg. For royal icing, substitute meringue powder with aquafaba (chickpea brine) — it whips up nicely but may take longer to dry.
- Seasonal Flavors: Add zest of lemon or orange to the dough for a citrusy twist. You might also try a pinch of cinnamon or nutmeg for a cozy fall flavor.
- Alternative Decorations: Instead of royal icing, try a simple glaze with powdered sugar and lemon juice for a more rustic look. Or top the cookies with sprinkles before baking for extra fun.
- Personal Favorite Variation: I once swapped vanilla for almond extract in the dough and colored the icing with soft pastel hues for a baby shower — the subtle nutty flavor paired beautifully with delicate decorations.
Serving & Storage Suggestions
These alphabet sugar cookies are best served at room temperature so the icing is firm but not cold and hard. Present them as a playful snack for kids to spell out words, or arrange them on a platter for parties — they’re a real conversation starter.
For storage, keep cookies in an airtight container at room temperature for up to a week. Avoid stacking them until the icing is completely dry to prevent smudging. If you need to keep them longer, freezing un-iced cookies works well; just thaw before decorating.
Reheating isn’t necessary, but if you want that fresh-baked smell again, pop them in a warm oven (about 300°F/150°C) for 3-5 minutes, watching carefully. Flavors can mellow and meld over a day or two, so sometimes resting them overnight actually improves the taste.
Pair these cookies with a warm cup of tea or a cold glass of milk — perfect for a cozy afternoon. They also make a charming addition to a dessert table alongside something savory like the easy sheet pan honey mustard salmon with asparagus for a balanced meal.
Nutritional Information & Benefits
Each cookie (depending on size) roughly contains:
| Calories | 110-130 kcal |
|---|---|
| Fat | 5-7 g (mostly from butter) |
| Carbohydrates | 15-18 g (mostly sugars and flour) |
| Protein | 1-2 g |
While these cookies are a sweet treat, the butter provides some healthy fats, and the egg adds a bit of protein. Using natural vanilla and high-quality ingredients gives a clean flavor without artificial nasties. For those watching gluten or dairy, the substitutions mentioned earlier keep this recipe inclusive. It’s a fun occasional treat that also doubles as an engaging activity, bringing some mental wellness through creative expression in the kitchen.
Conclusion
If you’re after a recipe that’s both playful and surprisingly straightforward, these easy fun ABC alphabet sugar cookies with royal icing should be your go-to. They bring a spark of joy and a little sugary sparkle to any day — especially when unplanned guests or rainy afternoons strike. Customize them with your favorite colors and flavors, or keep it classic for that timeless cookie feel.
I love this recipe because it’s not just about baking; it’s about making memories, whether solo or with little helpers. Plus, it’s a sweet reminder that sometimes, the best kitchen moments come from using what you have and making something unexpectedly wonderful.
Give these a try and let me know your favorite letter to bake or decorate — I always enjoy hearing your creative twists. Baking is better when shared, even through stories and recipes!
Frequently Asked Questions
Can I make the dough ahead of time?
Yes! You can prepare the dough up to 3 days in advance and keep it wrapped tightly in the refrigerator. Just bring it back to room temperature before rolling out.
How long does royal icing take to dry?
Royal icing usually sets to a firm finish within 4-6 hours at room temperature. For best results, let decorated cookies dry overnight.
Can I freeze these cookies?
Absolutely. Freeze undecorated cookies in an airtight container for up to 3 months. Thaw completely before decorating.
What if I don’t have alphabet cookie cutters?
No worries! You can use any small cookie cutters or even cut shapes freehand with a knife. Alternatively, roll the dough and decorate with simple shapes and letters piped on top.
How do I get smooth royal icing without cracks?
Mix icing to a smooth consistency without overwhipping. Avoid adding too much water. Let cookies dry slowly at room temperature rather than in a warm or humid environment.
Pin This Recipe!
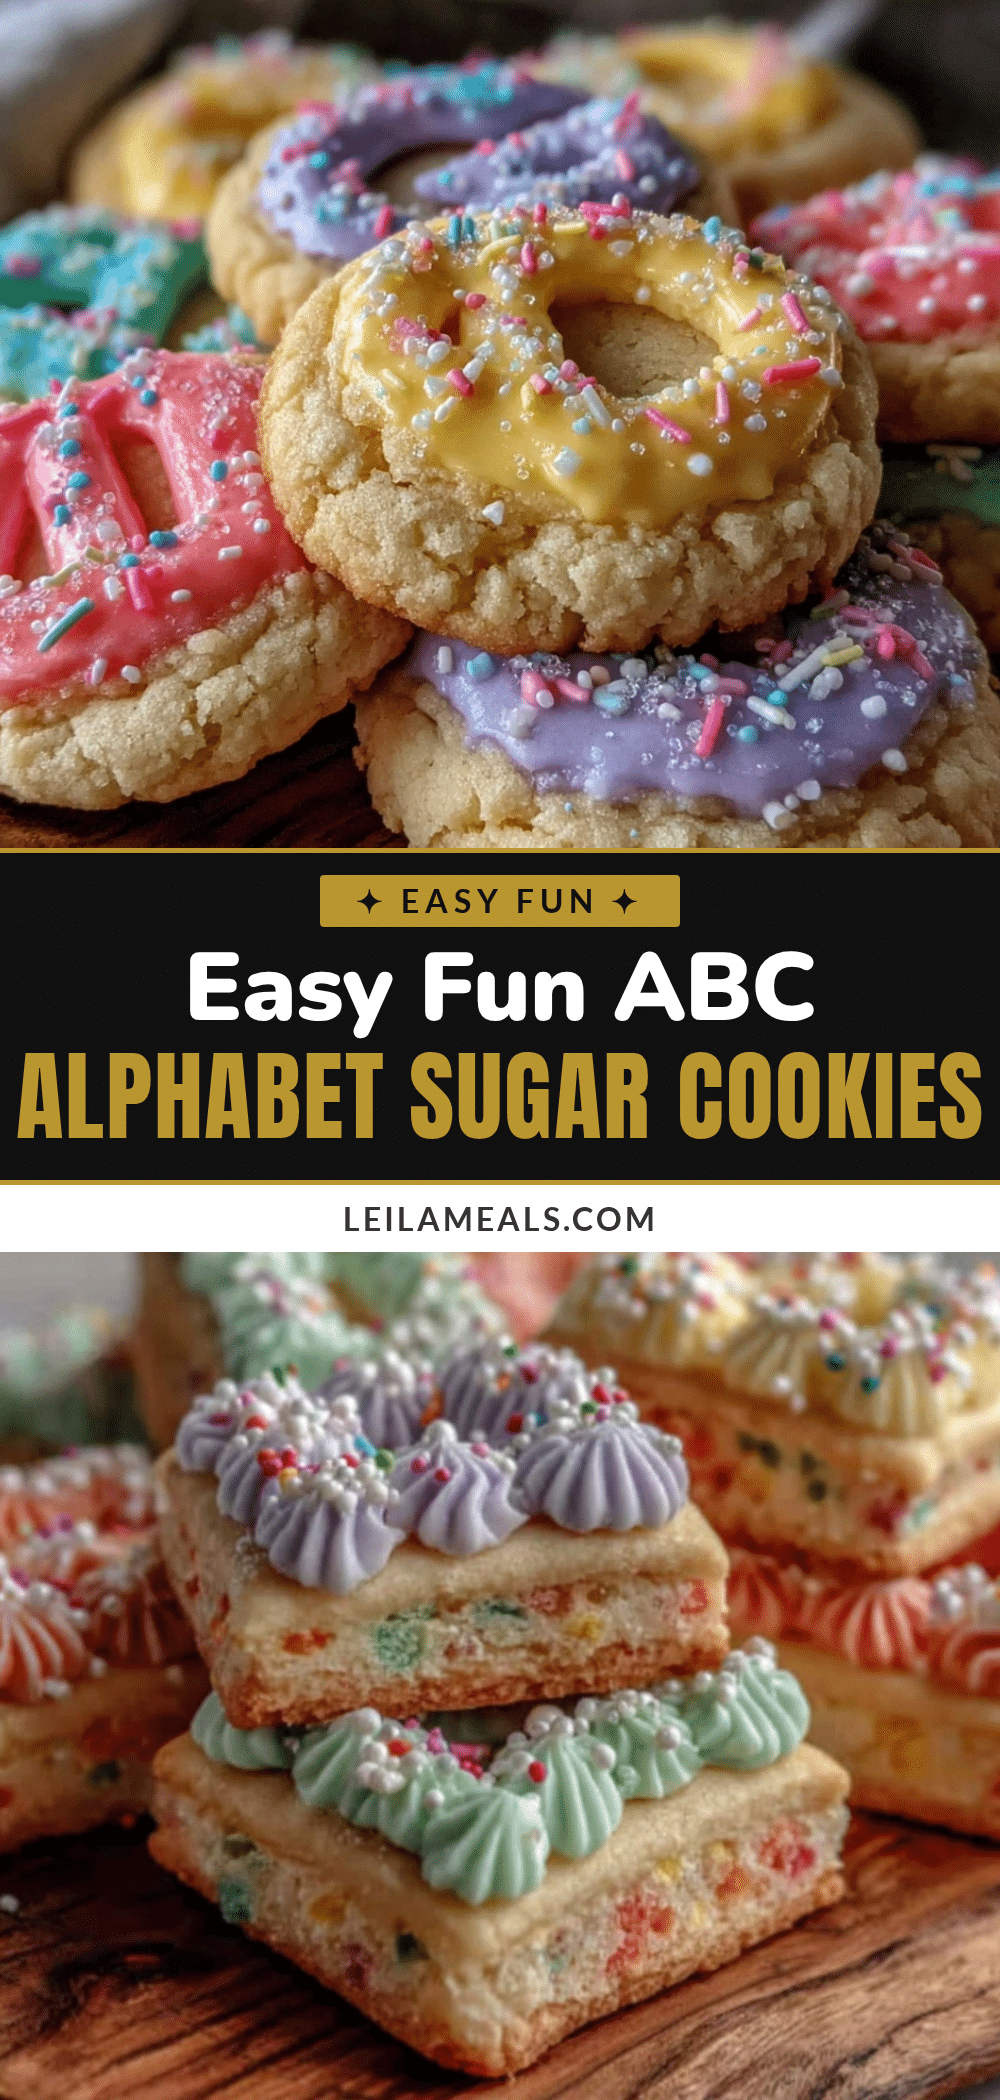
Easy Fun ABC Alphabet Sugar Cookies Recipe with Royal Icing Tutorial

A playful and easy recipe for alphabet-shaped sugar cookies decorated with smooth, glossy royal icing. Perfect for all ages and occasions, these cookies combine simple pantry ingredients with creative decorating fun.
- Prep Time: 15 minutes
- Cook Time: 10 minutes
- Total Time: 1 hour 25 minutes
- Yield: About 24-30 cookies (depending on size) 1x
- Category: Dessert
- Cuisine: American
Ingredients
- 2 ¾ cups (345 g) all-purpose flour, sifted
- 1 teaspoon baking powder
- ½ teaspoon salt
- 1 cup (227 g) unsalted butter, softened (room temperature but not melted)
- 1 ½ cups (300 g) granulated sugar
- 1 large egg, room temperature
- 1 teaspoon pure vanilla extract
- 2 tablespoons milk
- 3 cups (360 g) powdered sugar, sifted
- 2 tablespoons meringue powder
- 5–6 tablespoons warm water
- Food coloring gels or natural dyes
- Optional: ½ teaspoon vanilla or almond extract for icing flavor
Instructions
- Mix dry ingredients: whisk together sifted flour, baking powder, and salt in a medium bowl (about 5 minutes).
- Cream butter and sugar: beat softened butter and granulated sugar with an electric mixer until light and fluffy (3-4 minutes).
- Add wet ingredients: beat in egg and vanilla extract until combined, then stir in milk just until incorporated.
- Combine dough: gradually add dry ingredients to wet mixture, mixing on low speed until dough forms; add more flour if too sticky.
- Chill dough: wrap dough in plastic wrap and refrigerate for at least 1 hour.
- Preheat oven to 350°F (175°C) and line baking sheets with parchment paper or silicone mats.
- Roll out dough: lightly flour surface and rolling pin; roll dough to about ¼ inch (6 mm) thickness.
- Cut cookies: use alphabet cookie cutters to cut letters; transfer to baking sheet spaced 1 inch apart.
- Bake cookies for 8-10 minutes until edges just start to turn golden; watch closely to avoid browning.
- Cool cookies on baking sheet for 5 minutes, then transfer to wire rack to cool completely.
- Prepare royal icing: combine powdered sugar and meringue powder; add warm water one tablespoon at a time until stiff peaks form; adjust consistency as needed.
- Divide icing into small bowls and tint with food coloring as desired.
- Decorate cookies: outline each letter with icing, then flood centers using a toothpick or small spatula; let icing set at room temperature for several hours or overnight.
Notes
If icing is too runny, add more powdered sugar; if too thick, add a few drops of water. Let decorated cookies dry overnight for best finish. Use gel food coloring to avoid thinning icing. Chill dough well before rolling to prevent sticking and shape loss. Dough can be prepared up to 3 days ahead and refrigerated. Freeze undecorated cookies up to 3 months.
Nutrition
- Serving Size: 1 cookie
- Calories: 110130
- Fat: 57
- Carbohydrates: 1518
- Protein: 12
Keywords: alphabet cookies, sugar cookies, royal icing, fun baking, kids baking, easy cookies, cookie decorating, ABC cookies