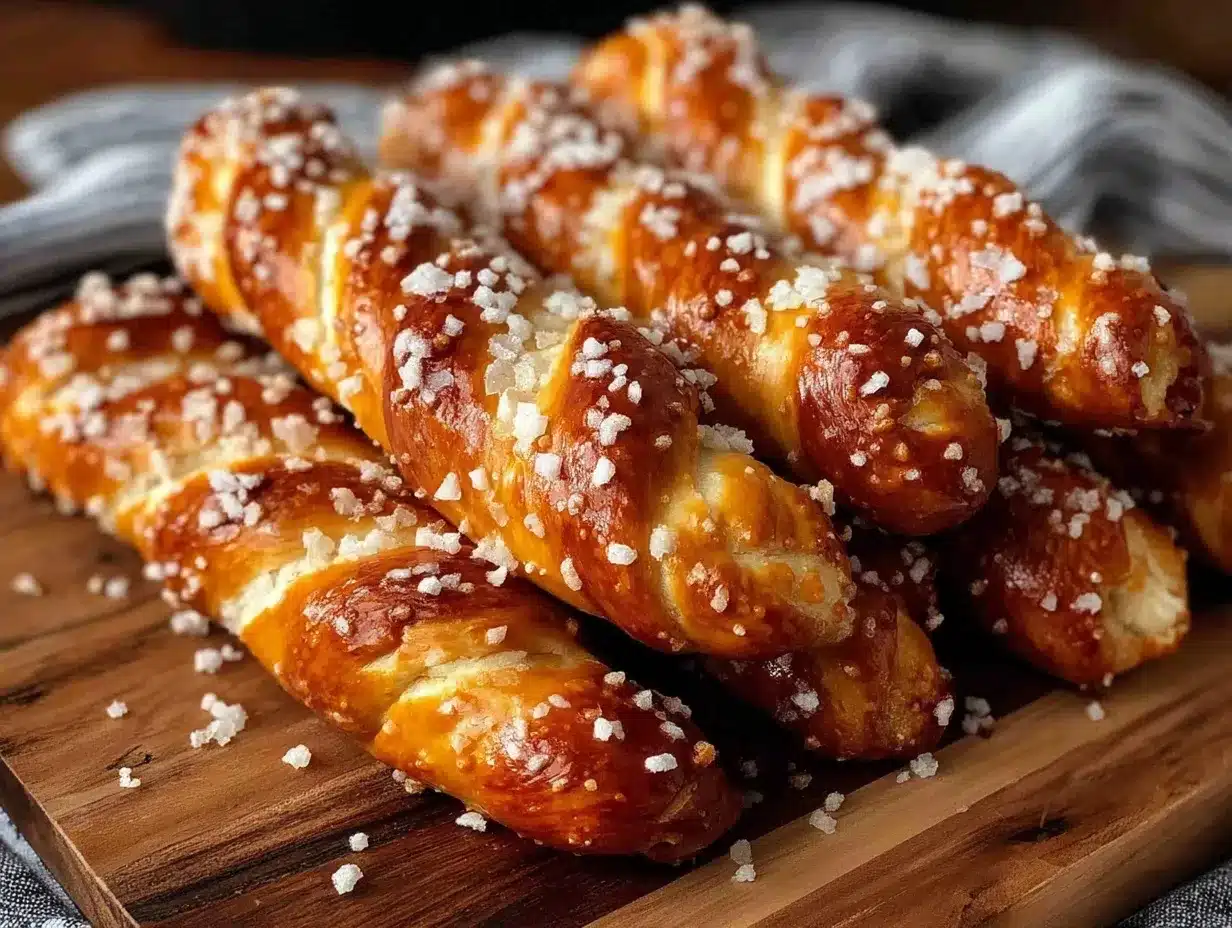
My niece took one look at these crispy pencil-shaped pretzel rods with their sunny yellow candy coating and said, “Can I have ten more?”—and honestly, that’s when I knew I’d stumbled on something special. She wasn’t even asked to try them again, but there she was, back for more like it was some kind of magic snack. The way her eyes lit up as she bit through that crisp candy shell and hit the salty pretzel inside was a moment I didn’t see coming.
It wasn’t just a kid’s whim, either. Later that evening, my partner casually reached for one during our movie night and gave a quiet nod of approval, the kind that usually means, “Yeah, keep making these.” The contrast between the sweet, almost tangy yellow candy and the crunch of the pretzel was a little unexpected but totally addictive. It’s funny how a simple twist—turning classic pretzel rods into pencil-shaped treats—can bring a spark of joy to snack time.
Watching their reactions made me realize this recipe wasn’t just about candy-coated pretzels; it was about crafting something that sparks a small moment of delight, no matter the age. Something easy enough to whip up on a whim but with enough personality to feel like a treat. And because the yellow candy coating is smooth, not too thick, and perfectly crisp, it doesn’t overpower the salty crunch inside. That balance is why this recipe sticks with me—a little reminder that snacks can be fun, quick, and surprisingly memorable.
Why You’ll Love This Crispy Pencil-Shaped Pretzel Rods Recipe
Honestly, this recipe has become a little secret weapon for quick homemade treats that impress without fuss. I’ve tested various candy coatings and shapes, but the pencil-like shape adds a playful twist that’s perfect for parties, school snacks, or just an afternoon pick-me-up.
- Quick & Easy: You can have these ready in under 30 minutes, ideal for last-minute cravings or when unexpected guests show up.
- Simple Ingredients: No need for fancy or hard-to-find ingredients—basic pretzel rods and candy melts are all you need.
- Perfect for Celebrations: Their pencil shape makes them a hit for back-to-school parties, kid-friendly events, or even as colorful dessert table additions.
- Crowd-Pleaser: Both kids and adults love the sweet-salty combo, and the candy coating’s bright yellow hue is a cheerful eye-catcher.
- Unbelievably Delicious: The thin, crispy candy shell cracks just right to reveal the crunchy pretzel, delivering a satisfying texture contrast.
What sets this recipe apart is the attention to the candy coating’s consistency. I’ve found that melting the yellow candy melts carefully (not too hot!) keeps the coating smooth and glossy, avoiding that weird grainy texture you sometimes get. Also, shaping the pretzels to mimic pencils—not just straight rods—adds a fun element that kids, especially, find irresistible.
It’s not just a snack recipe; it’s a way to turn simple ingredients into something a little special, a treat that makes snack time feel lighter and more playful. And if you’re like me, always juggling quick dinners like the sheet pan honey mustard salmon or the fresh caprese sandwich with creamy pesto mayo, having a reliable, speedy treat up your sleeve is a game-changer. These pretzel rods fit right in.
What Ingredients You Will Need
This recipe uses simple, wholesome ingredients to deliver bold flavor and a satisfying crunch without the fuss. Most of these are pantry staples, and the candy melts come in fun colors that you can swap seasonally or for different occasions.
- Pretzel rods: Choose sturdy, thick rods that can hold up to the candy coating without breaking. I like the classic pretzel rods from Rold Gold for the best crunch.
- Yellow candy melts: These are the star for the coating. You can find Wilton or Mercken’s brand candy melts in most craft or baking stores. The yellow color is cheerful and perfect for the pencil look.
- Vegetable shortening (optional): About 1 tablespoon helps thin out the candy melts for a smoother dip without losing that crisp finish.
- Edible black decorating gel or black icing pen: For drawing the pencil tip details (like the graphite point and bands). Adds a nice finishing touch.
- Light corn syrup (optional): Adding a splash (about 1 teaspoon) to the melted candy can keep the coating shiny and less brittle.
For substitutions, if you want to switch up the color, you can use other candy melt colors (like red for a cherry twist) or even white chocolate tinted with food coloring. For a gluten-free option, swap the pretzels for gluten-free rods, but be mindful the texture will vary slightly.
If you want to skip the candy melts, you might try dipping in colored white chocolate, but the candy melts give that signature crisp shell that’s hard to replicate.
Equipment Needed
- Microwave-safe bowl or double boiler: Needed to melt the candy melts gently. I prefer the microwave method, stirring every 30 seconds to avoid overheating.
- Baking sheet lined with parchment paper or silicone mat: For placing the coated pretzels to set without sticking.
- Fork or dipping tool: Helpful for dipping the pretzels evenly and letting excess drip off.
- Toothpicks or small paintbrush: For applying the black decorating gel or icing details.
- Cooling rack (optional): For setting the pretzels if you want airflow all around to speed drying.
For a budget-friendly option, parchment paper works perfectly, and a simple microwave-safe glass bowl does the job melting candy. If you’re making these often, a double boiler setup can help prevent overheating and burning the candy melts, which is a quick way to ruin the texture.
Preparation Method
- Prep your workspace: Line a baking sheet with parchment paper or a silicone mat so the pretzels won’t stick.
- Melt the candy coating: Place 8 ounces (about 227 grams) of yellow candy melts in a microwave-safe bowl. Heat in 30-second bursts, stirring well each time. When nearly melted, add 1 tablespoon vegetable shortening and 1 teaspoon light corn syrup to smooth the texture. Stir until glossy and fully melted.
- Dip the pretzels: Holding a pretzel rod by one end, dip it into the melted candy coating until mostly covered, leaving about 1 inch (2.5 cm) at the bottom uncovered to mimic a pencil’s eraser end. Let excess drip off back into the bowl.
- Shape the tip: To create the pencil tip, gently press the candy-coated end of the rod against the parchment paper forming a slight angle or taper (think of a sharpened pencil point). Do this carefully before the coating sets.
- Set and dry: Place the dipped pretzels on the lined baking sheet. Allow them to set at room temperature for 15-20 minutes or in the fridge for 10 minutes to firm up.
- Decorate the pencil tip: Using edible black decorating gel or a black icing pen, draw the pointed graphite tip at the candy-coated end. Add a thin black band near the other end to represent the metal ferrule of a pencil. Let dry completely.
- Store or serve: Once fully set, transfer pretzels to a container or serve immediately.
Watch out for overheating the candy melts — if they get too hot, the texture becomes grainy and dull. Stirring frequently is key. Also, if your kitchen is warm, consider setting the pretzels in the fridge to firm up faster, though room temperature drying helps avoid condensation.
One time I rushed and dipped too many pretzels at once, and the candy hardened too fast in the bowl—lesson learned: work in small batches for best results.
Cooking Tips & Techniques
For the crispiest candy coating, the key is in controlling the temperature of your melted candy. Too hot, and it loses its snap; too cool, and it gets clumpy. I’ve found that stirring every 20-30 seconds while microwaving keeps it silky smooth.
When dipping, hold the pretzel at an angle to get an even candy coat without drips pooling at the bottom. Letting excess drip off is crucial to avoid thick, chewy spots that slow the crunch.
Using vegetable shortening thins the candy melts slightly, which makes a thinner, crisper shell. It also helps the candy stay shiny rather than matte.
If you want super sharp pencil tips, try shaping the wet candy with a small offset spatula before it sets. This step adds a little extra flair but isn’t mandatory.
Common mistake: rushing to decorate before the candy coating fully sets. That can cause smudges or bleeding colors. Patience here pays off.
Timing tip: While the pretzels set, you can multitask by prepping the easy zesty lemon garlic shrimp pasta for dinner or get your lunch ready with the fresh caprese sandwich with creamy pesto mayo. That way, the snack and meal come together smoothly.
Variations & Adaptations
- Color swaps: Use candy melts in red, blue, or green for holiday themes or birthday parties. I once made these in pastel pink for a baby shower, and they were a hit.
- Flavor twists: Add a sprinkle of sea salt or cinnamon sugar to the candy coating before it sets for a unique flavor combo.
- Dietary adjustments: For dairy-free versions, use dairy-free candy melts (brands like Enjoy Life make great options) and gluten-free pretzel rods.
- Chocolate coating: Swap the yellow candy melts for dark or white chocolate for a richer taste. Just keep the coating thin to maintain crispness.
- Decorative toppings: Try adding edible glitter or tiny sprinkles on the candy coating before it sets for extra sparkle.
Personally, I like to experiment by dipping the pencil tips in a thin layer of melted dark chocolate after the yellow candy sets, creating a “sharpened” look that’s visually fun and adds a flavor contrast.
Serving & Storage Suggestions
These crispy pencil-shaped pretzel rods are best served at room temperature to keep the candy coating crisp and the pretzel inside crunchy. They make a fun addition to snack trays or packed lunchboxes, especially when you want something a little different.
Pair them with a fresh fruit salad or a creamy dip like chocolate or caramel sauce for dipping. They also go surprisingly well alongside savory dishes like the fresh Thai cucumber noodle salad with creamy peanut sauce if you want a sweet crunch to balance flavors.
Store leftover pretzels in an airtight container at room temperature for up to 5 days. Avoid refrigeration, which can cause the candy coating to sweat and lose crispness. If you want to freeze them, wrap individually in plastic wrap and place in a freezer-safe bag; thaw at room temperature before serving.
Over time, the candy coating may soften slightly, but the flavor holds up well, making these a great make-ahead treat for parties or gifting.
Nutritional Information & Benefits
Each candy-coated pretzel rod contains approximately 120-150 calories, depending on the thickness of the candy coating. They provide a satisfying balance of sweet and salty flavors, with the pretzel offering a modest source of carbohydrates for quick energy.
Key ingredients like the pretzels contribute some dietary fiber and iron, while the candy melts add sugar and fat. This snack is definitely an occasional treat rather than an everyday staple.
For those watching allergens, these pretzels contain gluten and may contain traces of dairy or soy depending on the candy melt brand, so always check labels if allergies are a concern.
From my perspective, these treats fit perfectly into a balanced lifestyle—something fun and homemade you can enjoy without guilt in moderation, especially when paired with healthier meals like the sheet pan honey mustard salmon dinner.
Conclusion
These crispy pencil-shaped pretzel rods with yellow candy coating are more than just a sweet snack—they’re a joyful little project with surprisingly big smiles. They come together quickly, use ingredients you probably already have, and add a pop of color and crunch to snack time that feels just a bit special.
If you like playful treats that are easy to make and fun to share, this recipe hits the mark. Plus, the pencil shape and bright candy shell make them stand out from ordinary candy-coated pretzels. I love how these have become my go-to for quick treats that feel homemade but impressive.
Give them a try and see who in your family or circle goes back for seconds—there’s something about these that’s just a little addictive. And when you do, drop a comment sharing your twist or how you served them. I’d love to hear about your experience!
Happy snacking and happy dipping!
FAQs About Crispy Pencil-Shaped Pretzel Rods
Can I use regular pretzels instead of rods?
Regular pretzels won’t have the same pencil-like shape or sturdy length needed for this recipe. Pretzel rods are best for coating evenly and creating that fun pencil effect.
How do I prevent the candy coating from melting in warm weather?
Store the pretzels in a cool, dry place. Avoid direct sunlight or heat, which can soften the candy shell. Refrigeration is not recommended as it causes condensation.
Can I make these ahead for a party?
Yes! These pretzel rods keep well for several days at room temperature in an airtight container, making them great for prepping a day or two in advance.
What if my candy melts get grainy?
Graininess usually means overheating. Melt in short bursts and stir frequently. Adding a little vegetable shortening can help smooth the texture.
Are there any fun ways to decorate beyond the pencil tip?
Definitely! You can add edible glitter, sprinkles, or drizzle contrasting candy colors for a festive look. Using edible markers for details also works well.
Pin This Recipe!
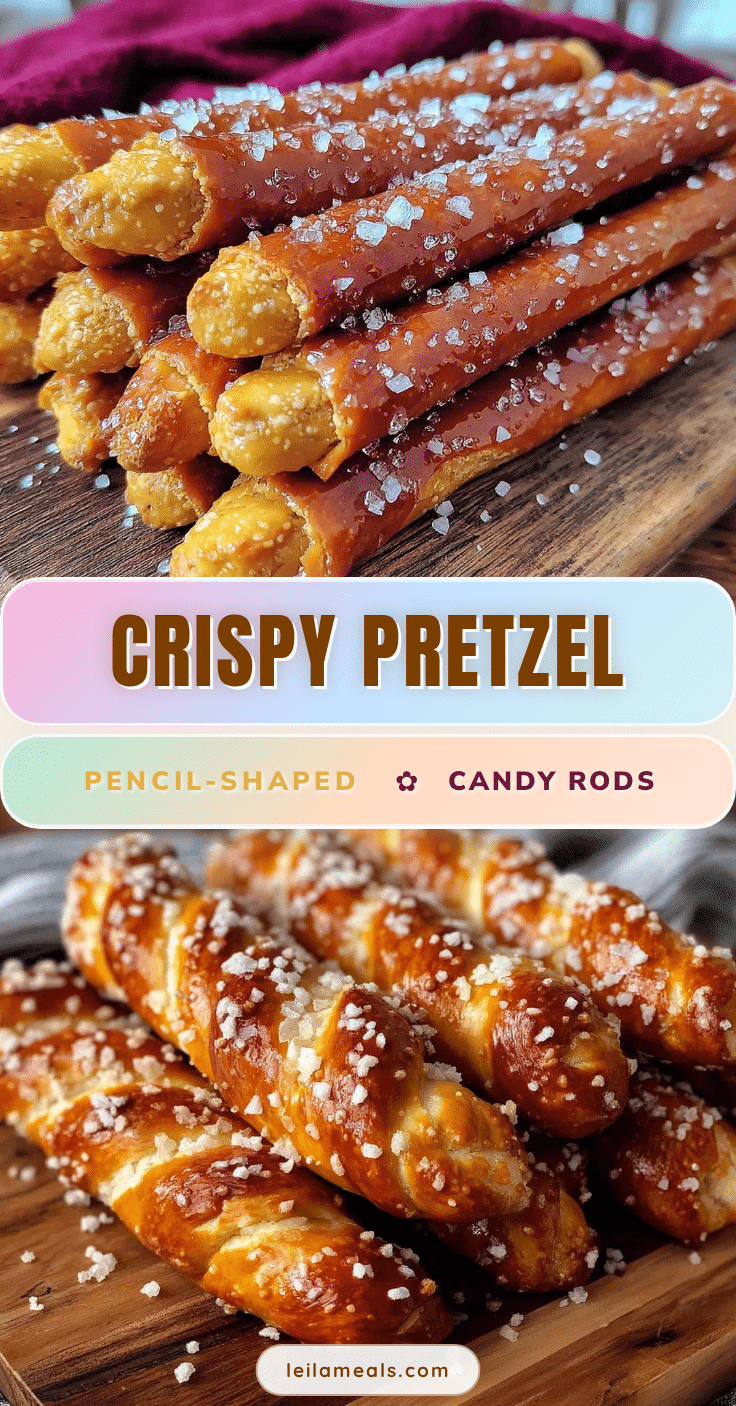
Crispy Pencil-Shaped Pretzel Rods Recipe Easy Homemade Candy Coating Treats

These crispy pencil-shaped pretzel rods feature a bright yellow candy coating that cracks perfectly to reveal a salty pretzel inside, making a fun and addictive snack for all ages.
- Prep Time: 10 minutes
- Cook Time: 15 minutes
- Total Time: 25 minutes
- Yield: 12 servings 1x
- Category: Snack
- Cuisine: American
Ingredients
- Pretzel rods (sturdy, thick rods)
- 8 ounces yellow candy melts
- 1 tablespoon vegetable shortening (optional)
- 1 teaspoon light corn syrup (optional)
- Edible black decorating gel or black icing pen
Instructions
- Line a baking sheet with parchment paper or a silicone mat so the pretzels won’t stick.
- Place 8 ounces (about 227 grams) of yellow candy melts in a microwave-safe bowl. Heat in 30-second bursts, stirring well each time.
- When nearly melted, add 1 tablespoon vegetable shortening and 1 teaspoon light corn syrup to smooth the texture. Stir until glossy and fully melted.
- Holding a pretzel rod by one end, dip it into the melted candy coating until mostly covered, leaving about 1 inch (2.5 cm) at the bottom uncovered to mimic a pencil’s eraser end. Let excess drip off back into the bowl.
- To create the pencil tip, gently press the candy-coated end of the rod against the parchment paper forming a slight angle or taper before the coating sets.
- Place the dipped pretzels on the lined baking sheet. Allow them to set at room temperature for 15-20 minutes or in the fridge for 10 minutes to firm up.
- Using edible black decorating gel or a black icing pen, draw the pointed graphite tip at the candy-coated end and add a thin black band near the other end to represent the metal ferrule of a pencil. Let dry completely.
- Once fully set, transfer pretzels to a container or serve immediately.
Notes
Avoid overheating candy melts to prevent grainy texture. Stir frequently while melting. Work in small batches to avoid candy hardening too fast. For faster setting, refrigerate but avoid condensation by drying at room temperature if possible. Use vegetable shortening to thin candy melts for a smoother, crisper shell.
Nutrition
- Serving Size: 1 candy-coated pretz
- Calories: 135
- Sugar: 15
- Sodium: 250
- Fat: 5
- Saturated Fat: 2.5
- Carbohydrates: 22
- Fiber: 1
- Protein: 2
Keywords: pretzel rods, candy coating, pencil-shaped pretzels, homemade treats, easy snacks, candy melts, party snacks, kids snacks