“Mom, can we have nuggets again?” That’s the kind of question that hits you right after a long day when your brain is a little mush and dinner needs to happen fast. I used to rely on the frozen aisle’s quick-fix nuggets, but honestly, they never quite hit that crispy, juicy note I craved. One evening, after a particularly chaotic day juggling work and a cranky toddler, I decided to try making chicken nuggets from scratch—baked, not fried, because who wants extra mess after a long day? I wasn’t expecting much, just something quick and passable.
But then, the oven timer dinged, and I pulled out these golden, crunchy nuggets that smelled like a dream. The crisp coating held up beautifully, and the chicken inside was juicy and tender, not dry or rubbery like so many baked attempts I’d tried before. My skeptical kiddo even gave a thumbs up (and asked for seconds), which sealed the deal for me. Since then, I’ve made these nuggets multiple times a week—sometimes even sneaking in extra spices or pairing them with a quick homemade dip. This recipe stuck because it’s simple, reliable, and honestly a little bit of comfort wrapped in a crispy crust. No complicated frying, no mystery ingredients, just real food done right.
Sometimes, when life is hectic, it’s these small wins in the kitchen that feel the most grounding. And that’s why this crispy homemade baked chicken nuggets recipe is one I keep coming back to—it’s my no-fuss solution that tastes way better than anything store-bought, made with care from scratch.
Why You’ll Love This Recipe
From my many experiments in the kitchen, this crispy homemade baked chicken nuggets recipe stands out because it balances convenience with real, delicious flavor. Here’s why I think it should be your go-to nugget fix:
- Quick & Easy: Ready in about 30 minutes, perfect for nights when you want something homemade but fast.
- Simple Ingredients: No need for weird additives—just chicken, pantry staples, and a few herbs and spices.
- Perfect for Family Meals: Whether it’s a kid’s lunchbox or a casual dinner, these nuggets always get devoured.
- Crowd-Pleaser: I’ve brought these to potlucks and they disappear quickly—adults and kids alike love them!
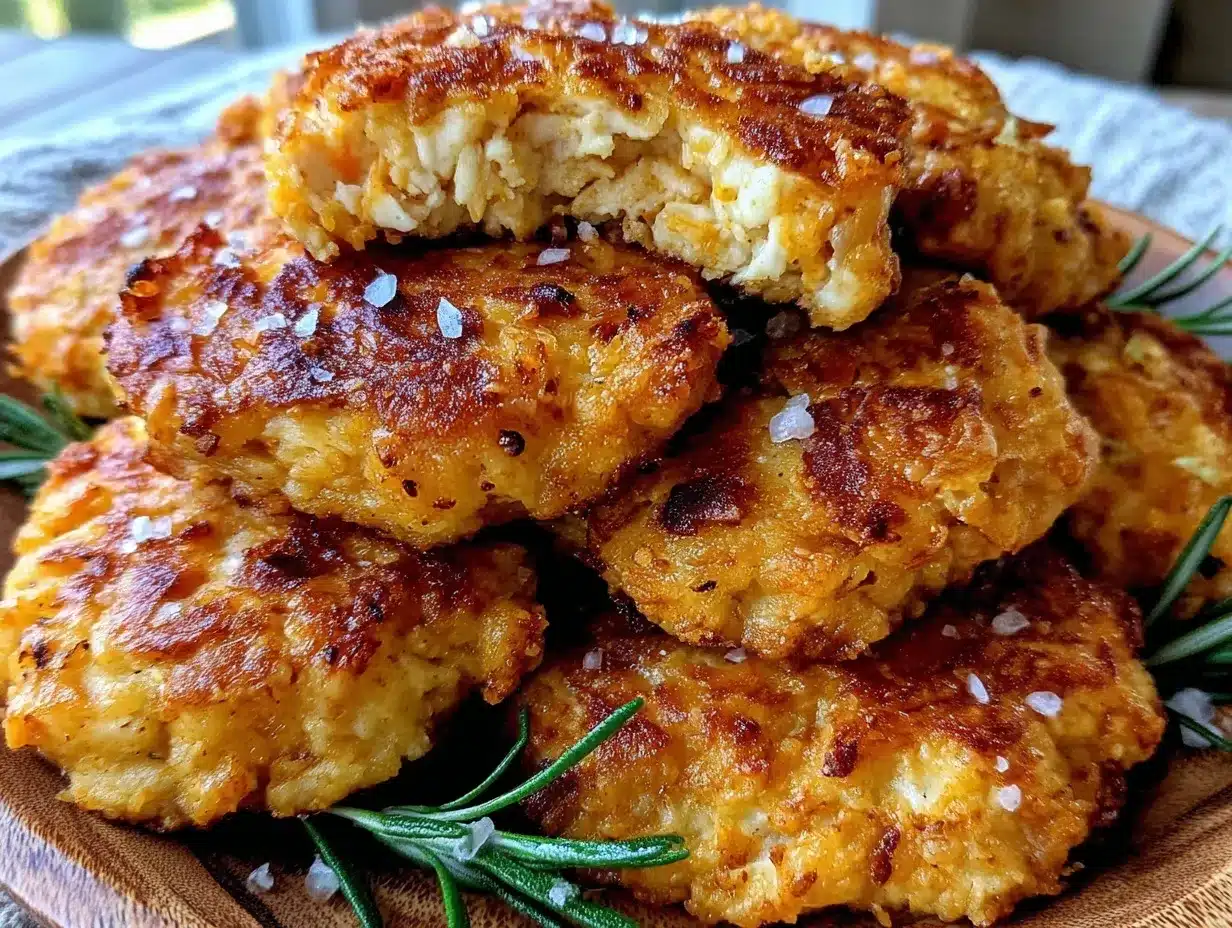
- Unbelievably Delicious: The crispy coating made from panko breadcrumbs keeps its crunch, while the chicken stays juicy inside.
This recipe isn’t just another baked nugget. The trick is in the double-coating method and a touch of seasoning in the flour mix that gives each bite a flavorful punch. Plus, baking instead of frying means less oil and less mess without sacrificing that golden, crispy texture. Honestly, it’s like the nuggets you remember from childhood but better and made with your own hands. For a fuss-free meal with the feeling of homemade comfort, this one’s a winner.
What Ingredients You Will Need
This recipe uses simple, wholesome ingredients to deliver bold flavor and satisfying texture without the fuss. Most of these are pantry staples, and substitutions are easy if needed.
- Chicken Breast, boneless and skinless, cut into nugget-sized pieces (about 1 pound / 450 g). I prefer fresh, high-quality chicken for the best texture.
- All-Purpose Flour (about ½ cup / 65 g) – for the first coating layer to help the breading stick.
- Panko Breadcrumbs (1 to 1¼ cups / 100-125 g) – these give the nuggets their signature crunch. Japanese brand panko works best for extra crispiness.
- Eggs, 2 large, beaten – acts as the glue for the breadcrumbs.
- Garlic Powder, 1 teaspoon – adds savory depth to the coating.
- Onion Powder, 1 teaspoon – complements the garlic perfectly.
- Paprika, 1 teaspoon – gives a subtle smoky hint and color.
- Salt, 1 teaspoon – enhances all the flavors.
- Black Pepper, ½ teaspoon – freshly ground if possible.
- Olive Oil or Cooking Spray – to lightly coat the nuggets before baking for extra crunch.
Optional:
- Parmesan Cheese, finely grated, ¼ cup (adds a savory richness mixed into the panko coating)
- Chili Powder or Cayenne Pepper, ¼ teaspoon (for a little kick if you like it spicy)
- Fresh Herbs like parsley or thyme, finely chopped (sprinkled in the coating for freshness)
You can swap all-purpose flour for almond flour for a gluten-free option, and coconut or oat milk can replace eggs for egg-free diets, though the coating texture might differ. For best results, choose fresh chicken and avoid pre-seasoned breadcrumbs, which can be too salty or inconsistent.
Equipment Needed
- Baking Sheet: A rimmed baking sheet to catch any drips and allow for even cooking. I like using a heavy-duty aluminum one—it heats up evenly.
- Cooling Rack: Placing a wire rack on top of the baking sheet helps the heat circulate around the nuggets, making them crispier on all sides.
- Three Shallow Bowls or Plates: For the flour, beaten eggs, and breadcrumb mixtures. Shallow dishes make dredging easier and faster.
- Kitchen Tongs: Useful for turning nuggets without ruining the coating.
- Measuring Cups & Spoons: Precise measurements help keep the spices balanced.
If you don’t have a cooling rack, you can bake the nuggets directly on the baking sheet, but flipping them halfway through is important to keep the crust crisp. For a budget-friendly option, foil-lined baking sheets work well and make cleanup a breeze. I’ve tried baking these nuggets in an air fryer too, which is great if you want even faster cooking and less oven use, similar to my crispy air fryer coconut shrimp experience.
Preparation Method
- Preheat your oven to 425°F (220°C). Line your baking sheet with foil and place a wire cooling rack on top. (This keeps nuggets crispy all around.) This step takes about 10 minutes, so you can prep while the oven warms.
- Prepare the breading stations: In the first shallow bowl, place the all-purpose flour mixed with half the salt, pepper, garlic powder, and onion powder. In the second bowl, beat the eggs. In the third bowl, combine panko breadcrumbs with paprika, remaining salt, pepper, and optional parmesan or herbs if using.
- Cut the chicken breasts into bite-sized nuggets, roughly 1.5 inches (3.8 cm) pieces. Try to keep them uniform for even cooking.
- Dredge the chicken pieces: First, toss them lightly in the seasoned flour, shaking off excess. Then dip into the beaten eggs, coating fully. Finally, press the chicken into the panko mixture, ensuring every side is covered well. (If you want extra crunch, repeat the egg and breadcrumb step once more.)
- Arrange the coated nuggets on the wire rack so they don’t touch. Lightly spray or brush olive oil over each nugget—this little step really helps the crust brown beautifully without frying.
- Bake in the preheated oven for 15 minutes. At this point, use tongs to flip them gently and spray lightly with more oil. Bake for an additional 8-10 minutes until golden brown and cooked through. Internal temperature should reach 165°F (74°C).
- Remove from oven and let them rest for a couple of minutes before serving. This helps the coating crisp up even more and locks in the juicy tenderness.
If you notice any uneven browning, rotate your baking sheet halfway through cooking. Keep an eye on the nuggets after 20 minutes to avoid drying out. The smell of garlic and paprika roasting in the oven is a great indicator you’re on the right track!
Cooking Tips & Techniques
To get these nuggets perfectly crispy, a few tricks have worked well for me over the years—and trust me, I’ve had my share of soggy failures:
- Use Panko Breadcrumbs: They’re the secret to that iconic crunch. Regular breadcrumbs tend to get mushy when baked.
- Double Coating: For extra crunch, dip the nuggets in egg and breadcrumbs twice. I know it sounds like extra work, but it’s worth it.
- Wire Rack Baking: Baking on a rack lets hot air circulate, crisping all sides and preventing sogginess.
- Don’t Overcrowd: Give each nugget some breathing room on the tray. If they’re squished together, they steam instead of crisp.
- Light Oil Spray: A quick spritz or brush of olive oil mimics frying and helps the golden crust form.
- Temperature Control: Baking at a high temperature (425°F/220°C) crisps the coating quickly without drying out the chicken.
- Check Internal Temperature: Use a meat thermometer to avoid undercooking or drying out your chicken nuggets.
One thing I learned the hard way is that skipping the flour stage leads to the coating slipping off during baking. Also, resting the nuggets after baking is crucial—if you dig in right away, the crust can seem softer. For a little twist, I’ve added a sprinkle of smoked paprika in the breadcrumb mix to give a subtle smoky flavor that’s addictive.
Variations & Adaptations
You can easily tweak this recipe to suit different tastes or dietary needs:
- Gluten-Free Option: Swap all-purpose flour with almond flour or a gluten-free blend, and use gluten-free panko breadcrumbs.
- Spicy Nuggets: Add cayenne pepper or chili powder to the flour and breadcrumb mix for a kick. Serve with a cooling ranch dip to balance heat.
- Herb-Infused: Mix in fresh chopped rosemary, thyme, or parsley into the breadcrumb coating for an aromatic twist.
- Air Fryer Method: Cook the nuggets at 400°F (200°C) for about 10-12 minutes, flipping halfway. This method locks in crispiness with less oil and less oven time.
- Dairy-Free: Skip parmesan and use plant-based milk in place of eggs, dipping the nuggets in a flaxseed “egg” mixture.
Personally, I’ve tried these nuggets with a dash of curry powder in the coating for a warm, savory spin. It pairs beautifully with a quick homemade mango chutney or even alongside a creamy pasta like my creamy Cajun chicken pasta. The flavor combo is surprisingly fantastic!
Serving & Storage Suggestions
These homemade chicken nuggets are best served warm and crispy right out of the oven. I usually plate them with a side of fresh veggies or sweet potato fries for a balanced meal. For dipping, classic ketchup works, but I also love pairing them with honey mustard or a quick sriracha mayo for a little heat.
If you’re preparing ahead or have leftovers, store cooled nuggets in an airtight container in the fridge for up to 3 days. To reheat, spread them out on a baking sheet and pop them back in a 375°F (190°C) oven for 8-10 minutes to crisp up again—microwaving tends to make them soggy.
For longer storage, nuggets freeze beautifully. Arrange them on a parchment-lined tray and freeze until solid, then transfer to a freezer bag. Reheat straight from frozen in a hot oven or air fryer—just add a few extra minutes to the cooking time. Over time, the flavors meld a bit, and the coating stays satisfyingly crunchy after reheating.
Nutritional Information & Benefits
This recipe provides a wholesome homemade alternative to processed nuggets, with control over salt, oil, and additives. A serving of about 6 nuggets (roughly 150g) contains approximately:
| Nutrient | Amount |
|---|---|
| Calories | 320 kcal |
| Protein | 35 g |
| Fat | 10 g |
| Carbohydrates | 15 g |
| Fiber | 1.5 g |
| Sodium | 450 mg |
Chicken breast is a lean protein source, supporting muscle health and satiety. The use of olive oil adds heart-healthy fats, while panko breadcrumbs contribute some carbohydrates and fiber for energy. By baking instead of frying, this recipe keeps the fat content moderate, making it a better choice for a balanced diet. It’s naturally gluten-free adaptable and free from artificial preservatives.
Conclusion
This crispy homemade baked chicken nuggets recipe has become a staple in my kitchen for good reason. It’s straightforward, quick, and rewards you with that perfect crunch and juicy chicken every time. Whether you’re cooking for picky eaters or just want a tasty, homemade alternative to fast food, this recipe delivers.
Feel free to tweak the seasoning to suit your family’s preferences or pair these nuggets with some of your favorite sides and dips. I love how this recipe invites creativity while keeping things simple—like my go-to for a busy weeknight meal. If you try it out, I’d love to hear how you make it your own or what dipping sauce you pair them with. Cooking should always be fun and comforting, and these nuggets are just that.
Frequently Asked Questions
Can I use chicken thighs instead of breast?
Yes! Boneless, skinless chicken thighs work well and can add extra juiciness, though they may take a minute or two longer to cook through.
How do I keep the nuggets crispy after baking?
Baking on a wire rack and lightly spraying with oil helps, as does reheating in the oven instead of the microwave.
Can I make these nuggets ahead of time?
Absolutely. You can prep and bread them in advance, then bake just before serving. They also freeze well for quick meals later.
What dipping sauces pair best with homemade chicken nuggets?
Classic choices like ketchup, honey mustard, ranch, or spicy sriracha mayo are fantastic. You can also try homemade barbecue sauce or a creamy garlic dip.
Is this recipe suitable for an air fryer?
Yes, cooking at 400°F (200°C) for 10-12 minutes with a flip halfway works great and yields super crispy nuggets with less oil.
Pin This Recipe!
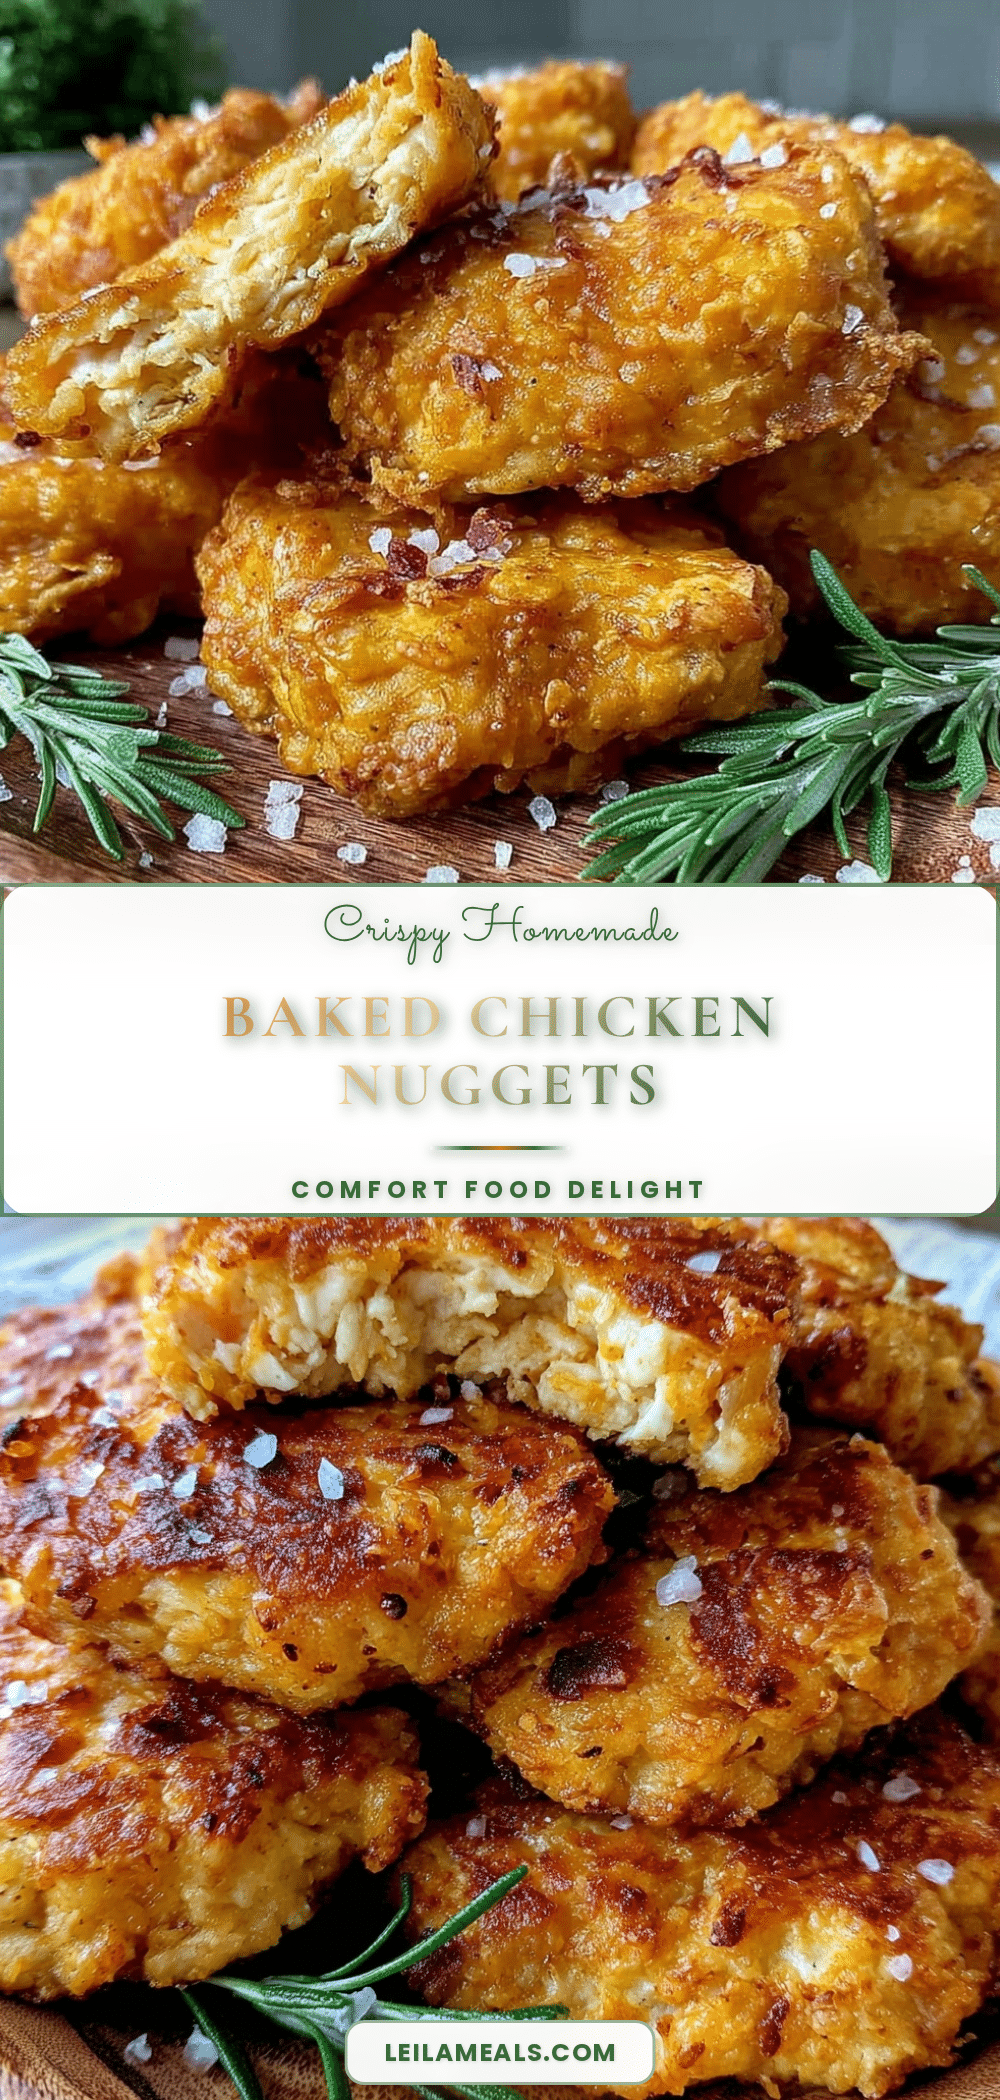
Crispy Homemade Baked Chicken Nuggets Recipe Easy and Perfect from Scratch

This recipe delivers crispy, juicy baked chicken nuggets made from scratch with simple ingredients and a double-coating method for extra crunch. Perfect for quick family meals without frying.
- Prep Time: 10 minutes
- Cook Time: 25 minutes
- Total Time: 35 minutes
- Yield: 4 servings 1x
- Category: Main Course
- Cuisine: American
Ingredients
- 1 pound (450 g) boneless, skinless chicken breast, cut into nugget-sized pieces
- ½ cup (65 g) all-purpose flour
- 1 to 1¼ cups (100–125 g) panko breadcrumbs
- 2 large eggs, beaten
- 1 teaspoon garlic powder
- 1 teaspoon onion powder
- 1 teaspoon paprika
- 1 teaspoon salt, divided
- ½ teaspoon black pepper, freshly ground
- Olive oil or cooking spray, for coating
- Optional: ¼ cup finely grated Parmesan cheese
- Optional: ¼ teaspoon chili powder or cayenne pepper
- Optional: Fresh herbs like parsley or thyme, finely chopped
Instructions
- Preheat oven to 425°F (220°C). Line a rimmed baking sheet with foil and place a wire cooling rack on top.
- Prepare breading stations: In the first shallow bowl, mix all-purpose flour with half the salt, pepper, garlic powder, and onion powder. In the second bowl, beat the eggs. In the third bowl, combine panko breadcrumbs with paprika, remaining salt, pepper, and optional Parmesan or herbs.
- Cut chicken breasts into 1.5-inch (3.8 cm) nugget-sized pieces, keeping them uniform.
- Dredge chicken pieces first in the seasoned flour, shaking off excess, then dip into beaten eggs, and finally press into the panko mixture to coat all sides. For extra crunch, repeat the egg and breadcrumb step once more.
- Arrange coated nuggets on the wire rack so they do not touch. Lightly spray or brush olive oil over each nugget.
- Bake for 15 minutes, then flip nuggets using tongs, spray lightly with more oil, and bake for an additional 8-10 minutes until golden brown and cooked through (internal temperature 165°F/74°C).
- Remove from oven and let rest for a couple of minutes before serving to crisp up the coating and lock in juiciness.
Notes
Use panko breadcrumbs for best crunch. Double coating with egg and breadcrumbs adds extra crispiness. Baking on a wire rack allows heat circulation for even crisping. Lightly spray olive oil to mimic frying without the mess. Check internal temperature to avoid undercooking. Rest nuggets after baking for best texture. For gluten-free, substitute almond flour and gluten-free panko. For dairy-free, omit Parmesan and use plant-based egg substitutes.
Nutrition
- Serving Size: About 6 nuggets (150
- Calories: 320
- Sodium: 450
- Fat: 10
- Carbohydrates: 15
- Fiber: 1.5
- Protein: 35
Keywords: chicken nuggets, baked chicken nuggets, crispy chicken nuggets, homemade chicken nuggets, easy chicken nuggets, family meal, kid-friendly, baked nuggets