Introduction
I did not trust the idea of a cheesecake that never touched the oven until a late summer afternoon when the oven was broken, and I was desperate for dessert. Honestly, the concept of no-bake cheesecake bars sounded too good to be true—how could something so creamy and rich come together without baking? I’d always pictured cheesecake as this delicate, finicky affair that required precision and patience, not a quick throw-together treat.
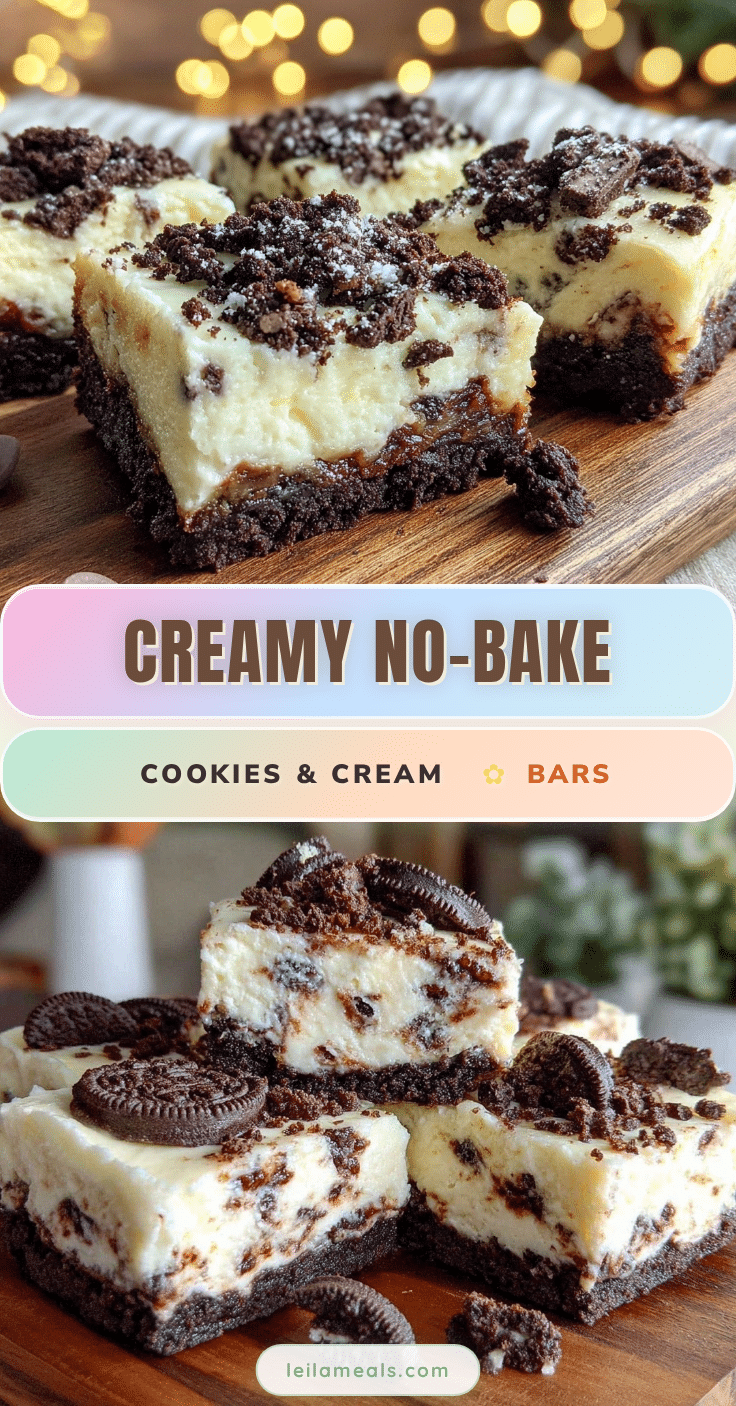
But there I was, with a bag of cookies, some cream cheese, and a random craving that wouldn’t quit. The texture surprised me first: velvety, smooth, with just the right density—not too heavy, not too light. The cookies embedded in the creamy filling added a nostalgic crunch that took me back to childhood afternoons and sneaky snack breaks. I remember thinking, “Okay, this is not a fluke.”
The bars chilled overnight, but the real revelation came with the first bite—the familiar cookies and cream flavor married with a luscious cheesecake base that didn’t fall apart or feel overly sweet. It stuck with me because it was easy enough for busy nights yet special enough for sharing. I found myself reaching for it on those scrambly days when I didn’t want to fuss but still craved something comforting and indulgent. This recipe has a quiet confidence—no grand promises, just a simple, creamy dessert that feels like a warm hug after a long day.
Why You’ll Love This Recipe
After testing this creamy no-bake cookies & cream cheesecake bars recipe multiple times, I can say it’s an absolute keeper. Here’s why you’ll be reaching for it again and again:
- Quick & Easy: Ready in under 20 minutes (plus chilling time), this dessert is perfect when you want something delicious without spending hours in the kitchen.
- Simple Ingredients: Most of these are pantry staples—cream cheese, crushed cookies, and a handful of other basics you probably already have on hand.
- Perfect for Any Occasion: Whether it’s a casual family gathering or a last-minute potluck contribution, these bars fit the bill without stress.
- Crowd-Pleaser: Kids and adults alike tend to go back for seconds (and thirds), making it a reliable dessert for all ages.
- Unbelievably Delicious: The creamy texture with crunchy cookie pieces is just the right balance that satisfies that sweet tooth craving.
What sets this recipe apart? It’s the no-bake method combined with a little twist—folding in crushed cookies directly into the cheesecake filling, so each bite has that perfect cookies & cream pop. I’ve tweaked the sweetness and texture to avoid the overly dense or chalky feel some no-bake cheesecakes get. Honestly, it’s the kind of dessert that makes you close your eyes and savor each bite, no fuss involved.
This recipe has become my go-to for easy entertaining, especially when I’m making quick healthy dinners or after whipping up a vibrant meal like the fresh Caprese sandwich. It’s simple, satisfying, and just a little bit nostalgic.
What Ingredients You Will Need
This recipe uses simple, wholesome ingredients to deliver that bold cookies & cream flavor and satisfyingly creamy texture without the fuss. Most ingredients are easy to find and often stocked in the pantry or fridge. Here’s the breakdown:
- For the crust:
- Chocolate sandwich cookies (like Oreos), about 24 cookies, crushed (use the whole cookie, cream included)
- Unsalted butter, melted (about 6 tbsp / 85 g) — adds richness and helps bind the crust together
- For the cheesecake filling:
- Cream cheese, softened (16 oz / 450 g) — I prefer full-fat for creaminess but reduced-fat works too
- Granulated sugar (3/4 cup / 150 g) — balances the tang of cream cheese
- Heavy cream (1 cup / 240 ml) — whipped to stiff peaks for lightness
- Vanilla extract (1 tsp) — enhances overall flavor depth
- Chocolate sandwich cookies, coarsely chopped (about 10 cookies) — folded into the filling for that classic cookies & cream texture
Optional add-ins: For a little extra flair, I sometimes add a pinch of salt to the crust to make the chocolate pop or a splash of coffee extract to deepen the flavor.
Substitutions worth noting: If you want a lighter version, swap heavy cream for coconut cream or a dairy-free alternative, which still whips nicely. For a gluten-free crust, try gluten-free chocolate sandwich cookies (brands like Schär or Kinnikinnick work well).
Equipment Needed

- 8×8 inch (20×20 cm) square baking pan — for shaping the bars
- Mixing bowls — at least two, one for crust, one for filling
- Electric mixer or stand mixer — essential for whipping the cream and beating the cream cheese smooth
- Spatula — for folding in chopped cookies and scraping sides
- Food processor or plastic bag and rolling pin — for crushing cookies evenly
- Measuring cups and spoons — accurate measurements ensure the right texture and flavor
If you don’t have a food processor, crushing the cookies in a sealed plastic bag with a rolling pin works just fine. For whipping the cream, hand beaters are enough, but a stand mixer definitely saves your arms and speeds things up.
Pro tip: Keep your mixing bowls chilled for whipping cream — it helps achieve stiff peaks faster. Also, a non-stick baking pan or one lined with parchment paper makes removing the bars much easier.
Preparation Method
- Prepare the crust (10 minutes): Start by crushing the chocolate sandwich cookies into fine crumbs using a food processor or place them in a plastic bag and crush with a rolling pin. Transfer the crumbs to a bowl, then pour in the melted butter. Mix until the crumbs are evenly coated and hold together when pressed.
- Press crust into pan: Line your 8×8 inch pan with parchment paper, leaving an overhang on the sides for easy removal. Press the cookie crumb mixture evenly into the bottom of the pan using the back of a spoon or your fingers. Aim for a compact, even layer. Chill in the fridge while you prepare the filling.
- Beat cream cheese and sugar (5-7 minutes): In a large bowl, beat the softened cream cheese with granulated sugar until completely smooth and creamy, no lumps. This step is crucial because lumps can ruin the filling texture.
- Whip heavy cream (5-7 minutes): In a separate chilled bowl, whisk the heavy cream to stiff peaks. You’ll know it’s ready when the peaks stand straight up without collapsing when you lift the whisk.
- Fold whipped cream and vanilla into cream cheese: Gently fold the whipped cream and vanilla extract into the cream cheese mixture. Use a spatula and take your time to keep as much air as possible in the filling for that light, creamy texture.
- Add chopped cookies: Fold in the coarsely chopped sandwich cookies, distributing them evenly without breaking them down too much. This keeps the bars texturally interesting.
- Assemble and chill (at least 4 hours or overnight): Pour the filling over the chilled crust and spread it out evenly. Cover tightly with plastic wrap and refrigerate for at least 4 hours, preferably overnight. This lets the bars set properly and the flavors meld together beautifully.
- Slice and serve: Once set, use the parchment paper overhang to lift the bars out of the pan. Slice into squares with a sharp knife, wiping the knife clean between cuts for neat edges.
Watch out for: overmixing the cream cheese can make the filling dense, and under-whipping the cream will lead to a runny filling. Also, don’t skip chilling time—it’s key for firm bars that hold together well.
Cooking Tips & Techniques
One trick I learned is to let the cream cheese sit out for about 30 minutes before starting. It softens just enough to whip smoothly without lumps. Trying to beat cold cream cheese often results in weird clumps, which no one wants.
When crushing the cookies for the crust, aim for fine crumbs rather than chunks. It helps the crust press together firmly and gives a better bite. However, for the filling, keep the cookie pieces chunkier to maintain that satisfying crunch.
Folding the whipped cream into the cream cheese is where patience pays off. Use a gentle folding motion, scraping the sides and bottom carefully so you don’t deflate the whipped cream. This is what keeps the filling light and airy instead of dense and heavy.
In terms of timing, mix and prep the crust first so it can start chilling while you whip up the filling. That way, assembly is quick and efficient. If you’re short on time, chilling the bars overnight gives the best texture and flavor.
Finally, a sharp knife warmed in hot water and dried before slicing helps make clean cuts without cracking the bars.
Variations & Adaptations
- Peanut Butter Twist: Stir 1/4 cup of creamy peanut butter into the filling for a cookies & cream peanut butter flavor combo.
- Minty Fresh: Add 1/2 tsp peppermint extract instead of vanilla and swap crushed mint chocolate cookies for the crust and filling.
- Berry Swirl: Fold in 1/2 cup of fresh or frozen raspberries (thawed and drained) for a tart contrast that balances the richness.
- Gluten-Free Option: Use gluten-free sandwich cookies for both crust and filling, plus a gluten-free butter substitute if needed.
- Vegan Version: Replace cream cheese with vegan cream cheese, use coconut cream whipped to stiff peaks, and vegan cookies and butter alternatives.
I once made a batch with crushed brown butter chocolate chip cookies instead of sandwich cookies, and while it lost the classic cookies & cream vibe, it gained a nutty, caramelized note that my family loved.
Serving & Storage Suggestions
Serve these cheesecake bars chilled straight from the fridge for that perfect creamy texture. You can garnish with extra crushed cookies, a drizzle of chocolate sauce, or fresh berries for a pop of color and flavor.
They pair wonderfully with a cup of coffee or a cold glass of milk—comfort food at its best. If you want to balance the richness, a light fruit salad or a refreshing cucumber salad like the fresh Thai cucumber noodle salad makes a great contrast.
Store leftovers in an airtight container in the fridge for up to 4 days. The flavors deepen overnight, but the texture remains creamy and delicious. For longer storage, freeze the bars (cut into squares first) for up to 2 months. Thaw in the fridge overnight before serving.
Reheating isn’t recommended as it changes the texture, but letting frozen bars sit at room temperature 15-20 minutes before eating softens them nicely.
Nutritional Information & Benefits
Each creamy no-bake cookies & cream cheesecake bar roughly contains:
| Nutrient | Amount per serving (1 bar) |
|---|---|
| Calories | 320 |
| Fat | 22 g |
| Carbohydrates | 28 g |
| Protein | 4 g |
| Sugar | 20 g |
While these bars are indulgent, cream cheese provides calcium and protein. Using full-fat cream cheese and heavy cream gives a rich mouthfeel but also means this dessert is best enjoyed in moderation. For those with dairy sensitivities, dairy-free substitutes can be used to make this recipe more accessible.
Because this recipe uses real ingredients without artificial stabilizers, it feels more natural and wholesome than store-bought alternatives. And honestly, having a homemade dessert that satisfies cravings without complicated ingredients makes me feel better about treating myself.
Conclusion
This creamy no-bake cookies & cream cheesecake bars recipe is a sweet little secret I never thought I’d embrace. It’s the kind of dessert that’s easy enough to whip up for a sudden craving but special enough to serve guests without breaking a sweat. I love how it balances creamy, crunchy, and sweet elements with no oven time required—which, let’s face it, is a lifesaver on busy days.
Feel free to make it your own—swap cookies, add flavors, or keep it classic. I hope it becomes a comforting staple for your kitchen just like it did for mine. And if you give it a try, I’d love to hear how you customized your bars or what memories it brings back.
Here’s to simple, creamy desserts that make life a little sweeter.
FAQs
Can I use a different kind of cookie for the crust?
Absolutely! Chocolate sandwich cookies work best for the classic flavor, but you can try graham crackers, gingersnaps, or gluten-free cookies depending on your taste and dietary needs.
How long do the cheesecake bars need to chill?
At least 4 hours in the fridge is needed for the bars to set properly, but overnight chilling gives the best texture and flavor.
Can I make these bars ahead of time for a party?
Yes! They keep well for up to 4 days refrigerated and can be frozen for longer storage. Just thaw overnight in the fridge before serving.
Is it possible to make this recipe dairy-free?
You can substitute dairy-free cream cheese and coconut cream for the filling, vegan butter for the crust, and check that your cookies are dairy-free. The texture will be slightly different but still tasty.
What’s the best way to cut the bars without crumbling?
Use a sharp knife warmed under hot water and wiped dry before slicing. This helps make clean cuts without cracking or crumbling the bars.
Pin This Recipe!
Creamy No-Bake Cookies & Cream Cheesecake Bars
A quick and easy no-bake cheesecake bar recipe featuring a creamy filling with crunchy cookies embedded, perfect for any occasion and requiring no oven time.
- Prep Time: 15 minutes
- Cook Time: 0 minutes
- Total Time: 4 hours 15 minutes
- Yield: 16 servings 1x
- Category: Dessert
- Cuisine: American
Ingredients
- 24 chocolate sandwich cookies (like Oreos), crushed (whole cookie, cream included)
- 6 tbsp unsalted butter, melted (85 g)
- 16 oz cream cheese, softened (450 g)
- 3/4 cup granulated sugar (150 g)
- 1 cup heavy cream (240 ml), whipped to stiff peaks
- 1 tsp vanilla extract
- 10 chocolate sandwich cookies, coarsely chopped (for filling)
Instructions
- Crush the chocolate sandwich cookies into fine crumbs using a food processor or a plastic bag and rolling pin.
- Transfer crumbs to a bowl and mix with melted butter until evenly coated and holds together when pressed.
- Line an 8×8 inch pan with parchment paper, leaving an overhang for easy removal.
- Press the cookie crumb mixture evenly into the bottom of the pan to form the crust. Chill in the fridge.
- Beat softened cream cheese with granulated sugar until smooth and creamy, about 5-7 minutes.
- Whip heavy cream in a chilled bowl to stiff peaks, about 5-7 minutes.
- Gently fold whipped cream and vanilla extract into the cream cheese mixture to keep it light and airy.
- Fold in the coarsely chopped cookies evenly without breaking them down too much.
- Pour the filling over the chilled crust and spread evenly.
- Cover tightly with plastic wrap and refrigerate for at least 4 hours or overnight to set.
- Use the parchment paper overhang to lift the bars out of the pan and slice into squares with a sharp knife warmed in hot water.
Notes
Let cream cheese sit out for 30 minutes before starting to soften. Crush cookies finely for crust but keep chunks larger for filling. Fold whipped cream gently to keep filling light. Chill bars at least 4 hours or overnight for best texture. Use a sharp knife warmed in hot water for clean slicing.
Nutrition
- Serving Size: 1 bar (1/16th of rec
- Calories: 320
- Sugar: 20
- Fat: 22
- Carbohydrates: 28
- Protein: 4
Keywords: no-bake cheesecake, cookies and cream, cheesecake bars, easy dessert, no oven dessert, creamy cheesecake, quick dessert