The neighborhood cookie exchange was in twenty-four hours and I’d completely forgotten. Everyone else would be bringing those elaborate, multi-day creations—you know, the ones with hand-piped royal icing and three different layers. I had a can of pumpkin puree, a block of cream cheese, and absolutely no time. Honestly, I almost just grabbed a store-bought pie and called it a day. But I’d promised my friend Maria I’d bring something homemade, and backing out felt worse than showing up with a kitchen disaster.
So there I was, Tuesday night, flour dusting my counter and a mild panic setting in. I’d made pumpkin rolls before, sure, but never under this kind of pressure. The first one cracked right down the middle when I tried to roll it. Let me tell you, that moment of silence before the crack? Heartbreaking. I took a breath, scraped that attempt into the compost, and started over. The second one worked. Barely. I remember holding my breath as I unrolled it to spread the filling, praying the whole thing wouldn’t fall apart in my hands.
That slightly imperfect, slightly lopsided pumpkin roll ended up being the star of the exchange. People were actually asking for the recipe before they’d even finished their first slice. I mean, I was just trying not to embarrass myself, and somehow this simple pumpkin roll with cream cheese filling became the thing everyone wanted. Maybe you’ve been there—the recipe you almost didn’t make turns into the one people remember.
That’s the thing about this best pumpkin roll recipe. It doesn’t need fancy techniques or a dozen specialty ingredients. It’s forgiving, even when you’re rushing. And honestly? That first cracked roll taught me more about making it right than any perfect attempt ever could. Now it’s the dessert I bring to every fall gathering, and it always, always gets that same reaction.
Why You’ll Love This Recipe
After testing this pumpkin roll more times than I care to count (and yes, cracking more than a few along the way), I can tell you exactly why this version works. It’s not just another recipe—it’s the one I’ve tweaked and perfected until every bite delivers that perfect balance of spiced cake and creamy filling.
- Foolproof Rolling Method: I’ve included my tried-and-true technique for rolling the cake without cracks. No more wrestling with broken cakes or torn edges.
- Perfect Cream Cheese Filling: This isn’t your average filling. It’s thick, tangy, and stable enough to hold its shape when you slice the roll.
- Make-Ahead Friendly: You can prep this pumpkin roll a day or two ahead of your gathering. The flavors actually get better as it sits in the fridge.
- Impressive Presentation: That spiral of orange cake and white filling? It looks like you spent hours. Between us, it takes about 45 minutes of active work.
- Crowd-Pleasing Flavor: The pumpkin spice blend I use isn’t just cinnamon and nutmeg—there’s a hint of ginger and clove that makes people ask, “What’s in this?”
What makes this recipe different from the dozens of others out there? It’s the texture. The cake is tender but sturdy enough to roll, the filling is silky without being runny, and the whole thing slices cleanly without squishing out the sides. I’ve tested it with different flour ratios, different mixing methods, and different chilling times to get it just right. This isn’t my first pumpkin roll rodeo—it’s my best one.
This is the dessert that makes you close your eyes after the first bite. It’s fall in a slice, but without the stress of a complicated pie or the fuss of a layered cake. Perfect for when you want to impress at a dinner party or just treat yourself to something special on a crisp October afternoon.
What Ingredients You Will Need
This pumpkin roll uses simple, everyday ingredients that come together to create something truly special. Most of these are pantry staples, especially during fall baking season. Here’s what you’ll need, broken down by component.
For the Pumpkin Cake
- All-purpose flour, ¾ cup (95g) – Spoon and level it for the most accurate measurement. Scooping directly from the bag packs in too much flour and makes the cake dry.
- Baking powder, 1 teaspoon – Make sure it’s fresh. Expired baking powder is the number one reason cakes don’t rise properly.
- Baking soda, ½ teaspoon – This helps the cake brown and gives it a tender crumb.
- Ground cinnamon, 1½ teaspoons – I use Vietnamese cinnamon for its warm, intense flavor. It makes a noticeable difference.
- Ground ginger, ½ teaspoon – Adds a subtle warmth that complements the pumpkin.
- Ground nutmeg, ¼ teaspoon – Freshly grated if you have it, but pre-ground works perfectly fine.
- Ground cloves, ¼ teaspoon – Just a pinch. Cloves are potent, so a little goes a long way.
- Salt, ½ teaspoon – Balances the sweetness and enhances all the other flavors.
- Granulated sugar, 1 cup (200g) – Regular white sugar. No need for anything fancy here.
- Large eggs, 3, at room temperature – Cold eggs don’t incorporate as well. Let them sit on the counter for 30 minutes before starting.
- Pumpkin puree, ⅔ cup (160g) – Not pumpkin pie filling. Make sure you grab the 100% pure pumpkin. Libby’s is my go-to brand for consistent results.
- Vanilla extract, 1 teaspoon – Pure vanilla, not imitation. The flavor is noticeably better.
- Powdered sugar, for dusting the towel – About 2 tablespoons. This prevents the cake from sticking when you roll it.
For the Cream Cheese Filling
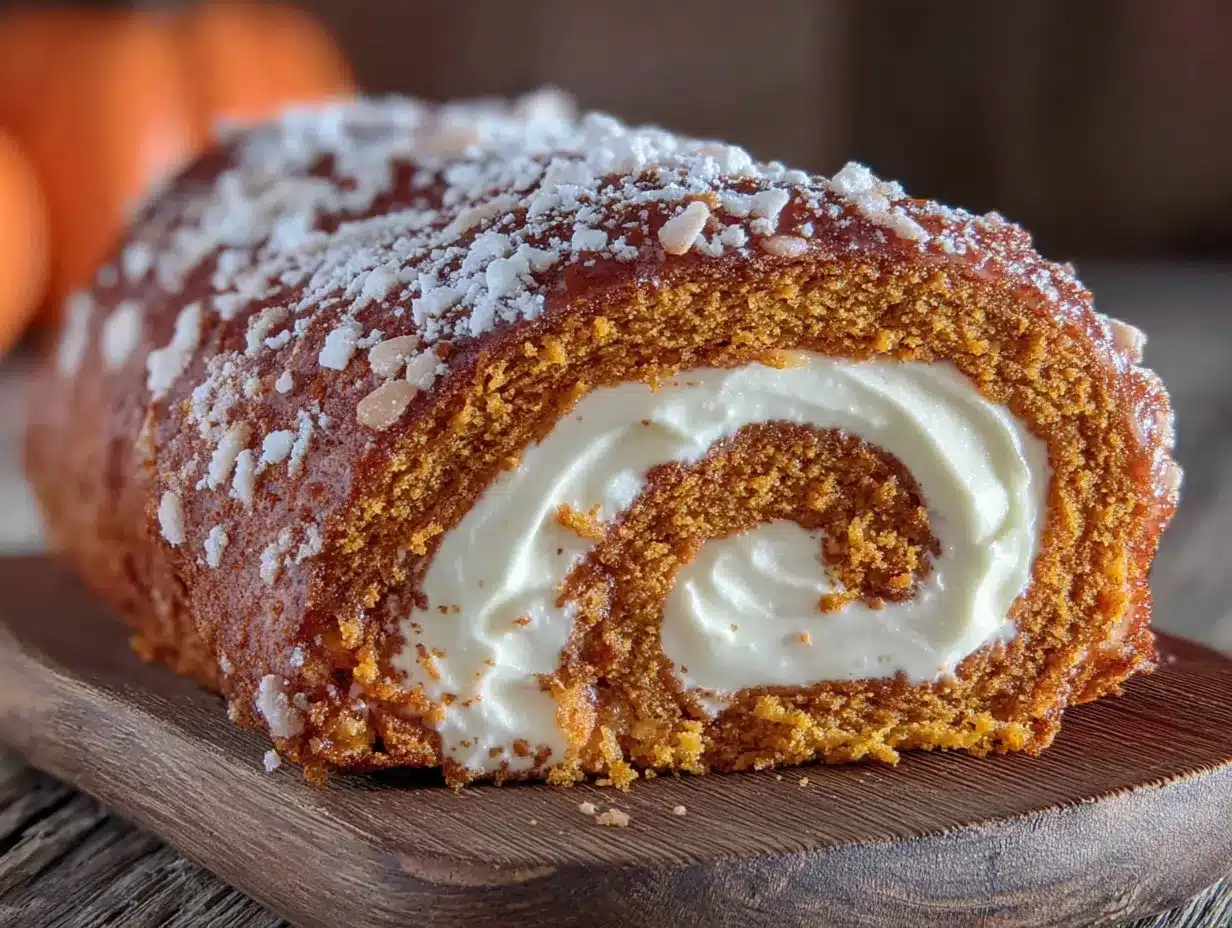
- Cream cheese, 8 ounces (226g), softened – Full-fat brick cream cheese, not the spreadable kind in a tub. It needs to be truly softened to room temperature, or your filling will be lumpy.
- Unsalted butter, ¼ cup (57g), softened – Let it sit out with the cream cheese. Using cold butter creates a grainy texture.
- Powdered sugar, 1 cup (120g), sifted – Sifting removes lumps and gives the filling a silky smooth texture. Don’t skip this step.
- Vanilla extract, 1 teaspoon – Same rule applies—use the good stuff.
Substitution Guidance
If you’re gluten-sensitive, you can substitute the all-purpose flour with a 1:1 gluten-free baking flour blend. I’ve had good results with Bob’s Red Mill 1:1 Baking Flour. For a dairy-free filling, use plant-based cream cheese and vegan butter, but let them soften fully—dairy-free alternatives can be firmer than the real thing. And if you don’t have pumpkin pie spice on hand, the individual spices listed above work beautifully. I actually prefer mixing my own blend because I can control the intensity of each spice.
Equipment Needed
You don’t need a professional bakery setup to make this pumpkin roll, but a few key tools make the process much smoother.
- 15×10-inch jelly roll pan – This is the standard size for a pumpkin roll. A half-sheet pan is slightly larger and will make the cake too thin. I’ve made that mistake, and the cake was impossible to roll without tearing.
- Parchment paper – Line the pan with parchment, leaving some overhang on the long sides. This makes lifting the cake out so much easier. Cheap parchment can stick, so I recommend Reynolds Kitchens brand.
- Clean kitchen towel – A thin, lint-free towel works best. Terry cloth towels leave texture on the cake. An old flour sack towel is perfect.
- Electric hand mixer or stand mixer – You’ll need this for beating the eggs and sugar, and for making the filling. Whisking by hand won’t incorporate enough air.
- Rubber spatula – For gently folding the dry ingredients into the batter. A wooden spoon can deflate the batter too much.
- Cooling rack – Allows air to circulate around the pan so the cake cools evenly.
- Sharp knife – For clean slices. A serrated knife works well, but a sharp chef’s knife does the job too. Dull knives squish the filling out.
If you don’t have a jelly roll pan, you can use a 9×13-inch baking dish. The cake will be slightly thicker and may need an extra minute or two of baking time. Just keep an eye on it. And if you don’t have parchment paper, greasing the pan well with butter and dusting it with flour works, but removal is trickier. I’ve been there, and let me tell you, parchment is worth the small investment.
Preparation Method
Let’s get to the fun part. This method has been tested over and over to give you the best chance of success, even on your first try. Take your time with each step, and you’ll be rewarded with a beautiful, sliceable pumpkin roll.
- Preheat and prepare. Preheat your oven to 375°F (190°C). Line your 15×10-inch jelly roll pan with parchment paper, leaving about an inch of overhang on the two long sides. Lightly spray the parchment with non-stick cooking spray. This extra step ensures the cake releases cleanly.
- Mix the dry ingredients. In a small bowl, whisk together the flour, baking powder, baking soda, cinnamon, ginger, nutmeg, cloves, and salt. Set this aside. Whisking aerates the mixture and ensures the spices are evenly distributed. Nobody wants a bite with all the cloves in one spot.
- Beat the eggs and sugar. In a large mixing bowl, beat the eggs and granulated sugar together with an electric mixer on medium-high speed for about 3-4 minutes. The mixture should become thick, pale, and fall in a ribbon when you lift the beaters. This step is crucial—it creates the structure that will hold the cake together when you roll it. Don’t rush it.
- Add the pumpkin and vanilla. Reduce the mixer speed to low and beat in the pumpkin puree and vanilla extract until just combined. The batter will look slightly curdled at this point. Don’t panic—that’s normal. The pumpkin is heavier than the egg mixture, so it separates a bit.
- Fold in the dry ingredients. Add the dry ingredients to the batter in two additions, folding gently with a rubber spatula after each. Fold just until you don’t see any more streaks of flour. Overmixing develops gluten and makes the cake tough. A few small lumps are perfectly fine.
- Spread and bake. Pour the batter into the prepared pan and spread it evenly with an offset spatula. It will be a thin layer—that’s exactly what you want. Bake for 12-14 minutes, or until the top springs back when lightly touched and the edges just start to pull away from the pan. The center should not look wet or jiggly.
- Prepare the rolling surface. While the cake bakes, lay your clean kitchen towel flat on the counter and dust it generously with powdered sugar. Use a fine-mesh sieve for even coverage. This sugar will transfer to the cake’s surface and prevent it from sticking to the towel.
- Roll the cake while warm. As soon as the cake comes out of the oven, run a knife around the edges to loosen it. Invert the pan onto the prepared towel. Peel off the parchment paper carefully. Starting at one of the short ends, roll the cake and towel together into a tight log. Don’t press too hard—you want a gentle, even roll. Let the rolled cake cool completely on a wire rack, seam-side down. This takes about 45 minutes to an hour. Don’t skip this cooling step. Rolling a warm cake trains it to hold that shape. If you cool it flat, it will crack when you try to roll it later.
- Make the filling. While the cake cools, make the filling. In a medium bowl, beat the softened cream cheese and butter together with an electric mixer on medium speed until smooth and creamy, about 2 minutes. There should be no lumps. Add the sifted powdered sugar and vanilla extract, then beat on low speed until combined. Increase to medium speed and beat for another minute until the filling is light and fluffy. Don’t overbeat, or the filling can become too soft to hold its shape.
- Unroll and fill. Once the cake is completely cool, carefully unroll it. The edges will want to curl up a bit—that’s fine. Spread the cream cheese filling evenly over the cake, leaving a ½-inch border on all sides. This border prevents the filling from squeezing out when you re-roll the cake.
- Re-roll and chill. Gently re-roll the cake, this time without the towel. Use the towel to help lift and guide the cake if needed. Wrap the rolled cake tightly in plastic wrap and refrigerate for at least 2 hours, or overnight. Chilling sets the filling and makes slicing much cleaner. I always chill mine overnight for the best results.
- Slice and serve. When ready to serve, trim off the uneven ends with a sharp knife for a clean presentation. Slice the pumpkin roll into ¾-inch thick rounds. Wipe the knife clean between slices for the prettiest presentation.
Cooking Tips & Techniques
I’ve made this pumpkin roll more times than I can count, and I’ve learned a few things the hard way. Here are the tips that will save you from my early mistakes.
Don’t skip the towel-and-powdered-sugar step. I tried using wax paper once because I was out of towels. Big mistake. The cake stuck, tore, and I ended up with pumpkin crumble instead of a roll. The powdered sugar creates a non-stick barrier that lets the cake glide as you roll it. Use a generous dusting—you can always brush off the excess later.
Roll while the cake is hot. This is non-negotiable. The cake is most pliable when it’s warm from the oven. Waiting even 10 minutes can make it brittle. I learned this when I got distracted by a phone call and came back to a cake that cracked like old leather. Set a timer if you need to.
Check your baking time carefully. An overbaked cake will crack. An underbaked cake will be too sticky to handle. The sweet spot is when the top springs back to the touch and the edges are just barely brown. Start checking at 12 minutes. Every oven runs a little differently, so trust your eyes and fingers over the timer.
Let the cream cheese and butter soften fully. Cold cream cheese creates lumpy filling that no amount of beating can fix. I leave mine on the counter for at least an hour before I start. If you’re in a hurry, cut the cream cheese into small cubes and let it sit for 20 minutes. It softens faster that way.
Use a sharp knife for slicing. This seems obvious, but I’ve used dull knives out of laziness and ended up with squished, messy slices. Run the knife under hot water, dry it off, and make one clean cut. Wipe the blade clean between each slice. It takes an extra 30 seconds and makes your pumpkin roll look bakery-quality.
Chill overnight for the best texture. Two hours is the minimum, but overnight is ideal. The cake absorbs some moisture from the filling, making every bite perfectly tender. The flavors also meld together beautifully. I once made two rolls for a party—one chilled for two hours and one chilled overnight. The overnight one disappeared first.
Variations & Adaptations
This pumpkin roll is versatile enough to adapt for different diets, occasions, and flavor preferences. Here are some of my favorite variations.
Gluten-Free Pumpkin Roll: Substitute the all-purpose flour with a 1:1 gluten-free baking blend. I’ve used King Arthur Measure for Measure with excellent results. The texture is slightly more delicate, so be extra gentle when rolling. Everything else stays the same.
Dairy-Free Version: Use dairy-free cream cheese and vegan butter for the filling. Miyoko’s brand cream cheese works particularly well—it has the right tang and consistency. For the cake, substitute the butter in the filling with a high-quality vegan butter. The cake itself doesn’t contain butter, so that part is already dairy-free.
Chocolate-Pumpkin Roll: Reduce the flour to ½ cup and add ¼ cup of unsweetened cocoa powder. The chocolate and pumpkin spice combination is surprisingly good. I was skeptical the first time I tried it, but now it’s my second-favorite version after the original.
Maple Cream Cheese Filling: Replace 2 tablespoons of the powdered sugar with pure maple syrup. Reduce the vanilla to ½ teaspoon. The maple flavor pairs beautifully with the pumpkin spice. Just be aware that the filling will be slightly softer, so chill the roll for at least 4 hours before slicing.
Nutty Crunch Variation: Sprinkle ½ cup of finely chopped pecans or walnuts over the filling before rolling. Toast the nuts first for extra flavor. The crunch adds a lovely textural contrast to the soft cake and creamy filling. This is my go-to version for Thanksgiving.
Lower Sugar Option: Reduce the granulated sugar in the cake to ¾ cup and use a sugar-free powdered sugar substitute in the filling. Swerve Confectioners works well. The cake will be slightly less tender, but the flavor is still excellent.
Serving & Storage Suggestions
This pumpkin roll is beautiful enough to stand on its own, but a few thoughtful touches can make it even more special for your guests.
Serving Temperature: Serve the pumpkin roll chilled, straight from the refrigerator. The filling is firmer and the slices hold their shape better when cold. If you prefer a softer texture, let the slices sit at room temperature for 10-15 minutes before serving. I personally love it cold—the contrast between the tender cake and the firm, tangy filling is perfect.
Presentation Ideas: Arrange the slices on a platter with a slight overlap, like dominoes. Dust the top with a light sprinkle of powdered sugar and a few fresh cranberries for a pop of color. A drizzle of caramel sauce over the top is never a bad idea either. For fall gatherings, I sometimes add a few candied pecans on the side.
What to Serve Alongside: This pumpkin roll pairs beautifully with a cup of hot apple cider, a chai latte, or a strong black coffee. For a dessert spread, serve it alongside a vanilla bean ice cream or a dollop of freshly whipped cream. The creaminess balances the spiced cake perfectly.
Storage Instructions: Wrap the pumpkin roll tightly in plastic wrap and store it in the refrigerator for up to 5 days. The flavors actually improve after the first day. For longer storage, wrap the roll in plastic wrap, then in aluminum foil, and freeze for up to 3 months. Thaw overnight in the refrigerator before slicing and serving. I always keep one in the freezer for unexpected guests.
Reheating Tips: I don’t recommend reheating the pumpkin roll—it’s meant to be served cold. But if you prefer a warm dessert, microwave individual slices for about 10-15 seconds. The cake will be warm and the filling will be slightly softened. Just don’t overdo it, or the filling can melt and become runny.
Flavor Development: The pumpkin spice flavors deepen and meld together after a day or two in the fridge. If you can, make this roll a day ahead of when you plan to serve it. The difference is subtle but noticeable. The cake also becomes more tender as it absorbs moisture from the filling.
Nutritional Information & Benefits
While this pumpkin roll is definitely a treat, it does offer some nutritional perks thanks to the star ingredient. Here’s a general breakdown per slice (based on 10 slices).
| Nutrient | Amount Per Slice |
|---|---|
| Calories | 285 |
| Total Fat | 14g |
| Saturated Fat | 8g |
| Cholesterol | 85mg |
| Sodium | 220mg |
| Total Carbohydrates | 36g |
| Dietary Fiber | 1g |
| Sugars | 28g |
| Protein | 4g |
| Vitamin A | 80% DV |
| Calcium | 4% DV |
| Iron | 6% DV |
Pumpkin is loaded with vitamin A, which supports eye health and immune function. It’s also a good source of fiber and antioxidants. The cream cheese filling adds calcium and protein, though it does contribute to the fat content. This isn’t a health food, but it’s a dessert made with real ingredients that you can feel good about serving to your family.
For those watching their sugar intake, you can reduce the sugar in the cake to ¾ cup without affecting the texture too much. And using a sugar substitute in the filling can cut the sugar content significantly. Just be aware that the texture may be slightly different.
This pumpkin roll is not gluten-free or dairy-free in its standard form, but the variations section above offers options for both dietary needs. It does contain eggs and wheat, so it’s not suitable for those with allergies to those ingredients.
Conclusion
This pumpkin roll with cream cheese filling is the dessert that keeps on giving. It’s impressive enough for holiday tables, simple enough for a Tuesday night craving, and forgiving enough for first-time bakers. The spiced pumpkin cake wrapped around that tangy, creamy filling is a combination that never gets old.
I love this recipe because it reminds me of that frantic Tuesday night when I almost gave up. It taught me that sometimes the best things come from a little bit of pressure and a lot of determination. Every time I make it now, I think about how that cracked first attempt led me to a version I’m genuinely proud of.
I’d love to hear how yours turns out. Did you try any of the variations? Did your family fight over the last slice? Drop a comment below and let me know. And if you share a photo on social media, tag me—I love seeing your kitchen victories. Happy baking, friends!
Frequently Asked Questions
Can I make this pumpkin roll ahead of time?
Absolutely. In fact, I recommend it. You can make the pumpkin roll up to two days in advance and keep it wrapped tightly in the refrigerator. The flavors develop and the texture improves as it sits. Just slice and serve when you’re ready.
Why did my pumpkin cake crack when I rolled it?
There are a few common reasons. The cake might have been overbaked, making it too dry to bend. Or you may have let it cool too long before rolling—the cake needs to be rolled while it’s still warm. Finally, make sure you’re rolling gently but firmly. A too-tight roll can cause cracks, but so can a too-loose roll.
Can I freeze this pumpkin roll?
Yes, and it freezes beautifully. Wrap the fully assembled and chilled pumpkin roll tightly in plastic wrap, then in aluminum foil. Freeze for up to 3 months. Thaw overnight in the refrigerator before slicing and serving. I always keep one in the freezer for unexpected company.
Can I use pumpkin pie filling instead of pumpkin puree?
No, please don’t. Pumpkin pie filling is pre-sweetened and spiced, which will throw off the balance of the recipe. The cake will be too sweet, too wet, and the texture will be off. Stick with 100% pure pumpkin puree. Libby’s is my go-to brand.
How do I get clean slices without squishing the filling?
Use a sharp knife and wipe it clean between each slice. For the cleanest cuts, run the knife under hot water, dry it off, and make one smooth cut. Don’t saw back and forth—that pushes the filling out. Chilling the roll for at least 2 hours before slicing also helps keep everything in place.
Pin This Recipe!
Best Pumpkin Roll Recipe with Cream Cheese Filling

A foolproof pumpkin roll with a perfectly spiced cake and tangy cream cheese filling. This impressive dessert is surprisingly easy to make and always a crowd-pleaser at fall gatherings.
- Prep Time: 30 minutes
- Cook Time: 14 minutes
- Total Time: 3 hours (includes chilling)
- Yield: 10 servings 1x
- Category: Dessert
- Cuisine: American
Ingredients
- ¾ cup (95g) all-purpose flour
- 1 teaspoon baking powder
- ½ teaspoon baking soda
- 1½ teaspoons ground cinnamon
- ½ teaspoon ground ginger
- ¼ teaspoon ground nutmeg
- ¼ teaspoon ground cloves
- ½ teaspoon salt
- 1 cup (200g) granulated sugar
- 3 large eggs, at room temperature
- ⅔ cup (160g) pumpkin puree (not pumpkin pie filling)
- 1 teaspoon vanilla extract
- 2 tablespoons powdered sugar (for dusting towel)
- 8 ounces (226g) cream cheese, softened
- ¼ cup (57g) unsalted butter, softened
- 1 cup (120g) powdered sugar, sifted
- 1 teaspoon vanilla extract
Instructions
- Preheat oven to 375°F (190°C). Line a 15×10-inch jelly roll pan with parchment paper, leaving overhang on the long sides. Lightly spray parchment with non-stick cooking spray.
- In a small bowl, whisk together flour, baking powder, baking soda, cinnamon, ginger, nutmeg, cloves, and salt. Set aside.
- In a large mixing bowl, beat eggs and granulated sugar with an electric mixer on medium-high speed for 3-4 minutes until thick, pale, and ribbon-like.
- Reduce mixer speed to low and beat in pumpkin puree and vanilla extract until just combined.
- Add dry ingredients in two additions, folding gently with a rubber spatula until just combined. Do not overmix.
- Pour batter into prepared pan and spread evenly. Bake for 12-14 minutes until top springs back when touched and edges pull away from pan.
- While cake bakes, lay a clean kitchen towel flat on the counter and dust generously with powdered sugar.
- Immediately after baking, run a knife around edges of pan. Invert cake onto prepared towel. Carefully peel off parchment paper.
- Starting at a short end, roll cake and towel together into a tight log. Let cool completely on a wire rack, seam-side down (about 45 minutes to 1 hour).
- While cake cools, make filling: Beat softened cream cheese and butter together until smooth and creamy, about 2 minutes. Add sifted powdered sugar and vanilla, beat on low until combined, then increase to medium and beat 1 minute until light and fluffy.
- Once cake is completely cool, carefully unroll it. Spread filling evenly over cake, leaving a ½-inch border on all sides.
- Gently re-roll cake without the towel. Wrap tightly in plastic wrap and refrigerate for at least 2 hours, preferably overnight.
- When ready to serve, trim uneven ends with a sharp knife. Slice into ¾-inch thick rounds, wiping knife clean between slices.
Notes
Roll the cake while it’s still warm to prevent cracking. Chill overnight for best texture and flavor. Use 100% pure pumpkin puree, not pumpkin pie filling. For clean slices, use a sharp knife and wipe it clean between each cut.
Nutrition
- Serving Size: 1 slice (1/10 of rol
- Calories: 285
- Sugar: 28
- Sodium: 220
- Fat: 14
- Saturated Fat: 8
- Carbohydrates: 36
- Fiber: 1
- Protein: 4
Keywords: pumpkin roll, pumpkin dessert, cream cheese filling, fall dessert, Thanksgiving dessert, pumpkin cake roll


