Frantically digging through the back of my pantry for something—anything—that could pass for a Halloween party dessert when I realized I had a bag of Oreos, a box of instant pudding, and exactly zero time to bake. The party was in two hours, my kitchen looked like a sugar bomb had gone off, and I had promised the host I’d bring “something fun and spooky.” No oven required. No complicated piping bags. Just me, a rolling pin, and a desperate need to make these kids (and adults) squeal with delight.
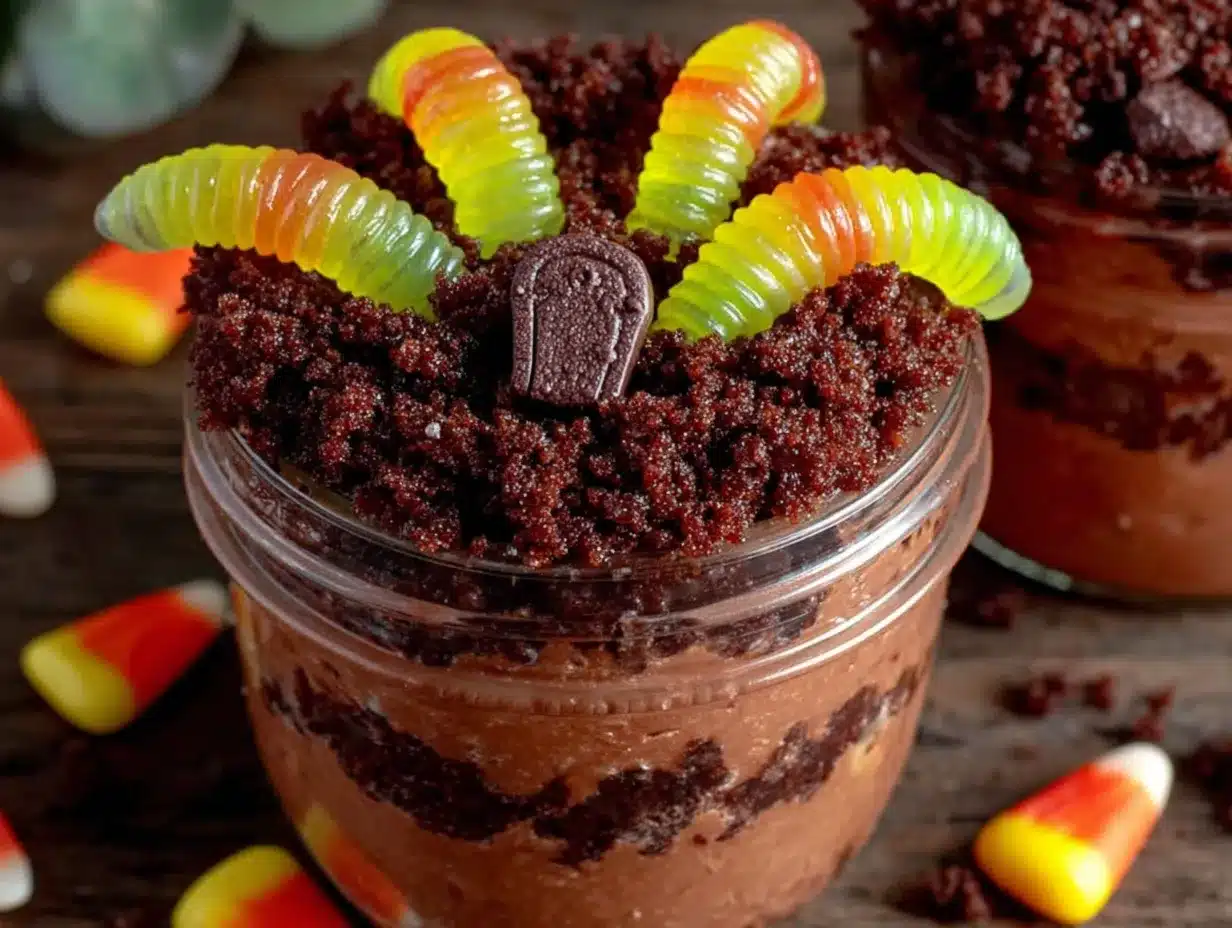
I won’t lie—it was a moment of pure, chaotic inspiration. I started crushing Oreos into what looked like potting soil, mixed up a creamy chocolate pudding base, and grabbed some gummy worms I’d stashed for emergencies. By the time I layered everything into clear cups and topped them with a few spooky decorations, I had created something that looked like a tiny graveyard in a glass. And honestly? It was the hit of the party. People couldn’t stop asking for the recipe, and I just smiled and said, “It’s literally dirt.”
That night, the Spooky Oreo Dirt Cups became my go-to Halloween party trick. They’re fun, they’re creepy in the best way, and they come together faster than you can say “trick or treat.” If you’re looking for a dessert that looks like you spent hours on it but actually takes minutes, you’re in the right place. Let’s make some magic—or maybe some mischief.
Why You’ll Love This Recipe
Listen, I’ve tested a lot of Halloween desserts over the years. Some are gorgeous but take forever. Others are quick but look, well, sad. These Spooky Oreo Dirt Cups hit that sweet spot where presentation meets simplicity. Here’s why I keep coming back to them year after year:
- No-Bake Magic: No oven, no stove, no stress. This is the kind of recipe you can make while wearing your costume.
- Kid-Friendly Fun: Little hands can help crush the Oreos, layer the cups, and add the creepy decorations. It’s basically a craft project you can eat.
- Make-Ahead Hero: These actually taste better after a few hours in the fridge. The pudding sets up perfectly, and the Oreo crumbs soften just enough to mimic real dirt.
- Totally Customizable: From gummy worms to candy eyeballs to crushed graveyard cookies—you can make each cup its own little spooky scene.
- Crowd-Pleasing Classic: I’ve served these at parties with kids, adults, and even picky eaters. Every single person goes back for seconds. It’s the kind of dessert that sparks joy and a little bit of playful disgust—in the best way.
What really sets this version apart is the texture. I use a combination of crushed Oreo crumbs and a creamy chocolate pudding that’s just thick enough to hold its shape. No soggy layers, no watery pudding. Just a perfect, spoonable dirt cup that looks like it came from a haunted bakery.
What Ingredients You Will Need
This recipe uses simple, everyday ingredients that you probably already have in your kitchen. No fancy baking supplies or obscure items—just the good stuff that makes Halloween magic happen.
- 1 package Oreo cookies (14.3 oz): Regular Oreos work best. The classic chocolate cookies with cream filling crush beautifully and give you that dark, earthy color. I’ve tried Double Stuf, but they make the crumbs a bit too greasy. Stick with the original for best results.
- 1 box instant chocolate pudding mix (3.9 oz): I prefer Jell-O brand for its consistent texture, but any brand works. Make sure it’s instant, not cook-and-serve—you want that quick set time.
- 2 cups cold whole milk: Whole milk gives the pudding a richer, creamier texture. You can use 2% or even oat milk in a pinch, but the pudding won’t be as thick and luscious.
- 8 oz cream cheese, softened: This is my secret ingredient. It adds a tangy richness that balances the sweetness of the Oreos and makes the pudding layer extra creamy. Let it sit out for 30 minutes before mixing.
- 1/4 cup powdered sugar: Just a touch to sweeten the cream cheese layer without making it grainy.
- 1 teaspoon vanilla extract: Pure vanilla adds warmth and depth. Skip the imitation stuff if you can.
- 1 cup whipped topping (like Cool Whip), thawed: This lightens the cream cheese mixture and gives it that fluffy, mousse-like texture. You can also whip your own heavy cream if you’re feeling fancy.
- Gummy worms: The classic spooky touch. I like the sour ones for extra flavor contrast.
- Candy eyeballs: These little guys make the cups look alive—in a creepy, fun way.
- Optional decorations: Crushed graveyard cookies, pumpkin-shaped sprinkles, or even a few candy corn pieces for color.
Ingredient Substitutions: For a gluten-free version, use gluten-free chocolate sandwich cookies. For a dairy-free option, swap the milk for almond or oat milk, use dairy-free cream cheese, and choose a vegan whipped topping. The texture will be a bit different, but still delicious.
Equipment Needed
You don’t need a lot of fancy tools for this recipe, which is part of its beauty. Here’s what you’ll need:
- Rolling pin or food processor: For crushing the Oreos into fine crumbs. A rolling pin and a zip-top bag work great if you want to get out some aggression. A food processor gives you a more consistent texture in seconds.
- Mixing bowls: One large bowl for the pudding, one medium bowl for the cream cheese mixture, and maybe a small one for extra crumbs.
- Hand mixer or stand mixer: For beating the cream cheese until smooth. A whisk works if you have strong arms, but a mixer makes it effortless.
- Clear plastic cups or small mason jars: The key to the “dirt cup” look is seeing the layers. I use 9-ounce clear cups from the party supply store, but any clear glass or plastic cup works. Mini mason jars are adorable for Halloween parties.
- Spatula: For scraping every last bit of that creamy goodness.
- Small spoon or piping bag: For layering the pudding mixture neatly. A piping bag gives you cleaner lines, but a spoon works just fine.
Budget-Friendly Tip: If you don’t have clear cups, use any small glass or even a bowl. The layers won’t be visible, but the taste is still amazing. I’ve also used small plastic shot glasses for mini versions—perfect for adult parties!
Preparation Method
This recipe comes together in about 20 minutes of active time, plus a couple of hours to chill. Let’s break it down step by step.
- Crush the Oreos (5 minutes): Place the entire package of Oreos (cream filling and all) into a large zip-top bag. Seal it tightly, then use a rolling pin to crush them into fine crumbs. You want a mix of fine powder and small pebbly bits—like real garden soil. Alternatively, pulse them in a food processor until you reach the desired texture. Set aside about 1/4 cup of the crumbs for topping later.
- Make the chocolate pudding (5 minutes): In a large bowl, whisk together the instant chocolate pudding mix and cold milk. Whisk vigorously for about 2 minutes until the mixture thickens. It should be smooth and glossy. Set it aside to set while you work on the cream cheese layer.
- Prepare the cream cheese mixture (5 minutes): In a separate medium bowl, beat the softened cream cheese with an electric mixer until smooth and fluffy. Add the powdered sugar and vanilla extract, and beat until well combined. Fold in the thawed whipped topping gently with a spatula until everything is light and airy.
- Combine the layers (3 minutes): Gently fold the prepared chocolate pudding into the cream cheese mixture. Don’t overmix—you want a marbled effect with streaks of dark and light. This gives the “dirt” a more natural, earthy look.
- Layer the cups (5 minutes): Grab your clear cups. Start with a layer of crushed Oreo crumbs at the bottom—about 2 tablespoons. Add a generous layer of the pudding-cream cheese mixture on top. Repeat with another layer of crumbs, then another layer of pudding mixture. End with a final layer of crumbs on top. The cups should be about 3/4 full.
- Add the creepy decorations (2 minutes): This is where the fun begins. Press a few gummy worms into the top layer so they look like they’re crawling out of the dirt. Add candy eyeballs for a spooky face. Sprinkle any extra decorations like crushed graveyard cookies or pumpkin sprinkles. Get creative—each cup can have its own personality.
- Chill and set (2 hours minimum): Place the cups in the refrigerator for at least 2 hours. This allows the pudding to fully set and the flavors to meld together. The longer they sit, the better they taste. I usually make them the night before a party.
Sensory Cues: When you press a gummy worm into the top layer, it should feel like pushing a toy into damp sand. The crumbs should hold their shape but yield easily. The pudding mixture should be thick enough to hold a spoon upright—if it’s runny, give it another few minutes to set.
Cooking Tips & Techniques
Over the years, I’ve learned a few tricks that make these Spooky Oreo Dirt Cups turn out perfectly every time. Here’s what I wish someone had told me when I first started making them:
- Don’t overcrush the Oreos: You want a mix of textures. If you turn them into a fine powder, it looks more like cocoa powder than dirt. Leave some small chunks for that realistic, crumbly look.
- Let the cream cheese soften properly: Cold cream cheese will leave lumps in your mixture no matter how much you beat it. Let it sit on the counter for 30 minutes before you start. Trust me on this one.
- Use a piping bag for clean layers: If you want those Instagram-worthy stripes, transfer the pudding mixture to a piping bag and snip off the tip. It makes layering so much easier and less messy.
- Chill the cups before serving: I learned this the hard way at a party where I served them too soon. The pudding was still loose, and the crumbs sank into a sad, muddy mess. Give them at least 2 hours in the fridge. Overnight is even better.
- Add decorations right before serving: Gummy worms and candy eyeballs can soften and bleed color if they sit in the fridge too long. Add them about 30 minutes before you serve, or right before you walk out the door.
Variations & Adaptations
One of the best things about this recipe is how easily it adapts to different tastes and dietary needs. Here are some of my favorite twists:
- Peanut Butter Dirt Cups: Add 1/4 cup creamy peanut butter to the cream cheese mixture. It gives the pudding a rich, nutty flavor that pairs perfectly with chocolate. Use Reese’s Peanut Butter Poke Cake vibes for extra inspiration.
- Pumpkin Spice Dirt Cups: Swap the chocolate pudding for vanilla or butterscotch pudding, and add 1/2 cup pumpkin puree and 1 teaspoon pumpkin pie spice to the cream cheese mixture. Top with crushed graham crackers instead of Oreos for a fall-themed treat. Pair it with this Homemade Pumpkin Spice Latte for a cozy Halloween morning.
- Vegan Dirt Cups: Use dairy-free chocolate pudding, vegan cream cheese, and coconut whipped topping. Crush up vegan chocolate sandwich cookies. It’s just as creamy and delicious—no one will know the difference.
- Spicy Dirt Cups: Add a pinch of cayenne pepper or cinnamon to the pudding mixture for a surprising kick. The heat plays off the sweetness in a way that makes adults do a double take.
- Mini Dirt Cups: Use small shot glasses or mini mason jars for bite-sized versions. Perfect for parties where people want to graze. I’ve made these for game day gatherings and they were a huge hit.
Serving & Storage Suggestions
These Spooky Oreo Dirt Cups are best served chilled, straight from the fridge. The contrast between the cold, creamy pudding and the crunchy Oreo crumbs is pure magic. Here’s how to make them shine:
- Serving Temperature: Cold. Don’t let them sit out too long, or the pudding will soften and the crumbs will get soggy. If you’re serving them at a party, keep them on a tray of ice or in a cooler.
- Presentation Ideas: Arrange the cups on a platter with fake spiderwebs, plastic spiders, or a few battery-operated tea lights for a spooky glow. You can also label them with little tombstone-shaped tags that say “Eat at Your Own Risk.”
- Complementary Dishes: These dirt cups pair beautifully with a warm drink like this Spiced Pumpkin Chai Latte or a glass of cold milk. For a full Halloween spread, serve them alongside a Fall Harvest Charcuterie Board for a sweet and savory balance.
- Storage: Cover each cup with plastic wrap or a lid and store in the refrigerator for up to 3 days. The flavors actually get better after a day. Do not freeze—the texture will become icy and grainy.
- Reheating: These are served cold, so no reheating needed. If you’ve stored them for a few days, let them sit at room temperature for 5 minutes before serving to take the chill off.
Nutritional Information & Benefits
Let’s be real—this is a treat, not a health food. But that doesn’t mean it can’t have a few redeeming qualities. Here’s the estimated nutritional breakdown per serving (based on 8 servings):
- Calories: 380
- Fat: 18g
- Carbohydrates: 48g
- Protein: 6g
- Sugar: 34g
Health Benefits: The cream cheese and milk provide a good dose of calcium and protein. The cocoa in the Oreos contains antioxidants (hey, we’re reaching here!). And let’s not forget the emotional benefits—sharing a fun, spooky dessert with friends and family is good for the soul.
Dietary Considerations: This recipe contains gluten, dairy, and soy. For a gluten-free version, use gluten-free sandwich cookies. For a dairy-free version, use plant-based alternatives as mentioned above. Always check labels if you’re serving guests with allergies.
Conclusion
So there you have it—Spooky Oreo Dirt Cups that are equal parts creepy, cute, and completely delicious. This is the kind of recipe that makes you look like a Halloween hero without breaking a sweat. Whether you’re hosting a costume party, bringing a dish to a school event, or just want to surprise your family with something fun, these dirt cups deliver every single time.
I love this recipe because it reminds me that the best desserts don’t have to be complicated. Sometimes the most memorable treats come from a moment of pantry desperation and a little bit of imagination. And honestly? Watching people’s faces light up when they see gummy worms crawling out of “dirt” never gets old.
Now it’s your turn. Grab some Oreos, get a little messy, and make these cups your own. Add extra candy, try a different pudding flavor, or go all out with spooky decorations. I’d love to hear how they turn out—drop a comment below and tell me your favorite Halloween dessert tradition. And if you share a photo on social media, tag me so I can see your creepy creations!
Frequently Asked Questions
Can I make these Spooky Oreo Dirt Cups ahead of time?
Absolutely! In fact, they taste better when made a day in advance. Just add the gummy worms and candy decorations about 30 minutes before serving to keep them from getting too soft.
Can I use homemade pudding instead of instant?
Yes, but you’ll need to let it cool completely before layering. Homemade pudding is thinner than instant, so it may not set up as firmly. If you go that route, add an extra tablespoon of cornstarch to the recipe.
How do I keep the Oreo crumbs from getting soggy?
The key is to let the cups chill for at least 2 hours, but no more than 24 hours before serving. The crumbs will soften slightly, which mimics real dirt, but they won’t become a mushy mess if you follow the timing.
Can I use a different type of cookie?
Of course! Chocolate wafer cookies, gluten-free chocolate cookies, or even crushed graham crackers work well. Just keep in mind that the color and flavor will change. Golden Oreos make a fun “sand” version for a beach-themed party.
How many servings does this recipe make?
This recipe makes about 8 standard 9-ounce cups. If you’re using smaller cups or shot glasses, you can easily double the number of servings. For a large party, I recommend making a double batch—trust me, they disappear fast.
Pin This Recipe!
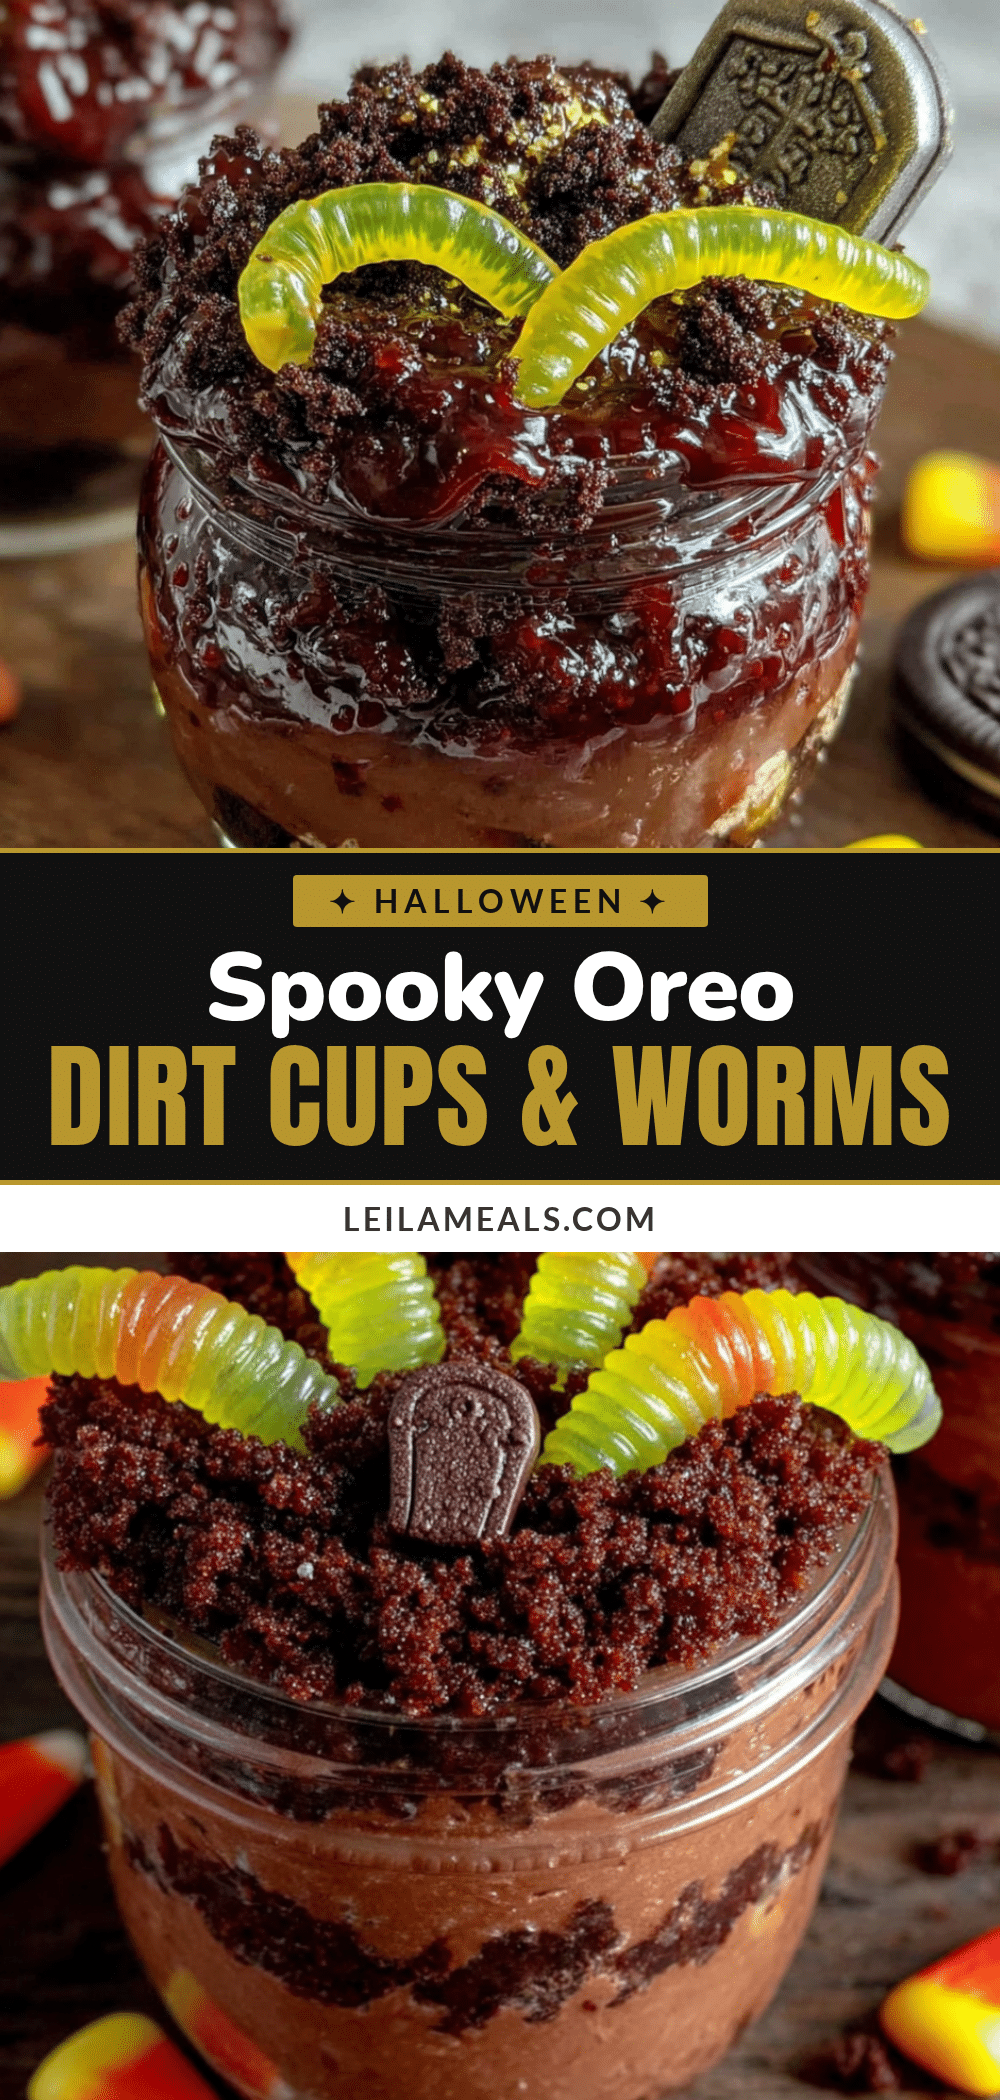
Spooky Oreo Dirt Cups: Easy Halloween Party Dessert
No-bake Oreo dirt cups with creamy chocolate pudding and gummy worms, perfect for Halloween parties. Quick, kid-friendly, and totally customizable.
- Prep Time: 20 minutes
- Cook Time: 0 minutes
- Total Time: 2 hours 20 minutes
- Yield: 8 servings 1x
- Category: Dessert
- Cuisine: American
Ingredients
- 1 package Oreo cookies (14.3 oz)
- 1 box instant chocolate pudding mix (3.9 oz)
- 2 cups cold whole milk
- 8 oz cream cheese, softened
- 1/4 cup powdered sugar
- 1 teaspoon vanilla extract
- 1 cup whipped topping (like Cool Whip), thawed
- Gummy worms
- Candy eyeballs
- Optional decorations: crushed graveyard cookies, pumpkin-shaped sprinkles, candy corn
Instructions
- Crush the Oreos: Place the entire package of Oreos (cream filling and all) into a large zip-top bag. Seal tightly, then use a rolling pin to crush them into fine crumbs. Alternatively, pulse in a food processor. Set aside about 1/4 cup of crumbs for topping.
- Make the chocolate pudding: In a large bowl, whisk together the instant chocolate pudding mix and cold milk. Whisk vigorously for about 2 minutes until thickened. Set aside.
- Prepare the cream cheese mixture: In a separate medium bowl, beat the softened cream cheese with an electric mixer until smooth and fluffy. Add powdered sugar and vanilla extract, beat until combined. Fold in the thawed whipped topping gently.
- Combine the layers: Gently fold the prepared chocolate pudding into the cream cheese mixture until just combined, leaving a marbled effect.
- Layer the cups: In clear cups, start with a layer of crushed Oreo crumbs (about 2 tablespoons). Add a generous layer of the pudding mixture. Repeat with another layer of crumbs and pudding mixture. End with a final layer of crumbs on top. Cups should be about 3/4 full.
- Add decorations: Press gummy worms into the top layer so they look like they’re crawling out. Add candy eyeballs and any other decorations.
- Chill: Refrigerate for at least 2 hours (overnight is best) before serving.
Notes
For best results, let cream cheese soften for 30 minutes before mixing. Add decorations right before serving to prevent softening. These cups taste better after a few hours in the fridge. For gluten-free, use gluten-free chocolate sandwich cookies. For dairy-free, use plant-based alternatives.
Nutrition
- Serving Size: 1 cup (9 oz)
- Calories: 380
- Sugar: 34
- Fat: 18
- Carbohydrates: 48
- Protein: 6
Keywords: Halloween dessert, no-bake, Oreo dirt cups, spooky, kid-friendly, party dessert