I had a bag of jalapeños staring at me from the crisper drawer and a block of cream cheese that needed using up. My nephew was coming over for a Halloween movie marathon, and I had promised something fun but I had zero energy for elaborate baking. The fridge was a graveyard of half-used ingredients—some bacon, a hunk of cheddar, and that lonely cream cheese. I wanted something that felt festive but was actually just a dressed-up version of the thing I make when I’m too tired to think. And honestly, jalapeño poppers are my favorite emergency snack. They’re always good, always satisfying, and they come together in a way that feels like cooking without actually being work.
I started roasting the peppers, and that’s when it hit me—what if I wrapped them up like little mummies? I had a tube of crescent roll dough in the fridge (don’t judge, it’s my secret weapon for everything), and I figured thin strips of dough would look exactly like mummy bandages. I stuffed the jalapeños with a creamy, cheesy filling—cream cheese, cheddar, a little garlic powder—and then I wrapped each one in those skinny dough strips, leaving a tiny gap for two little “eyes” made of mustard. The result was ridiculous in the best way. My nephew called them “spooky bites” before he even tasted one, and after the first batch came out of the oven, we couldn’t stop eating them. They were crispy, creamy, spicy, and salty all at once. This is one of those recipes that makes you look like a Halloween hero without any actual effort. And honestly, that’s my favorite kind of recipe.
Why You’ll Love This Recipe
These Spooky Mummy-Wrapped Jalapeno Popper Bites are the kind of appetizer that disappears before you can put the tray down. I’ve tested them at three different parties now, and every single time, people ask for the recipe before they’ve even finished chewing. Here’s why they work so well:
- Quick & Easy: You can have these ready in under 30 minutes, from start to finish. Perfect for last-minute Halloween gatherings or when you need a crowd-pleaser fast.
- Simple Ingredients: Everything is stuff you probably already have—jalapeños, cream cheese, cheddar, crescent roll dough, and a little bacon. No specialty grocery runs required.
- Perfect for Halloween: They look like little mummies! The crescent dough wraps around the filling like bandages, and the mustard eyes give them that classic mummy face. Kids and adults both go crazy for them.
- Crowd-Pleaser: I’ve served these alongside crispy baked buffalo cauliflower bites at a party, and they stole the show. Even people who don’t usually like spicy food couldn’t stop grabbing them.
- Unbelievably Delicious: The combination of creamy cheese, smoky bacon, spicy jalapeño, and flaky golden dough is just next-level comfort food. It’s the kind of thing that makes you close your eyes after the first bite.
What makes this recipe different from the usual jalapeño popper is the mummy wrapping technique. The thin strips of dough get perfectly crispy in the oven, creating this amazing texture contrast with the creamy filling inside. Plus, the presentation is just so fun—it turns a classic appetizer into something that feels special and festive without any complicated steps. This isn’t just another version of jalapeño poppers. It’s the best version, the one that makes people say “wait, you made these?” with genuine surprise.
What Ingredients You Will Need
This recipe uses simple, everyday ingredients to deliver big flavor. Most of these are pantry staples or easy to find at any grocery store. Here’s what you’ll need:
- Fresh jalapeños (8-10 medium-sized) – Look for firm, smooth peppers without wrinkles. Larger jalapeños are easier to stuff, but medium ones give a better heat-to-cream-cheese ratio. If you want less heat, use a spoon to scrape out the white membranes inside.
- Cream cheese (8 ounces, softened) – Full-fat cream cheese gives the creamiest texture. I prefer Philadelphia brand for consistency, but any block-style cream cheese works. Let it sit at room temperature for 20 minutes before mixing.
- Sharp cheddar cheese (1 cup, shredded) – Adds that savory, tangy flavor that balances the heat. I like using a good quality sharp cheddar—it melts beautifully and gives the filling more depth.
- Bacon (6 slices, cooked and crumbled) – Optional but highly recommended. The smoky, salty crunch takes these poppers to another level. I usually cook the bacon in the oven at 400°F for about 15 minutes while I prep the peppers.
- Crescent roll dough (1 can, 8 ounces) – This is the secret to the mummy look. I use Pillsbury Original Crescent Rolls, but any brand works. You’ll cut each triangle into thin strips to wrap around the peppers.
- Garlic powder (½ teaspoon) – Adds a subtle savory note that complements the cheese. Fresh garlic can burn in the oven, so stick with the powdered version here.
- Onion powder (½ teaspoon) – Rounds out the flavor of the filling. It’s subtle but makes a difference.
- Salt and black pepper (to taste) – Go easy on the salt since the bacon and cheese are already salty. A pinch is usually enough.
- Yellow mustard (for the eyes) – This is purely for decoration, but it’s what gives the mummies their faces. You can use regular yellow mustard or even a little dollop of sour cream if you prefer.
- Olive oil spray (for the baking sheet) – Helps the dough get golden and crispy without sticking. You can also use parchment paper if you prefer.
For a dairy-free version, you can substitute the cream cheese with a plant-based alternative and use dairy-free cheddar shreds. The texture will be slightly different, but it still works great. If you want to skip the bacon, just add an extra ¼ cup of shredded cheddar to the filling for more flavor.
Equipment Needed
You don’t need any fancy equipment for this recipe. Here’s what I use:
- Baking sheet (half-sheet size, 13×18 inches) – A rimmed baking sheet works best to catch any cheese that might bubble out. I use my old Nordic Ware sheet that’s seen better days but still bakes evenly.
- Parchment paper or silicone baking mat – Makes cleanup so much easier and prevents the dough from sticking. I prefer parchment for this recipe because it helps the bottoms get crispy.
- Small mixing bowl – For combining the cream cheese, cheddar, bacon, and seasonings. Any medium bowl works fine.
- Sharp knife and cutting board – For slicing the jalapeños in half and cutting the crescent dough into strips. A serrated knife works well for the peppers if you have one.
- Small spoon or teaspoon measure – For scooping out the jalapeño seeds and membranes. A grapefruit spoon with serrated edges is my favorite tool for this job.
- Pastry brush (optional) – For brushing the dough with egg wash if you want extra golden color. I usually skip this step, and they still come out beautiful.
- Cooling rack – Helps the poppers stay crispy after baking instead of getting soggy on the pan. If you don’t have one, just transfer them to a plate lined with paper towels.
If you don’t have a pastry brush, you can use a paper towel dipped in oil to lightly coat the dough. And if you’re making these for a party, you can prep everything a few hours ahead and bake them right before serving.
Preparation Method

Follow these steps for perfect Spooky Mummy-Wrapped Jalapeno Popper Bites every time:
- Preheat your oven to 375°F (190°C). Line a baking sheet with parchment paper or a silicone mat. This ensures the dough gets crispy on the bottom and doesn’t stick.
- Prepare the jalapeños. Cut each jalapeño in half lengthwise. Use a small spoon to scrape out the seeds and white membranes. If you want milder poppers, be thorough—most of the heat lives in those white ribs. If you like it spicy, leave a few seeds in. Wear gloves if your skin is sensitive to capsaicin. I learned that lesson the hard way after rubbing my eye mid-recipe. Trust me on this one.
- Make the filling. In a small bowl, combine 8 ounces of softened cream cheese, 1 cup of shredded sharp cheddar, ½ teaspoon garlic powder, ½ teaspoon onion powder, and a pinch of salt and pepper. If you’re using bacon, fold in the crumbled pieces now. Mix until everything is well combined. The filling should be smooth and easy to scoop.
- Stuff the peppers. Using a small spoon, fill each jalapeño half with the cream cheese mixture. Don’t overfill—you want the filling to be level with the cut edge of the pepper. A generous teaspoon per half is usually perfect. Set the stuffed peppers aside on a plate.
- Prepare the dough. Open the can of crescent roll dough and unroll it onto a clean cutting board. Separate the triangles along the perforated lines. Using a sharp knife or pizza cutter, cut each triangle lengthwise into 3-4 thin strips. The strips should be about ½ inch wide. Don’t worry if they’re not perfectly even—it adds to the mummy look.
- Wrap the mummies. Take one stuffed jalapeño half and place it at one end of a dough strip. Wrap the strip around the pepper, slightly overlapping as you go, like you’re bandaging a tiny mummy. Leave a small gap near the top for the eyes. Press the end of the dough gently to seal. Repeat with all the peppers. You should get about 16-20 mummy poppers total.
- Arrange on the baking sheet. Place the wrapped peppers on the prepared baking sheet, seam-side down, spaced about an inch apart. They don’t spread much, so you can fit them pretty close together.
- Bake. Place the baking sheet in the preheated oven and bake for 12-15 minutes, or until the dough is golden brown and the filling is bubbly. The kitchen will smell incredible at this point. If you want extra golden dough, you can brush the strips with a little beaten egg before baking.
- Add the eyes. Remove the poppers from the oven and let them cool for 2-3 minutes on the baking sheet. While they’re still warm, use a toothpick to dab a tiny dot of yellow mustard in the exposed gap on each mummy. Two dots per popper, and you’ve got eyes. The warmth helps the mustard stick.
- Serve immediately. Transfer the mummy poppers to a serving platter while they’re still warm. The dough is crispiest right out of the oven, and the cheese is perfectly gooey. Watch them disappear!
Cooking Tips & Techniques
After making these poppers about a dozen times (yes, I became obsessed), I’ve picked up a few tricks that make the process smoother and the results better:
Don’t skip softening the cream cheese. I’ve tried making the filling with cold cream cheese straight from the fridge, and it’s a disaster. The filling doesn’t mix evenly, and you end up with lumpy poppers. Let it sit at room temperature for 20-30 minutes before you start. If you’re in a hurry, microwave it for 10 seconds at a time, but be careful—you don’t want it melted.
Cut the dough strips thin enough. The first time I made these, I cut the crescent dough into thick, chunky strips, and they didn’t cook through properly. The outside was golden, but the inside was doughy. Thin strips—about ½ inch wide—cook evenly and give you that perfect crispy texture. Plus, they look more like real mummy bandages.
Double-wrap for extra dough lovers. If you’re like me and you love the dough part, you can use two strips per pepper instead of one. Just wrap them in opposite directions for a thicker, more bandaged look. You might need an extra can of crescent dough, but it’s worth it.
Watch the baking time. Every oven runs a little differently. My old oven takes exactly 13 minutes, but my friend’s convection oven only needs 10. Start checking at the 10-minute mark. You want the dough to be golden brown and the filling to be bubbling slightly. If the dough is browning too fast but the filling isn’t hot yet, tent the pan loosely with foil for the last few minutes.
Make ahead tip. You can stuff the peppers and wrap them in dough up to 4 hours ahead of time. Keep them in the fridge on the baking sheet, covered with plastic wrap. When you’re ready to serve, just pop them in the oven straight from the fridge—add 2-3 extra minutes to the baking time.
My biggest failure? I once forgot to cook the bacon before adding it to the filling. The bacon didn’t cook through in the oven, and the poppers were chewy and greasy. Always cook the bacon first until it’s crispy. It makes a huge difference.
Variations & Adaptations
One of the best things about this recipe is how flexible it is. Here are some variations I’ve tried and loved:
Spicy Mummy Poppers: For extra heat, add ¼ teaspoon of cayenne pepper to the cream cheese mixture, or use pepper jack cheese instead of cheddar. I made these for a Halloween party where everyone claimed to love spicy food, and they were a hit. Just be warned—they have a serious kick.
Vegetarian Mummies: Skip the bacon and add ¼ cup of finely chopped green onions or chives to the filling instead. You get a fresh, oniony flavor that balances the richness of the cheese. I’ve also added a handful of chopped roasted red peppers, and it was delicious.
Gluten-Free Version: Use gluten-free crescent roll dough or puff pastry sheets cut into strips. The texture will be slightly different, but the concept works perfectly. Just check the baking time on the package and adjust as needed.
Air Fryer Method: I tried these in the air fryer last week, and they came out incredibly crispy. Cook at 350°F for 8-10 minutes, flipping halfway through. The dough gets extra crunchy, and the cheese stays perfectly gooey. You can fit about 6-8 poppers in a standard air fryer basket, so you might need to work in batches.
Sweet Mummy Bites: Okay, this one sounds weird, but hear me out. I made a dessert version using cream cheese mixed with a little powdered sugar and cinnamon, stuffed into halved Medjool dates instead of jalapeños, and wrapped in crescent dough. They looked exactly like mummies, but they were sweet and dessert-like. Perfect for a Halloween treat table alongside brown butter pumpkin chocolate chip cookies.
Serving & Storage Suggestions
These mummy poppers are best served warm, right after the mustard eyes go on. The dough is at its crispiest, and the cheese filling is perfectly melted and gooey. I like to arrange them on a dark platter or a black serving board to make the golden mummies pop. A sprinkle of fresh chopped parsley or chives adds a nice green contrast if you’re feeling fancy.
For dipping, ranch dressing is the classic choice, but I also love serving them with fiery habanero honey hot sauce for extra heat, or a cool sour cream dip mixed with a little lime juice. The creamy dips balance the spice perfectly.
If you have leftovers (which honestly, rarely happens in my house), here’s how to store them:
- Refrigerator: Store leftover poppers in an airtight container for up to 3 days. The dough will soften a bit, but they’re still delicious.
- Reheating: The best way to reheat them is in the oven at 350°F for 5-7 minutes. This crisps the dough back up. The microwave works in a pinch, but the dough gets chewy and soft.
- Freezer: You can freeze unbaked, wrapped poppers on a baking sheet until solid, then transfer them to a freezer bag. Bake straight from frozen, adding 5-7 minutes to the baking time. I’ve done this for a few parties, and it’s a lifesaver.
The flavors actually meld together beautifully overnight. If you somehow have leftovers, they’re fantastic cold straight from the fridge the next day—like a weirdly delicious savory snack.
Nutritional Information & Benefits
Here’s the thing about these mummy poppers—they’re indulgent, and I’m not going to pretend otherwise. But they’re also made with real ingredients, and there are a few redeeming qualities worth mentioning.
Each popper (based on a recipe that makes 18) contains approximately:
- Calories: 145
- Fat: 10g
- Carbohydrates: 8g
- Protein: 5g
- Fiber: 0.5g
Jalapeños are actually a good source of vitamin C and capsaicin, which has anti-inflammatory properties. The cream cheese provides calcium and protein, and if you use bacon, you’re getting a little extra protein and B vitamins. The crescent dough is mostly carbs, but hey—it’s Halloween, and we’re allowed to have fun.
For a lighter version, you can use reduced-fat cream cheese and turkey bacon. The texture will be slightly less creamy, but the flavor is still fantastic. And if you’re watching your sodium, skip the added salt and use low-sodium bacon.
These poppers are not gluten-free as written, but the gluten-free variation works beautifully. They’re also nut-free and egg-free (unless you add an egg wash), which makes them a safe option for many allergy-friendly gatherings.
Conclusion
These Spooky Mummy-Wrapped Jalapeno Popper Bites are the perfect Halloween appetizer—fun to look at, easy to make, and absolutely delicious to eat. They’re the kind of recipe that makes you look like a kitchen wizard without any of the stress. Whether you’re hosting a Halloween party, bringing a dish to a potluck, or just want to make a fun snack for a scary movie night, these little mummies deliver every single time.
I love how customizable they are. You can make them as spicy or as mild as you want, add bacon or skip it, use different cheeses, or even turn them into a sweet treat. The mummy wrapping technique is so simple but so effective, and the mustard eyes give them that perfect spooky face that makes everyone smile.
If you try this recipe, I’d love to hear how it goes. Did you add any fun twists? Did the kids love them? Did they disappear as fast as they do at my house? Drop a comment below and let me know! And if you’re looking for more Halloween party inspiration, check out easy loaded nacho beef dip for another crowd-pleasing favorite. Happy Halloween, and happy cooking!
Frequently Asked Questions
Can I use pickled jalapeños instead of fresh?
I don’t recommend it. Pickled jalapeños are too soft and watery, so they don’t hold up well during baking. The filling gets watery, and the dough can become soggy. Fresh jalapeños give you that perfect crunch and controlled heat level.
How do I make these less spicy?
The heat lives in the seeds and white membranes inside the jalapeños. Use a small spoon to scrape out every bit of the white ribs, and you’ll be left with mostly mild pepper flavor. You can also rinse the jalapeño halves under cold water after seeding to remove any remaining capsaicin.
Can I make these in advance for a party?
Absolutely. You can stuff the peppers and wrap them in dough up to 4 hours ahead. Keep them covered in the fridge, then bake them right before serving. You can also freeze them unbaked for up to 3 months—just bake straight from frozen, adding a few extra minutes.
What can I use instead of crescent roll dough?
Puff pastry works beautifully. Just thaw it, cut it into thin strips, and wrap the same way. You can also use homemade pizza dough rolled very thin, or even refrigerated pie crust. The texture will vary slightly, but the mummy look works with any flaky dough.
Can I make these without bacon?
Yes, and they’re still delicious. Just add an extra ¼ cup of shredded cheddar to the filling to make up for the lost flavor and richness. You can also add a pinch of smoked paprika to give the filling a subtle smoky taste without the bacon.
Pin This Recipe!
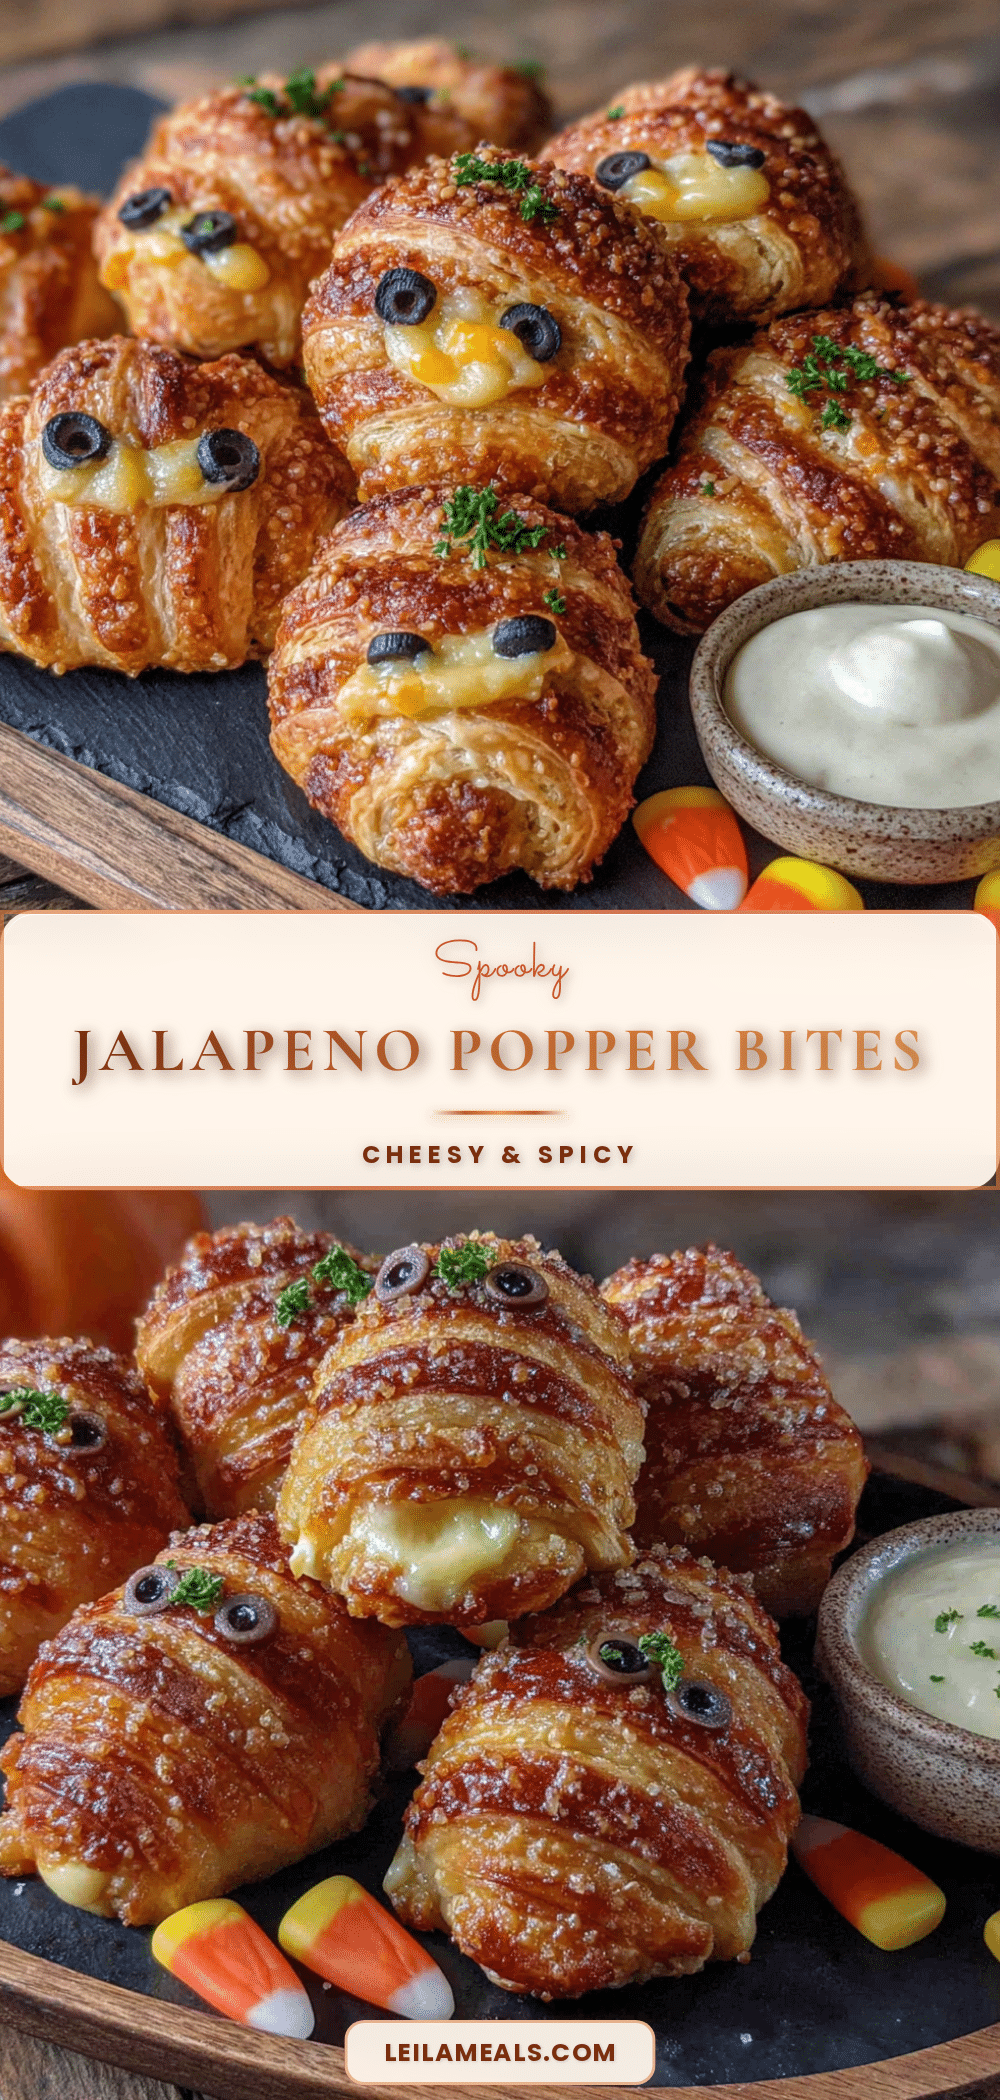
Best Spooky Mummy Jalapeno Popper Bites Recipe

These Spooky Mummy-Wrapped Jalapeno Popper Bites are a fun and easy Halloween appetizer featuring creamy, cheesy jalapeño poppers wrapped in crescent dough strips to look like little mummies. Ready in under 30 minutes, they’re crispy, creamy, spicy, and salty all at once.
- Prep Time: 15 minutes
- Cook Time: 15 minutes
- Total Time: 30 minutes
- Yield: 18 servings 1x
- Category: Appetizer
- Cuisine: American
Ingredients
- 8–10 fresh jalapeños, halved lengthwise and seeded
- 8 ounces cream cheese, softened
- 1 cup sharp cheddar cheese, shredded
- 6 slices bacon, cooked and crumbled (optional)
- 1 can (8 ounces) crescent roll dough
- ½ teaspoon garlic powder
- ½ teaspoon onion powder
- Salt and black pepper to taste
- Yellow mustard (for eyes)
- Olive oil spray (for baking sheet)
Instructions
- Preheat oven to 375°F (190°C). Line a baking sheet with parchment paper or a silicone mat.
- Cut each jalapeño in half lengthwise. Use a small spoon to scrape out seeds and white membranes. For milder poppers, remove all membranes.
- In a small bowl, combine softened cream cheese, shredded cheddar, garlic powder, onion powder, salt, pepper, and crumbled bacon (if using). Mix until smooth.
- Fill each jalapeño half with the cream cheese mixture, level with the cut edge. Set aside.
- Unroll crescent roll dough and separate into triangles. Cut each triangle lengthwise into 3-4 thin strips (about ½ inch wide).
- Place a stuffed jalapeño half at one end of a dough strip. Wrap the strip around the pepper, slightly overlapping, leaving a small gap near the top for eyes. Press to seal. Repeat with all peppers.
- Arrange wrapped peppers on the prepared baking sheet, seam-side down, spaced about 1 inch apart.
- Bake for 12-15 minutes, until dough is golden brown and filling is bubbly.
- Remove from oven and let cool for 2-3 minutes. Use a toothpick to dab two small dots of yellow mustard in the exposed gap on each mummy for eyes.
- Serve immediately while warm.
Notes
For less heat, thoroughly remove seeds and white membranes. For extra golden dough, brush with beaten egg before baking. Make ahead: stuff and wrap up to 4 hours ahead, refrigerate, then bake straight from fridge adding 2-3 minutes. Freeze unbaked poppers for up to 3 months; bake from frozen adding 5-7 minutes.
Nutrition
- Serving Size: 1 popper
- Calories: 145
- Sugar: 2
- Sodium: 280
- Fat: 10
- Saturated Fat: 5
- Carbohydrates: 8
- Fiber: 0.5
- Protein: 5
Keywords: Halloween, jalapeño poppers, mummy, appetizer, crescent roll, cream cheese, bacon, spicy, party food