The kitchen was quiet except for the soft hum of the mixer and the clatter of a metal whisk against the side of a bowl. I had already burned one batch of buttercream—don’t ask—and the air smelled like sugar and vanilla and a tiny bit of defeat. Then my daughter wandered in, still in her pajamas, and pointed at the cooling chocolate cupcakes on the counter. “They look like little black cats,” she said, squinting at the dark, rounded tops. And honestly? They didn’t. Not yet. But that one comment—that one spark of imagination—completely shifted my evening. I grabbed a piping bag, some candy eyes, and a bag of black gel food coloring, and I started building the cutest little faces I could manage. By the time the frosting was set, we had a whole tray of spooky black cat chocolate cupcakes staring back at us. That’s the thing about Halloween baking—it doesn’t have to be perfect. It just has to be fun. And these cupcakes? They’re pure, delicious fun.
Why You’ll Love This Recipe
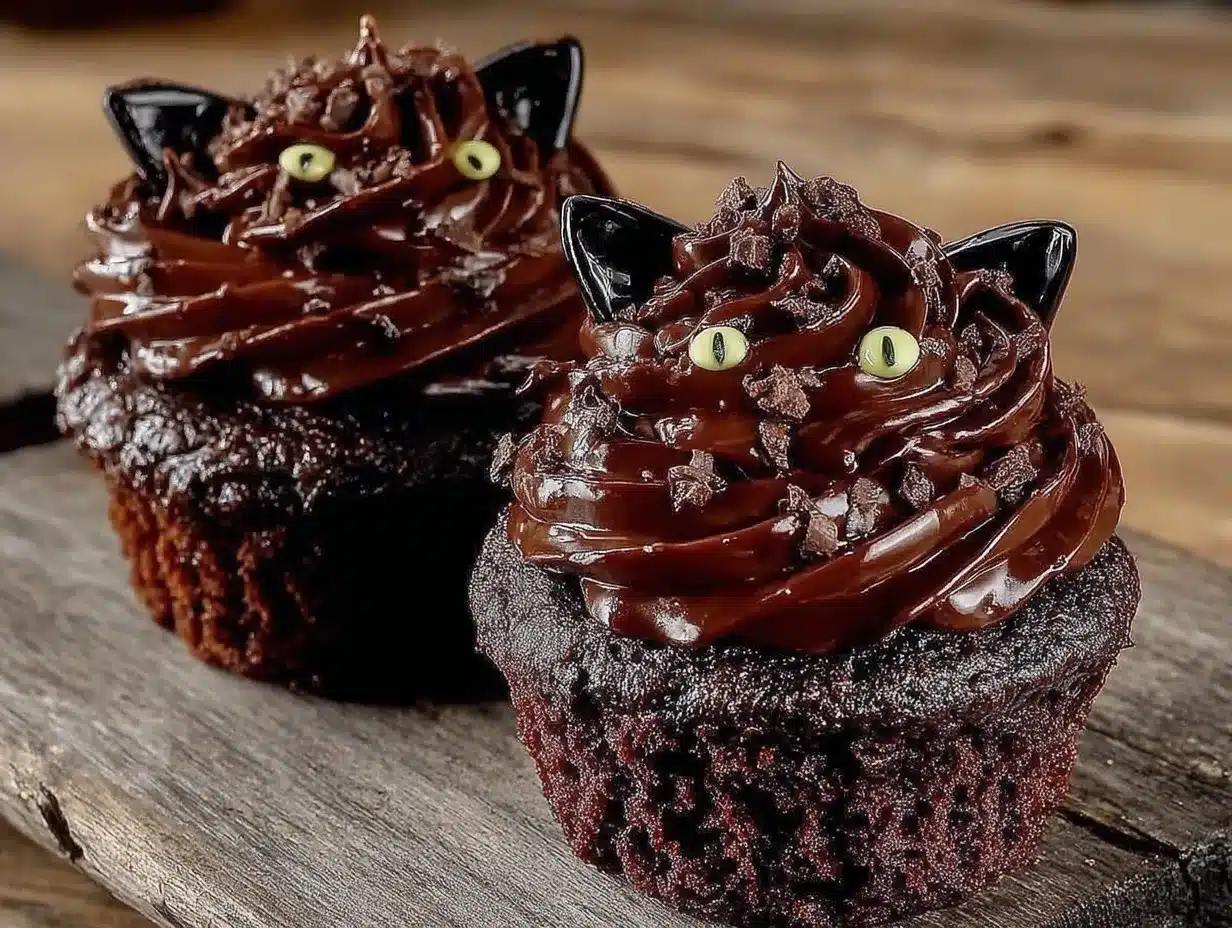
These spooky black cat chocolate cupcakes are the kind of treat that makes people stop mid-conversation and say, “Wait, you made those?” They’re rich, moist, and deeply chocolatey—exactly what a Halloween dessert should be. But what really sets them apart is how they look. Each cupcake transforms into a tiny black cat face, complete with candy eyes and little pointed ears. It’s adorable without being overly fussy.
- Fun to Decorate : You don’t need to be a pastry chef to pull these off. A simple piping technique and a few store-bought candies do all the heavy lifting.
- Rich Chocolate Flavor : The cupcake base is made with cocoa powder and hot coffee, which deepens the chocolate flavor without making it bitter. Trust me on this one.
- Perfect for Halloween Parties : Whether you’re hosting a costume party or sending treats to a school event, these cupcakes fit right in. They’re spooky but not scary—kid-approved all the way.
- Make-Ahead Friendly : Bake the cupcakes a day ahead and frost them the morning of. The flavor actually gets better after a night in the fridge.
- Customizable : Want orange frosting instead of black? Go for it. Prefer a different candy for the eyes? No problem. This recipe is a template for your own creativity.
I’ve tested this recipe four times to get the texture just right. The first batch was too dry. The second was too dense. But the third? That was the one. The crumb is tender, the frosting is silky, and the whole thing comes together with ingredients you probably already have in your pantry. Honestly, if you can make a boxed mix, you can make these from scratch—and they taste a hundred times better.
What Ingredients You Will Need
This recipe uses simple, everyday ingredients to deliver a bakery-quality cupcake with zero fuss. Most of these are pantry staples, which means you’re probably already halfway there.
- All-purpose flour (1 ½ cups / 180g) – Provides structure without making the cupcake too dense. Spoon and level it for accuracy.
- Granulated sugar (1 cup / 200g) – Adds sweetness and helps with browning. Don’t reduce it—the sugar also keeps the crumb tender.
- Unsweetened cocoa powder (½ cup / 50g) – I prefer Dutch-processed for a smoother, darker chocolate flavor. Natural cocoa works too, but the color will be slightly lighter.
- Baking soda (1 tsp) – Helps the cupcakes rise and creates a light texture. Make sure it’s fresh—old baking soda won’t give you the same lift.
- Salt (½ tsp) – Balances the sweetness and brings out the chocolate.
- Large egg (1, room temperature) – Binds everything together. If you forget to take it out of the fridge, place it in a bowl of warm water for 5 minutes.
- Buttermilk (½ cup / 120ml, room temperature) – Adds moisture and a subtle tang. No buttermilk? Add 1 tablespoon of lemon juice or vinegar to regular milk and let it sit for 5 minutes.
- Vegetable oil (½ cup / 120ml) – Keeps the cupcakes moist for days. Butter adds flavor, but oil guarantees tenderness.
- Hot coffee (½ cup / 120ml, freshly brewed) – This is the secret ingredient. Coffee intensifies the chocolate flavor without tasting like coffee at all. I use whatever I have leftover from the morning pot.
- Vanilla extract (1 tsp) – Enhances the chocolate and rounds out the flavor.
For the Black Cat Frosting:
- Unsalted butter (1 cup / 226g, softened) – Make sure it’s truly soft, not melted. Cold butter creates lumpy frosting.
- Powdered sugar (3 ½ cups / 420g) – Sift it if you want extra-smooth frosting, but I rarely do and it turns out fine.
- Heavy cream (3–4 tbsp / 45–60ml) – Adjust the amount to reach your desired consistency. Use milk if that’s what you have.
- Black gel food coloring (about 1 tsp) – Liquid coloring won’t give you that deep, dark black. Gel is concentrated and won’t thin out the frosting.
- Vanilla extract (1 tsp)
- Candy eyes (2 per cupcake) – You can find these at most grocery stores or online. They’re edible and add instant personality.
- Black licorice strings or thin pretzel sticks (cut into small pieces for whiskers) – Optional, but they make the cats look extra expressive.
Equipment Needed
You don’t need a professional bakery setup for these spooky black cat chocolate cupcakes, but a few tools will make your life easier.
- Muffin tin (standard 12-cup) – Grease it well or use paper liners. I prefer liners for easy cleanup and a cleaner look.
- Electric hand mixer or stand mixer – You can whisk the frosting by hand, but your arm will hate you. A mixer saves time and effort.
- Mixing bowls (medium and large)
- Whisk and rubber spatula
- Piping bag with a round tip – A zip-top bag with the corner snipped off works perfectly in a pinch.
- Cooling rack – Essential for letting cupcakes cool evenly. If you frost them while they’re warm, the frosting will melt into a sad puddle.
- Small offset spatula – Not required, but it helps smooth the frosting neatly.
I’ve used the same beat-up muffin tin for years, and honestly, it’s got more character than my fancy nonstick pans. If you’re just starting out, don’t overthink the equipment—use what you have.
Preparation Method
Let’s get baking. This method is broken down into simple steps, so even if you’re new to making cupcakes from scratch, you’ll feel confident.
- Preheat and Prep – Preheat your oven to 350°F (175°C). Line your muffin tin with 12 paper liners. This is non-negotiable if you want easy removal later.
- Mix the Dry Ingredients – In a medium bowl, whisk together the flour, sugar, cocoa powder, baking soda, and salt. Make sure there are no lumps. If your cocoa powder is clumpy, sift it in.
- Combine the Wet Ingredients – In a large bowl, whisk the egg, buttermilk, vegetable oil, and vanilla extract until smooth. The mixture will look a bit thin—that’s normal.
- Add the Hot Coffee – Pour the hot coffee into the wet ingredients and whisk gently. The coffee will smell amazing and will make the batter very liquid. Don’t panic—it’s supposed to be that way.
- Combine Wet and Dry – Pour the dry ingredients into the wet mixture. Fold gently with a rubber spatula until just combined. A few small lumps are fine. Overmixing will make the cupcakes tough.
- Fill the Liners – Use a cookie scoop or a measuring cup to fill each liner about ⅔ full. This gives the cupcakes room to rise without overflowing.
- Bake – Place the tin in the preheated oven and bake for 18 to 20 minutes. The tops should spring back when lightly touched, and a toothpick inserted in the center should come out clean or with a few moist crumbs.
- Cool Completely – Let the cupcakes cool in the tin for 5 minutes, then transfer them to a wire rack. Wait until they’re completely cool before frosting—about 30 to 40 minutes. I know it’s hard to wait, but trust me.
- Make the Frosting – While the cupcakes cool, beat the softened butter in a large bowl with an electric mixer until smooth and creamy. Gradually add the powdered sugar, one cup at a time, beating on low speed. Add the vanilla extract and 3 tablespoons of heavy cream. Beat on medium-high for 2 to 3 minutes until light and fluffy. If the frosting is too thick, add the remaining tablespoon of cream. If it’s too thin, add a bit more powdered sugar.
- Color the Frosting – Add the black gel food coloring, starting with ½ teaspoon. Beat until the color is uniform. Add more gel until you reach your desired shade of deep black. It will look slightly gray at first—keep adding until it’s dark enough.
- Frost the Cupcakes – Fit a piping bag with a round tip (or snip the corner of a zip-top bag). Fill it with frosting. Pipe a generous swirl on each cooled cupcake, starting from the outside and working your way inward. Smooth the top slightly with an offset spatula if you want a cleaner look.
- Decorate the Cats – While the frosting is still soft, press two candy eyes into each cupcake. Cut small triangles from black licorice strings or pretzel sticks for whiskers and press them in gently. If you want ears, cut small triangles from black cardstock or fondant and insert them behind the eyes. (I’ve used both—fondant tastes better.)
One thing I learned the hard way: don’t overfill the piping bag. It’s tempting, but a half-full bag is way easier to control. Also, if your frosting starts to feel too soft, pop the bowl in the fridge for 10 minutes.
Cooking Tips & Techniques
I’ve made plenty of mistakes with chocolate cupcakes over the years, and I’m sharing them so you don’t have to repeat them.
- Use room temperature ingredients – Cold buttermilk and eggs can cause the batter to seize, resulting in dense cupcakes. Set them out 30 minutes before you start.
- Don’t skip the coffee – I know it sounds weird, but the coffee doesn’t make the cupcakes taste like a latte. It enhances the cocoa flavor and makes the chocolate taste deeper. I’ve used decaf and it works just as well.
- Check your oven temperature – Ovens lie. I’ve had ovens that run 25 degrees hotter than the dial says. An inexpensive oven thermometer will save your cupcakes from burning.
- Let the frosting set – After decorating, let the cupcakes sit at room temperature for about 20 minutes so the frosting firms up slightly. This makes them easier to transport without smudging the faces.
- Work in batches – If you’re making a double batch, don’t try to bake all 24 cupcakes at once. Bake one tray at a time on the center rack for even heat distribution.
I once forgot the baking soda entirely and ended up with flat, sad discs that looked more like chocolate cookies than cupcakes. That batch went straight into the trash. Learn from my mistakes—double-check your ingredients before you start mixing.
Variations & Adaptations
One of the best things about these spooky black cat chocolate cupcakes is how easy they are to adapt. Here are a few ways to make them your own.
- Gluten-Free Version – Swap the all-purpose flour for a 1:1 gluten-free baking blend. I’ve used Cup4Cup and Bob’s Red Mill with great results. The texture is slightly more delicate, so handle gently.
- Dairy-Free Option – Use almond milk or oat milk mixed with 1 tablespoon of vinegar in place of buttermilk. Replace the butter in the frosting with vegan butter or coconut oil (refined for no coconut flavor).
- Different Frosting Colors – Black frosting is classic for Halloween, but you can make these into orange cats, white ghosts, or even green monsters. Just swap the food coloring.
- Stuffed Cupcakes – Before baking, place a small piece of dark chocolate or a teaspoon of caramel in the center of each liner, then pour the batter on top. It creates a molten surprise inside.
- Mini Version – Use a mini muffin tin and bake for 10 to 12 minutes. These are perfect for classroom parties or snack-sized treats.
Last year, I made a batch with cream cheese frosting instead of buttercream, and honestly, it was incredible. The tanginess balanced the sweetness beautifully. If you’re feeling adventurous, give it a try.
Serving & Storage Suggestions
These cupcakes are best served at room temperature, which lets the frosting soften just enough to feel luxurious. Arrange them on a black cake stand or a wooden board for a spooky Halloween display. If you’re serving them at a party, place them on a platter with some smoky blackberry bourbon sangria for a grown-up pairing that’s both festive and delicious.
Storage: Store leftover cupcakes in an airtight container at room temperature for up to 2 days. If your kitchen is warm, refrigerate them—the frosting will hold its shape better. Bring them back to room temperature before serving for the best texture.
Freezing: You can freeze the unfrosted cupcakes for up to 3 months. Wrap each one tightly in plastic wrap, then place them in a freezer bag. Thaw at room temperature, then frost and decorate as usual. I’ve done this for parties and it works like a charm.
Reheating: If you prefer your cupcakes slightly warm (I do, especially on a chilly October evening), microwave one for about 10 seconds. The frosting will soften, but the cake will taste freshly baked.
One thing I’ve noticed: the chocolate flavor deepens overnight. So if you bake these a day ahead, they’ll actually taste even better the next day. Just keep them covered so they don’t dry out.
Nutritional Information & Benefits
Let’s be honest—these are cupcakes, not health food. But that doesn’t mean they can’t fit into a balanced lifestyle. Here’s a rough estimate per cupcake (based on 12 servings):
| Nutrient | Amount |
|---|---|
| Calories | 385 |
| Fat | 22g |
| Carbohydrates | 46g |
| Protein | 3g |
| Sugar | 34g |
| Fiber | 2g |
The cocoa powder in these cupcakes is rich in antioxidants called flavonoids, which can support heart health. And the coffee? It adds a little caffeine boost—perfect for a Halloween party where you need energy to keep up with the kids (or the candy bowl). If you’re watching your sugar intake, you can reduce the sugar in the frosting by using a sugar substitute, but I’ll warn you—the texture won’t be quite the same.
These cupcakes are not gluten-free, dairy-free, or vegan in their standard form, but as I mentioned above, substitutions are easy. They do contain eggs and dairy, so keep that in mind if you’re serving guests with allergies.
Conclusion
These spooky black cat chocolate cupcakes are everything I want in a Halloween treat: rich, chocolatey, and ridiculously cute. They’re the kind of dessert that makes people smile the second they see them, and that’s honestly my favorite part of baking. The recipe is forgiving enough for beginners but impressive enough to steal the show at any party.
I hope you make these and put your own spin on them. Maybe your cats will have pink frosting instead of black. Maybe you’ll use candy corn for teeth. That’s the beauty of baking—you get to decide. If you do try them, I’d love to hear how they turned out. Drop a comment below, share a photo on social media, or tag me in your post. And if you’re looking for more Halloween inspiration, don’t miss my witch finger shortbread cookies or this black velvet Halloween layer cake—they’re both absolute hits.
Happy Halloween, and happy baking. You’ve got this.
Frequently Asked Questions
Can I use a boxed cake mix for these cupcakes?
Absolutely. If you’re short on time, a chocolate boxed mix works fine. Just follow the package directions, then focus your energy on the frosting and decorations. The homemade version tastes better, but no one will complain about a boxed mix with that adorable black cat face on top.
How do I get the frosting to be truly black?
Use black gel food coloring, not liquid. Start with ½ teaspoon, mix well, and add more until you’re happy with the shade. It will look slightly gray at first, but it darkens as you add more. I’ve found that about 1 teaspoon gives me the deep black I want.
Can I make these cupcakes ahead of time?
Yes! Bake the cupcakes up to 2 days in advance and store them in an airtight container at room temperature. Frost and decorate them the day you plan to serve them. The frosting stays fresh for about 2 days at room temperature.
What can I use instead of candy eyes?
You can use mini chocolate chips, white chocolate chips with a tiny dot of dark chocolate, or even small candies like M&M’s. If you’re feeling creative, pipe small circles with white and dark frosting. The eyes are really what bring the cats to life, so have fun with it.
How do I store leftover cupcakes?
Store them in an airtight container at room temperature for up to 2 days. If your kitchen is warm or humid, refrigerate them to keep the frosting from getting too soft. Let them sit at room temperature for about 15 minutes before serving for the best texture and flavor.
PrintSpooky Black Cat Chocolate Cupcakes – Best Halloween Treat
These spooky black cat chocolate cupcakes are rich, moist, and deeply chocolatey, decorated to look like adorable black cat faces. Perfect for Halloween parties, they are fun to decorate and kid-approved.
- Prep Time: 30 minutes
- Cook Time: 20 minutes
- Total Time: 50 minutes
- Yield: 12 servings 1x
- Category: Dessert
- Cuisine: American
Ingredients
- 1 ½ cups (180g) all-purpose flour
- 1 cup (200g) granulated sugar
- ½ cup (50g) unsweetened cocoa powder (Dutch-processed preferred)
- 1 tsp baking soda
- ½ tsp salt
- 1 large egg, room temperature
- ½ cup (120ml) buttermilk, room temperature
- ½ cup (120ml) vegetable oil
- ½ cup (120ml) hot coffee, freshly brewed
- 1 tsp vanilla extract
- 1 cup (226g) unsalted butter, softened
- 3 ½ cups (420g) powdered sugar
- 3–4 tbsp (45–60ml) heavy cream
- 1 tsp black gel food coloring
- Candy eyes (2 per cupcake)
- Black licorice strings or thin pretzel sticks (for whiskers, optional)
Instructions
- Preheat oven to 350°F (175°C). Line a 12-cup muffin tin with paper liners.
- In a medium bowl, whisk together flour, sugar, cocoa powder, baking soda, and salt until no lumps remain.
- In a large bowl, whisk egg, buttermilk, vegetable oil, and vanilla extract until smooth.
- Pour hot coffee into the wet ingredients and whisk gently. The batter will be very liquid.
- Pour dry ingredients into wet mixture and fold gently with a rubber spatula until just combined. A few small lumps are fine.
- Fill each liner about ⅔ full using a cookie scoop or measuring cup.
- Bake for 18 to 20 minutes, until tops spring back when lightly touched and a toothpick inserted in the center comes out clean or with a few moist crumbs.
- Let cupcakes cool in the tin for 5 minutes, then transfer to a wire rack to cool completely (about 30 to 40 minutes).
- While cupcakes cool, make frosting: Beat softened butter in a large bowl with an electric mixer until smooth and creamy. Gradually add powdered sugar, one cup at a time, beating on low speed. Add vanilla extract and 3 tablespoons of heavy cream. Beat on medium-high for 2 to 3 minutes until light and fluffy. If too thick, add remaining tablespoon of cream; if too thin, add more powdered sugar.
- Add black gel food coloring, starting with ½ teaspoon, and beat until uniform. Add more gel until desired shade of deep black is reached.
- Fit a piping bag with a round tip (or snip the corner of a zip-top bag) and fill with frosting. Pipe a generous swirl on each cooled cupcake, starting from the outside and working inward. Smooth top slightly with an offset spatula if desired.
- While frosting is still soft, press two candy eyes into each cupcake. Cut small triangles from black licorice strings or pretzel sticks for whiskers and press them in gently. For ears, cut small triangles from black fondant or cardstock and insert behind the eyes.
Notes
Use room temperature ingredients for best results. Don’t skip the coffee—it enhances the chocolate flavor without tasting like coffee. Let cupcakes cool completely before frosting to prevent melting. Frosting can be made ahead and refrigerated; bring to room temperature before piping.
Nutrition
- Serving Size: 1 cupcake
- Calories: 385
- Sugar: 34
- Sodium: 280
- Fat: 22
- Saturated Fat: 12
- Carbohydrates: 46
- Fiber: 2
- Protein: 3
Keywords: Halloween cupcakes, black cat cupcakes, chocolate cupcakes, spooky treats, Halloween baking