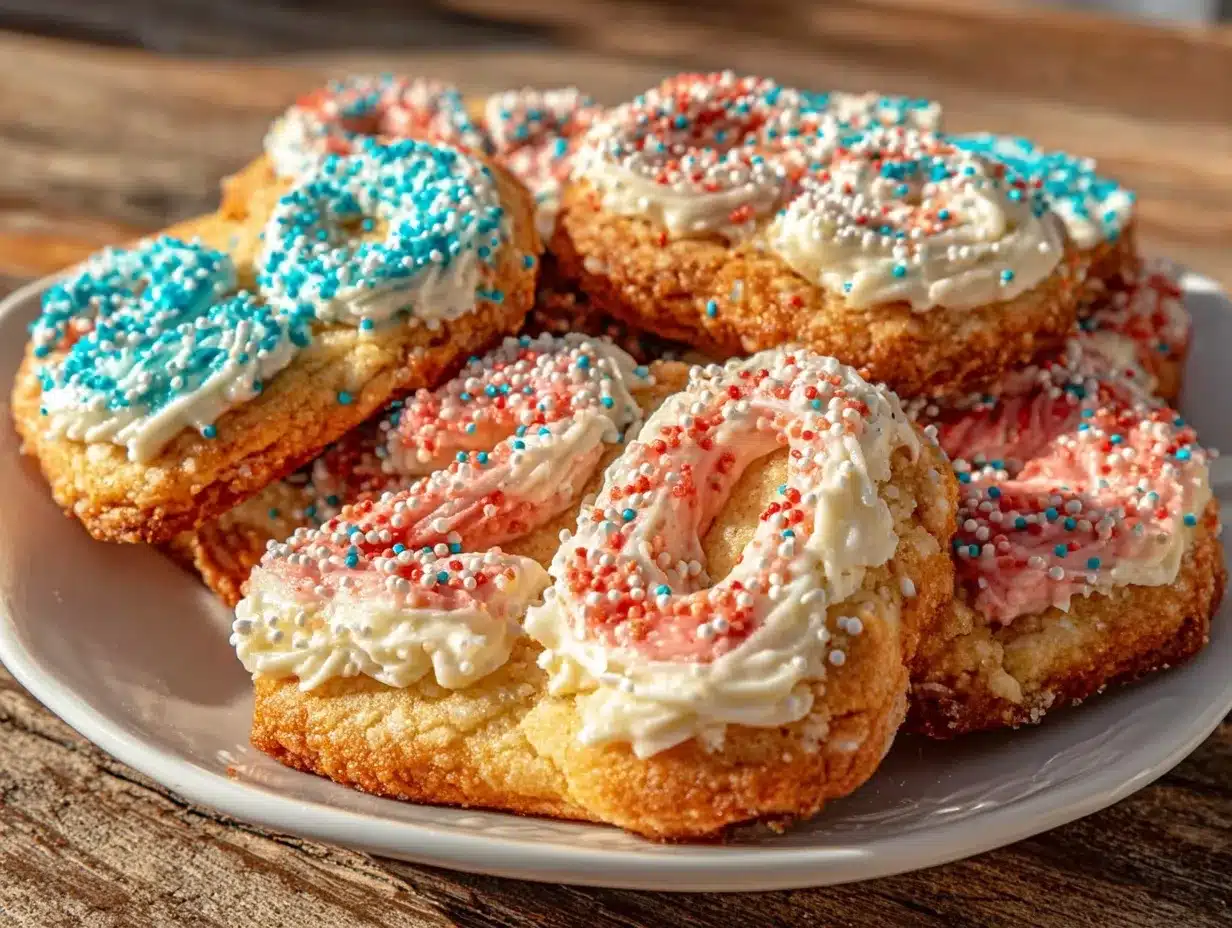
It started with a text from my neighbor, Jen, who’s always the unofficial party planner in our little cul-de-sac. “Got any cute ideas for the Class of 2026 celebration?” she asked, right when I was knee-deep in flour and frosting after an impromptu baking marathon. Honestly, I wasn’t sure if I could pull off something special on short notice. But then, the idea hit me like a sprinkle-covered epiphany: number cookies. Not just any cookies, but perfectly shaped “2026” cookies, decorated bright and bold—easy to eat, easy to share, and undeniably festive.
I had my doubts at first. Would the dough roll out smoothly? Would the icing hold up under the summer sun? But as I shaped the first “2,” and then the “0,” and baked those golden edges, I realized this wasn’t just a party snack. It was a small, sweet way to mark a big milestone. The smell of vanilla and sugar filling the kitchen reminded me of those moments when celebrations don’t have to be complicated to feel meaningful.
By the time the neighbors gathered on the porch, the cookies were the hit of the day. Kids and adults alike couldn’t resist grabbing one (or three). Now, every time June rolls around, these cookies come out again, each batch a little more perfected, a little more colorful. The “Perfect Class of 2026 Number Cookies” became more than just a recipe—they became a tradition. And honestly, I think that’s why they stick around: because they’re simple enough to whip up last minute, but special enough to make you pause and smile.
Why You’ll Love This Recipe
- Quick & Easy: This recipe comes together in under two hours, making it perfect for last-minute celebrations or busy weekends filled with planning and prep.
- Simple Ingredients: No need to hunt down fancy baking supplies. You probably have everything in your pantry right now—flour, sugar, butter, eggs, and a few staples.
- Perfect for Celebrations: These number cookies are ideal for graduation parties, school events, or any milestone moments where you want a personalized touch.
- Crowd-Pleaser: Kids love decorating and eating these cookies, while adults appreciate the buttery, crisp texture and balanced sweetness.
- Unbelievably Delicious: The buttery cookie base is tender yet crisp, with just the right amount of vanilla. The icing is smooth and colorful, adding a festive flair without overwhelming the flavor.
What sets this recipe apart isn’t just the shape or the decoration—it’s the way the dough behaves. It rolls out without cracking, holds its shape beautifully, and bakes evenly every time. Plus, I tweak the icing just enough so it’s sturdy enough for decorating but still melts in your mouth. This isn’t your average sugar cookie recipe; it’s the one I come back to for every graduation or milestone gathering. And if you’re like me, juggling party prep with the rest of life’s chaos, these cookies feel like a little celebration all on their own.
What Ingredients You Will Need
This recipe uses simple, wholesome ingredients to deliver bold flavor and satisfying texture without the fuss. Everything here is easy to find and mostly pantry staples, which means you can get started right away.
- For the Cookie Dough:
- 2 ¾ cups (345g) all-purpose flour – choose a trusted brand like King Arthur for consistent results
- 1 teaspoon baking powder – helps the cookies rise just enough for a tender crumb
- ½ teaspoon salt – balances sweetness and enhances flavor
- 1 cup (227g) unsalted butter, softened – room temperature butter gives the best texture
- 1 ½ cups (300g) granulated sugar – provides sweetness and crispness
- 1 large egg, at room temperature – adds structure and moisture
- 2 teaspoons pure vanilla extract – for that warm, inviting aroma
- 1 tablespoon milk (whole or 2%) – optional, to help the dough come together if it feels dry
- For the Royal Icing:
- 3 cups (360g) powdered sugar, sifted – for smooth, lump-free icing
- 2 large egg whites or 4 tablespoons meringue powder + 6 tablespoons water – meringue powder is a safer alternative if you’re wary of raw eggs
- 1 teaspoon lemon juice or vanilla extract – adds brightness and flavor
- Food coloring gels – use vibrant colors to make your “2026” pop; I prefer AmeriColor gels for rich hues
If you need gluten-free options, almond or oat flour can work but expect a softer texture. For dairy-free, swap butter with vegan margarine or coconut oil, but the flavor will shift slightly. When it comes to icing, meringue powder is a lifesaver if you want to avoid raw eggs but still want that classic royal icing texture.
Equipment Needed
- Rolling pin – a smooth, medium-sized one works best for even dough thickness.
- Number cookie cutters (0, 2, 6) – metal cutters hold shape better than plastic; I personally use Wilton’s set, which is budget-friendly and durable.
- Baking sheets lined with parchment paper or silicone mats – prevents sticking and helps with even baking.
- Mixing bowls – at least two, one for dough and one for icing.
- Electric hand mixer or stand mixer – makes creaming butter and mixing icing much easier and quicker.
- Piping bags and small round tips – for precise icing application; you can also use zip-top bags with a corner snipped off if you’re in a pinch.
- Cooling racks – important for letting cookies cool completely before decorating.
If you don’t have cookie cutters, you can carefully cut numbers out using a sharp knife and a printed template underneath parchment paper. I’ve done it when cutters went missing mid-bake, and it works, just takes a little patience. For icing, if you don’t have piping bags, a small spoon or even a toothpick can help with detail work.
Preparation Method
- Mix Dry Ingredients: In a medium bowl, whisk together 2 ¾ cups (345g) flour, 1 teaspoon baking powder, and ½ teaspoon salt. This ensures even distribution of rising agents and seasoning. Set aside.
- Cream Butter and Sugar: In a large bowl, beat 1 cup (227g) softened unsalted butter and 1 ½ cups (300g) granulated sugar with an electric mixer on medium speed until light and fluffy, about 3-4 minutes. This step traps air that helps cookies stay tender.
- Add Egg and Vanilla: Beat in 1 large egg and 2 teaspoons vanilla extract until just combined. If the mixture looks a bit curdled, that’s okay—don’t overmix.
- Incorporate Dry Ingredients: Gradually add the dry ingredients to the butter mixture in batches, mixing on low speed. If the dough feels too dry or crumbly, add 1 tablespoon milk to bring it together. The dough should be soft but not sticky.
- Chill the Dough: Divide dough into two flat disks, wrap in plastic wrap, and refrigerate for at least 1 hour or overnight. This helps firm up the butter and prevents spreading during baking.
- Preheat Oven: Set oven to 350°F (175°C) and line baking sheets with parchment paper or silicone mats.
- Roll and Cut Cookies: On a lightly floured surface, roll out one disk of dough to about ¼ inch (6mm) thickness. Use your number cookie cutters to cut out “2,” “0,” “2,” and “6” shapes. Transfer carefully to baking sheets, spacing about 1 inch (2.5 cm) apart.
- Bake: Bake cookies for 8-10 minutes, until edges just start to turn golden. Keep an eye on them—the difference between perfect and overbaked here is minutes.
- Cool: Let cookies cool on the baking sheet for 5 minutes, then move to a wire rack to cool completely before decorating.
- Prepare Royal Icing: In a clean bowl, beat 3 cups (360g) powdered sugar with 2 large egg whites (or meringue powder solution) and 1 teaspoon lemon juice/vanilla extract until stiff peaks form. Divide icing into separate bowls and tint with food coloring gels.
- Decorate Cookies: Transfer icing to piping bags and outline the edges of each cookie first, then flood the center with thinner icing if desired. Allow each layer to dry before adding details or additional colors. This can take 15-30 minutes depending on humidity.
- Let Set: Once decorated, let cookies dry at room temperature for several hours or overnight before stacking or packaging.
Pro tip: If your dough feels sticky while rolling, sprinkle a little more flour but don’t overdo it—you want tender cookies, not tough. Also, if your royal icing feels too runny, add a bit more powdered sugar; if too stiff, a few drops of water will help. Practice makes perfect, especially with the piping!
Cooking Tips & Techniques
One key to these number cookies is chilling the dough well. If you skip this, the cookies spread too much and lose their crisp edges, which ruins that neat “2026” look. I learned this the hard way after one rushed batch turned into a blurry number mess.
When rolling dough, aim for consistent thickness so cookies bake evenly. Uneven dough leads to burnt edges or undercooked centers. I usually roll between two sheets of parchment paper—that also cuts down on extra flour and sticky mess.
For decorating, patience is your best friend. Outline first and let it crust over before flooding with thinner icing. It’s tempting to rush, but layering this way helps your colors stay vibrant and prevents bleeding.
If you want to save time, prepare the dough and icing a day ahead. Cookies can be baked and stored in an airtight container for a few days, and icing can be covered with plastic wrap to prevent drying out.
Finally, keep a damp cloth nearby when piping. Sometimes the tips get clogged with sugar crystals, and a quick wipe keeps everything flowing smoothly.
Variations & Adaptations
- Gluten-Free Option: Swap all-purpose flour with a 1:1 gluten-free baking blend. The texture will be slightly softer but still delicious.
- Flavor Twist: Add ½ teaspoon almond extract or lemon zest to the dough for a subtle flavor boost that pairs beautifully with vanilla icing.
- Vegan Version: Use vegan butter and a flax egg (1 tablespoon ground flaxseed + 3 tablespoons water) instead of regular eggs. Use aquafaba or meringue powder for the icing base.
- Seasonal Colors: Customize icing colors to match school colors or holiday themes—red and green for winter celebrations, pastels for springtime graduations.
- Alternative Shapes: Try cookie cutters of caps, stars, or school mascots if number cutters aren’t handy. I once made a set with stars and it was just as fun!
Serving & Storage Suggestions
Serve these number cookies at room temperature for best flavor and texture. They pair wonderfully with a cold glass of milk or a hot cup of coffee, making them great for both kids and adults.
To keep cookies fresh, store them in an airtight container layered with parchment paper at room temperature for up to 5 days. If you want to keep them longer, freeze undecorated cookies in a single layer, wrapped tightly, for up to 3 months. Decorated cookies freeze best if flash-frozen on a tray first, then stacked gently with parchment in between.
When reheating, avoid the microwave as it can make cookies soft and soggy. Instead, let frozen cookies thaw at room temperature or warm briefly in a 300°F (150°C) oven for 5 minutes to bring back crispness.
Interestingly, the flavors mellow and deepen if you make the cookies a day ahead, making them even better for celebrations planned in advance.
Nutritional Information & Benefits
Each cookie (depending on size) typically contains around 150-180 calories, with about 7g fat, 22g carbohydrates, and 2g protein. While these treats are indulgent, the simple ingredients mean no artificial additives or preservatives.
Butter and eggs provide some beneficial fats and protein, while vanilla extract adds aroma without calories. This recipe can be modified for dietary needs—gluten-free or vegan versions are easily done without sacrificing taste.
For anyone mindful of allergens, note that traditional royal icing contains egg whites; meringue powder substitutes offer a safer route for egg allergies. Also, swapping butter for plant-based fats can accommodate dairy sensitivities.
From a wellness point of view, these cookies are a joyful treat—perfect for savoring special moments without overcomplicating your diet.
Conclusion
These Perfect Class of 2026 Number Cookies are more than just a sweet bite—they’re a little celebration you can bake at home. Easy enough for a last-minute party but impressive enough to make guests ask for the recipe again. Whether you decorate them with bright colors or keep it simple, they bring a sense of joy and accomplishment to any event.
Feel free to tweak the colors, flavors, or even shapes to fit your celebration vibe. I often find myself experimenting with new icing designs or adding a sprinkle of edible glitter for extra sparkle. It’s always fun to make these cookies your own.
Give them a try, and if you do, I’d love to hear how your batch turned out or what creative twists you added. There’s nothing better than sharing a little sweet success from the kitchen to your celebration table!
FAQs
Can I make these cookies ahead of time?
Yes! You can prepare the dough and icing a day or two in advance. Store the dough wrapped in plastic wrap in the fridge, and keep the icing covered tightly to prevent drying out.
What if I don’t have number cookie cutters?
You can use a sharp knife and printed number templates under parchment paper to cut the shapes by hand. It takes patience but works well for a personalized touch.
How do I prevent royal icing from cracking?
Avoid letting the icing dry too quickly in direct sunlight or near heat sources. Also, don’t add too much powdered sugar, which can make it stiff and prone to cracking.
Can I store decorated cookies in the fridge?
It’s best to store decorated cookies at room temperature in an airtight container. Refrigeration can cause the icing to sweat or soften.
What’s a good substitute for raw egg whites in royal icing?
Meringue powder mixed with water is a safe and reliable substitute that provides the same stiff peaks without the risk of raw eggs.
Pin This Recipe!

Perfect Class of 2026 Number Cookies Recipe

Easy homemade celebration treats featuring buttery, crisp number-shaped cookies decorated with vibrant royal icing, perfect for graduation parties and milestone events.
- Prep Time: 20 minutes
- Cook Time: 10 minutes
- Total Time: 1 hour 30 minutes
- Yield: 12-16 cookies 1x
- Category: Dessert
- Cuisine: American
Ingredients
- 2 ¾ cups (345g) all-purpose flour
- 1 teaspoon baking powder
- ½ teaspoon salt
- 1 cup (227g) unsalted butter, softened
- 1 ½ cups (300g) granulated sugar
- 1 large egg, at room temperature
- 2 teaspoons pure vanilla extract
- 1 tablespoon milk (whole or 2%), optional
- 3 cups (360g) powdered sugar, sifted
- 2 large egg whites or 4 tablespoons meringue powder + 6 tablespoons water
- 1 teaspoon lemon juice or vanilla extract
- Food coloring gels
Instructions
- Mix dry ingredients: whisk together flour, baking powder, and salt in a medium bowl; set aside.
- Cream butter and sugar: beat softened butter and granulated sugar with an electric mixer on medium speed until light and fluffy, about 3-4 minutes.
- Add egg and vanilla: beat in egg and vanilla extract until just combined.
- Incorporate dry ingredients gradually into the butter mixture on low speed; add milk if dough feels dry. Dough should be soft but not sticky.
- Chill dough: divide into two disks, wrap in plastic, refrigerate at least 1 hour or overnight.
- Preheat oven to 350°F (175°C) and line baking sheets with parchment paper or silicone mats.
- Roll and cut cookies: roll dough to ¼ inch thickness on floured surface, cut out numbers 2, 0, 2, and 6 with cookie cutters, place on baking sheets spaced 1 inch apart.
- Bake for 8-10 minutes until edges start to turn golden; watch carefully to avoid overbaking.
- Cool cookies on baking sheet 5 minutes, then transfer to wire rack to cool completely.
- Prepare royal icing: beat powdered sugar with egg whites (or meringue powder solution) and lemon juice/vanilla until stiff peaks form; divide and tint with food coloring gels.
- Decorate cookies: outline edges with icing, flood centers with thinner icing, allow layers to dry 15-30 minutes before adding details.
- Let decorated cookies dry at room temperature for several hours or overnight before storing or packaging.
Notes
Chill dough well to prevent spreading and maintain crisp edges. Roll dough evenly for uniform baking. Outline icing first and let crust before flooding to avoid color bleeding. Store cookies in airtight container at room temperature up to 5 days or freeze undecorated cookies up to 3 months. Use meringue powder as a safe alternative to raw egg whites in icing.
Nutrition
- Serving Size: 1 cookie
- Calories: 165
- Sugar: 14
- Sodium: 90
- Fat: 7
- Saturated Fat: 4
- Carbohydrates: 22
- Protein: 2
Keywords: number cookies, graduation cookies, celebration treats, royal icing cookies, easy cookie recipe, homemade cookies, party cookies