It was just one of those evenings when I found myself staring at an almost-empty bottle of champagne and a half-baked idea for a graduation party dessert. Honestly, I hadn’t planned on making a cake that night—more like grabbing something quick from the bakery. But then my mind wandered, and I thought, “Why not turn this bubbly into something special?”
Years of baking have taught me that some of the best recipes come from those unplanned moments, and the Perfect Champagne Graduation Cake with Luxurious Gold Accents was born right there, amid the clinking of glasses and last-minute party prep chaos. I was skeptical at first—would the champagne flavor come through? Would the gold accents feel over-the-top or tacky? But after the first slice, it was clear: this cake wasn’t just a pretty face. It had that delicate, celebratory sparkle that made the whole event feel a bit more magical.
What stuck with me, beyond the shimmer, was the way the cake’s light texture and subtle champagne flavor somehow mirrored the feeling of that milestone—a moment to savor, a little indulgent but still refined. Now, it’s become my go-to recipe whenever a graduation or special occasion rolls around. There’s something quietly elegant about the golden touches that make guests pause and smile, and honestly, that’s why this recipe keeps coming back to life in my kitchen.
Why You’ll Love This Recipe
- Quick & Easy: This cake comes together in about an hour, perfect for those last-minute celebrations when time isn’t on your side.
- Simple Ingredients: No need for fancy or hard-to-find items—most are pantry staples or easy to grab at any grocery store.
- Perfect for Graduations & Parties: The sophisticated champagne flavor and gleaming gold accents make it ideal for marking big milestones or fancy gatherings.
- Crowd-Pleaser: Whether you’re feeding a group of teens or adults, this cake’s light, moist crumb and delicate frosting always get rave reviews.
- Unbelievably Delicious: The combination of champagne-infused cake layers and silky buttercream frosting creates a luxurious, melt-in-your-mouth experience.
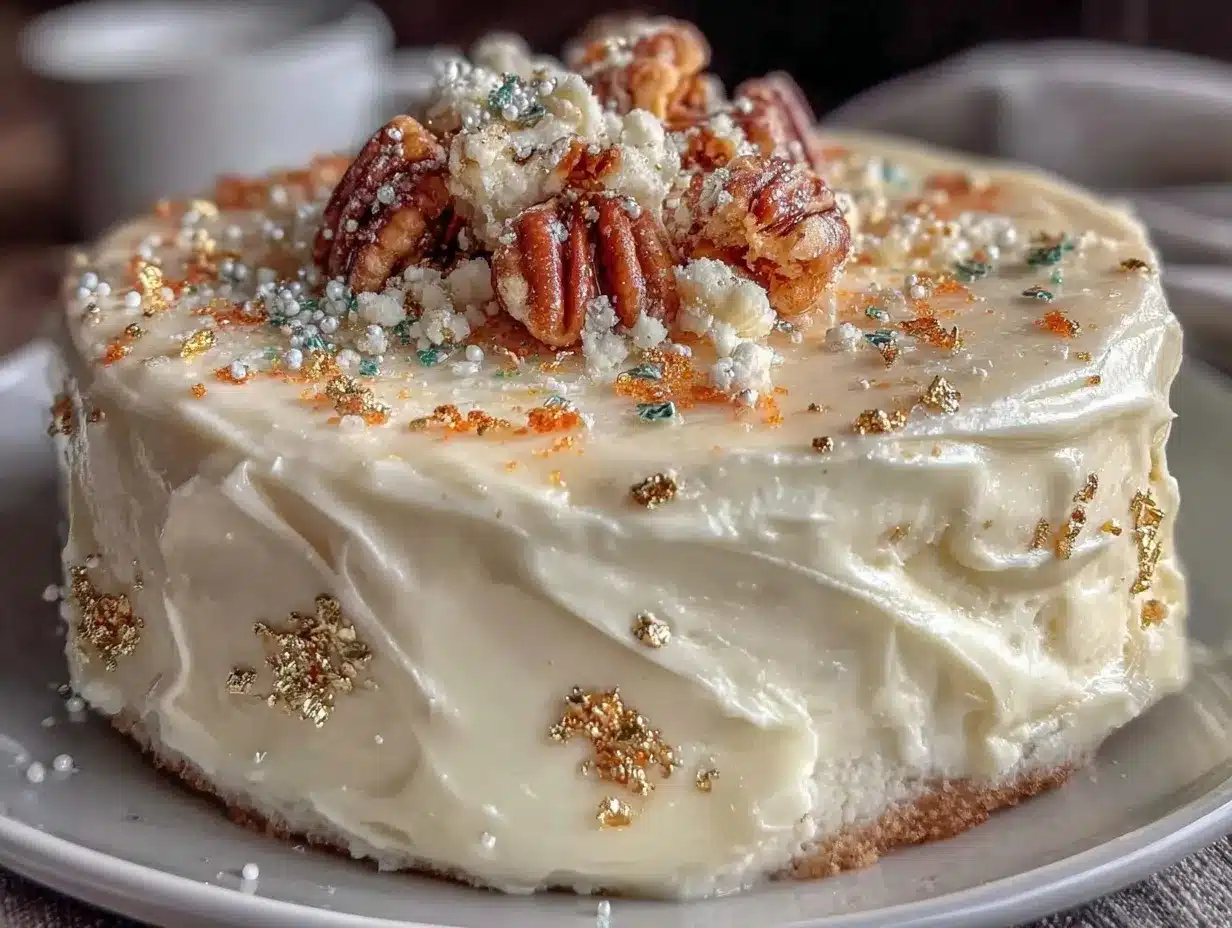
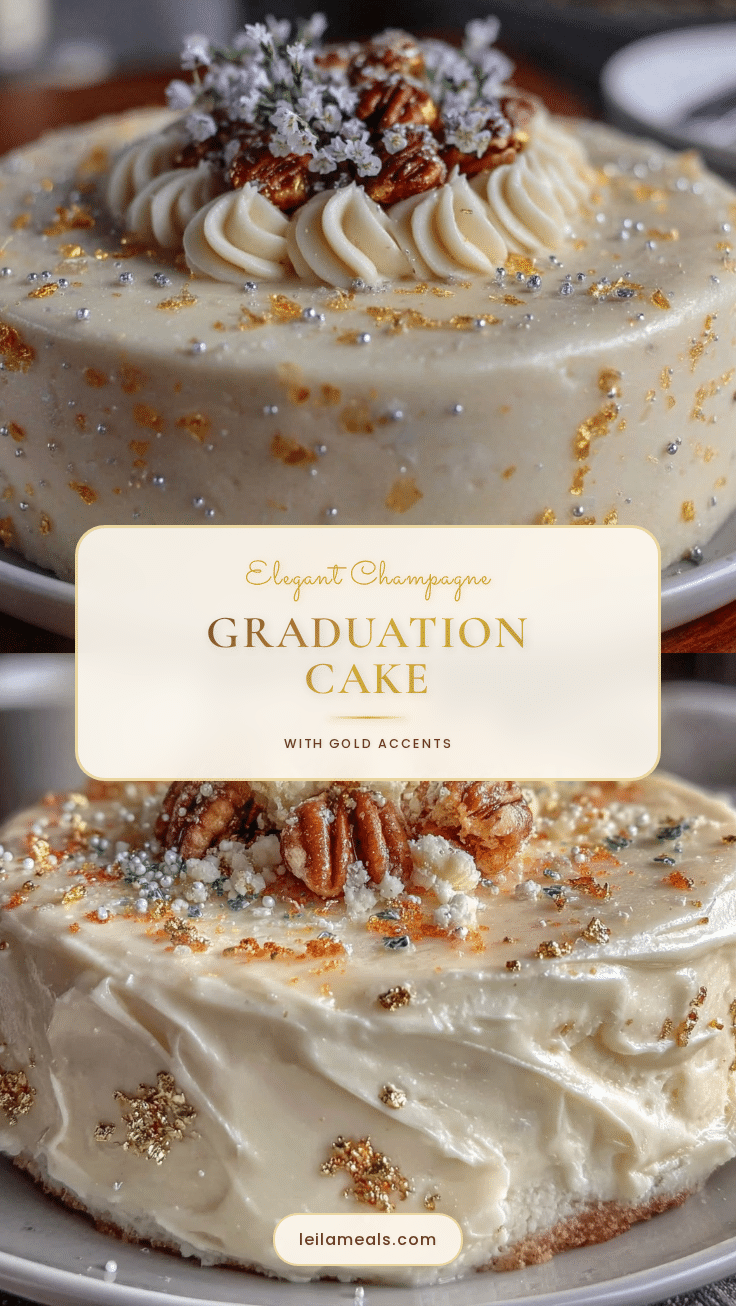
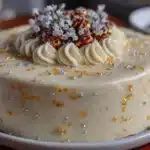
This isn’t just another vanilla cake with a splash of champagne—no, the secret lies in gently folding the champagne into the batter and frosting, preserving that subtle fizz and aroma without overpowering the sweetness. Plus, the gold accents aren’t just slapped on; they’re carefully brushed on with edible gold dust to give that undeniable luxe feel without the fuss.
Honestly, it’s the kind of cake that makes you close your eyes after the first bite and think, “Yep, this is how you celebrate right.” And if you’re anything like me, you’ll find yourself making it again, even when there’s no graduation in sight.
What Ingredients You Will Need
This recipe uses simple, wholesome ingredients to deliver bold flavor and satisfying texture without the fuss. Most are easy to find, and you can swap a few without losing the magic.
- For the Cake Batter:
- 2 ½ cups (310g) all-purpose flour (I prefer King Arthur for consistent results)
- 2 ½ tsp baking powder
- ½ tsp salt
- 1 cup (225g) unsalted butter, softened (room temperature is key for smooth mixing)
- 1 ¾ cups (350g) granulated sugar
- 4 large eggs, room temperature
- ¾ cup (180ml) champagne (choose a dry one for balance)
- ½ cup (120ml) whole milk, room temperature
- 2 tsp vanilla extract
- For the Champagne Buttercream Frosting:
- 1 cup (225g) unsalted butter, softened
- 4 cups (480g) powdered sugar, sifted
- ¼ cup (60ml) champagne
- 1 tsp vanilla extract
- Pinch of salt
- For the Luxurious Gold Accents:
- Edible gold dust or gold luster dust (I recommend Wilton brand for vibrant shine)
- Clear vanilla extract or lemon extract (to mix with gold dust for painting)
Ingredient Tips: Use room temperature eggs and milk to keep the batter smooth and airy. The champagne should be dry or brut-style to avoid excess sweetness. If you prefer, substitute the champagne with sparkling white grape juice for a non-alcoholic option.
Equipment Needed
- Two 8-inch (20 cm) round cake pans (non-stick preferred or well-greased)
- Electric mixer or stand mixer with paddle attachment (makes whipping buttercream a breeze)
- Mixing bowls (medium and large sizes)
- Rubber spatula for folding batter gently
- Cooling racks (to cool cakes evenly without sogginess)
- Offset spatula and bench scraper (for smooth frosting application)
- Small, clean paintbrush (for applying gold dust accents)
- Measuring cups and spoons (accuracy matters here!)
Alternative Tips: If you don’t have a mixer, a hand whisk and a bit of elbow grease can work for the frosting, but expect to spend more time and get a good arm workout. For pans, glass or silicone can be substitutes but adjust baking time slightly.
Preparation Method
- Preheat your oven to 350°F (175°C). Grease and flour your two 8-inch cake pans or line them with parchment paper. This prevents sticking and helps with even browning. (Prep time: 10 minutes)
- Mix the dry ingredients: In a medium bowl, whisk together the all-purpose flour, baking powder, and salt. Set aside. This ensures your leavening is evenly distributed. (Prep time: 5 minutes)
- Cream the butter and sugar: Using your mixer on medium speed, beat the softened butter and granulated sugar until fluffy and pale, about 3-5 minutes. You’ll notice the mixture lightening in color—a good sign you’re on track.
- Add eggs one at a time: Beat in the eggs, one by one, mixing well after each addition. This helps maintain the batter’s structure. If the mixture looks a bit curdled, don’t panic; it will smooth out once you add the dry ingredients.
- Combine liquids: In a small bowl, mix the champagne, milk, and vanilla extract.
- Alternate adding dry ingredients and liquids: Reduce mixer speed to low. Add the dry flour mixture in three parts, alternating with the champagne mixture (start and end with flour). Mix gently until just combined—overmixing can make the cake tough.
- Divide batter evenly: Pour the batter into the two prepared pans. Use a spatula to level the surface for even baking.
- Bake: Place pans in the center of your oven and bake for 30-35 minutes, or until a toothpick inserted into the center comes out clean. Oven temps vary, so start checking at 30 minutes.
- Cool your cakes: Let the cakes rest in the pans for 10 minutes, then transfer to cooling racks to cool completely. Cooling fully prevents frosting meltdown and crumbling.
- Prepare the champagne buttercream frosting: Beat softened butter on medium speed until creamy. Gradually add sifted powdered sugar, alternating with champagne and vanilla extract. Add a pinch of salt. Beat until fluffy and smooth. (Tip: If frosting is too thin, add more powdered sugar; too thick, a splash of milk helps.)
- Assemble the cake: Place one cake layer on your serving plate. Spread a generous layer of buttercream on top. Add the second cake layer and cover the entire cake with frosting using an offset spatula. Smooth or texture as you like.
- Add the gold accents: Mix a small amount of edible gold dust with a few drops of clear vanilla extract to make a paint-like consistency. Using a clean, fine paintbrush, gently brush the gold onto the cake’s edges or create delicate patterns. Let dry before serving.
Cooking Tips & Techniques
Getting that champagne flavor just right is tricky—too much liquid and your batter gets runny; too little and you lose the subtle bubbles that make the cake special. I learned to mix the champagne with milk to balance moisture without overwhelming the texture.
When folding flour into the wet ingredients, slow and gentle is the name of the game. Overworking the batter can make the crumb dense, and honestly, that’s a bummer in a cake that should feel light and celebratory.
For the buttercream, patience is key. I once rushed and added all the powdered sugar at once, resulting in a gritty mess. Adding sugar gradually and beating well gives you that silky, spreadable frosting that holds up to the gold brushstrokes.
When applying gold dust, less is more. I recommend practicing on parchment paper first. It’s easy to get carried away, but subtle shimmer catches the light beautifully without looking gaudy.
Lastly, timing matters. Cool your cakes completely before frosting so buttercream doesn’t melt into sad puddles. And if you want a clean finish, chill the frosted cake for 20 minutes before adding gold accents—that way, the paint stays put.
Variations & Adaptations
- Non-Alcoholic Option: Replace champagne with sparkling white grape juice or a mixture of apple cider and a splash of lemon juice for that bubbly effect without alcohol.
- Flavor Twists: Add a teaspoon of lemon zest to the batter for a bright citrus note that pairs beautifully with champagne. Alternatively, fold in a handful of fresh raspberries for a fruity surprise.
- Gluten-Free Version: Swap all-purpose flour for a gluten-free baking mix (like Bob’s Red Mill 1-to-1). The texture might be a bit different, but the champagne flavor shines through nicely.
- Gold Accent Alternatives: Use gold leaf sheets for a more dramatic decoration, or sprinkle edible gold glitter for a fun, sparkly finish. Both work well if you’re short on time for detailed brushing.
- Personal Favorite: I once added a thin layer of raspberry jam between the cake layers for a tart balance. It was an unexpected hit at a family celebration.
Serving & Storage Suggestions
Serve this cake chilled or at room temperature. The champagne buttercream softens beautifully once it warms slightly, making every bite melt in your mouth.
This cake pairs wonderfully with a glass of the same champagne you baked with, or a light herbal tea if you want to keep things simple. For a fresh touch, serve with a side of mixed berries or a small scoop of vanilla bean ice cream.
Store leftovers tightly covered in the refrigerator for up to 4 days. The flavors actually deepen overnight, so if anything, the cake tastes even better the next day. To revive, let it sit at room temperature for 30 minutes before serving.
For longer storage, freeze the frosted cake (wrapped well in plastic wrap and foil) for up to 2 months. Thaw overnight in the fridge, then bring to room temperature before serving.
Nutritional Information & Benefits
Each slice (based on 12 servings) contains approximately 350 calories, 18g of fat, 45g of carbohydrates, and 3g of protein. The champagne adds flavor with minimal calories thanks to its dryness and small quantity.
Butter provides richness and fat-soluble vitamins, while eggs contribute protein and essential nutrients. Using real champagne instead of artificial flavorings means you get authentic aroma without added sugars.
This cake is not gluten-free unless you use a gluten-free flour substitute. It contains dairy and eggs, so it’s not suitable for vegan or dairy-free diets without modifications.
From my experience, this is a treat that feels indulgent but not overwhelming—perfect for celebrating milestones with a touch of sophistication.
Conclusion
The Perfect Champagne Graduation Cake with Luxurious Gold Accents isn’t just a dessert; it’s a statement. It brings a sparkle to any celebration that’s hard to match with store-bought options. The subtle champagne flavor paired with the elegant gold finish creates a cake that feels thoughtfully made yet approachable.
Feel free to tweak the flavors or decorate it your way—this recipe is forgiving and welcomes your personal touch. I love this cake because it manages to be both festive and refined, a rare combination that makes every slice feel like a celebration.
If you try it, I’d love to hear how your cake turned out or what gold accents you added. Sharing these moments makes the recipe even sweeter. Here’s to many more celebrations with a little sparkle on the side!
FAQs
Can I make this cake ahead of time?
Yes! You can bake the cake layers up to 2 days in advance and keep them wrapped tightly in the fridge. Assemble and frost on the day you plan to serve.
What if I don’t have edible gold dust?
You can skip the gold accents or substitute with gold leaf sheets or edible gold glitter, which are often easier to find and apply.
How do I prevent the cake from drying out?
Be sure not to overbake—check with a toothpick early. Also, store the cake covered to keep moisture locked in.
Can I use sparkling wine instead of champagne?
Absolutely! Any dry sparkling white wine will work similarly in the batter and frosting.
Is this recipe suitable for kids?
The alcohol cooks off during baking, so the cake is safe for kids to eat. For a non-alcoholic version, simply swap the champagne with sparkling grape juice.
Pin This Recipe!
Perfect Champagne Graduation Cake Recipe with Easy Gold Accent Tips
A light and moist champagne-infused cake with silky buttercream frosting and elegant edible gold accents, perfect for graduations and special celebrations.
- Prep Time: 20 minutes
- Cook Time: 30-35 minutes
- Total Time: 50-55 minutes
- Yield: 12 servings 1x
- Category: Dessert
- Cuisine: American
Ingredients
- 2 ½ cups (310g) all-purpose flour
- 2 ½ tsp baking powder
- ½ tsp salt
- 1 cup (225g) unsalted butter, softened
- 1 ¾ cups (350g) granulated sugar
- 4 large eggs, room temperature
- ¾ cup (180ml) champagne (dry or brut-style)
- ½ cup (120ml) whole milk, room temperature
- 2 tsp vanilla extract
- 1 cup (225g) unsalted butter, softened (for frosting)
- 4 cups (480g) powdered sugar, sifted
- ¼ cup (60ml) champagne (for frosting)
- 1 tsp vanilla extract (for frosting)
- Pinch of salt (for frosting)
- Edible gold dust or gold luster dust
- Clear vanilla extract or lemon extract (to mix with gold dust for painting)
Instructions
- Preheat your oven to 350°F (175°C). Grease and flour two 8-inch cake pans or line them with parchment paper.
- In a medium bowl, whisk together the all-purpose flour, baking powder, and salt. Set aside.
- Using a mixer on medium speed, beat the softened butter and granulated sugar until fluffy and pale, about 3-5 minutes.
- Beat in the eggs one at a time, mixing well after each addition.
- In a small bowl, mix the champagne, milk, and vanilla extract.
- Reduce mixer speed to low. Add the dry flour mixture in three parts, alternating with the champagne mixture (start and end with flour). Mix gently until just combined.
- Divide the batter evenly into the two prepared pans and level the surface with a spatula.
- Bake for 30-35 minutes or until a toothpick inserted into the center comes out clean. Start checking at 30 minutes.
- Let the cakes rest in the pans for 10 minutes, then transfer to cooling racks to cool completely.
- For the frosting, beat softened butter on medium speed until creamy. Gradually add sifted powdered sugar, alternating with champagne and vanilla extract. Add a pinch of salt. Beat until fluffy and smooth.
- Place one cake layer on a serving plate. Spread a generous layer of buttercream on top. Add the second cake layer and cover the entire cake with frosting using an offset spatula.
- Mix edible gold dust with a few drops of clear vanilla extract to make a paint-like consistency. Using a clean, fine paintbrush, gently brush the gold onto the cake’s edges or create delicate patterns. Let dry before serving.
Notes
Use room temperature eggs and milk for smooth batter. Choose dry or brut-style champagne to avoid excess sweetness. For non-alcoholic version, substitute champagne with sparkling white grape juice. Cool cakes completely before frosting to prevent melting. Practice applying gold dust on parchment paper first. Chill frosted cake before adding gold accents for best results.
Nutrition
- Serving Size: 1 slice (1/12th of c
- Calories: 350
- Fat: 18
- Carbohydrates: 45
- Protein: 3
Keywords: champagne cake, graduation cake, gold accents, buttercream frosting, celebration cake, easy cake recipe, party dessert