“Hey, did you bring the dessert?” my neighbor asked as I arrived for our Fourth of July block party. Honestly, I hadn’t planned much beyond showing up with a smile and some lawn chairs. But then, standing in my kitchen late the night before, I found myself staring at a lonely box of angel food cake and a fridge full of berries I’d grabbed on a whim. Somehow, that odd combo sparked the idea for this Easy Red White and Blue Trifle with Fresh Berries.
I wasn’t totally convinced it would wow anyone—after all, it felt like a throw-together. But the layers of fluffy cake, creamy vanilla pudding, and those vibrant berries turned out to be a total crowd-pleaser. People kept coming back for seconds, and I found myself making this trifle multiple times over that summer. It became my go-to dessert when I needed something festive but fuss-free.
That mix of sweet, tart, and creamy, plus the patriotic colors, makes this trifle more than just a dessert—it’s a reminder that sometimes the simplest things, thrown together with a little heart, can make summer celebrations feel special. So, if you’ve got a craving for a no-fuss, fresh, and colorful treat that feels like a mini party in a bowl, this recipe’s probably going to stick around your kitchen too.
Why You’ll Love This Recipe
This Easy Red White and Blue Trifle with Fresh Berries isn’t just another layered dessert. It’s one I’ve tested over many summer gatherings, and honestly, it’s become a reliable favorite because:
- Quick & Easy: You can whip this up in under 20 minutes—perfect for those last-minute party invites or when you just want a simple indulgence.
- Simple Ingredients: No need for specialty stores; most of the ingredients are pantry staples or seasonal fruits you can find fresh anywhere.
- Perfect for Summer Celebrations: Whether it’s the Fourth of July, Memorial Day, or any sunny weekend BBQ, this trifle fits right in.
- Crowd-Pleaser: Kids love the sweet layers, and adults appreciate the fresh fruit and lightness—everyone seems to agree!
- Unbelievably Delicious: The airy angel food cake combined with creamy pudding and juicy berries creates a texture and flavor combo that’s honestly hard to beat.
What sets this recipe apart is the balance—it’s not too sweet or heavy like some trifles can be. Plus, swapping in fresh berries instead of canned fruits keeps it bright and fresh. I also love how easy it is to customize, which means you can make it your own without stress. It’s that kind of dessert that makes you close your eyes after the first bite and just savor the moment.
What Ingredients You Will Need
This recipe uses simple, wholesome ingredients to deliver bold flavor and a satisfying texture without the fuss. You probably already have most of these on hand, or they’re easy to find fresh and seasonal. Here’s the rundown:
- Angel Food Cake: About 10 ounces (280 grams), cut into 1-inch cubes. I usually buy a ready-made one, but you can bake your own if you prefer.
- Vanilla Pudding: One 3.4-ounce (96 grams) package of instant vanilla pudding mix, prepared according to package instructions (using 2 cups/480 ml milk). For a lighter option, use almond or oat milk.
- Whipped Cream: 1 cup (240 ml) heavy whipping cream, whipped to soft peaks. You can also use store-bought whipped topping if you’re short on time.
- Fresh Strawberries: 1 cup (150 grams), hulled and sliced. Look for firm berries; they add the vibrant red color and sweetness.
- Fresh Blueberries: 1 cup (150 grams), rinsed and drained. These provide the perfect contrast in both color and flavor.
- Fresh Raspberries: 1 cup (125 grams), gently rinsed. They add a tart pop and deepen the red-white-and-blue theme.
- Vanilla Extract: 1 teaspoon (5 ml), optional but adds a lovely warmth to the pudding layer.
- Powdered Sugar: 1-2 tablespoons (8-16 grams), to sweeten the whipped cream slightly (optional).
For the best results, I recommend brands like Driscoll’s for berries—they’re usually fresh and flavorful. In the summer, swapping in fresh mulberries or blackberries can add a fun twist, similar to my mulberry cobbler experience. If you want a gluten-free variation, almond flour angel food cake is a neat find at specialty stores or online.
Equipment Needed
You don’t need fancy tools to make this trifle, but having the right equipment can make things smoother:
- Large Mixing Bowl: For whipping cream and mixing pudding. A glass or stainless steel bowl works best.
- Electric Mixer or Whisk: Whipping cream by hand is possible but takes longer—an electric hand mixer saves time and effort.
- Measuring Cups and Spoons: Precision helps keep the flavors balanced, especially with pudding mix and sugar.
- Trifle Bowl or Clear Glass Dish: To layer the dessert attractively. If you don’t have a trifle bowl, a large glass bowl or even individual cups work fine.
- Spatula or Spoon: For folding whipped cream and layering ingredients gently.
I’ve tried making this trifle in everything from mason jars to vintage glass bowls—each gives a slightly different vibe. For budget-friendly options, thrift stores often have beautiful glass bowls perfect for layering desserts like this. Keeping your mixing bowl chilled before whipping cream really helps it thicken faster, which is a trick I picked up after many late-night dessert attempts.
Preparation Method
- Prepare the Pudding: In a large bowl, whisk together the instant vanilla pudding mix with 2 cups (480 ml) of cold milk. Stir for about 2 minutes until thickened. Let it set for 5 minutes to get that perfect creamy consistency. If you want, stir in 1 teaspoon (5 ml) of vanilla extract to deepen the flavor.
- Whip the Cream: In a chilled mixing bowl, beat 1 cup (240 ml) of heavy whipping cream with 1-2 tablespoons (8-16 grams) of powdered sugar until soft peaks form. Be careful not to overbeat—it should be light and fluffy, not grainy.
- Prepare the Berries: Gently rinse and drain all the fresh berries. Hull and slice the strawberries to bite-sized pieces. Set aside.
- Cut the Angel Food Cake: Using a serrated knife, cut the angel food cake into roughly 1-inch (2.5 cm) cubes. Avoid squeezing too hard to keep the cake airy.
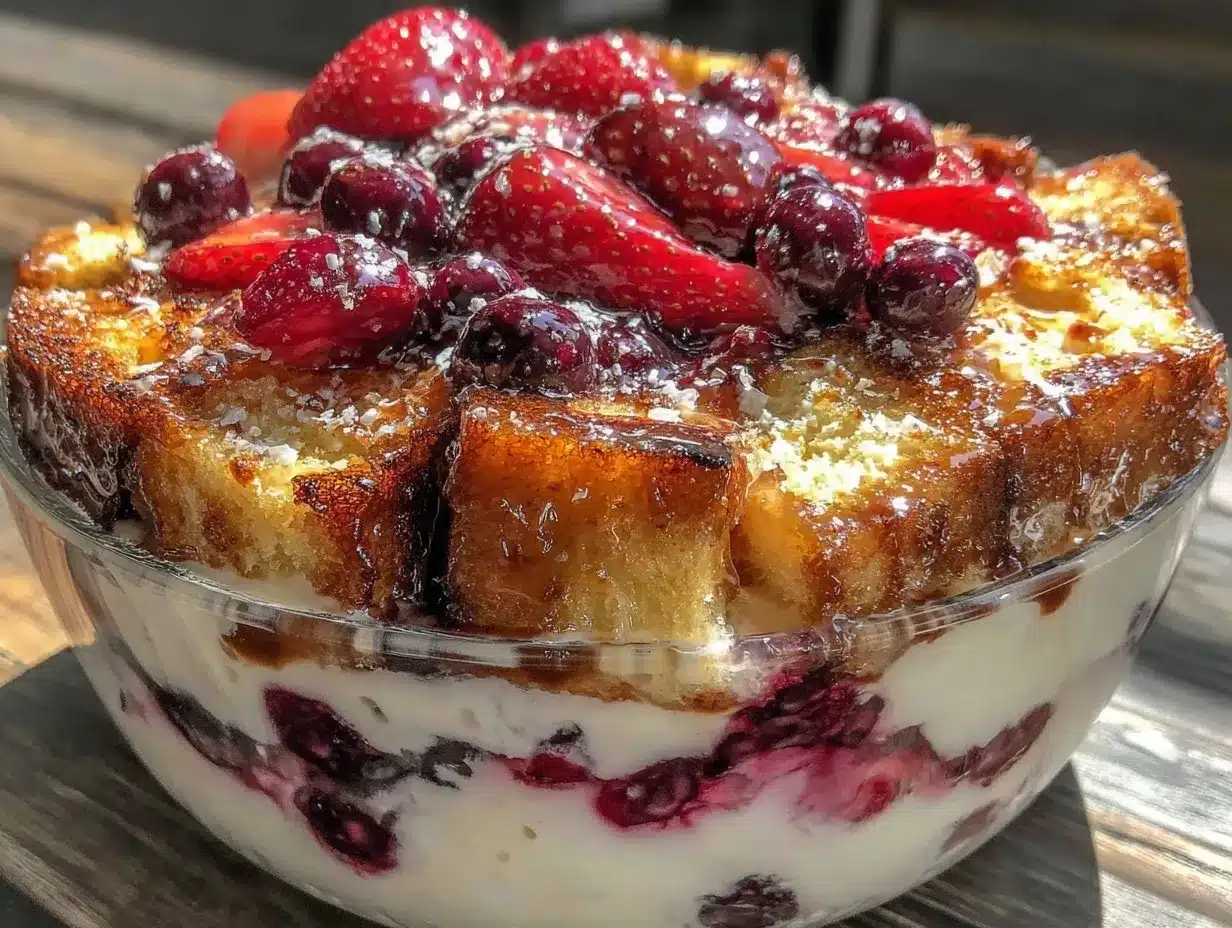
- Layer the Trifle: In your trifle bowl, start with a layer of angel food cake cubes (about 1/3 of the cake). Next, spoon a layer of vanilla pudding over the cake, spreading it evenly. Follow with a layer of mixed berries—strawberries, blueberries, and raspberries. Then add a layer of whipped cream, gently spreading it with a spatula.
- Repeat Layers: Repeat the layering once more in the same order: cake, pudding, berries, whipped cream. For a final touch, top the trifle with a generous sprinkle of fresh berries arranged artfully.
- Chill: Cover the trifle with plastic wrap and refrigerate for at least 2 hours, preferably 4 hours or overnight. This resting time lets the flavors marry and the cake soak up the pudding slightly without getting soggy.
Pro tip: If your pudding seems a little too thick, whisk in a splash of milk before layering to keep the texture light. Also, when layering, don’t press down too hard—let the trifle breathe and keep its fluffy texture. This method makes sure every bite has the perfect balance of softness and freshness.
Cooking Tips & Techniques
Making a trifle might seem straightforward, but a few little tricks can turn it from good to unforgettable. Here’s what I’ve learned over the years:
- Whip Cream Just Right: Stop whipping the cream as soon as soft peaks form. Overwhipping turns it grainy and tough. Using cold cream and a chilled bowl helps speed this up.
- Layer with Care: Use a gentle hand when layering the cake and fruit to keep the angel food cake from turning mushy too soon. This also keeps the trifle looking beautiful.
- Use Fresh, Firm Berries: Soft or overripe berries can release too much juice, making the pudding watery. Rinsing and drying the berries well before layering is key.
- Chill Adequately: Don’t rush the chilling step. The flavors blend and the texture improves dramatically after a few hours in the fridge. If you’re pressed for time, even 1 hour helps.
- Make Ahead: This dessert is a lifesaver for parties because you can assemble it a day in advance. Just add the top layer of berries right before serving to keep the colors vibrant.
I once tried swapping pudding for custard made from scratch, but honestly, the instant pudding keeps it light and hassle-free without compromising flavor. For a faster version, you can replace whipped cream with a dollop of vanilla Greek yogurt, which adds a nice tang and reduces sweetness.
Variations & Adaptations
This Easy Red White and Blue Trifle is super flexible, so feel free to tweak it according to your taste and dietary needs:
- Dairy-Free: Use coconut or almond milk pudding and coconut whipped cream. The tropical notes surprisingly complement the berries well.
- Seasonal Fruit Swap: In fall, try layering with fresh pears and pomegranate seeds for a different color palette. Or in summer, add peaches alongside the berries for extra juiciness, like in my grilled watermelon dish that celebrates seasonal fruits.
- Chocolate Twist: Add a thin layer of chocolate ganache or sprinkle mini chocolate chips between layers for a richer version.
- Low Sugar: Use sugar-free pudding mix and unsweetened whipped cream. Add a little vanilla or almond extract to boost flavor.
- Mini Trifles: Assemble individual trifles in small jars or glasses for easy portion control and a cute presentation—perfect for picnics or potlucks.
Personally, I once tried a version with lemon curd swirled into the pudding layer. It added a zesty brightness that cut through the sweetness beautifully. This recipe’s versatility means you can keep making it without getting bored.
Serving & Storage Suggestions
This trifle is best served chilled, straight from the fridge. The colors really pop when the berries are fresh and the pudding is set nicely. For a festive touch, garnish with a few whole berries and a sprig of fresh mint just before serving.
Pair it with light drinks like iced tea, lemonade, or even a sparkling wine for celebrations. It’s a refreshing finish after smoky BBQ dishes or heavy mains.
To store, cover the trifle tightly with plastic wrap and refrigerate for up to 2 days. The cake will soak up more moisture over time, so it’s best enjoyed within that window for optimal texture. You can also prepare the layers in advance but add the whipped cream and berries just before serving to keep things fresh.
If you have leftovers, individual portions can be kept in airtight containers and reheated slightly at room temperature, but reheating isn’t usually necessary—this one tastes great cold.
Nutritional Information & Benefits
Per serving (assuming 8 servings), this Easy Red White and Blue Trifle offers approximately:
| Calories | 220 |
|---|---|
| Fat | 8g |
| Carbohydrates | 32g |
| Protein | 4g |
| Fiber | 3g |
The fresh berries bring antioxidants, vitamin C, and fiber, making this dessert a lighter choice among typical sweets. Using angel food cake keeps the fat content lower compared to butter-based cakes. For those watching gluten, note that traditional angel food cake contains wheat, but gluten-free options are available.
This dessert fits well for those wanting a treat that balances indulgence and freshness. The berries also add natural sweetness and vibrant nutrients, complementing the creamy layers without overwhelming sugar.
Conclusion
In the end, this Easy Red White and Blue Trifle with Fresh Berries turned out to be my summer dessert hero—not because it’s fancy or complicated, but because it’s honest, colorful, and genuinely delicious. It’s the kind of recipe you can make with little effort but big impact, whether for a crowd or a quiet night in.
Feel free to make it your own—swap fruits, adjust sweetness, or add your favorite twist. That’s what keeps it fun for me every time I pull it out. If you give it a try, I’d love to hear how you made it your own or what memories it brings up.
Here’s to simple, joyful desserts that bring a bit of summer magic to your table.
Frequently Asked Questions
Can I make the trifle ahead of time?
Yes! Assemble the trifle up to a day in advance, but add the whipped cream and fresh berries just before serving to keep the colors vibrant and textures fresh.
What can I use instead of angel food cake?
Sponge cake or pound cake works well too, but angel food cake keeps it lighter. For gluten-free options, look for almond flour-based cakes or gluten-free sponge cakes.
Can I freeze this trifle?
Freezing isn’t recommended because the texture of the whipped cream and fresh berries can change after thawing. Best to enjoy it fresh or refrigerated.
How do I prevent the cake from getting soggy?
Don’t press down when layering and make sure the pudding isn’t too watery. Chilling the assembled trifle helps the cake absorb just enough moisture without becoming mushy.
Are there any good non-dairy substitutions?
Absolutely! Use dairy-free pudding mixes, coconut whipped cream, and plant-based milk like almond or oat milk for a delicious vegan-friendly version.
Pin This Recipe!
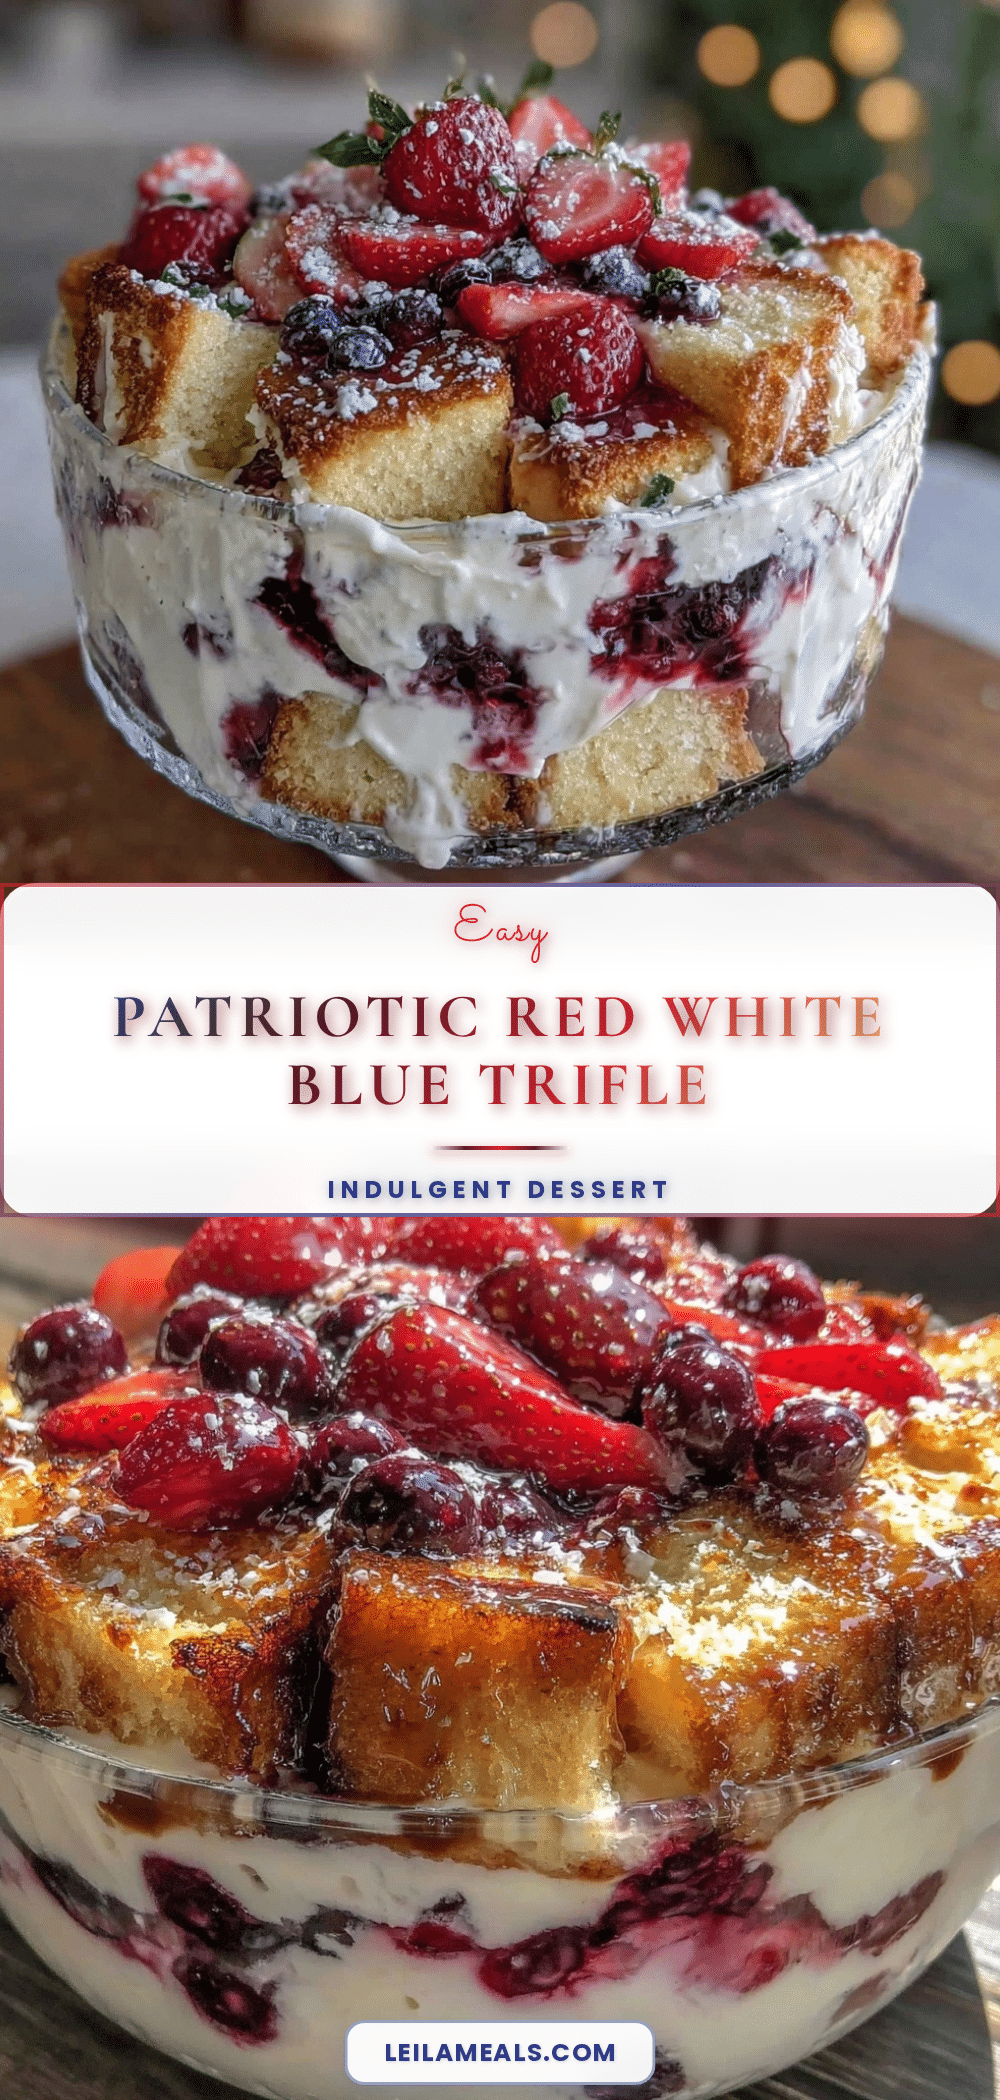
Easy Red White and Blue Trifle Recipe with Fresh Berries for Perfect Fourth of July Dessert

A quick and easy layered dessert featuring angel food cake, creamy vanilla pudding, and fresh red, white, and blue berries. Perfect for summer celebrations and patriotic occasions.
- Prep Time: 15 minutes
- Cook Time: 0 minutes
- Total Time: 2 hours 15 minutes
- Yield: 8 servings 1x
- Category: Dessert
- Cuisine: American
Ingredients
- 10 ounces angel food cake, cut into 1-inch cubes
- 1 (3.4-ounce) package instant vanilla pudding mix
- 2 cups (480 ml) milk (or almond/oat milk for lighter option)
- 1 cup (240 ml) heavy whipping cream
- 1–2 tablespoons powdered sugar (optional)
- 1 teaspoon vanilla extract (optional)
- 1 cup (150 grams) fresh strawberries, hulled and sliced
- 1 cup (150 grams) fresh blueberries, rinsed and drained
- 1 cup (125 grams) fresh raspberries, gently rinsed
Instructions
- Prepare the pudding by whisking the instant vanilla pudding mix with 2 cups (480 ml) of cold milk. Stir for about 2 minutes until thickened and let set for 5 minutes. Stir in vanilla extract if using.
- Whip the heavy cream with powdered sugar until soft peaks form, being careful not to overbeat.
- Rinse and drain all fresh berries. Hull and slice the strawberries.
- Cut the angel food cake into roughly 1-inch cubes using a serrated knife.
- In a trifle bowl, layer 1/3 of the angel food cake cubes, then a layer of vanilla pudding, followed by a layer of mixed berries, and then a layer of whipped cream.
- Repeat the layering once more in the same order: cake, pudding, berries, whipped cream.
- Top the trifle with a generous sprinkle of fresh berries arranged artfully.
- Cover with plastic wrap and refrigerate for at least 2 hours, preferably 4 hours or overnight before serving.
Notes
Use chilled mixing bowl for whipping cream to speed up the process. Do not overwhip cream to avoid grainy texture. Handle berries gently and avoid pressing down layers to keep cake fluffy. Assemble a day ahead but add whipped cream and berries just before serving for best freshness. For dairy-free, use coconut or almond milk pudding and coconut whipped cream. Gluten-free angel food cake options are available.
Nutrition
- Serving Size: 1/8 of the trifle bo
- Calories: 220
- Fat: 8
- Carbohydrates: 32
- Fiber: 3
- Protein: 4
Keywords: red white and blue trifle, fourth of july dessert, fresh berry trifle, easy summer dessert, angel food cake dessert