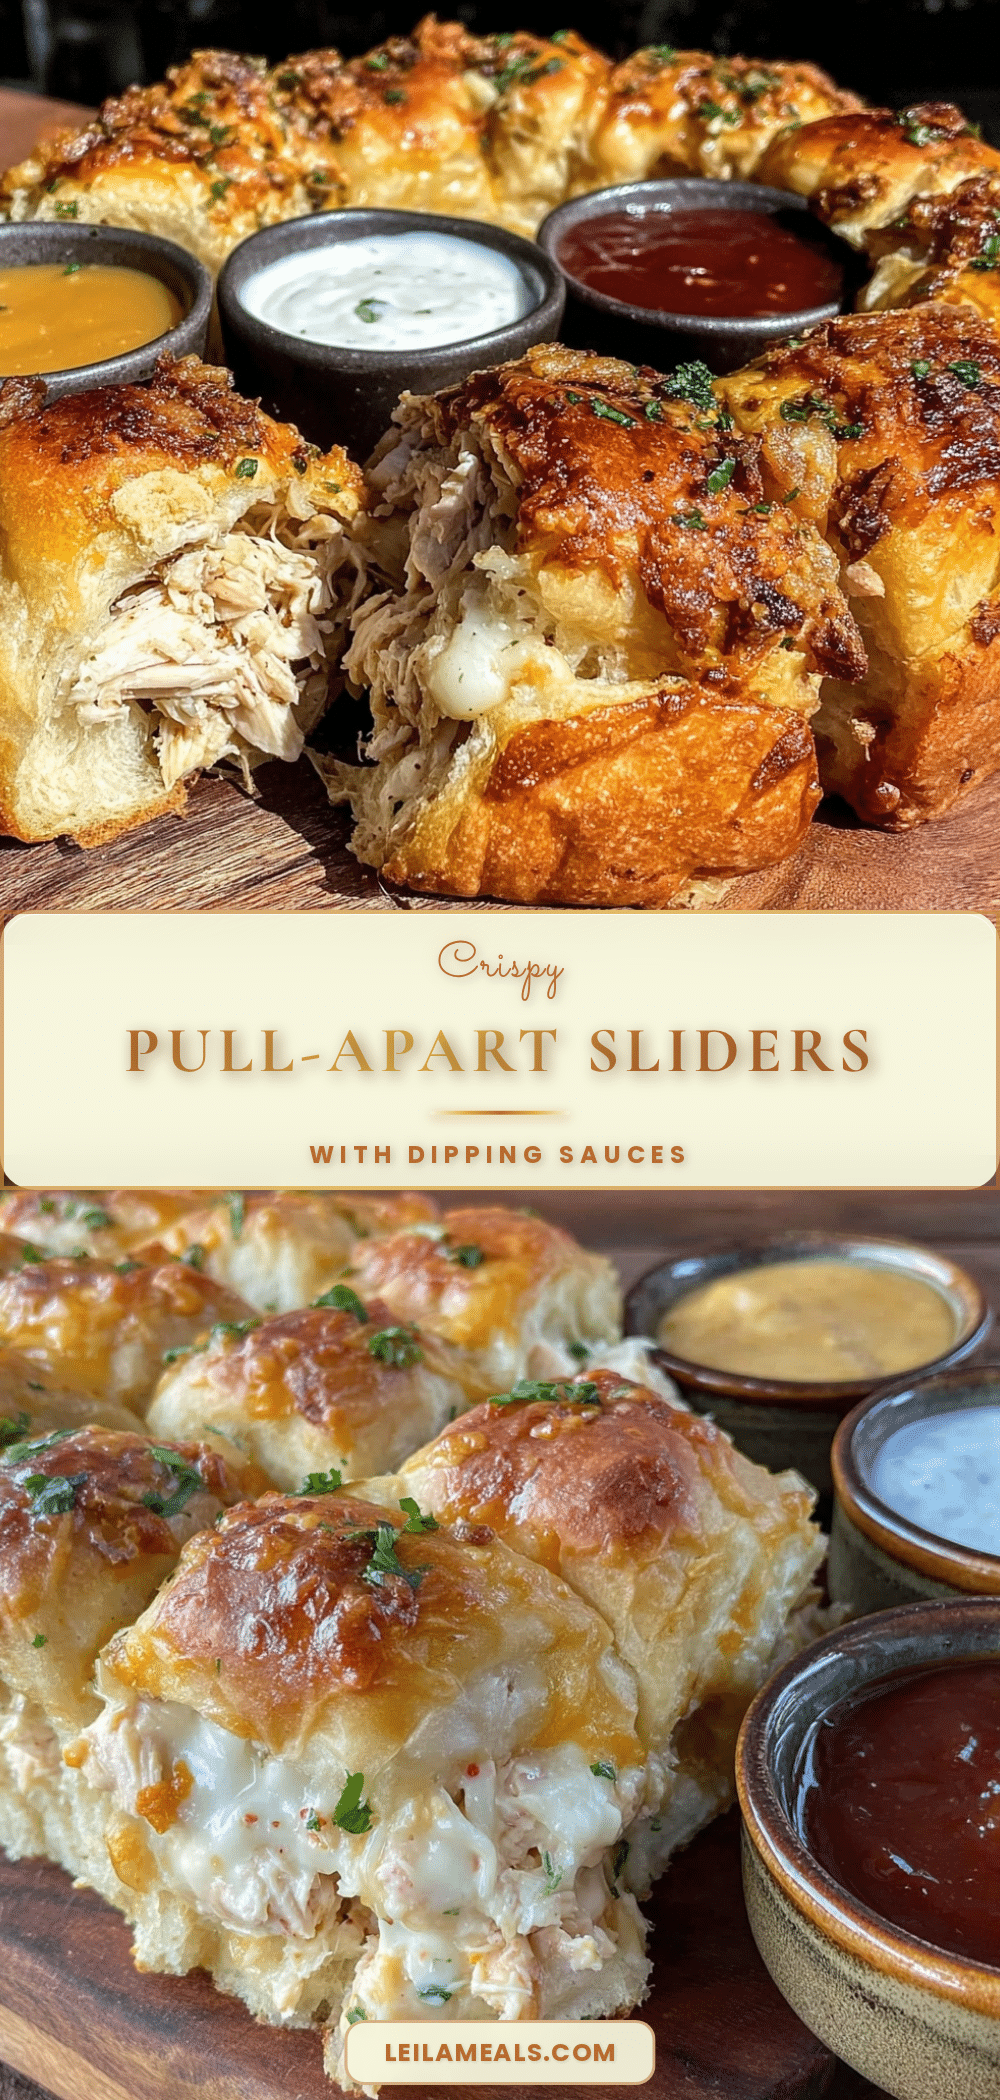
“Are you seriously telling me this came from a boxed mix?” my friend asked, eyes wide as she ripped apart that first crispy slider. Honestly, I couldn’t blame her for the skepticism. The day started with a rushed grocery run, a craving for something fun yet fuss-free, and a shelf full of store-bought buns that just didn’t scream wow. So, I grabbed a few ingredients on a whim, tossed them together, and ended up creating this Crispy Pull-Apart Slider Bar that somehow felt like a party on a plate.
It was one of those moments where the kitchen chaos—kids running around, a deadline looming—made me just want something that worked without asking for too much. The crispy edges, the gooey cheese, and those three dipping sauces that came together faster than expected turned out to be the perfect answer. My friend’s casual “You’ve got to share this,” sealed the deal. Now, this recipe has become my go-to whenever I need to impress without stress.
The magic of this slider bar is in the way it invites everyone to gather ‘round, pulling apart pieces with messy fingers and big smiles. It’s not just a dish; it’s a vibe. I love how the crunchy outside contrasts with the soft, flavorful inside. Plus, the homemade dipping sauces—each with a unique personality—add layers of fun and flavor that store-bought just can’t match. Honestly, this recipe stuck with me because it blends convenience with the kind of comfort food that makes you pause and savor the moment, no matter how busy the day is.
So, if you’re craving something crispy, cheesy, and delightfully shareable, this Crispy Pull-Apart Slider Bar with three homemade dipping sauces might just become your new favorite too.
Why You’ll Love This Recipe
This Crispy Pull-Apart Slider Bar is one of those rare recipes that feels like a celebration but comes together with surprising ease. Having made it several times (yes, more than once a week during a recent obsession phase), I can confidently say it’s a crowd-pleaser through and through. Here’s why I keep coming back to it:
- Quick & Easy: You can have it ready in about 35 minutes, making it perfect for busy weeknights or unexpected guests.
- Simple Ingredients: No need for a trip to specialty stores — most items are pantry staples or easy to find at any grocery.
- Perfect for Parties: Whether it’s game day, a casual get-together, or even a laid-back brunch, this slider bar fits right in.
- Crowd-Pleaser: Kids, adults, picky eaters—everyone loves pulling apart the crispy, cheesy goodness.
- Unbelievably Delicious: The crispy edges, melty cheese, and the zing from the dipping sauces create a flavor and texture combo that’s honestly addictive.
What sets this recipe apart is how the sliders crisp up perfectly without drying out, thanks to a simple brushed butter and seasoning combo that I swear by. Plus, the three dipping sauces add such a fun twist—one smoky, one creamy, and one tangy—that it feels like a mini tasting adventure. This isn’t just another slider recipe; it’s the one I trust to turn any casual gathering into a memorable moment.
What Ingredients You Will Need
This recipe uses straightforward, wholesome ingredients to deliver bold flavors and that finger-licking crispy texture without the fuss. You’re likely to already have most of these in your kitchen, which is why it’s so easy to whip up whenever the craving hits.
- Slider Bread: One pack of small slider buns or dinner rolls (preferably soft but sturdy enough to hold fillings).
- Cheese Blend: 2 cups shredded sharp cheddar and mozzarella mix (I recommend Sargento for melt and flavor).
- Protein: 1 lb ground beef or shredded rotisserie chicken (seasoned with salt, pepper, and a touch of smoked paprika).
- Butter: 4 tbsp unsalted butter, melted (adds richness and helps crisp the tops).
- Seasoning Blend for Butter: 1 tsp garlic powder, 1 tsp onion powder, ½ tsp smoked paprika, ¼ tsp cayenne (optional for a mild kick).
- Fresh Herbs: 2 tbsp chopped parsley or chives for garnish (freshness and color).
For the Dipping Sauces:
- Smoky Chipotle Mayo: ½ cup mayonnaise, 1 tbsp chipotle in adobo sauce (minced), 1 tsp lime juice.
- Honey Mustard Dip: ¼ cup Dijon mustard, 2 tbsp honey, 1 tbsp apple cider vinegar.
- Herbed Ranch Dip: ½ cup sour cream, 2 tbsp fresh dill, 1 tbsp lemon juice, pinch of garlic salt.
Feel free to swap in vegan butter and dairy-free cheese to make this friendly for plant-based diets. For a gluten-free option, small gluten-free buns work surprisingly well (just toast lightly before assembling to avoid sogginess). If you’re in the mood for a twist, swapping ground beef with spicy chorizo or even buffalo chicken can totally change the vibe.
Equipment Needed
- Baking Dish: A 9×13-inch glass or metal baking pan works perfectly for even cooking and easy cleanup.
- Mixing Bowls: One large bowl for combining the meat and seasoning, plus smaller bowls for the dipping sauces.
- Measuring Spoons & Cups: For precise seasoning and sauce ratios.
- Nonstick Skillet: To brown the meat before adding it to the sliders (alternatively, you can use a cast iron skillet for a nice sear).
- Spoon or Spatula: For mixing and spreading ingredients.
If you don’t have a proper baking dish, a rimmed cookie sheet lined with foil can also do the trick. For the dipping sauces, a small whisk or fork is handy for smooth blending, but a simple spoon works too. And honestly, I’ve made this with whatever bowls were on hand—sometimes the best kitchen moments happen when you’re improvising!
Preparation Method

- Preheat your oven to 350°F (175°C). This ensures the slider bar crisps just right without burning.
- Prepare the protein: In a skillet over medium heat, cook 1 lb ground beef until browned and cooked through, about 8-10 minutes. Season with salt, pepper, and smoked paprika as it cooks. Drain excess fat and set aside to cool slightly.
- Mix the butter seasoning: In a small bowl, combine melted butter with garlic powder, onion powder, smoked paprika, and cayenne. Stir well. This seasoned butter will brush over the buns for that crave-worthy crispy top.
- Assemble the sliders: Slice the slider buns in half horizontally. In your baking dish, arrange the bottom halves snugly together. Spread the cooked meat evenly over the bottoms, then sprinkle the shredded cheese generously.
- Top with the bun lids: Place the top halves of the buns over the cheese layer, pressing down slightly.
- Brush the tops: Use a pastry brush to coat the bun tops with the seasoned butter mixture. This is key for that golden, crispy finish.
- Bake: Place the slider bar in the preheated oven and bake for 20-25 minutes until the cheese is melted, and the tops are golden and crispy. You’ll see bubbles of cheese around the edges—that’s your cue!
- Prepare the dipping sauces while baking: Mix ingredients for each sauce in separate small bowls, stirring until well combined and smooth.
- Garnish and serve: Once out of the oven, sprinkle chopped parsley or chives over the slider bar for color and freshness. Serve immediately with the three dipping sauces on the side.
Heads up: if your buns aren’t getting crispy enough, try broiling for the last 2 minutes, but watch closely to avoid burning. Also, if you want to save time, cooking the meat the day before works great—just reheat gently before assembling.
Cooking Tips & Techniques
One trick I learned the hard way: don’t skip seasoning the butter. It might seem minor, but that little step transforms the sliders from soft and dull to crisply irresistible. Also, browning the meat well adds a depth of flavor that you can’t fake with pre-seasoned mixes.
When mixing the dipping sauces, taste as you go. Sometimes a splash more lime juice or a pinch more honey makes all the difference. I often tweak the chipotle mayo by adding a tiny bit of smoked paprika for extra smokiness.
Watch your baking time closely — ovens vary, and you want golden tops without drying out the sliders. If your buns are on the softer side, placing a sheet of foil loosely over the pan for the first 15 minutes prevents premature browning.
Multitasking tip: prepare the sauces while the sliders bake to save time and keep the workflow smooth. It’s all about rhythm in the kitchen (and a bit of patience when the smell starts to take over the whole house!).
Variations & Adaptations
This recipe is wonderfully adaptable. Here are some ways I’ve switched it up:
- Vegetarian Version: Swap the meat for sautéed mushrooms, caramelized onions, and roasted peppers. Add a sprinkle of smoked gouda for a rich, smoky flavor.
- Spicy Kick: Mix diced jalapeños into the meat or add hot sauce to the dipping sauces for those who like it fiery. Buffalo chicken sliders are a personal favorite when I want a tangy twist.
- Seasonal Flavors: In fall, try mixing in sautéed apples and sage with the meat for a cozy vibe. During summer, fresh herbs like basil and oregano brighten the whole dish.
- Gluten-Free: Use gluten-free slider buns or mini gluten-free sandwich rolls. Toasting them lightly beforehand helps maintain that crispy texture.
- Dairy-Free: Use vegan butter and dairy-free cheese alternatives. The dipping sauces can easily be made with coconut yogurt or vegan mayo.
Once, I tossed in some caramelized onion jam from a batch I made recently (similar to my small batch mulberry jam), and it added this unexpected sweetness that balanced the savory perfectly. Experimenting with flavors keeps this slider bar exciting every time.
Serving & Storage Suggestions
Serve this slider bar hot and fresh for the best experience—there’s nothing quite like that crispy cheese edge right out of the oven. I like to plate it with colorful dipping bowls for the sauces, encouraging everyone to mix and match flavors with each bite.
It pairs wonderfully with fresh summer sides, like a crisp cucumber salad or grilled corn with herb butter, much like the ones in my perfect grilled corn with herb butter recipe. For a refreshing drink, something light like iced tea or sparkling water balances the richness.
Leftovers store well in an airtight container in the fridge for up to 3 days. To reheat, cover loosely with foil and warm in a 350°F (175°C) oven for about 10 minutes to bring back some crispness. Microwaving works in a pinch but can soften the crust.
Flavors actually deepen overnight—the dipping sauces meld with the sliders, making the next-day snack almost as good as fresh.
Nutritional Information & Benefits
This slider bar offers a balanced mix of protein, carbohydrates, and fats, making it satisfying without feeling heavy. Each serving (about 3 sliders) provides approximately 400 calories, 25g protein, and 20g fat.
Ground beef or chicken delivers essential amino acids and iron, while the cheese adds calcium and vitamin D. Using fresh herbs boosts antioxidants and adds a fresh note without extra calories.
For those watching carbs, consider swapping regular buns for low-carb or whole-grain options. The dipping sauces are made with wholesome ingredients and can be adjusted to reduce sugar or fat by using lighter mayo or yogurt alternatives.
Just a heads-up: this recipe contains dairy and gluten, so it’s not suitable for those with allergies to those ingredients without the adaptations mentioned above.
Conclusion
There’s something undeniably satisfying about tearing into a Crispy Pull-Apart Slider Bar with three homemade dipping sauces—the mix of textures and flavors feels like a little celebration every time. I love how this recipe fits into busy schedules yet brings that cozy, indulgent vibe we all crave now and then.
Feel free to play around with the fillings, cheeses, and sauces to make it your own. Whether you’re feeding a crowd or just treating yourself, this slider bar has a way of making simple moments feel special.
Give it a try, and I’d love to hear how you customize your version. Drop a comment or share your favorite dipping sauce combo!
FAQs
Can I make the slider bar ahead of time?
Absolutely! You can assemble it a few hours before baking and keep it covered in the fridge. Just add the butter topping right before baking to keep the tops crispy.
What can I use if I don’t have slider buns?
Small dinner rolls or even dinner-sized sandwich buns cut into smaller portions work well. Just adjust the assembly to fit your baking dish.
How do I keep the sliders from getting soggy?
Make sure to drain any excess fat from the cooked meat and brush the tops with seasoned butter before baking. Also, baking uncovered helps maintain crispiness.
Can I freeze the sliders?
Yes! Freeze the assembled slider bar before baking, wrapped tightly in foil. When ready, bake from frozen, adding a few extra minutes to the baking time.
What’s the best way to reheat leftover sliders?
Reheat in the oven at 350°F (175°C) covered loosely with foil for about 10 minutes. This restores crispiness better than the microwave.
Pin This Recipe!
Crispy Pull-Apart Slider Bar with 3 Easy Homemade Dipping Sauces

A quick and easy slider bar recipe featuring crispy edges, gooey cheese, and three flavorful homemade dipping sauces, perfect for parties and casual gatherings.
- Prep Time: 15 minutes
- Cook Time: 25 minutes
- Total Time: 40 minutes
- Yield: 8 servings 1x
- Category: Main Course
- Cuisine: American
Ingredients
- 1 pack small slider buns or dinner rolls
- 2 cups shredded sharp cheddar and mozzarella cheese blend
- 1 lb ground beef or shredded rotisserie chicken, seasoned with salt, pepper, and smoked paprika
- 4 tbsp unsalted butter, melted
- 1 tsp garlic powder
- 1 tsp onion powder
- ½ tsp smoked paprika
- ¼ tsp cayenne pepper (optional)
- 2 tbsp chopped parsley or chives for garnish
- For the Smoky Chipotle Mayo: ½ cup mayonnaise, 1 tbsp chipotle in adobo sauce (minced), 1 tsp lime juice
- For the Honey Mustard Dip: ¼ cup Dijon mustard, 2 tbsp honey, 1 tbsp apple cider vinegar
- For the Herbed Ranch Dip: ½ cup sour cream, 2 tbsp fresh dill, 1 tbsp lemon juice, pinch of garlic salt
Instructions
- Preheat oven to 350°F (175°C).
- In a skillet over medium heat, cook ground beef until browned and cooked through, about 8-10 minutes. Season with salt, pepper, and smoked paprika. Drain excess fat and set aside to cool slightly.
- In a small bowl, combine melted butter with garlic powder, onion powder, smoked paprika, and cayenne. Stir well.
- Slice slider buns in half horizontally. Arrange bottom halves snugly in a 9×13-inch baking dish.
- Spread cooked meat evenly over the bottom halves, then sprinkle shredded cheese generously on top.
- Place top halves of buns over the cheese layer, pressing down slightly.
- Brush the tops with the seasoned butter mixture using a pastry brush.
- Bake for 20-25 minutes until cheese is melted and tops are golden and crispy.
- While baking, prepare the dipping sauces by mixing their ingredients in separate small bowls until smooth.
- Once baked, sprinkle chopped parsley or chives over the slider bar for garnish.
- Serve immediately with the three dipping sauces on the side.
Notes
If buns are not crispy enough, broil for last 2 minutes watching closely to avoid burning. Cooking meat a day ahead saves time. Use vegan butter and dairy-free cheese for plant-based diets. Gluten-free buns can be toasted lightly before assembling to avoid sogginess. Adjust dipping sauces to taste, adding more lime juice or honey as desired.
Nutrition
- Serving Size: About 3 sliders
- Calories: 400
- Sugar: 5
- Sodium: 600
- Fat: 20
- Saturated Fat: 10
- Carbohydrates: 30
- Fiber: 1
- Protein: 25
Keywords: slider bar, pull-apart sliders, crispy sliders, homemade dipping sauces, party food, easy recipe, ground beef sliders, chicken sliders