“You guys have got to try these sliders,” a neighbor blurted out as I wrestled with a stubborn grill lid on a hot Saturday afternoon. Honestly, I wasn’t in the mood for fussing over food that day—too much running around, too little time. But the smell drifting over from their backyard was impossible to ignore: smoky, sweet, with a hint of crispy bacon that made my stomach rumble before I even took a bite.
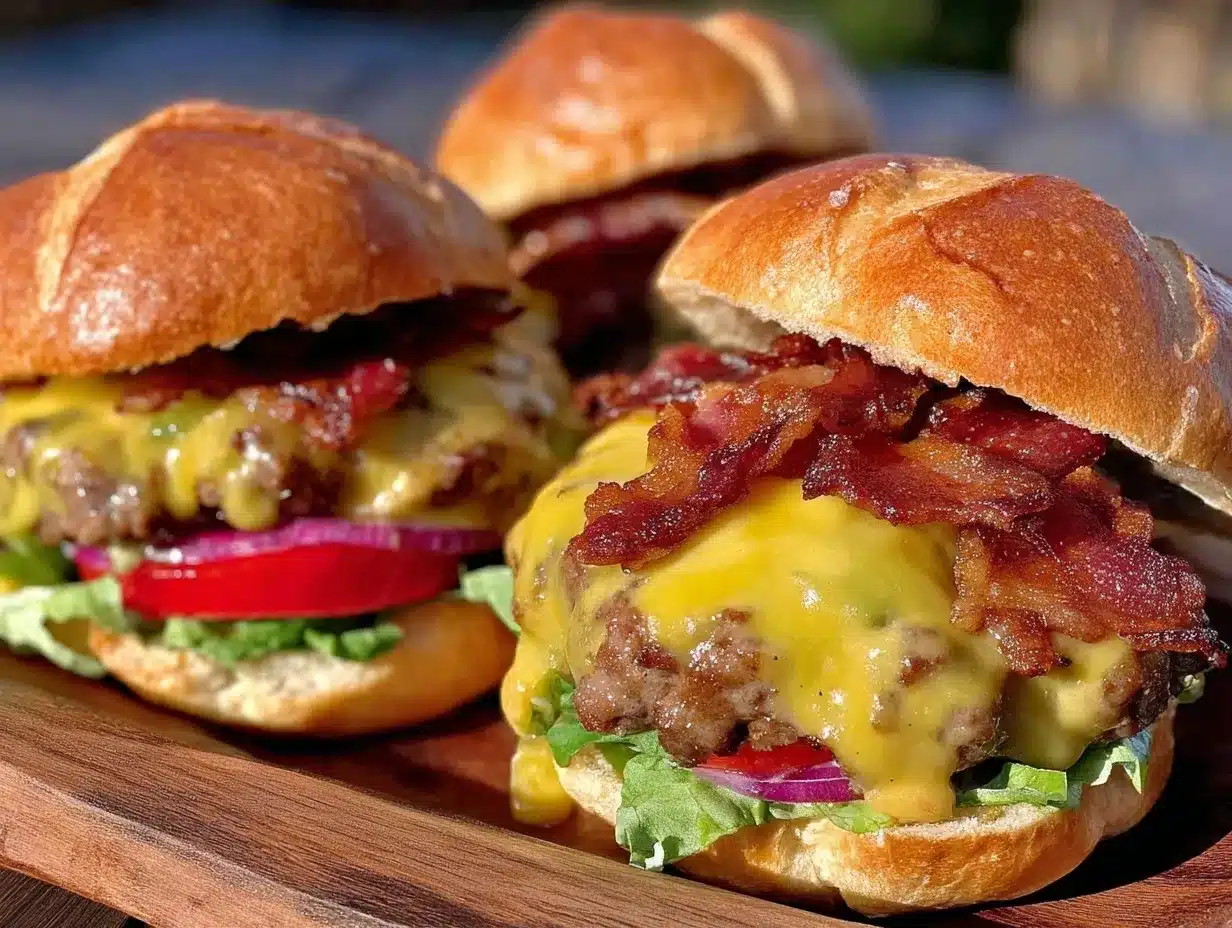
That first mouthful of the crispy BBQ bacon cheeseburger sliders was like a little party in my mouth. Crunchy edges, melty cheese, smoky-sweet BBQ sauce, and that salty bacon crunch—talk about comfort food meeting backyard chill vibes. I was skeptical at first; sliders can sometimes feel like mini versions of bigger burgers, but these had their own personality. They weren’t just a snack; they were the centerpiece.
Since then, I’ve made these sliders more times than I can count, especially when friends drop by unannounced or when the grill beckons on warm evenings. They’re the kind of recipe that doesn’t ask for much—just a few staples from your fridge and pantry, a bit of patience, and a grill or skillet. No fancy ingredients, no complicated steps, just honest, crave-worthy flavor. And, if you’re anything like me, you’ll appreciate how they come together fast enough to keep the party going without turning into a kitchen marathon.
These sliders have become my go-to for cookouts, backyard hangouts, and even casual game nights. They carry the smoky-sweet spirit of summer with every bite and somehow manage to satisfy the whole crowd, from kids sneaking in second helpings to adults who claim they’re “watching their diet” (yeah right!). Somehow, this recipe stuck around because it hits that perfect note of crispy, cheesy, smoky, and saucy all at once—comfort food that’s also a little bit fun.
Honestly, once you try these crispy BBQ bacon cheeseburger sliders, you won’t just be making sliders—you’ll be making memories. And that’s the kind of food I want on my cookout table.
Why You’ll Love This Recipe
From the first time I threw this together, I knew it was a keeper—and not just because of the flavor. Here’s why these crispy BBQ bacon cheeseburger sliders have earned their spot in my recipe rotation:
- Quick & Easy: Ready in about 30 minutes, these sliders are perfect for those last-minute cookout plans or spontaneous cravings.
- Simple Ingredients: No need to hunt for anything exotic—just basics you probably have on hand, like ground beef, bacon, cheddar, and a good BBQ sauce.
- Perfect for Cookouts: These sliders steal the show at any summer gathering, backyard BBQ, or casual party.
- Crowd-Pleaser: Kids, adults, picky eaters—you name it, everyone’s asking for seconds.
- Unbelievably Delicious: The crispy crust on the patty combined with melty cheese and smoky bacon is that next-level comfort combo you didn’t know you needed.
What really sets this recipe apart is the way the patties get crispy edges without drying out—thanks to a quick sear and careful handling. Plus, the BBQ sauce is just the right balance of sweet and tangy, making every bite pop. I’ve swapped in different cheeses and even tried turkey bacon for a lighter twist, but honestly, the original combo keeps calling me back.
It’s not just a burger; it’s a little handheld experience that brings people together. Whether you’re firing up the grill after a day of gardening or throwing together a quick dinner, these sliders deliver that satisfying mix of smoky, savory, and crispy that makes you pause and enjoy the moment.
What Ingredients You Will Need
This recipe uses simple, wholesome ingredients to deliver bold flavor and satisfying texture without the fuss. Most of these are pantry staples or easily found at your local grocery store. Here’s what you’ll need:
- Ground beef (80/20 blend): About 1 pound (450g) – this fat ratio helps keep the patties juicy and flavorful.
- Bacon strips: 6-8 slices, cooked crisp and chopped – adds that smoky crunch that makes these sliders irresistible.
- Sharp cheddar cheese: 6 slices – you want it melty but with enough flavor to stand up to the BBQ sauce.
- BBQ sauce: ½ cup (120ml) – I recommend a smoky, slightly sweet variety like Sweet Baby Ray’s or Stubb’s for that authentic backyard taste.
- Slider buns: 6-8 small buns – Hawaiian rolls work beautifully for a soft, slightly sweet touch.
- Onion powder: 1 teaspoon – for subtle savory depth.
- Garlic powder: ½ teaspoon – adds a gentle kick without overpowering.
- Salt and freshly ground black pepper: To taste – simple but essential.
- Butter: 2 tablespoons, melted – to brush on buns for a golden, crispy finish.
- Optional extras: Pickles, sliced red onions, or lettuce for topping – whatever you love on a burger.
If you want a gluten-free version, swap the slider buns with gluten-free rolls or lettuce wraps. And if you don’t have sharp cheddar, a good-quality American or pepper jack cheese works well too.
Equipment Needed
- Grill or large skillet: For cooking the patties—grilling adds smokiness, but a cast-iron skillet on the stove works wonders too.
- Mixing bowl: To gently combine beef and seasonings without overworking the meat.
- Spatula or grill tongs: For flipping patties carefully to keep them intact.
- Baking sheet or grill-safe tray: Useful for warming buns and melting cheese at the end.
- Brush: To apply melted butter on buns for that crispy, golden finish.
- Meat thermometer (optional): To check for doneness without cutting into patties.
If you don’t have a grill, a good heavy-bottomed skillet or griddle pan will get you close to that nice crust. I personally prefer a cast-iron skillet because it holds heat evenly and helps develop a crispy crust that’s hard to beat. For a more budget-friendly option, a nonstick pan works fine, but you might miss out on some of the sear.
Preparation Method
- Preheat your grill or skillet: Get it hot—medium-high heat is ideal. If using a skillet, add a small drizzle of oil to prevent sticking. This step takes about 5 minutes.
- Mix the beef: In a bowl, combine 1 pound (450g) ground beef with onion powder, garlic powder, salt, and pepper. Use your hands or a spatula to mix gently—don’t overwork the meat or the patties will get tough.
- Form the patties: Divide the beef into 6-8 equal portions. Shape each into a small, slightly flattened circle about 3 inches (7.5 cm) wide. Make a small dent in the center of each patty with your thumb to prevent puffing up during cooking.
- Cook the bacon: Fry 6-8 strips in a skillet over medium heat until crispy. Transfer to paper towels to drain, then chop roughly. This takes around 10 minutes.
- Grill or sear the patties: Place the patties on your hot grill or skillet. Cook for about 3-4 minutes per side for medium doneness (internal temp ~160°F/71°C). Avoid pressing down on them—let the crust form naturally. If you want them well done, add another minute or two per side.
- Add cheese and bacon: In the last minute of cooking, top each patty with a slice of sharp cheddar and a sprinkle of chopped bacon. Cover with a lid or tent with foil to melt the cheese nicely.
- Prepare the buns: While patties finish cooking, brush slider buns with melted butter. Toast them on the grill or in a skillet for about 1-2 minutes until golden and crisp.
- Assemble the sliders: Spread a spoonful of BBQ sauce on the bottom bun, place the cheesy bacon burger patty on top, add any optional toppings like pickles or onions, then cap with the top bun.
- Serve immediately: These sliders are best enjoyed hot off the grill or skillet, while the cheese is melty and the buns are still warm and crispy.
Pro tip: If your grill tends to flare up, move patties to a cooler spot and close the lid to avoid charring. And if you want to save time, cook the bacon ahead and keep it warm wrapped in foil.
Cooking Tips & Techniques
Here’s what I learned the hard way so you don’t have to:
- Don’t overmix the beef: Handling the meat too much leads to dense, tough sliders. Gentle mixing keeps them tender.
- Indent the patties: That little thumbprint keeps them from puffing up in the middle, so they cook evenly and fit perfectly on your slider buns.
- Get your grill or pan hot: A hot surface is key to forming that crispy, caramelized crust that makes these sliders shine.
- Use a meat thermometer: It’s the best way to hit your desired doneness every time without cutting into the patties and losing juices.
- Toast the buns: Butter and toast the buns for texture contrast and flavor—it turns an ordinary slider into something special.
- Timing is everything: Cook bacon and patties simultaneously if possible to save time. No one likes waiting around when the smell is this good.
One time, I left the patties too thick and ended up with raw centers. Lesson learned: keep sliders small and thin enough to cook through quickly. Also, I once skipped toasting the buns, and while the sliders were tasty, the buns got soggy fast. Don’t be like me—toast those buns.
Variations & Adaptations
These sliders are a great canvas for creativity. Here are some ways I’ve switched things up:
- Spicy Kick: Add some chopped jalapeños to the beef mix or swap regular BBQ sauce for a chipotle version. A little smoky heat goes a long way.
- Cheese Swap: Use pepper jack or smoked gouda instead of cheddar for a different flavor profile.
- Turkey or Chicken Sliders: Swap ground beef with ground turkey or chicken for a leaner option. Just be gentle when forming patties since these meats are leaner and can dry out.
- Vegetarian Version: Use plant-based burger patties and dairy-free cheese. I’ve tried Beyond Meat patties here with great success—still crispy and packed with flavor.
- Seasonal Toppings: Add caramelized onions in the fall or fresh tomato slices in the summer for extra freshness. They pair wonderfully with the smoky BBQ sauce.
One personal favorite twist is adding a smear of garlic aioli on the buns—it adds a creamy brightness that cuts through the richness. If you want to pair these sliders with something fresh, try the fresh grilled watermelon with balsamic glaze for a cool contrast.
Serving & Storage Suggestions
Serve these sliders hot and fresh off the grill or skillet, ideally with a side of crispy fries or a tangy coleslaw. They’re perfect for casual gatherings, and the small size makes them easy to eat while mingling.
To keep buns from getting soggy, assemble sliders just before serving. If you’re prepping ahead, keep patties warm wrapped in foil and toast buns right before plating.
Leftover sliders can be stored in an airtight container in the fridge for up to 2 days. To reheat, unwrap and warm in a skillet over medium heat or in the oven at 350°F (175°C) for about 10 minutes. Avoid microwaving to keep the buns from getting mushy.
Flavors actually deepen after resting overnight, so if you’re meal prepping, these sliders can be even better the next day. Just reheat gently and toast buns fresh.
Nutritional Information & Benefits
Each slider contains approximately:
| Calories | 280-320 kcal |
|---|---|
| Protein | 18-20g |
| Fat | 18g (mostly from cheese and bacon) |
| Carbohydrates | 15-18g (mostly from the bun and BBQ sauce) |
Using an 80/20 ground beef blend ensures juicy patties with enough fat for flavor, while bacon adds protein and that crave-worthy smoky boost. Sharp cheddar cheese provides calcium and a good dose of protein, too. If you want a lighter version, swapping in turkey or chicken and using low-sugar BBQ sauce can reduce calories and carbs.
These sliders aren’t low-calorie, but they deliver satisfying nutrition that keeps you full and energized for your cookout activities. Just keep in mind any dietary restrictions like gluten if you choose traditional buns, and swap accordingly.
Conclusion
These crispy BBQ bacon cheeseburger sliders have become my secret weapon for impressing guests and satisfying hungry bellies without hours in the kitchen. They bring that perfect balance of smoky, cheesy, crispy, and saucy—comfort food that feels both familiar and just a bit special.
Feel free to tweak the toppings, cheeses, or even the meat to fit your mood or dietary needs. That’s the fun part about sliders—they’re little blank canvases for whatever flavor you crave.
I love how these sliders turn a simple cookout into a memorable event, the kind that has people coming back for seconds and asking for the recipe. If you try them, I’d love to hear your favorite twists or how they landed at your table.
Here’s to good food and great company—one slider at a time.
FAQs
Can I make these sliders ahead of time?
You can prep the patties and bacon in advance, but I recommend cooking and assembling them just before serving for the best texture and flavor.
What’s the best way to get crispy edges on the patties?
Use a hot grill or cast-iron skillet and avoid pressing down on the patties while cooking. The high heat sears the outside, creating that crisp crust.
Can I freeze these sliders?
Yes! Cook the patties, cool completely, then freeze in an airtight container. Reheat in the oven or skillet when ready. Toast buns fresh for best results.
What type of BBQ sauce works best?
I prefer a smoky, slightly sweet BBQ sauce like Stubb’s or Sweet Baby Ray’s, but feel free to use your favorite. Just avoid overly watery sauces that can sog the buns.
Are these sliders suitable for kids?
Definitely! Most kids love the familiar flavors of bacon, cheese, and BBQ sauce. Just adjust the spice level or toppings to their preferences.
Pin This Recipe!
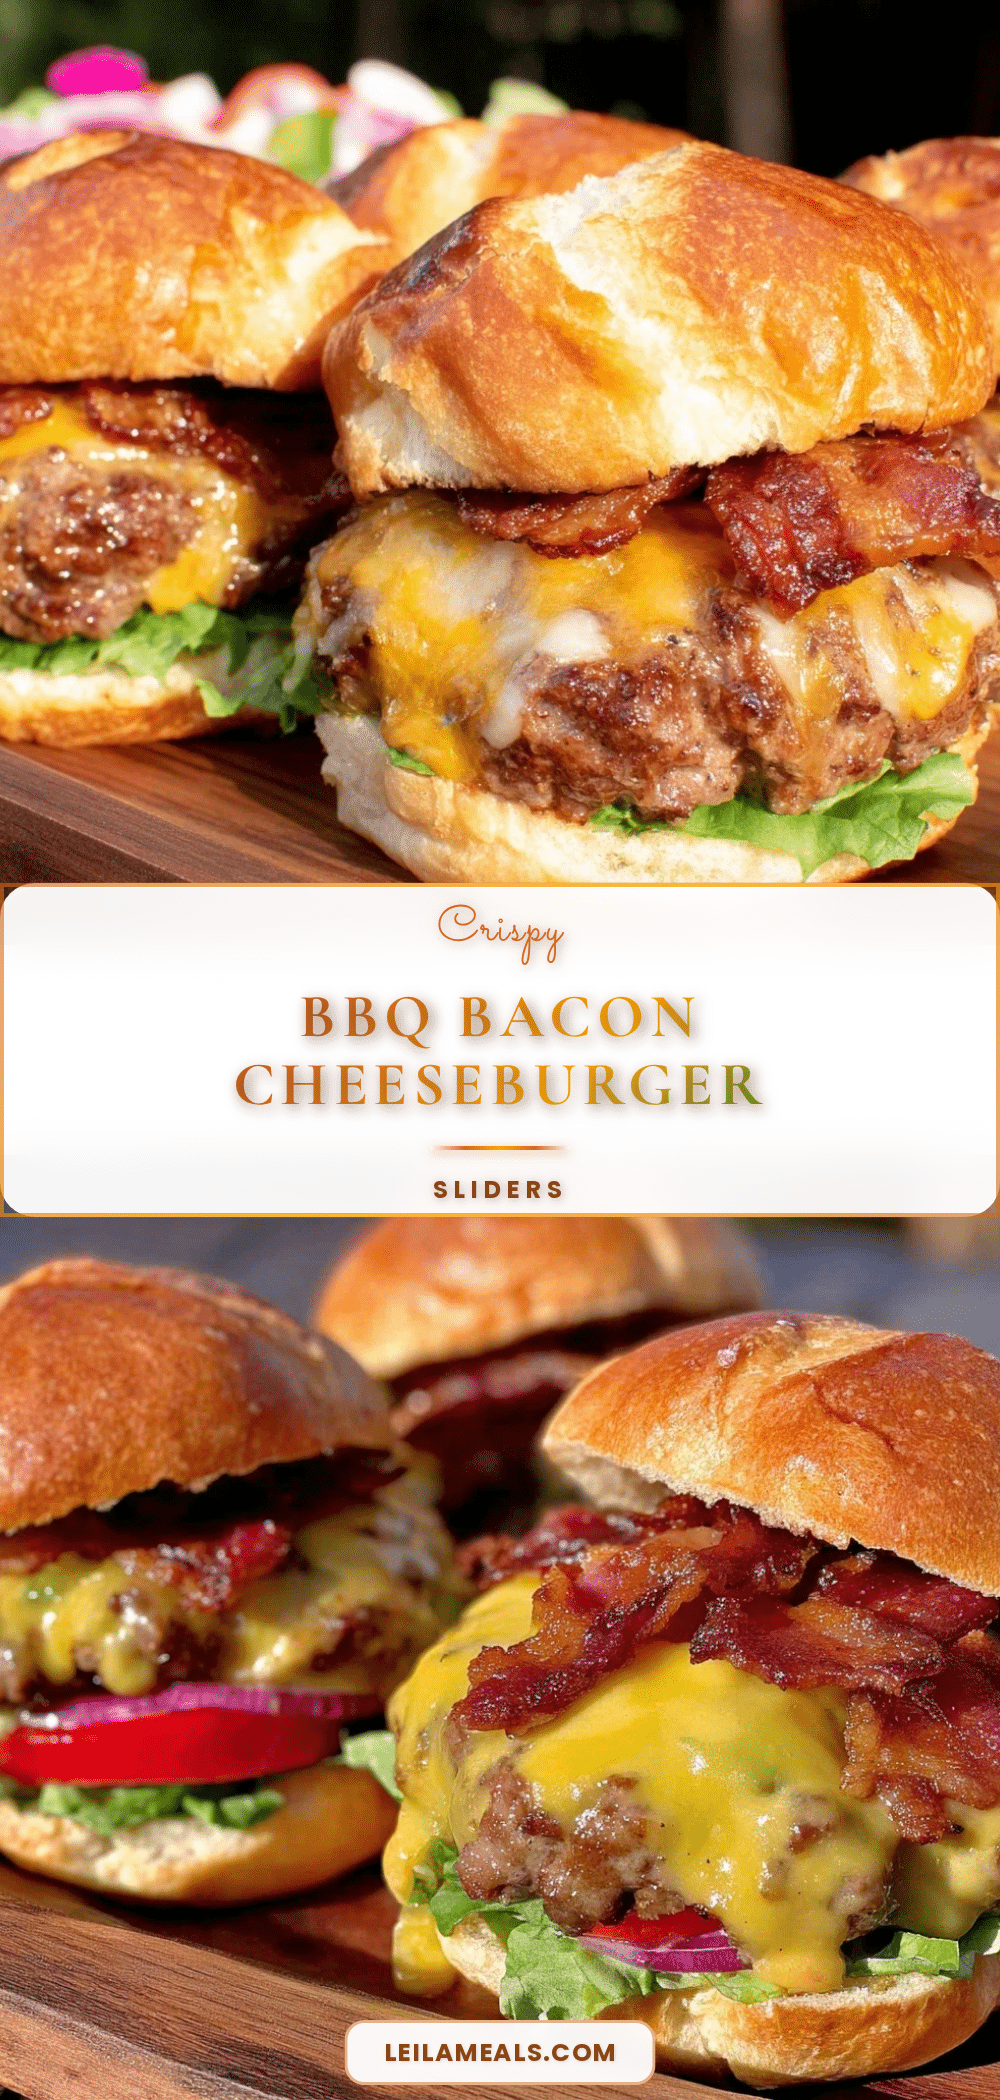
Crispy BBQ Bacon Cheeseburger Sliders

These sliders combine crispy edges, melty cheddar cheese, smoky bacon, and sweet BBQ sauce for a perfect cookout treat that’s quick and easy to make.
- Prep Time: 10 minutes
- Cook Time: 20 minutes
- Total Time: 30 minutes
- Yield: 6-8 sliders 1x
- Category: Main Course
- Cuisine: American
Ingredients
- 1 pound (450g) ground beef (80/20 blend)
- 6–8 slices bacon, cooked crisp and chopped
- 6 slices sharp cheddar cheese
- ½ cup (120ml) smoky, slightly sweet BBQ sauce
- 6–8 slider buns (Hawaiian rolls recommended)
- 1 teaspoon onion powder
- ½ teaspoon garlic powder
- Salt and freshly ground black pepper to taste
- 2 tablespoons melted butter (for brushing buns)
- Optional: pickles, sliced red onions, lettuce for topping
Instructions
- Preheat your grill or skillet to medium-high heat (about 5 minutes). If using a skillet, add a small drizzle of oil to prevent sticking.
- In a mixing bowl, gently combine ground beef with onion powder, garlic powder, salt, and pepper without overworking the meat.
- Divide the beef into 6-8 equal portions and shape each into a small, slightly flattened circle about 3 inches wide. Make a small dent in the center of each patty with your thumb.
- Cook bacon strips in a skillet over medium heat until crispy, about 10 minutes. Drain on paper towels and chop roughly.
- Place patties on the hot grill or skillet and cook for 3-4 minutes per side for medium doneness (internal temperature ~160°F). Avoid pressing down on patties.
- In the last minute of cooking, top each patty with a slice of cheddar cheese and a sprinkle of chopped bacon. Cover with a lid or foil to melt the cheese.
- Brush slider buns with melted butter and toast on the grill or skillet for 1-2 minutes until golden and crisp.
- Assemble sliders by spreading BBQ sauce on the bottom bun, placing the cheesy bacon patty on top, adding optional toppings, and capping with the top bun.
- Serve immediately while hot and cheese is melty.
Notes
Do not overmix the beef to keep sliders tender. Make a thumbprint in patties to prevent puffing. Use a hot cooking surface for crispy crust. Toast buns with butter for best texture. Cook bacon and patties simultaneously to save time. Use a meat thermometer to check doneness. Assemble sliders just before serving to avoid soggy buns.
Nutrition
- Serving Size: 1 slider
- Calories: 280320
- Fat: 18
- Carbohydrates: 1518
- Protein: 1820
Keywords: BBQ sliders, bacon cheeseburger, cookout recipe, easy sliders, backyard BBQ, cheesy bacon burgers