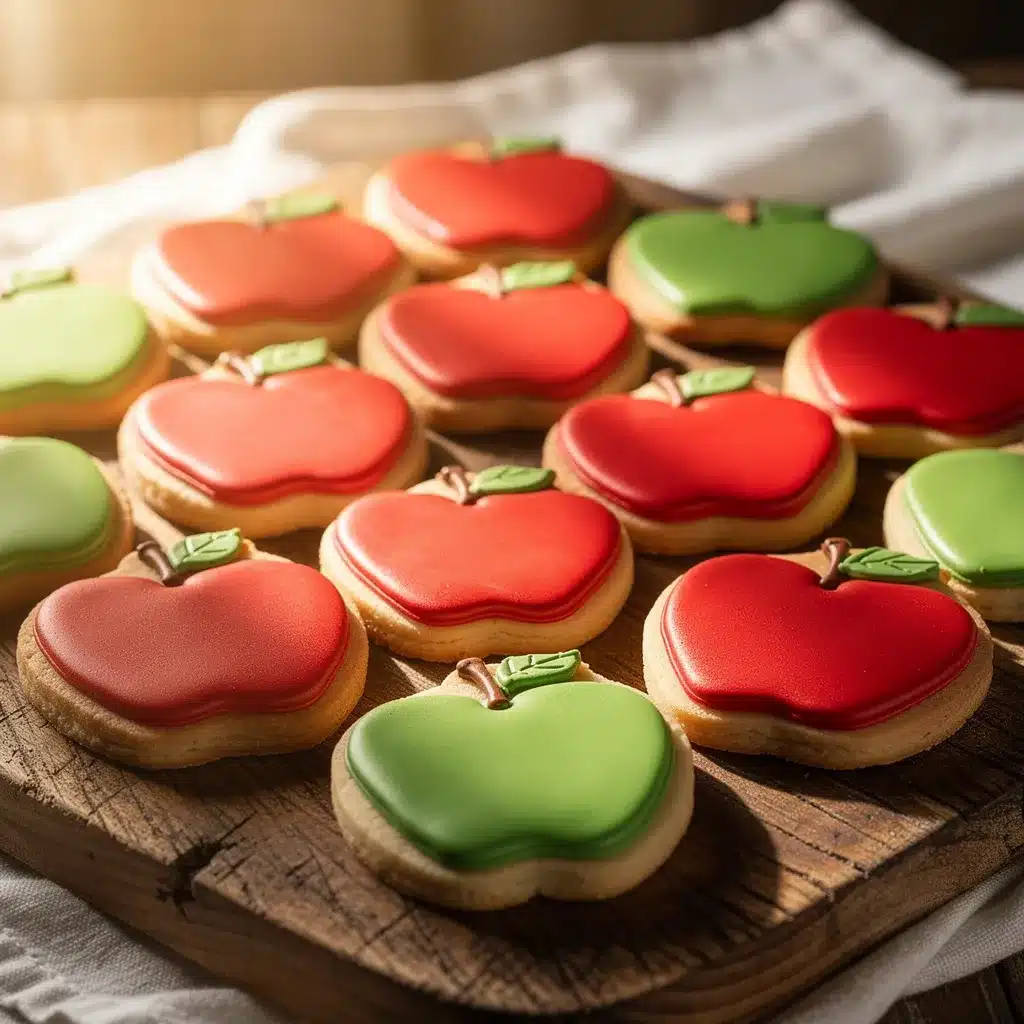
“Are you really going to make cookies shaped like apples again?” my husband teased, eyeing the kitchen counter covered in red and green frosting tubes, rolling pins, and cookie cutters. Honestly, I get it. I didn’t set out to turn baking teacher gifts into a full-on tradition, but the first time I tried these perfect apple-shaped sugar cookies, I was hooked. It started one hectic September evening when I wanted to whip up something quick yet special for my kid’s teacher. I grabbed a basic sugar cookie recipe, threw in some food coloring, and shaped the dough roughly like apples with a leaf or two. The result? Surprisingly charming cookies that tasted buttery, sweet, and just a little nostalgic.
Since then, I’ve baked these cookies so many times that my kid’s teacher actually asks when I’m bringing them again (which is honestly a little bit flattering and pressure-inducing). The best part is how these cookies capture that back-to-school vibe without being overly complicated or fussy. There’s something about the shape and the glossy frosting that feels like a little edible thank you note, you know? I’ve learned a few tricks along the way to make the dough easier to handle and the icing actually taste good, so I’m excited to share my perfected version of these apple-shaped sugar cookies with you.
Whether you’re a seasoned baker or just someone looking for a sweet, thoughtful gift that doesn’t require a fancy bakery trip, these cookies fit the bill. They remind me of those simple school days, and I think they’ll bring a quiet smile to your favorite teacher’s face too.
Why You’ll Love This Recipe
After countless batches and recipe tweaks, I genuinely believe these perfect apple-shaped sugar cookies are something special. Here’s why they stand out in the crowded world of cookie gifting:
- Quick & Easy: These cookies come together in about an hour from start to finish — perfect when you’re juggling a million back-to-school errands.
- Simple Ingredients: No need for specialty stores or obscure baking supplies. You probably have everything in your pantry already.
- Perfect for Teacher Gifts: The apple shape is a classic symbol of appreciation, making these cookies an easy way to say “thank you” without fuss.
- Crowd-Pleaser: They’re buttery and just sweet enough, so kids and adults alike can’t resist them.
- Unbelievably Delicious: The texture strikes a lovely balance — crisp edges and a tender center, finished with smooth, flavorful royal icing that’s easy to decorate.
What sets this recipe apart is the frosting technique. Instead of the usual overly sweet, hard-to-spread icing, I use a royal icing recipe that dries smooth but still melts on the tongue, with a hint of vanilla and lemon zest that adds brightness. Plus, the cookie dough has a subtle hint of almond extract that lifts the flavor without overpowering. This isn’t just another sugar cookie — it’s a small celebration of flavor and form, perfect for those who want to impress without stress. Honestly, after trying to make these crispy sourdough discard pizza dough the night before, I needed a comforting win, and these cookies delivered.
What Ingredients You Will Need
This recipe uses straightforward, wholesome ingredients to create a cookie that’s both flavorful and easy to work with. The ingredients are mostly pantry staples, so no last-minute runs to specialty stores.
- For the Cookie Dough:
- All-purpose flour (2 ¾ cups / 345 grams) — provides structure and tenderness
- Baking powder (1 teaspoon) — helps cookies rise slightly
- Salt (½ teaspoon) — balances sweetness
- Unsalted butter (1 cup / 227 grams), softened — for richness and moisture (I trust brands like Land O Lakes for consistent results)
- Granulated sugar (1 cup / 200 grams) — sweetness and slight crispness on edges
- Large egg (1), room temperature — binds ingredients
- Pure vanilla extract (1 teaspoon) — classic aroma and flavor
- Almond extract (½ teaspoon) — subtle nutty note that makes these cookies stand out
- For the Royal Icing:
- Powdered sugar (4 cups / 480 grams), sifted — for smooth, sweet icing
- Egg whites (2 large) or pasteurized egg white powder equivalent — creates structure and shine
- Fresh lemon juice (1 tablespoon) — adds brightness and helps the icing dry
- Water (2-4 tablespoons), as needed — to thin the icing to desired consistency
- Gel food coloring (red, green, brown) — for vibrant, true-to-apple colors (I prefer AmeriColor gels for intensity without flavor)
- Optional:
- Edible shimmer dust or sprinkles for a little extra sparkle
- Leaf-shaped cookie cutters if you want to get fancy with decoration
If you’re gluten-sensitive, you can swap the all-purpose flour for a 1:1 gluten-free baking flour, though the texture will be slightly different. For dairy-free options, replace butter with a vegan butter alternative, and use egg replacer or aquafaba for binding, but I haven’t tested those swaps extensively.
Equipment Needed
- Mixing bowls (medium and large) — for combining dough and icing
- Electric mixer (stand or hand) — makes creaming butter and beating icing much easier
- Rolling pin — a smooth, medium-sized rolling pin works best for even dough thickness
- Apple-shaped cookie cutter (about 3 inches / 7.5 cm) — essential for shaping these cookies; if you don’t have one, a small round cutter and knife can do the trick
- Baking sheets lined with parchment paper or silicone baking mats — prevents sticking and browning
- Cooling racks — to let cookies cool evenly without sogginess
- Small piping bags or squeeze bottles — for precise royal icing decoration
- Food-safe brushes (optional) — handy for adding details or blending colors
I started using a silicone baking mat years ago, and honestly, it changed my cookie game — no more worrying about burning bottoms or uneven baking. If you’re on a budget, parchment paper works just fine. For the royal icing, piping bags with small round tips make decorating easier, but you can also use a zip-top bag with a tiny corner snipped off. Just remember to clean your equipment well after use, especially if using raw egg whites in the icing.
Preparation Method
- Prepare the dough: In a medium bowl, whisk together the all-purpose flour, baking powder, and salt. Set aside. (This usually takes about 5 minutes.)
- Cream butter and sugar: In a large bowl, use an electric mixer to beat the softened butter and granulated sugar until light and fluffy, about 3-4 minutes. The texture should be pale and airy, which helps create tender cookies.
- Add egg and extracts: Beat in the egg, vanilla extract, and almond extract until fully combined. This step ensures the dough is flavorful and slightly aromatic.
- Incorporate dry ingredients: Gradually add the flour mixture to the wet ingredients in batches, mixing on low speed until just combined. Avoid overmixing here to keep the cookies tender. When the dough starts to come together, stop mixing.
- Chill the dough: Shape the dough into a disk, wrap it tightly in plastic wrap, and refrigerate for at least 1 hour (or up to overnight). Chilling firms the dough, making it easier to roll and cut precise shapes.
- Preheat the oven: Set your oven to 350°F (175°C) and line baking sheets with parchment paper or silicone mats.
- Roll and cut: On a lightly floured surface, roll the chilled dough to about ¼ inch (6 mm) thickness. Use your apple-shaped cookie cutter to cut out shapes and gently transfer them to the prepared baking sheets. (Tip: Use a thin spatula to lift cookies without stretching the dough.)
- Bake: Bake cookies for 8-10 minutes, or until the edges start to turn a light golden brown. Watch carefully as overbaking will dry them out. The centers should still look soft.
- Cool: Let cookies cool on the baking sheet for 5 minutes, then transfer to a wire rack to cool completely before decorating. This prevents icing from melting off.
- Make royal icing: In a clean bowl, beat the egg whites until frothy. Gradually add sifted powdered sugar, mixing until stiff peaks form. Thin the icing with water, one tablespoon at a time, until it reaches flood consistency (smooth but not runny). Divide icing into separate bowls and tint with gel colors for apples and leaves.
- Decorate: Use piping bags to outline each apple cookie with red icing, flood the inside, and let dry for 15 minutes. Pipe green leaves and a brown stem once the base layer sets. Add details like veins on leaves or a tiny white highlight for a natural touch.
- Dry completely: Allow decorated cookies to dry at room temperature for several hours or overnight. This helps the icing harden to a smooth, matte finish perfect for stacking or gift packaging.
When I first made these, I learned that rushing the drying time causes the icing to smudge or crack — patience really pays off. Also, I like to bake a test cookie first to check oven temperature since it can vary, especially in older ovens.
Cooking Tips & Techniques
Making these apple-shaped sugar cookies can feel like a fun project, but a few pro tips can save you from common pitfalls:
- Don’t skip chilling the dough: It makes rolling and cutting much easier and prevents the cookies from spreading too much in the oven.
- Use gel food coloring: It adds vibrant color without thinning the royal icing too much, unlike liquid dyes.
- Roll evenly: Keeping the dough about ¼ inch thick ensures even baking and the right texture — too thin, and they crisp up like crackers; too thick, and they get cakey.
- Test bake: Oven temperatures can be tricky. Baking a single cookie first helps you avoid burnt edges or undercooked centers.
- Work in batches when decorating: Flood a few cookies, let the base dry, then add details. This layering technique prevents colors from bleeding.
- Clean your piping tips often: Dried icing can clog tips and ruin your decorating flow.
- Don’t overmix the royal icing: Stiff peaks are good, but too stiff can make flooding difficult.
One time, I accidentally used warm eggs for the icing, and it didn’t set right — lesson learned: always use room temperature or colder eggs for stability. Also, multitasking between baking and icing is easier if you prepare your icing bowls and colors while the cookies bake.
Variations & Adaptations
These cookies are a great canvas for creativity. Here are some ways I’ve adapted the recipe:
- Gluten-free version: Use a 1:1 gluten-free flour blend. The texture is slightly more crumbly but still delicious.
- Vegan adaptation: Substitute butter with vegan margarine and use aquafaba for the royal icing (though it won’t harden quite as much).
- Flavor twists: Swap almond extract for cinnamon or pumpkin spice during fall to make the cookies seasonal.
- Decorating styles: Instead of royal icing, try a simple glaze of powdered sugar and milk for a rustic look. Or use edible markers for quick details.
- Different shapes: If you want to surprise a teacher for other occasions, try heart or star cookie cutters — the dough works well for both.
I once made a batch with a hint of lemon zest in the dough and decorated them with a lemon glaze for a bright, fresh take — it was a hit at a teacher appreciation event. Also, if you enjoy experimenting, these cookies pair nicely with the texture and flavors of moist sourdough discard banana bread, making for a sweet and wholesome gift bundle.
Serving & Storage Suggestions
These apple-shaped sugar cookies are best served at room temperature, allowing the icing’s flavors to shine without becoming too soft or sticky. Present them on a simple platter or wrap them individually in clear cellophane tied with a ribbon for a charming teacher gift.
They pair wonderfully with a warm cup of tea or a classic glass of milk. For a fun twist, include a little note suggesting a cozy snack break.
To store, place cookies in an airtight container layered with parchment paper to prevent sticking. They keep well at room temperature for up to 5 days. For longer storage, freeze undecorated cookies in a single layer; thaw before decorating. Decorated cookies freeze best if wrapped tightly in plastic wrap and kept in an airtight container — just allow them to come to room temperature before serving to avoid condensation ruining the icing.
Over time, the flavors meld and the texture softens slightly, which some people actually prefer. I find that after a day, the almond and vanilla notes deepen, making the cookies even more comforting.
Nutritional Information & Benefits
Each cookie (approximately 3 inches/7.5 cm) contains roughly:
| Calories | 150 |
|---|---|
| Fat | 7g |
| Carbohydrates | 22g |
| Protein | 1.5g |
| Sugar | 12g |
The key health benefit here is the use of real ingredients without artificial additives. Almond extract adds a hint of natural flavoring, and the lemon juice in the icing provides a mild dose of vitamin C. While these are treats, making them at home lets you control the sugar level and avoid preservatives.
Note: This recipe contains gluten, dairy, and eggs, so it’s not suitable for those with allergies to these ingredients unless adapted. I’ve found that balancing sweet treats with wholesome meals like my fresh Mediterranean quinoa bowl helps keep my family’s nutrition on point during busy weeks.
Conclusion
These perfect apple-shaped sugar cookies are more than just a sweet treat; they’re a simple way to share warmth and appreciation with a teacher who makes a difference. I love how the recipe blends classic flavors with a bit of fun in the shape and decoration. It’s satisfying to see that first smile when the cookies are gifted — like a small, edible thank you that feels personal and thoughtful.
Feel free to tweak the flavors and colors to match your style, and don’t worry about perfection — these cookies are forgiving and meant to be enjoyed. If you try this recipe, I’d love to hear how your decorated apples turn out or any creative spins you add. Sharing these little moments is what makes cooking fun.
Happy baking, and here’s to many sweet teacher gifts ahead!
FAQs
Can I make the cookie dough ahead of time?
Yes, you can prepare the dough up to 2 days in advance and keep it wrapped tightly in the refrigerator. Just bring it to room temperature before rolling.
What if I don’t have an apple-shaped cookie cutter?
No worries! Use a small round cutter and gently shape the dough into an apple silhouette with a knife, or try other shapes like hearts or circles for a different look.
How long does royal icing take to dry?
Royal icing typically needs at least 4-6 hours to dry completely at room temperature, but overnight drying is best for firm, matte finishes.
Can I use powdered egg whites instead of fresh eggs for the icing?
Absolutely. Powdered egg whites are a safer, convenient option and work well for royal icing. Follow package instructions for rehydration.
What’s the best way to store decorated sugar cookies?
Store them in an airtight container at room temperature, layered with parchment paper, for up to 5 days. For longer storage, freeze undecorated cookies separately and decorate after thawing.
Pin This Recipe!
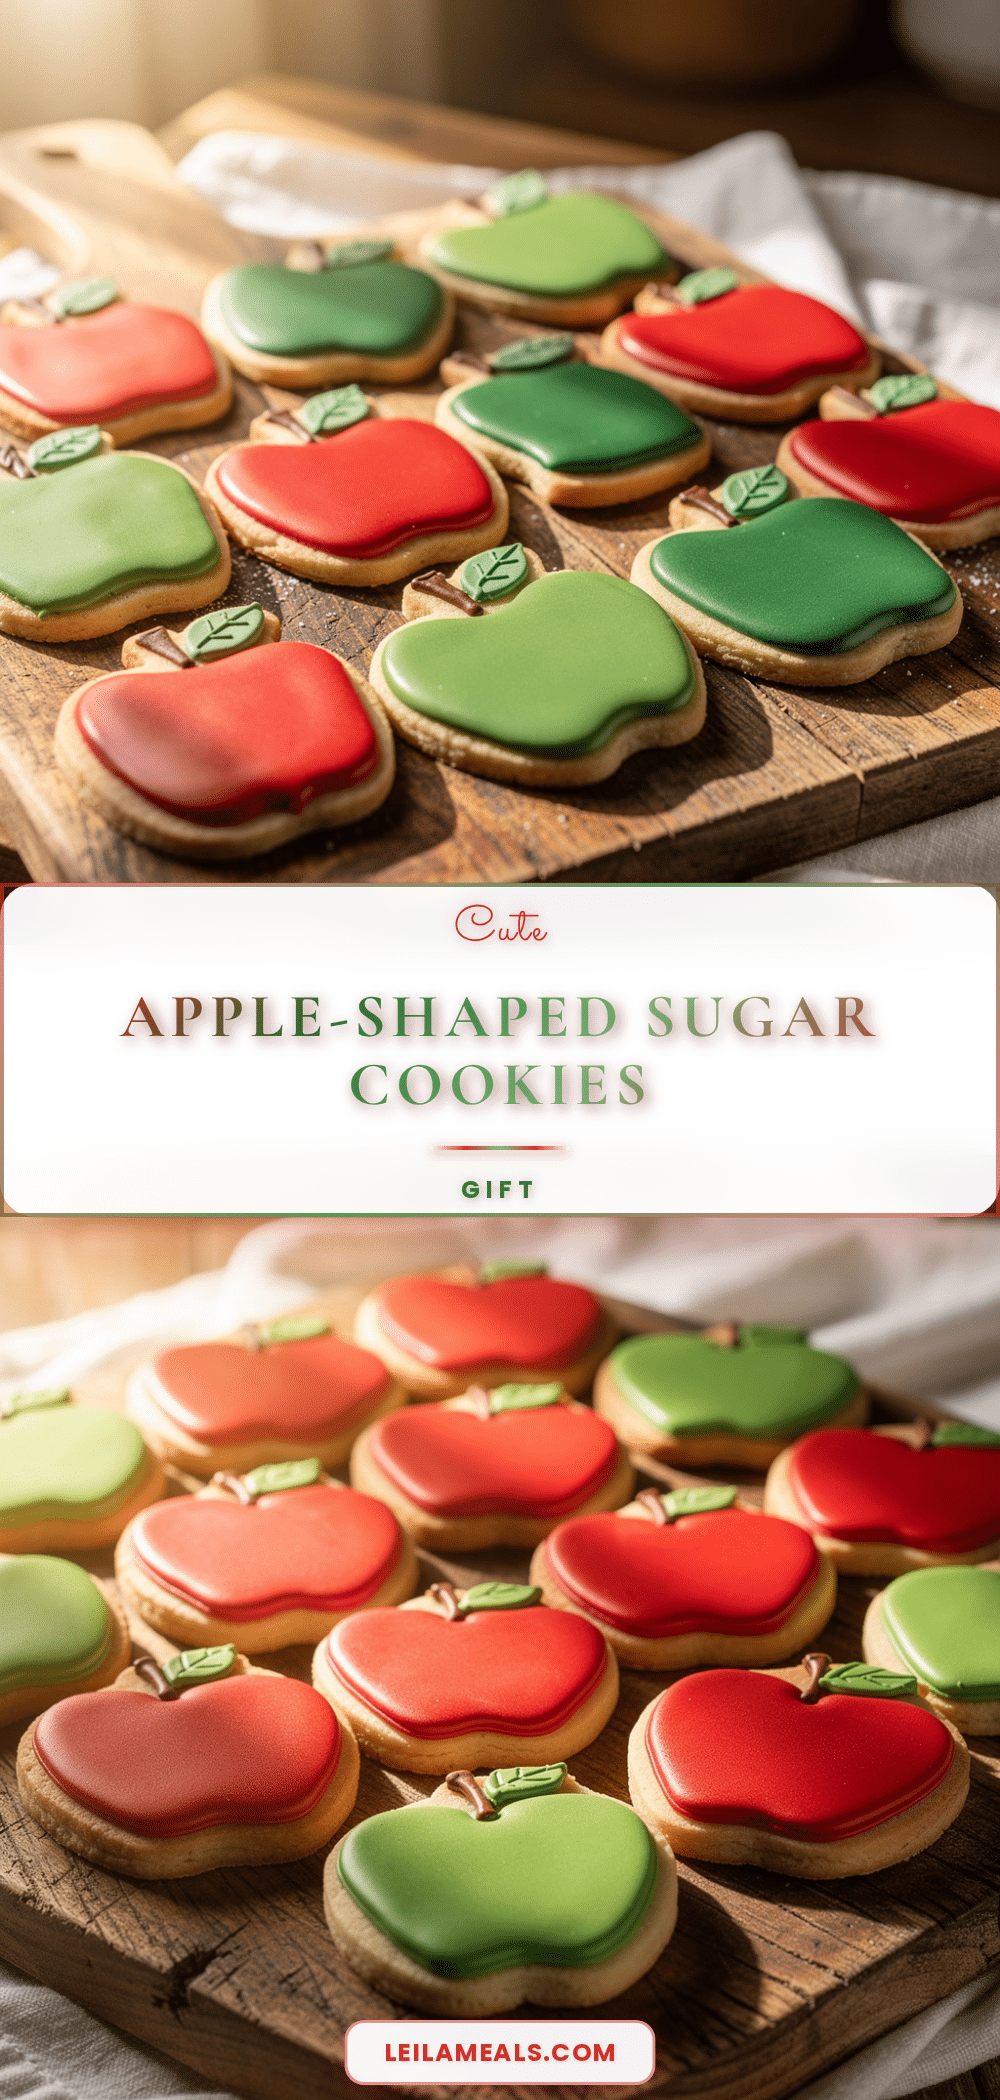
Perfect Apple-Shaped Sugar Cookies Easy Homemade Teacher Gift Recipe

These apple-shaped sugar cookies are buttery, sweet, and nostalgic, perfect for teacher gifts. They feature a tender center with crisp edges and smooth royal icing decorated like apples.
- Prep Time: 15 minutes
- Cook Time: 10 minutes
- Total Time: 1 hour 25 minutes
- Yield: 24 cookies 1x
- Category: Dessert
- Cuisine: American
Ingredients
- 2 ¾ cups (345 grams) all-purpose flour
- 1 teaspoon baking powder
- ½ teaspoon salt
- 1 cup (227 grams) unsalted butter, softened
- 1 cup (200 grams) granulated sugar
- 1 large egg, room temperature
- 1 teaspoon pure vanilla extract
- ½ teaspoon almond extract
- 4 cups (480 grams) powdered sugar, sifted (for royal icing)
- 2 large egg whites or equivalent pasteurized egg white powder (for royal icing)
- 1 tablespoon fresh lemon juice (for royal icing)
- 2–4 tablespoons water (for royal icing, as needed)
- Gel food coloring (red, green, brown)
- Optional: edible shimmer dust or sprinkles
- Optional: leaf-shaped cookie cutters
Instructions
- In a medium bowl, whisk together the all-purpose flour, baking powder, and salt. Set aside.
- In a large bowl, use an electric mixer to beat the softened butter and granulated sugar until light and fluffy, about 3-4 minutes.
- Beat in the egg, vanilla extract, and almond extract until fully combined.
- Gradually add the flour mixture to the wet ingredients in batches, mixing on low speed until just combined. Avoid overmixing.
- Shape the dough into a disk, wrap tightly in plastic wrap, and refrigerate for at least 1 hour or up to overnight.
- Preheat oven to 350°F (175°C) and line baking sheets with parchment paper or silicone mats.
- On a lightly floured surface, roll the chilled dough to about ¼ inch (6 mm) thickness. Use an apple-shaped cookie cutter to cut out shapes and transfer to baking sheets.
- Bake cookies for 8-10 minutes, until edges are lightly golden but centers remain soft.
- Let cookies cool on the baking sheet for 5 minutes, then transfer to a wire rack to cool completely.
- For royal icing, beat egg whites until frothy. Gradually add sifted powdered sugar, mixing until stiff peaks form.
- Thin icing with water, one tablespoon at a time, until flood consistency is reached.
- Divide icing into bowls and tint with gel food coloring for apples and leaves.
- Use piping bags to outline each apple cookie with red icing, flood the inside, and let dry for 15 minutes.
- Pipe green leaves and brown stems once base layer sets. Add details like veins or highlights.
- Allow decorated cookies to dry at room temperature for several hours or overnight until icing hardens.
Notes
Chill dough for at least 1 hour to prevent spreading. Use gel food coloring for vibrant colors without thinning icing. Test bake one cookie to check oven temperature. Allow royal icing to dry overnight for best results. Clean piping tips often to avoid clogging. For gluten-free or vegan adaptations, substitute ingredients accordingly but note texture differences.
Nutrition
- Serving Size: 1 cookie (approximat
- Calories: 150
- Sugar: 12
- Fat: 7
- Carbohydrates: 22
- Protein: 1.5
Keywords: apple shaped sugar cookies, teacher gift cookies, royal icing cookies, homemade sugar cookies, easy sugar cookies, back to school cookies