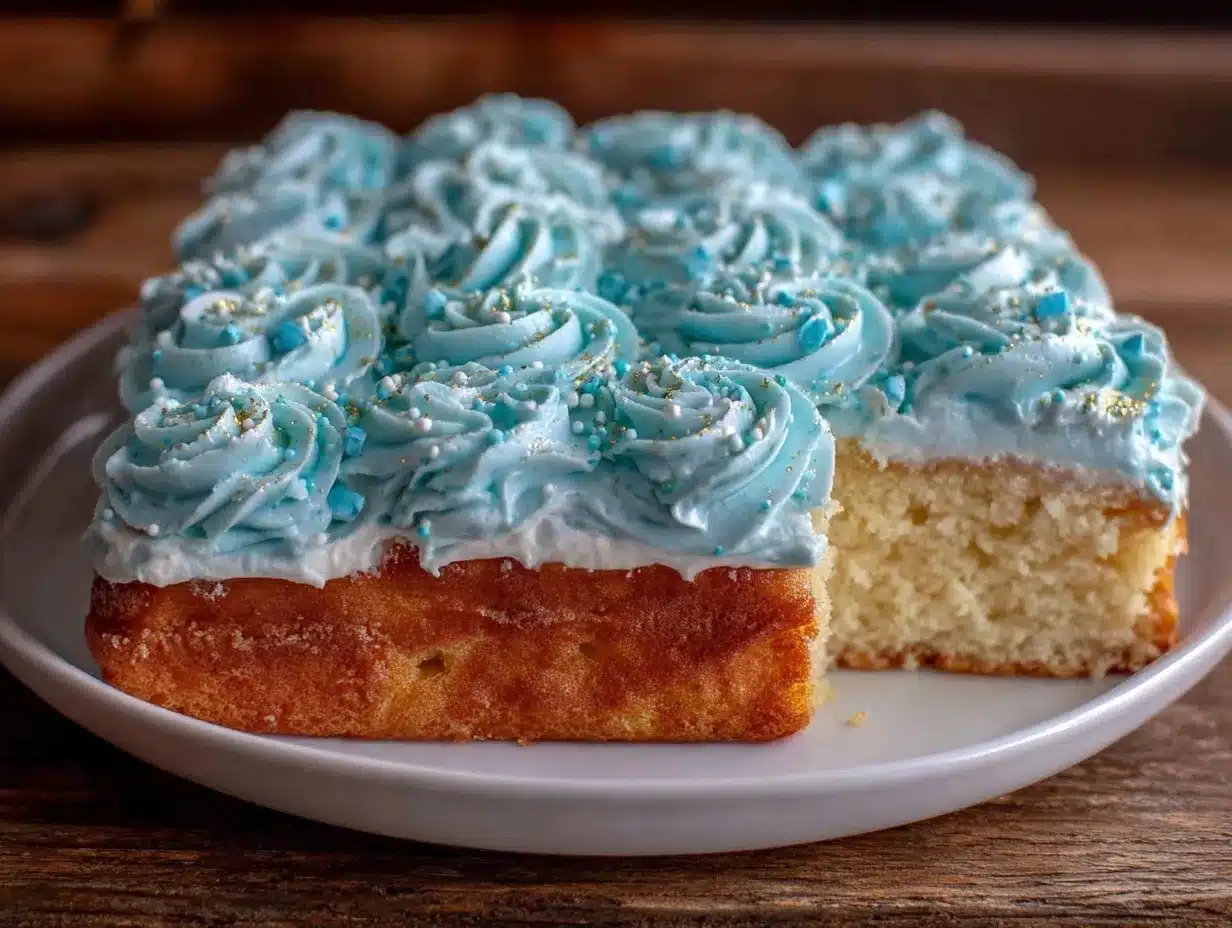
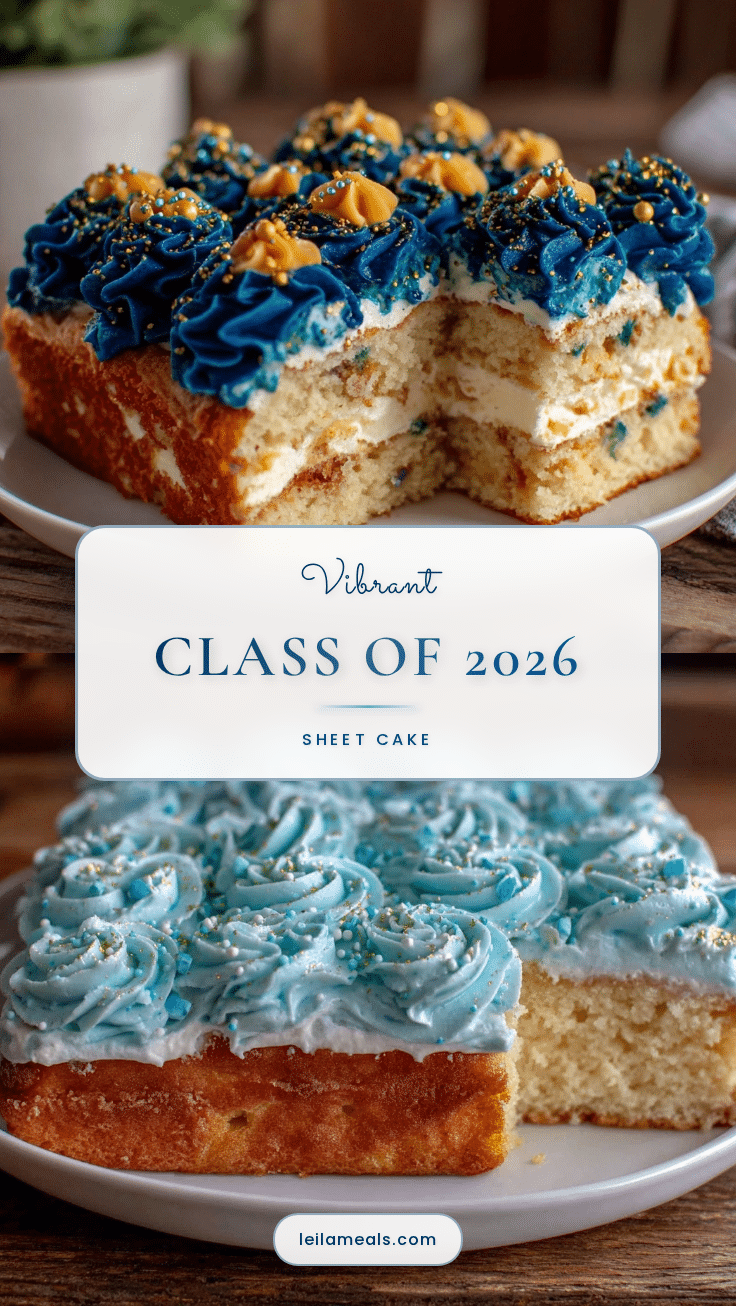
It all started on a hectic Thursday afternoon, with a last-minute text from my neighbor: “Hey, can you bring a cake for the Class of 2026 celebration tomorrow? Something colorful, please!” Honestly, I was caught off guard—busy schedules, a cluttered kitchen, and zero time to experiment. I almost considered running to the bakery, but then I remembered the stash of food coloring and trusty cake mix tucked away in my pantry. That’s when the idea for the Perfect Class of 2026 Sheet Cake with Vibrant School Colors took shape.
At first, I was skeptical. Could a simple sheet cake really capture the spirit of an entire graduating class? Could it look festive without turning into a sugary rainbow disaster? But, you know, sometimes the best recipes come from moments of sheer improvisation. I mixed up the batter, split it into portions, and added the school’s colors—bold, bright, and exactly what the celebration called for. The result was unexpectedly stunning. The colors held their vibrancy, the texture was moist and tender, and the whole cake felt like a joyful shout-out to those kids stepping into their next chapter.
Since then, I’ve made this cake more times than I can count—tweaking the frosting, adjusting the color intensity, and even adding little edible glitter specks for extra sparkle. It’s become my go-to for school events, and honestly, it’s a crowd-pleaser every time. The Perfect Class of 2026 Sheet Cake with Vibrant School Colors isn’t just a dessert; it’s a celebration you can slice and share. And it’s stuck with me because it’s easy, colorful, and just right for marking milestones that matter.
Why You’ll Love This Recipe
- Quick & Easy: This cake comes together in about 45 minutes, perfect for those last-minute celebrations or spontaneous school spirit moments.
- Simple Ingredients: No need to hunt down exotic items—most ingredients are pantry staples you probably already have.
- Perfect for School Events: Whether it’s a graduation party, pep rally, or classroom treat, this cake fits the bill with its vibrant, customizable colors.
- Crowd-Pleaser: Kids and adults alike rave about the moist texture and the fun, festive look of the cake.
- Unbelievably Delicious: The vanilla base is soft and buttery, with a frosting that’s creamy and just sweet enough to balance the bright colors.
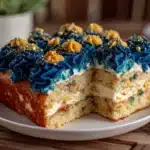
- This isn’t your run-of-the-mill decorated cake. The trick lies in splitting the batter and layering the colors evenly, creating a clean, sharp look that really pops.
- The frosting is whipped to perfection, light but rich, and can be tinted to match any school’s colors without tasting artificial.
- It’s the kind of cake that makes people pause—and then ask for seconds. That’s the kind of celebration magic you want on your side.
What Ingredients You Will Need
This recipe uses simple, wholesome ingredients to deliver bold flavor and that satisfying, moist texture without fuss. You’ll find most of these in your pantry or local grocery store.
- For the Cake Batter:
- 2 ½ cups (312g) all-purpose flour, sifted (I prefer King Arthur for consistent texture)
- 2 tsp baking powder
- ½ tsp baking soda
- ½ tsp salt
- 1 cup (227g) unsalted butter, softened (use quality butter like Plugrá for richness)
- 1¾ cups (350g) granulated sugar
- 4 large eggs, room temperature
- 1 tbsp pure vanilla extract
- 1 cup (240ml) buttermilk, room temperature (substitute with milk + 1 tbsp lemon juice if needed)
- Gel food coloring in your school’s colors (gel works best to keep batter consistency)
- For the Frosting:
- 1 cup (227g) unsalted butter, softened
- 4 cups (480g) powdered sugar, sifted
- 2-3 tbsp heavy cream or whole milk (add more for desired consistency)
- 1 tsp vanilla extract
- Gel food coloring for frosting accents
Look for firm, quality butter and sifted powdered sugar to avoid lumps in your frosting. If you want a dairy-free option, swap butter with plant-based margarine and use almond or oat milk for the liquid. For gluten-free, almond flour or a gluten-free baking blend works well, but you might want to adjust the liquids slightly.
Equipment Needed
- 9×13 inch (23×33 cm) rectangular sheet cake pan – I like using a heavy-gauge metal pan for even baking
- Mixing bowls – one large and a few smaller ones for dividing batter
- Electric mixer or stand mixer – makes creaming butter and sugar a breeze
- Rubber spatula – perfect for folding and scraping
- Measuring cups and spoons – precise measurements are key here
- Cake leveler or serrated knife – to get an even cake surface if needed
- Offset spatula or butter knife – for smooth frosting application
- Piping bags and tips (optional) – if you want to add decorative touches in school colors
If you don’t have a stand mixer, a good hand mixer works just fine. For budget-friendly pans, aluminum ones are okay but watch the baking time closely as they may cook faster. I suggest greasing the pan well and lining it with parchment paper for easy cake removal. Keeping your tools clean and dry helps with smooth frosting application and color layering.
Preparation Method
- Preheat the oven to 350°F (175°C). Lightly grease your 9×13 inch pan and optionally line it with parchment paper. This helps the cake come out cleanly.
- Combine dry ingredients: In a medium bowl, whisk together 2 ½ cups flour, 2 tsp baking powder, ½ tsp baking soda, and ½ tsp salt. Set aside.
- Cream butter and sugar: In a large bowl, beat 1 cup softened unsalted butter with 1¾ cups granulated sugar on medium speed until light and fluffy, about 3-4 minutes. This step is crucial for a tender crumb.
- Add eggs and vanilla: Beat in eggs one at a time, mixing well after each addition. Stir in 1 tbsp vanilla extract.
- Alternate adding dry ingredients and buttermilk: Reduce mixer speed to low. Add dry ingredients in three parts, alternating with 1 cup buttermilk (start and end with dry). Mix just until combined—overmixing can toughen the cake.
- Divide the batter: Spoon the batter evenly into separate bowls based on how many colors you want (usually two or three). Use gel food coloring to tint each portion to your school’s vibrant colors. Mix gently until color is even.
- Layer the batter: Pour the colored batters carefully into the prepared pan in sections or stripes. You can swirl slightly with a toothpick if you want a marbled effect, but keep it neat for a classic layered look.
- Bake: Place the pan in the oven and bake for 35-40 minutes, or until a toothpick inserted in the center comes out clean. The top should spring back lightly when pressed.
- Cool: Let the cake cool in the pan for 15 minutes, then transfer to a wire rack to cool completely. This prevents the frosting from melting when applied.
- Prepare the frosting: Beat 1 cup softened butter on medium speed until creamy. Gradually add 4 cups sifted powdered sugar, mixing on low. Add 2-3 tbsp heavy cream and 1 tsp vanilla extract. Beat on high speed for 3 minutes until fluffy. Tint small portions with gel colors as desired.
- Frost the cake: Spread a thin crumb coat over the cooled cake. Chill 15 minutes, then apply a final smooth layer of frosting. Use colored frosting for piping or decorative accents in school colors.
Tip: Keep the frosting cold if your kitchen is warm, and work quickly to get a smooth finish. If your batter looks too thick after coloring, add a splash of buttermilk to loosen it slightly. The smell of vanilla and butter baking together makes the kitchen feel like a celebration already!
Cooking Tips & Techniques
- Room Temperature Ingredients: Make sure eggs, butter, and buttermilk are at room temperature; this helps everything mix smoothly and prevents lumps.
- Don’t Overmix: When combining wet and dry ingredients, stir just until blended. Overmixing develops gluten, making the cake dense rather than tender.
- Gel Food Coloring Wins: Avoid liquid food coloring—it thins your batter and can dull the color. Gel colors keep the batter thick and vibrant.
- Layering Colors: Pour batter gently to avoid mixing colors unintentionally. If you want crisp stripes, let each color settle a bit before adding the next.
- Frosting Consistency: Adjust cream or milk slowly to get frosting that holds shape but spreads easily. If too soft, chill it briefly in the fridge.
- Common Mistake: Baking at too high a temperature can cause the edges to brown before the center is done. Keep your oven calibrated and consider rotating the pan halfway through baking.
- Efficiency Tip: While the cake cools, prep your frosting and colors. This multitasking saves time and keeps the flow going.
- Personal Lesson: I once rushed the cooling step and ended up with a melting frosting mess. Patience really pays off here!
Variations & Adaptations
- Dietary: Gluten-free version: Swap all-purpose flour with a 1:1 gluten-free baking blend. Add an extra egg for structure if needed.
- Flavor Twists: Add a tablespoon of almond or coconut extract to the batter for a subtle flavor lift that still pairs well with bright colors.
- Seasonal: Swap vanilla for lemon zest and juice in spring or summer for a fresh citrus note that complements vibrant hues.
- Frosting Variations: Try cream cheese frosting tinted with your school colors for a tangy contrast, perfect if you want something less sweet.
- Cooking Methods: Use cupcake tins to make individual portions, adjusting baking time to 18-22 minutes. Ideal for classroom treats or grab-and-go servings.
- Personal Variation: I once added edible glitter on top for a graduation party—it looked like confetti and was a huge hit!
- Allergen-Friendly: Swap butter for vegan margarine and use plant-based milk for a dairy-free option. Use flax eggs for egg-free baking.
Serving & Storage Suggestions
Serve the Perfect Class of 2026 Sheet Cake chilled or at room temperature. The vibrant colors look best when the frosting is freshly spread and smooth. For presentation, adding a sprinkle of edible confetti or mini fondant logos can really make it pop for school events.
This cake pairs wonderfully with light beverages like iced tea or sparkling water to cut through the sweetness. For a cozy touch, serve alongside a cup of coffee or hot chocolate.
Store leftover cake covered tightly in the refrigerator for up to 4 days. For longer storage, wrap in plastic wrap and foil, then freeze for up to 3 months. Thaw in the fridge overnight and allow to come to room temperature before serving.
Reheat individual slices briefly in a microwave (10-15 seconds) to soften the frosting slightly—just don’t melt it! The flavors actually deepen a bit after sitting overnight, so it’s a great make-ahead dessert.
Nutritional Information & Benefits
Each serving of this sheet cake (based on 12 slices) contains approximately:
| Calories | 340 kcal |
|---|---|
| Fat | 15g (mostly from butter) |
| Carbohydrates | 45g |
| Protein | 4g |
| Sugar | 30g |
While this cake is a treat, it uses real butter and eggs, providing a richer nutrient profile than box mixes with fillers. The vanilla extract contains antioxidants, and using buttermilk adds a slight tang plus calcium. For those mindful of gluten, there’s an easy swap option. Just a friendly reminder: this recipe contains common allergens like eggs, dairy, and wheat.
Conclusion
The Perfect Class of 2026 Sheet Cake with Vibrant School Colors is more than just a dessert; it’s a simple, joyful way to celebrate big milestones with a splash of color and a whole lot of flavor. I love how it’s easy enough to whip up in a pinch yet customizable enough to fit any school’s unique spirit. Whether you’re a seasoned baker or just someone who appreciates a good cake, this recipe invites you to bring a bit of fun and festivity to your table.
Give it a try and feel free to make it your own—switch up the colors, add your favorite flavors, or decorate to your heart’s content. It’s a reminder that the best celebrations are the ones made with a little creativity and a lot of heart.
And hey, if you try it, I’d love to hear how it turns out or what personal twists you add. Sharing those moments is part of what makes cooking so worthwhile.
FAQs
Can I make this cake gluten-free?
Yes! Swap the all-purpose flour with a 1:1 gluten-free baking blend and consider adding an extra egg to help with structure. Baking times stay roughly the same.
How do I keep the colors from bleeding into each other?
Use gel food coloring to keep the batter thick, and pour each color carefully without swirling too much. Letting batter settle a bit before adding the next layer helps keep lines crisp.
Can I prepare this cake a day ahead?
Absolutely. Bake the cake and frost it the day before your event, storing it covered in the fridge. Bring it to room temperature before serving for best flavor and texture.
What’s the best way to store leftover cake?
Keep leftovers tightly wrapped or in an airtight container in the refrigerator for up to 4 days. For longer storage, freeze wrapped cake for up to 3 months.
Is there a way to make this cake vegan?
You can substitute butter with vegan margarine, use plant-based milk, and replace eggs with flax eggs (1 tbsp ground flaxseed + 3 tbsp water per egg). The texture might be slightly different but still delicious!
Pin This Recipe!
Perfect Class of 2026 Sheet Cake Recipe Easy Vibrant School Colors
A quick and easy vanilla sheet cake with vibrant school colors, perfect for celebrations and school events. Moist, tender, and customizable with colorful frosting accents.
- Prep Time: 15 minutes
- Cook Time: 40 minutes
- Total Time: 55 minutes
- Yield: 12 servings 1x
- Category: Dessert
- Cuisine: American
Ingredients
- 2 1/2 cups (312g) all-purpose flour, sifted
- 2 tsp baking powder
- 1/2 tsp baking soda
- 1/2 tsp salt
- 1 cup (227g) unsalted butter, softened
- 1 3/4 cups (350g) granulated sugar
- 4 large eggs, room temperature
- 1 tbsp pure vanilla extract
- 1 cup (240ml) buttermilk, room temperature (or milk + 1 tbsp lemon juice)
- Gel food coloring in your school’s colors
- For the Frosting:
- 1 cup (227g) unsalted butter, softened
- 4 cups (480g) powdered sugar, sifted
- 2–3 tbsp heavy cream or whole milk
- 1 tsp vanilla extract
- Gel food coloring for frosting accents
Instructions
- Preheat the oven to 350°F (175°C). Lightly grease a 9×13 inch pan and optionally line with parchment paper.
- In a medium bowl, whisk together flour, baking powder, baking soda, and salt. Set aside.
- In a large bowl, beat softened butter with granulated sugar on medium speed until light and fluffy, about 3-4 minutes.
- Beat in eggs one at a time, mixing well after each addition. Stir in vanilla extract.
- Reduce mixer speed to low. Add dry ingredients in three parts, alternating with buttermilk, starting and ending with dry ingredients. Mix just until combined.
- Divide the batter evenly into separate bowls based on the number of colors desired. Tint each portion with gel food coloring and mix gently until even.
- Pour the colored batters carefully into the prepared pan in sections or stripes. Optionally swirl slightly with a toothpick for a marbled effect.
- Bake for 35-40 minutes or until a toothpick inserted in the center comes out clean and the top springs back lightly when pressed.
- Cool the cake in the pan for 15 minutes, then transfer to a wire rack to cool completely.
- Prepare the frosting by beating softened butter on medium speed until creamy. Gradually add sifted powdered sugar, mixing on low.
- Add heavy cream and vanilla extract. Beat on high speed for 3 minutes until fluffy. Tint small portions with gel colors as desired.
- Spread a thin crumb coat over the cooled cake and chill for 15 minutes.
- Apply a final smooth layer of frosting. Use colored frosting for piping or decorative accents in school colors.
Notes
Use gel food coloring to keep batter thick and vibrant. Avoid overmixing to maintain a tender crumb. Chill frosting if too soft. For gluten-free, substitute flour with gluten-free blend and add an extra egg. For dairy-free, use plant-based margarine and milk alternatives. Let each colored batter settle before layering to keep colors crisp.
Nutrition
- Serving Size: 1 slice (1/12 of cak
- Calories: 340
- Sugar: 30
- Fat: 15
- Carbohydrates: 45
- Protein: 4
Keywords: sheet cake, school colors cake, vanilla cake, colorful cake, celebration cake, easy cake recipe, vibrant cake, school event dessert