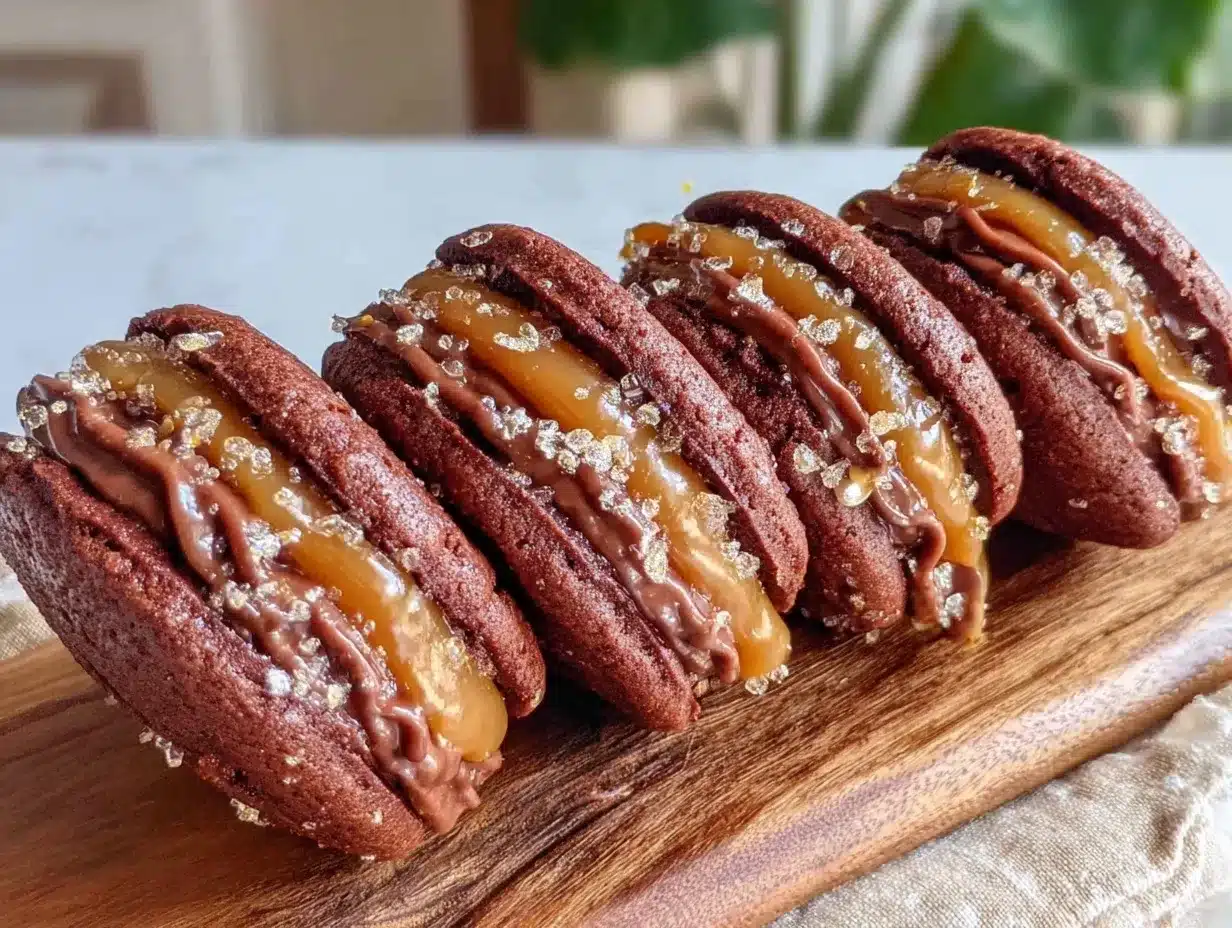
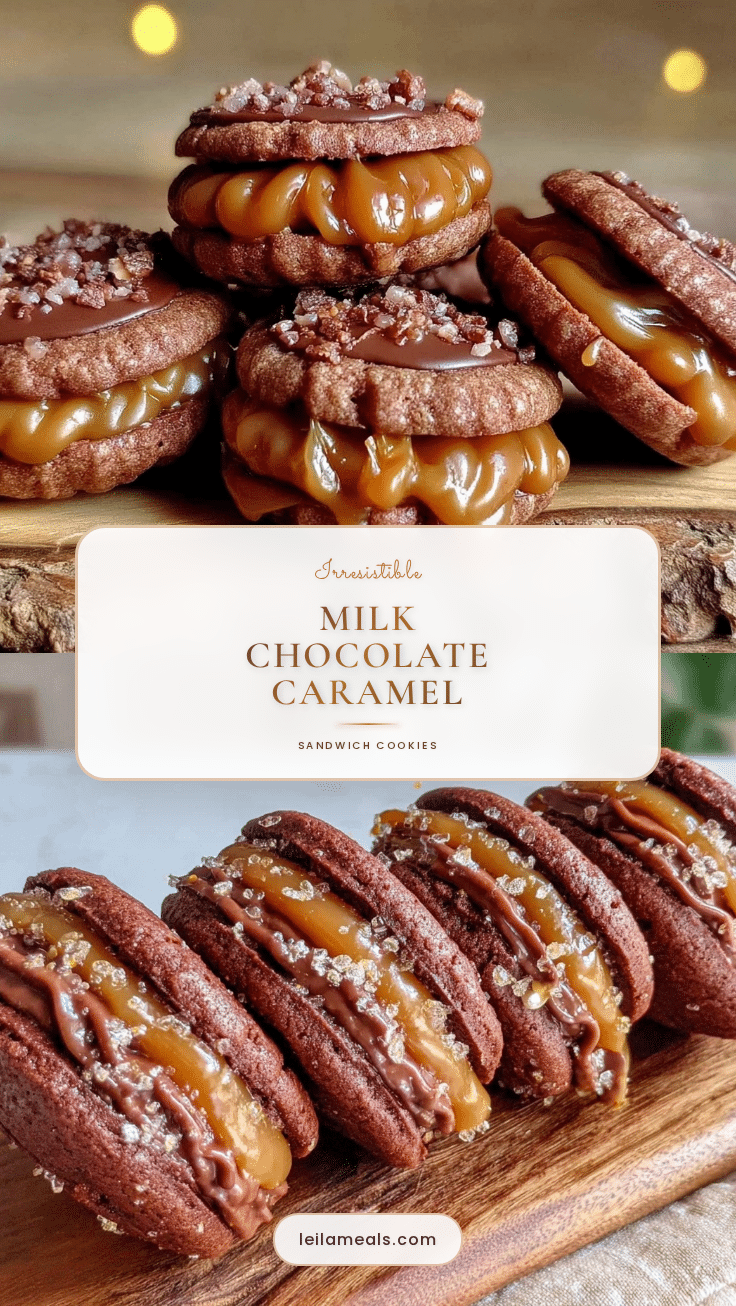
Let me tell you, the smell of warm caramel mingling with rich milk chocolate as these sandwich cookies bake is enough to make anyone’s mouth water instantly. The first time I baked these irresistible milk chocolate caramel sandwich cookies, I was honestly hooked from that very first bite. It was one of those moments—you know the kind—where you pause, take a deep breath, and just smile because you know you’re onto something truly special. I remember making them on a chilly weekend years ago when I was knee-high to a grasshopper, helping my grandma in her cozy kitchen. The magic of sticky caramel tucked between soft, chewy cookies coated with creamy milk chocolate instantly felt like pure, nostalgic comfort.
My family couldn’t stop sneaking them off the cooling rack (and I can’t really blame them). These treats quickly became a staple for family gatherings and a go-to gift at bake sales. Honestly, this recipe is dangerously easy, and you’re going to want to bookmark this one for those moments when you need a sweet treat that feels fancy but doesn’t fuss around. Perfect for potlucks, afternoon tea, or just brightening up your Pinterest cookie board, these milk chocolate caramel sandwich cookies hit all the right notes—sweet, gooey, and utterly satisfying.
I’ve tested this recipe more times than I can count (in the name of research, of course), and it never disappoints. If you’re a caramel and chocolate fan, trust me—you’ll want to keep this recipe close because it feels like a warm hug in cookie form.
Why You’ll Love This Recipe
What makes these irresistible milk chocolate caramel sandwich cookies stand out? Let me share a few reasons why this recipe has become a favorite in my kitchen:
- Quick & Easy: Comes together in under an hour, perfect for those busy weeknights or last-minute dessert cravings.
- Simple Ingredients: No fancy grocery runs needed; you probably already have most of these pantry staples on hand.
- Perfect for Any Occasion: Whether it’s a cozy family night, a festive holiday spread, or a casual potluck, these cookies fit right in.
- Crowd-Pleaser: Kids and adults alike rave about the chewy cookie base, gooey caramel center, and silky milk chocolate coating.
- Unbelievably Delicious: The balance of textures and flavors is next-level comfort food—sweet but never overwhelming.
This recipe isn’t just another caramel sandwich cookie—it’s the best version you’ll find. The cookie dough has just the right amount of chew, while the caramel is luscious without being too sticky or runny. Plus, the milk chocolate coating adds a smooth, creamy finish that brings everything together perfectly. I’ve tried a lot of caramel cookie recipes, and honestly, this one makes you close your eyes after the first bite—pure bliss. It’s comfort food with a twist that’s both easy and impressive, ideal for when you want something homemade without the stress.
What Ingredients You Will Need
This recipe uses simple, wholesome ingredients to deliver bold flavor and satisfying texture without the fuss. Most of these are pantry staples, which makes it super convenient. Here’s what you’ll need:
- For the Cookie Dough:
- All-purpose flour (2 ½ cups / 312 grams) – provides the perfect structure and chew
- Baking soda (1 teaspoon) – helps with a gentle rise and tender crumb
- Salt (½ teaspoon) – balances sweetness
- Unsalted butter (1 cup / 227 grams), softened – adds richness and moisture (I recommend using Land O’Lakes for best texture)
- Granulated sugar (¾ cup / 150 grams) – sweetens and adds crispness
- Brown sugar, packed (¾ cup / 165 grams) – brings moisture and deep caramel notes
- Large eggs (2), room temperature – binds everything together
- Pure vanilla extract (2 teaspoons) – essential for that warm, inviting flavor
- For the Caramel Filling:
- Soft caramel candies (12 ounces / 340 grams), unwrapped – the gooey heart of the sandwich (Werther’s Original work beautifully)
- Heavy cream (3 tablespoons) – softens caramel for easy spreading
- For the Milk Chocolate Coating:
- Milk chocolate chips or chopped milk chocolate (12 ounces / 340 grams) – smooth and creamy finish (Ghirardelli is my go-to)
- Vegetable oil (1 tablespoon) – for a glossy, easy-to-dip coating
Feel free to swap all-purpose flour with a gluten-free blend if needed, and you can use dairy-free butter and cream alternatives for a vegan twist. For seasonal flair, add a pinch of sea salt on top before the chocolate sets – it’s a little something extra that makes these cookies unforgettable.
Equipment Needed
- Mixing bowls – I prefer glass or stainless steel for easy cleanup
- Electric hand mixer or stand mixer – makes creaming butter and sugar a breeze
- Measuring cups and spoons – for precise measurements
- Baking sheets lined with parchment paper – prevents sticking and helps with even baking
- Cooling racks – essential for letting cookies cool before assembly
- Microwave-safe bowl or double boiler – to melt chocolate smoothly
- Small offset spatula or butter knife – to spread caramel evenly
- Optional: Candy thermometer – handy if you want to make homemade caramel instead of using candies
If you don’t have a stand mixer, no worries! An electric hand mixer works just fine. For melting chocolate, I’ve found a double boiler keeps the chocolate silky without burning, but the microwave works well too—just heat in short bursts and stir often. For budget-friendly baking sheets, I like using aluminum pans lined with parchment; it’s a great shortcut without sacrificing quality.
Preparation Method
- Preheat your oven to 350°F (175°C). Line two baking sheets with parchment paper to keep cookies from sticking and ensure even baking.
- Mix dry ingredients: In a medium bowl, whisk together 2 ½ cups (312 g) all-purpose flour, 1 teaspoon baking soda, and ½ teaspoon salt. Set aside.
- Cream butter and sugars: In a large bowl, use an electric mixer to beat 1 cup (227 g) softened unsalted butter with ¾ cup (150 g) granulated sugar and ¾ cup (165 g) packed brown sugar until light and fluffy, about 3-4 minutes. The mixture should look pale and airy.
- Add eggs and vanilla: Beat in 2 large eggs, one at a time, then stir in 2 teaspoons pure vanilla extract. Scrape down the sides as needed to combine fully.
- Combine wet and dry: Gradually add the flour mixture, mixing on low speed until just combined. Avoid overmixing—this keeps the cookies tender.
- Shape the cookies: Using a tablespoon or small cookie scoop, drop rounded balls of dough onto the prepared baking sheets, spacing them about 2 inches apart. Flatten each slightly with your fingers or the bottom of a glass to about ¼ inch thickness.
- Bake: Place in the oven and bake for 10-12 minutes, until the edges are lightly golden but centers still look soft. This keeps them chewy after cooling.
- Cool: Transfer cookies to wire racks and let cool completely before assembling.
- Prepare caramel filling: In a microwave-safe bowl, combine 12 ounces (340 g) of soft caramel candies and 3 tablespoons heavy cream. Microwave in 20-second bursts, stirring in between, until smooth and spreadable. Be careful not to overheat—the caramel should be gooey but not runny.
- Assemble sandwiches: Spread about 1 tablespoon of caramel filling on the flat side of one cookie, then gently press another cookie on top to form a sandwich. Repeat with all cookies.
- Melt chocolate coating: In a double boiler or microwave, melt 12 ounces (340 g) milk chocolate with 1 tablespoon vegetable oil until glossy and smooth.
- Dip sandwiches: Using a fork or dipping tool, dip each sandwich cookie into the melted chocolate, allowing excess to drip off. Place on parchment-lined trays.
- Set and chill: Let the chocolate coating set at room temperature or refrigerate for 15-20 minutes until firm.
If the chocolate starts to thicken while dipping, gently warm it again to keep it smooth. When spreading caramel, if it feels too stiff, microwave for a few extra seconds. Trust your senses—the caramel should be soft enough to spread but not so runny it drips everywhere.
Cooking Tips & Techniques
Making these irresistible milk chocolate caramel sandwich cookies the perfect way takes a few little tricks I’ve picked up along the way. First, always soften your butter to room temperature before creaming. Cold butter doesn’t whip up nicely, and you’ll miss out on that light texture. Also, don’t overbake the cookies; pull them out when the edges are golden but the centers look a little underdone—they’ll finish cooking as they cool, staying chewy.
When melting caramel, patience is key. Heating it slowly and stirring often prevents burning or graininess. If your caramel hardens, a quick zap in the microwave for 10-15 seconds softens it right up. For the chocolate coating, adding a touch of vegetable oil helps the chocolate dip smoothly and dries with a beautiful shine.
One lesson I learned the hard way: don’t skip chilling the cookies before assembly. Warm cookies can make the caramel melt too much, turning your sandwiches into sticky messes. Also, when dipping in chocolate, work in small batches to keep the coating warm and fluid. If you’re juggling multiple tasks, prepping the caramel and melting chocolate while the cookies bake saves serious time.
Variations & Adaptations
Feel like switching things up? Here are some tasty ways to customize these milk chocolate caramel sandwich cookies:
- Salted Caramel Twist: Sprinkle a pinch of flaky sea salt on the caramel layer or the chocolate coating for a sweet-salty combo that’s addictive.
- Dairy-Free Version: Use vegan butter, coconut cream instead of heavy cream, and dairy-free chocolate to make this treat plant-based and just as delicious.
- Nutty Upgrade: Add finely chopped toasted pecans or almonds to the cookie dough for a little crunch and nutty depth.
- Chocolate Lovers’ Dream: Swap the milk chocolate coating for dark chocolate or even white chocolate to suit your taste preferences.
- Seasonal Flair: In fall, try stirring a teaspoon of pumpkin pie spice into the cookie dough for a cozy, autumn vibe.
Personally, I tried adding a hint of espresso powder to the dough once, and it gave the chocolate and caramel an unexpectedly rich boost—definitely worth experimenting! If you want to skip dipping, just sandwich the caramel between cookies and dust with powdered sugar for a simpler but still scrumptious treat.
Serving & Storage Suggestions
These irresistible milk chocolate caramel sandwich cookies are best served at room temperature so the caramel is soft and the chocolate isn’t too hard. I love arranging them on a pretty platter with a side of hot coffee or milk for the ultimate cozy snack moment. They also make a stunning gift when wrapped in parchment and tied with twine.
Store leftover cookies in an airtight container at room temperature for up to 3 days. If your kitchen is warm, refrigerate them to keep the chocolate coating firm, but note the caramel might stiffen a bit. To revive that gooey caramel softness after refrigeration, let the cookies sit out for 15-20 minutes before serving.
These cookies freeze beautifully too! Pop them in a single layer on a baking sheet and freeze until firm, then transfer to a freezer-safe container for up to 2 months. Thaw in the fridge overnight and bring to room temperature before enjoying. Over time, the flavors meld together and the cookies become even more delicious—a true treat worth making ahead.
Nutritional Information & Benefits
Each irresistible milk chocolate caramel sandwich cookie is a delightful indulgence, packing roughly 220-250 calories depending on size. They’re rich in carbohydrates and sugars, so best enjoyed as an occasional treat. The butter provides some healthy fats, and using real vanilla adds natural flavor without artificial additives.
If you swap to dairy-free or gluten-free ingredients, you can tailor these cookies to fit various dietary needs. Just be mindful that caramel and chocolate typically contain dairy, so check labels if allergies are a concern. While these cookies aren’t a health food per se, they bring joy and comfort, which I believe counts for something in wellness. Sharing homemade treats like these can brighten days and create lasting memories—a benefit that’s hard to measure but priceless.
Conclusion
In the end, these irresistible milk chocolate caramel sandwich cookies are worth every minute you spend making them. They strike that perfect balance of chewy cookie, gooey caramel, and smooth milk chocolate—exactly the kind of homemade treat that feels special but is surprisingly easy to whip up. I love how versatile and forgiving this recipe is, making it easy to customize based on what you have or your taste buds’ whims.
So go ahead, make a batch, share with friends or keep them all for yourself (I won’t tell). I’d love to hear how you make these your own—drop a comment or share your favorite twists. Thanks for stopping by, and happy baking! These cookies feel like a warm hug you’ll want to revisit again and again.
FAQs
Can I make the caramel filling from scratch instead of using caramel candies?
Absolutely! You can make homemade caramel by melting sugar with butter and cream, but it takes a bit more time and attention to avoid burning. Using soft caramel candies is a convenient shortcut that still tastes amazing.
How long do these cookies stay fresh?
Stored in an airtight container at room temperature, they stay fresh for about 3 days. Refrigerating can extend their life but may change the texture of the caramel slightly.
Can I use dark chocolate instead of milk chocolate for the coating?
Definitely! Dark chocolate pairs wonderfully with caramel and gives a richer flavor. Just melt it the same way as the milk chocolate.
Are these cookies gluten-free?
The original recipe uses all-purpose flour, which contains gluten. However, you can substitute a gluten-free flour blend to make them gluten-free—just watch for texture differences.
What’s the best way to melt the chocolate coating?
You can melt chocolate gently in a double boiler or in the microwave in short bursts (15-20 seconds), stirring frequently to avoid burning. Adding a tablespoon of vegetable oil helps create a smooth, glossy coating.
Pin This Recipe!
Irresistible Milk Chocolate Caramel Sandwich Cookies

These milk chocolate caramel sandwich cookies combine chewy cookie bases with a gooey caramel center and a smooth milk chocolate coating, creating a nostalgic and utterly satisfying treat perfect for any occasion.
- Prep Time: 20 minutes
- Cook Time: 12 minutes
- Total Time: 45 minutes
- Yield: 24 cookies (12 sandwiches) 1x
- Category: Dessert
- Cuisine: American
Ingredients
- 2 ½ cups (312 grams) all-purpose flour
- 1 teaspoon baking soda
- ½ teaspoon salt
- 1 cup (227 grams) unsalted butter, softened
- ¾ cup (150 grams) granulated sugar
- ¾ cup (165 grams) packed brown sugar
- 2 large eggs, room temperature
- 2 teaspoons pure vanilla extract
- 12 ounces (340 grams) soft caramel candies, unwrapped
- 3 tablespoons heavy cream
- 12 ounces (340 grams) milk chocolate chips or chopped milk chocolate
- 1 tablespoon vegetable oil
Instructions
- Preheat your oven to 350°F (175°C). Line two baking sheets with parchment paper.
- In a medium bowl, whisk together the flour, baking soda, and salt. Set aside.
- In a large bowl, beat the softened butter with granulated sugar and brown sugar until light and fluffy, about 3-4 minutes.
- Beat in the eggs one at a time, then stir in the vanilla extract. Scrape down the sides as needed.
- Gradually add the flour mixture, mixing on low speed until just combined. Avoid overmixing.
- Drop rounded balls of dough onto the prepared baking sheets about 2 inches apart. Flatten each slightly to about ¼ inch thickness.
- Bake for 10-12 minutes until edges are lightly golden but centers look soft.
- Transfer cookies to wire racks and let cool completely.
- In a microwave-safe bowl, combine caramel candies and heavy cream. Microwave in 20-second bursts, stirring until smooth and spreadable.
- Spread about 1 tablespoon of caramel filling on the flat side of one cookie, then press another cookie on top to form a sandwich. Repeat with all cookies.
- Melt milk chocolate with vegetable oil in a double boiler or microwave until glossy and smooth.
- Dip each sandwich cookie into the melted chocolate, allowing excess to drip off. Place on parchment-lined trays.
- Let the chocolate set at room temperature or refrigerate for 15-20 minutes until firm.
Notes
Soften butter to room temperature before creaming. Do not overbake cookies; edges should be golden and centers soft. Heat caramel slowly and stir often to avoid burning. Add vegetable oil to chocolate for a glossy coating. Chill cookies before assembly to prevent caramel melting. Work in small batches when dipping in chocolate to keep coating smooth.
Nutrition
- Serving Size: 1 sandwich cookie
- Calories: 235
- Sugar: 22
- Sodium: 110
- Fat: 12
- Saturated Fat: 7
- Carbohydrates: 30
- Fiber: 1
- Protein: 3
Keywords: milk chocolate, caramel, sandwich cookies, homemade treats, easy cookies, caramel cookies, chocolate coating