Let me tell you, the scent of rich dark chocolate mingling with a hint of sea salt, toasted coconut, and buttery graham cracker crust wafting from my oven is enough to make anyone’s mouth water. The first time I baked these salted dark chocolate magic bars, I was instantly hooked—the kind of moment where you pause, take a deep breath, and just smile because you know you’re onto something truly special. Years ago, when I was knee-high to a grasshopper, my grandma used to make layered bars that were the highlight of every family gathering, but this version adds that irresistible salted dark chocolate twist that makes it feel fresh and fancy without any fuss.
My family couldn’t stop sneaking them off the cooling rack (and I can’t really blame them). Honestly, these bars are dangerously easy to whip up and provide pure, nostalgic comfort, perfect for potlucks, sweet treats for your kids, or brightening up your Pinterest cookie board. I’ve tested this recipe multiple times in the name of research, of course, and it’s become a staple for family gatherings, gifting, and those moments when you just crave a warm hug in dessert form. You’re going to want to bookmark this one for sure.
Why You’ll Love This Recipe
Having tried countless magic bar recipes over the years, I can confidently say this salted dark chocolate magic bars recipe stands out for a few reasons. It’s a tried-and-true favorite in my kitchen, and here’s why you’ll love it just as much:
- Quick & Easy: Comes together in under 30 minutes, perfect for busy weeknights or last-minute cravings.
- Simple Ingredients: No fancy grocery trips needed; you likely already have everything in your pantry and fridge.
- Perfect for Any Occasion: Great for potlucks, birthday parties, or a cozy night in with a cup of tea.
- Crowd-Pleaser: Always gets rave reviews from kids and adults alike, thanks to the sweet and salty balance.
- Unbelievably Delicious: The combination of creamy, gooey layers with that subtle hit of sea salt takes these bars to another level.
What makes this recipe different? Well, I blend in a pinch of flaky sea salt on top that perfectly offsets the bittersweet dark chocolate chunks. Plus, I use a mix of shredded coconut and chopped nuts for that satisfying crunch and texture combo. This isn’t just another magic bar—it’s the one you’ll find yourself craving again and again. Honestly, it’s the kind of dessert that makes you close your eyes after the first bite and say, “Yep, this is it.”
What Ingredients You Will Need
This recipe uses simple, wholesome ingredients to deliver bold flavor and satisfying texture without the fuss. Most are pantry staples, and substitutions are easy if you want to tweak it to your taste.
- Graham Cracker Crumbs: About 2 cups (200g), for that buttery, crunchy base. I recommend using honey-flavored graham crackers for added sweetness.
- Unsalted Butter: 6 tablespoons (85g), melted, to bind the crust and add richness.
- Sweetened Shredded Coconut: 1 cup (80g), for a chewy, tropical touch (feel free to omit if you’re not a fan).
- Chopped Nuts: 1 cup (120g) — walnuts, pecans, or almonds all work well. Toast them lightly for extra flavor.
- Sweetened Condensed Milk: 1 can (14 oz / 396g), the magic ingredient that holds everything together with creamy sweetness.
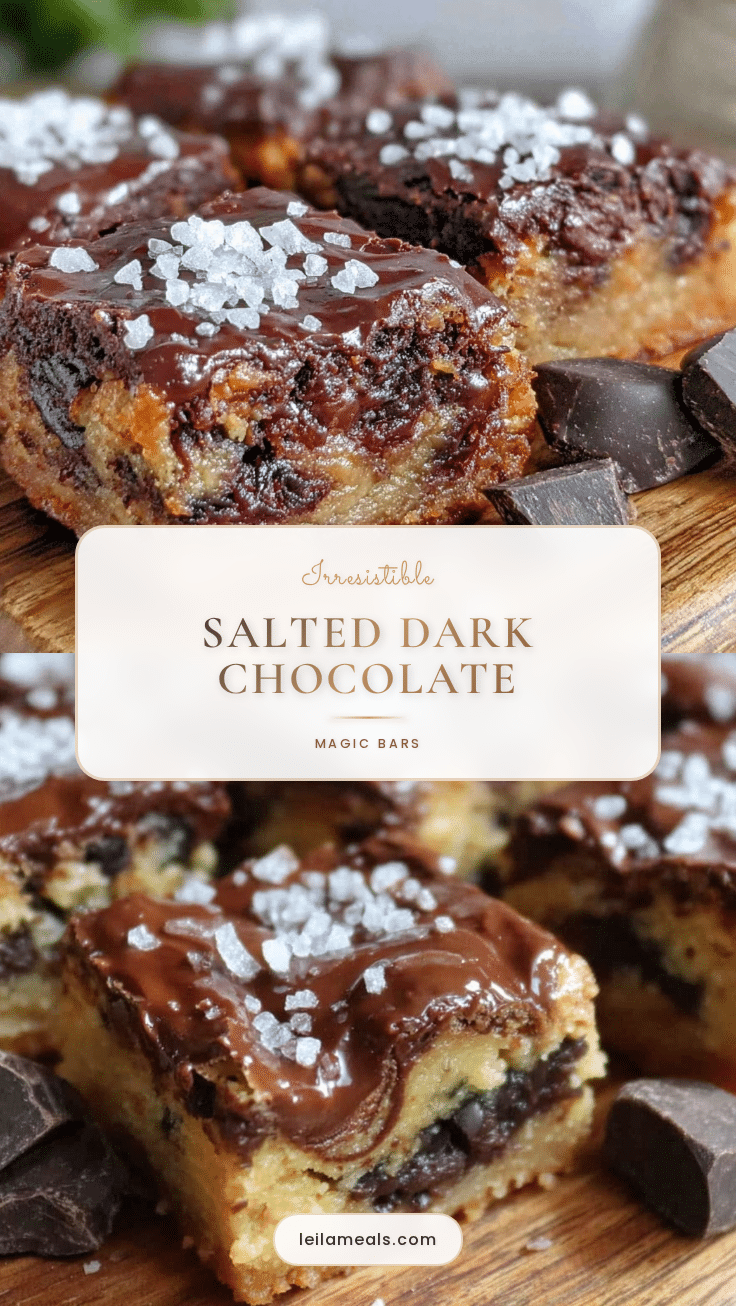
- Dark Chocolate Chunks or Chips: 1 ½ cups (270g), the star of the show. I use 70% cacao for a perfect bittersweet balance.
- Vanilla Extract: 1 teaspoon, to enhance all the flavors.
- Sea Salt Flakes: ½ teaspoon, sprinkled on top for that irresistible salty kick (coarse flakes work best).
Substitution tips: Use dairy-free butter and sweetened condensed coconut milk for a vegan-friendly twist. Swap nuts for seeds if you’re nut-free. In summer, fresh raspberry bits can add a lovely pop of tartness if you want to experiment!
Equipment Needed
- 9×13 inch (23×33 cm) baking pan — I prefer glass or metal depending on your oven heat distribution.
- Mixing bowls — one large for combining, plus a small one for melting butter.
- Measuring cups and spoons — precision matters here, so keep these handy.
- Spatula or wooden spoon — for mixing and spreading the layers evenly.
- Microwave-safe bowl or small saucepan — to melt the butter gently.
If you don’t have a 9×13 pan, an 8×8 will work but expect thicker bars and slightly longer baking time. I’ve tried silicone pans, too, and they release bars beautifully, but watch the baking time as it can vary.
Preparation Method

- Preheat your oven to 350°F (175°C) and lightly grease your 9×13 inch baking pan or line it with parchment paper for easy removal.
- Make the crust: In a large bowl, combine 2 cups (200g) graham cracker crumbs with 6 tablespoons (85g) melted unsalted butter. Stir until the crumbs are evenly coated and look like wet sand. Press this mixture firmly into the bottom of your prepared pan, creating an even layer. This should take about 3-5 minutes. Don’t skip pressing firmly—this helps the bars hold together well.
- Add the layers: Sprinkle 1 cup (80g) shredded coconut evenly over the crust, followed by 1 cup (120g) toasted chopped nuts. Pour 1 can (14 oz / 396g) sweetened condensed milk evenly over the top, making sure to cover the layers completely. This is the glue that binds it all and gives that gooey magic bar texture.
- Top with chocolate: Scatter 1 ½ cups (270g) dark chocolate chunks evenly across the surface. Don’t be shy here—more chocolate means more magic! Then sprinkle ½ teaspoon flaky sea salt evenly over the top to balance the sweetness.
- Bake: Place the pan in the preheated oven and bake for 25-30 minutes, or until the edges are golden and the chocolate is glossy but set. You’ll know it’s done when you gently shake the pan and the filling doesn’t jiggle excessively. Let cool completely on a wire rack before slicing into squares.
Pro tip: Let the bars cool fully before cutting to avoid a gooey mess. I usually let them rest for at least an hour, but overnight is best if you can wait!
Cooking Tips & Techniques
Getting these salted dark chocolate magic bars just right is all about layering flavors and textures thoughtfully. Here are some tips I’ve picked up:
- Press the crust firmly: This prevents the base from crumbling when you cut the bars. I use the bottom of a glass or measuring cup to really compact it well.
- Toast your nuts and coconut: It adds a lovely toasty depth and crunch, making the bars feel more gourmet.
- Watch the baking time closely: Overbaking dries the bars out, underbaking leaves them sloppy. Start checking at 25 minutes.
- Use quality chocolate: The dark chocolate really shines here, so pick a brand you love. I find the bittersweet balance cuts through the sweetness perfectly.
- Multitasking tip: While the bars bake, clean your prep area and start planning your coffee or tea pairing—it pairs beautifully with either!
- Common mistake: Adding too much salt can overpower the bars—stick to a light sprinkle for that perfect hint of savory contrast.
Variations & Adaptations
Want to make these salted dark chocolate magic bars your own? Here are some variations I’ve tried and loved:
- Nut-free version: Swap nuts for extra shredded coconut or pumpkin seeds to keep that crunch without allergens.
- White chocolate twist: Replace dark chocolate chunks with white chocolate and add dried cranberries for a festive flair.
- Gluten-free option: Use gluten-free graham cracker crumbs or substitute with crushed gluten-free cookies.
- Spicy kick: Add a pinch of cayenne pepper or cinnamon to the graham cracker crust for a subtle warmth that pairs surprisingly well with dark chocolate.
- Salted caramel magic bars: Drizzle caramel sauce over the top before baking for an ooey-gooey caramel surprise.
Once, I even swapped the shredded coconut for finely chopped dried cherries—talk about a tart surprise! Feel free to experiment; these bars are forgiving and fun.
Serving & Storage Suggestions
These salted dark chocolate magic bars are best served at room temperature or slightly chilled, allowing the flavors to meld and the texture to be just right. For a fancy touch, dust with a little cocoa powder or place a mint leaf on top when serving.
They pair wonderfully with a strong cup of coffee, a creamy latte, or even a glass of cold milk for the kids. I like to serve them alongside fresh berries or a simple whipped cream for extra indulgence.
To store, keep the bars in an airtight container at room temperature for up to 3 days. They also freeze beautifully—wrap individual squares in plastic wrap and place in a freezer-safe container for up to 3 months. When ready to eat, thaw overnight in the fridge and bring to room temp before serving.
Reheating for a few seconds in the microwave (10-15 seconds) softens the chocolate and brings back that fresh-baked warmth. Plus, the flavors actually deepen after resting, so these bars only get better over time.
Nutritional Information & Benefits
Each salted dark chocolate magic bar (based on 12 servings) contains approximately:
| Calories | Fat | Carbohydrates | Protein |
|---|---|---|---|
| 320 kcal | 18g | 36g | 4g |
The dark chocolate provides antioxidants and a richer, less sugary flavor than milk chocolate. Nuts add heart-healthy fats and protein, while coconut contributes fiber and a tropical flair. Though these bars are a treat (and rightly so!), they include wholesome ingredients that add more than just empty sweetness.
If you’re watching your sugar intake, try using a dark chocolate with higher cacao content and reduce the sweetened coconut. Gluten-free and vegan substitutions can be made easily, making this recipe flexible for various dietary needs.
Conclusion
Salted dark chocolate magic bars are a must-try for anyone who appreciates a blend of sweet, salty, and rich flavors all in one bite. This recipe’s ease, minimal ingredients, and delightful texture make it a winner every time. I love how it brings a bit of nostalgia with a grown-up twist—perfect for sharing or sneaking a quiet moment of indulgence.
Don’t be shy to customize these bars to your liking—they’re forgiving and fun to play with. If you give this recipe a try, I’d love to hear how you tweaked it or what your favorite add-ins are. Drop a comment, share your photos, and let’s keep the magic going!
Here’s to sweet moments and salty surprises—happy baking!
FAQs
Can I use milk chocolate instead of dark chocolate in these bars?
Absolutely! Milk chocolate will make the bars sweeter and creamier. Just keep an eye on baking time since milk chocolate melts faster.
How long do these magic bars keep fresh?
At room temperature in an airtight container, they stay fresh for about 3 days. Refrigeration extends their life to about a week.
Can I make these bars ahead of time?
Yes! These bars are perfect for making a day or two ahead. They actually taste better after the flavors meld overnight.
Is it possible to freeze these magic bars?
Definitely. Wrap individual squares tightly and freeze for up to 3 months. Thaw in the fridge overnight before serving.
What can I use instead of sweetened condensed milk?
You can use a vegan or dairy-free condensed milk alternative or make your own by simmering coconut milk with sugar until thickened.
Pin This Recipe!
Salted Dark Chocolate Magic Bars
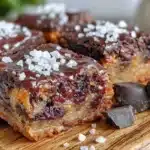
These salted dark chocolate magic bars combine a buttery graham cracker crust with layers of toasted coconut, chopped nuts, sweetened condensed milk, and rich dark chocolate chunks, finished with a sprinkle of flaky sea salt for a perfect sweet and salty treat.
- Prep Time: 10 minutes
- Cook Time: 25-30 minutes
- Total Time: 35-40 minutes
- Yield: 12 servings 1x
- Category: Dessert
- Cuisine: American
Ingredients
- 2 cups (200g) graham cracker crumbs (honey-flavored recommended)
- 6 tablespoons (85g) unsalted butter, melted
- 1 cup (80g) sweetened shredded coconut
- 1 cup (120g) chopped nuts (walnuts, pecans, or almonds), toasted
- 1 can (14 oz / 396g) sweetened condensed milk
- 1 ½ cups (270g) dark chocolate chunks or chips (70% cacao recommended)
- 1 teaspoon vanilla extract
- ½ teaspoon flaky sea salt
Instructions
- Preheat your oven to 350°F (175°C) and lightly grease a 9×13 inch baking pan or line it with parchment paper.
- In a large bowl, combine graham cracker crumbs with melted unsalted butter. Stir until evenly coated and press firmly into the bottom of the prepared pan to form an even crust layer.
- Sprinkle shredded coconut evenly over the crust, then add the toasted chopped nuts on top.
- Pour the sweetened condensed milk evenly over the layers, covering them completely.
- Scatter dark chocolate chunks evenly across the surface and sprinkle flaky sea salt on top.
- Bake for 25-30 minutes until edges are golden and chocolate is glossy but set. Let cool completely on a wire rack before slicing into squares.
Notes
Press the crust firmly to prevent crumbling. Toast nuts and coconut for extra flavor. Let bars cool fully before cutting to avoid a gooey mess; overnight resting is best. Use quality dark chocolate for best results. Avoid adding too much salt to maintain balance.
Nutrition
- Serving Size: 1 bar (1/12th of rec
- Calories: 320
- Fat: 18
- Carbohydrates: 36
- Protein: 4
Keywords: salted dark chocolate magic bars, magic bars, chocolate dessert, easy dessert, layered bars, sweet and salty dessert, homemade treats