Picture this: the sun is streaming in through your kitchen window, and the scent of fresh garlic mingles with the earthy aroma of tahini, drifting up as you whirl creamy chickpeas in your food processor. The first time I made a homemade hummus trio, I was genuinely surprised by just how vibrant and inviting my kitchen felt. There’s something magical about seeing three colorful bowls—classic, roasted red pepper, and zesty lemon-herb—lined up on your counter, each one practically begging for a swipe of pita or a crunchy carrot stick.
Honestly, I can still remember the look on my sister’s face when she dipped into the lemon-herb version for the first time. She paused, closed her eyes, and grinned—one of those “aha!” moments you don’t forget. It was the kind of moment where you pause, take a deep breath, and just smile because you know you’re onto something truly special. This hummus trio has roots in family gatherings when I was knee-high to a grasshopper, sitting at my grandma’s table as she mashed chickpeas with a fork. I loved the ritual, but I always wished I’d known just how easy and customizable hummus could be back then.
My family couldn’t stop sneaking bites straight from the fridge (sometimes with a spoon—no shame!). Let’s face it: this hummus trio is dangerously easy to whip up, and it brings pure, nostalgic comfort with a burst of freshness. It’s perfect for potlucks, a game-day snack spread, or simply to brighten up your Pinterest board with a pop of color. And yes, I’ve tested these flavors more times than I can count—in the name of research, of course. Now, this homemade hummus trio is a staple for family get-togethers, gifting, or just those days when you need a little edible sunshine. Feels like a warm hug, and you’re going to want to bookmark this one for sure!
Why You’ll Love This Homemade Hummus Trio Recipe
When it comes to snack tables and party spreads, this fresh healthy homemade hummus trio checks all the boxes. After years of testing and tweaking hummus recipes—sometimes with success, sometimes with a kitchen disaster or two—I can say with confidence that this is the one you’ll come back to, again and again. Here’s why:
- Quick & Easy: All three hummus flavors come together in under 30 minutes. If you’re juggling last-minute party prep, this is your lifesaver!
- Simple Ingredients: You don’t need anything fancy. Chickpeas, tahini, olive oil, lemon, and a few pantry basics—nothing you have to hunt down at a specialty store.
- Perfect for Parties & Snacking: This trio is a show-stopper on any snack table. It’s great for picnics, brunch, or a healthy after-school snack. Kids and adults both swoon over the variety.
- Crowd-Pleaser: I’ve watched even the pickiest eaters go back for seconds. You can adjust the spice, tang, or herbs to suit your crowd.
- Unbelievably Delicious: The texture is ultra-creamy (thanks to a sneaky blending trick I’ll share below), and each flavor brings something unique—classic is rich and garlicky, roasted red pepper has a smoky-sweet kick, and lemon-herb is bright and zingy.
What makes this homemade hummus trio recipe stand out? Well, a few things. I use ice-cold water to get that dreamy, smooth texture you usually only find in restaurant hummus. For the roasted red pepper version, I char the peppers myself (it’s worth the extra five minutes), and for the lemon-herb, fresh parsley and dill add a punch of freshness you just can’t get from dried herbs. This isn’t just “another hummus”—it’s my go-to, chef-tested, family-approved, and totally customizable base for all your snack cravings.
This recipe isn’t just good—it’s the kind of food that makes you close your eyes and savor every bite. It’s comforting, nourishing, and feels like a celebration every time you serve it. Perfect for impressing guests without breaking a sweat, or for turning a basic lunch box into something special. Whether you’re a seasoned cook or just starting out, this homemade hummus trio is foolproof and guaranteed to bring smiles all around.
What Ingredients You Will Need
This recipe uses simple, wholesome ingredients to deliver bold flavor and that creamy, satisfying texture—no fuss, no mystery. Most of these are pantry staples, and you’ll be able to swap or adjust based on what you have on hand. Here’s your quick ingredient breakdown by flavor:
For the Classic Hummus
- 1 (15 oz / 425 g) can chickpeas, drained and rinsed (or 1 1/2 cups cooked chickpeas)
- 2 tbsp tahini (well-stirred for best consistency)
- 2 tbsp fresh lemon juice (about 1 medium lemon)
- 1 small garlic clove, minced (adjust to taste)
- 2-3 tbsp cold water (use ice cubes if you want ultra-creamy hummus!)
- 2 tbsp extra-virgin olive oil (plus more for drizzling)
- 1/2 tsp ground cumin (adds warmth)
- 1/4-1/2 tsp salt (to taste)
- Paprika and chopped parsley (for garnish, optional)
For Roasted Red Pepper Hummus
- All classic ingredients, plus:
- 1/2 cup (120 g) roasted red pepper (store-bought or homemade, drained well)
- 1/8 tsp smoked paprika (for a deeper, smoky flavor)
- Pinch of cayenne pepper (if you like a little heat)
For Lemon-Herb Hummus
- All classic ingredients, plus:
- 1/2 cup (about 15 g) fresh mixed herbs (parsley, dill, cilantro, or basil—your choice, chopped)
- Zest of 1 lemon (for extra zing)
- Extra lemon juice, to taste (if you like it tangy)
Ingredient Notes & Substitutions
- Chickpeas: Canned is perfectly fine—I like the Goya or Eden brands for their creamy texture. If you want extra-smooth hummus, peel your chickpeas (I do this when I have the patience!)
- Tahini: Not all tahini is created equal. Soom and Seed + Mill are my favorites for their nutty, smooth taste. If you’re out, you can swap in sunflower seed butter for a nut-free version.
- Lemon Juice: Fresh is best, but bottled works in a pinch. For an extra-bright flavor, add a little grated lemon zest.
- Roasted Red Peppers: You can roast your own by charring a pepper over an open flame or in the oven, then peeling off the skin. Or, just grab a jar from the store—it’s all good.
- Herbs: Go wild with what’s in your fridge. Parsley adds freshness, dill gives a light anise note, and cilantro brings brightness. Mix and match!
- Salt: Start with less, then taste and adjust. Hummus can go from bland to amazing with just a pinch more salt.
- Olive Oil: Use the good stuff for drizzling—it really makes a difference.
If you want to make it gluten-free, just double-check your tahini and spices for any sneaky flour additives. Want it vegan? You’re already there! This recipe is naturally plant-based and allergy-friendly.
Equipment Needed
You don’t need a fancy kitchen to whip up this homemade hummus trio, but a few tools will make your life a lot easier. Here’s what I use (and some handy alternatives):
- Food Processor (7-cup / 1.7-liter or larger): This is the hero for creamy hummus. I use my trusty Cuisinart—never lets me down. If you don’t have a food processor, a high-speed blender works in a pinch, though you may need to scrape the sides more often.
- Measuring Cups and Spoons: Accuracy helps, especially for the tahini and lemon juice.
- Rubber Spatula: For scraping every last bit of hummus (you don’t want to waste a drop!).
- Small Mixing Bowls: For dividing base hummus and mixing in flavor variations.
- Baking Sheet (if roasting your own peppers): Line with foil for easy cleanup.
- Fine-Mesh Sieve: Optional, but great for draining and rinsing canned chickpeas.
- Zester or Microplane: For that bright lemon zest.
Don’t worry if you’re missing something. I’ve mashed chickpeas with a fork in a hotel room before (not ideal, but it works). If you’re on a budget, check thrift stores for food processors—mine was a $10 find and still going strong. For maintenance, rinse your food processor bowl right after use to avoid stuck-on tahini. And always dry your blades by hand—keeps them sharp for years!
Preparation Method
- Drain and Rinse Chickpeas: Pour your can of chickpeas (15 oz / 425 g) into a fine-mesh sieve. Rinse under cold water for 30 seconds. For extra-creamy hummus, gently pinch each chickpea to remove the skins (it’s a little tedious, but so worth it—your hummus will be silkier!).
- Blend the Tahini and Lemon Juice: In your food processor, add 2 tbsp tahini and 2 tbsp fresh lemon juice. Process for 1 minute until the mixture is pale and creamy. This “whipping” step makes your hummus extra fluffy.
- Add Garlic and Spices: Scrape down the sides, then add 1 minced garlic clove, 1/2 tsp ground cumin, and 1/4-1/2 tsp salt. Blend for 30 seconds, stopping to scrape as needed.
- Incorporate Chickpeas: Add the drained (and, if you’re up for it, peeled) chickpeas to the processor. Blend for 1 minute. The mixture will look thick and grainy at this stage.
- Stream in Olive Oil and Water: With the processor running, slowly drizzle in 2 tbsp olive oil and 2-3 tbsp ice-cold water. Blend for another 2-3 minutes, stopping to scrape down the sides as needed, until the hummus is completely smooth and creamy. If it looks too thick, add a bit more water, 1 tbsp at a time.
- Adjust and Taste: Scoop out a spoonful and give it a taste. Need more salt? More lemon? Now’s the time to tweak. The hummus should be luscious, not stodgy.
- Divide for Trio Flavors: Scoop the classic hummus into three small bowls. About 2/3 cup (150 g) in each.
- Make Roasted Red Pepper Hummus: Return one portion to the processor. Add 1/2 cup (120 g) roasted red pepper, 1/8 tsp smoked paprika, and a pinch of cayenne. Blend until smooth and vibrant red. Scrape into a serving bowl.
- Make Lemon-Herb Hummus: Clean the processor bowl (a quick rinse is fine). Add another portion of hummus, 1/2 cup (15 g) chopped fresh herbs, and the zest of 1 lemon. Squeeze in a bit more lemon juice if you love it tangy. Blend until flecked with green. Scrape into a bowl.
- Classic Hummus: The final portion is your classic base. Give it a stir, and transfer to a bowl.
- Garnish: Drizzle each bowl with olive oil, a sprinkle of paprika or smoked paprika, and fresh herbs or chopped roasted pepper if you’re feeling fancy.
- Serve or Store: Serve right away, or cover and refrigerate for up to 4 days. The flavors deepen as they sit—sometimes even tastier the next day!
Note: If your hummus ever turns out “gritty,” blend longer and add a little more water. If it’s bland, it almost always needs a pinch more salt or lemon. Trust your taste buds!
Cooking Tips & Techniques
Getting homemade hummus just right can take a little trial and error, but I’ve picked up some tricks along the way (mostly after a few less-than-perfect batches!). Here’s what I’ve learned, so you don’t have to find out the hard way:
- Use Ice-Cold Water: This sounds odd, but it helps the tahini whip up light and fluffy. When I skip this step, my hummus always comes out a little dense.
- Peel Chickpeas for Extra Creaminess: If you have the patience, pinch off the chickpea skins. It’s a labor of love, but you’ll be rewarded with the smoothest hummus ever.
- Don’t Rush the Blending: Let your food processor run for 2-3 full minutes at the end. The longer it blends, the silkier the texture. Most home cooks stop too soon (trust me, I used to!).
- Adjust by Taste: Hummus flavor varies by brand of tahini, lemon, and even the salt you use. Always taste before you serve, and don’t be afraid to add a little more acid or salt.
- Chill for Maximum Flavor: If you can, let the hummus rest in the fridge for a couple of hours before serving. The flavors meld and get even better.
- Multitasking Tip: Roast your peppers while you prep the base hummus. That way, everything is ready at once—no wasted time!
- Consistency Troubleshooting: If your hummus is too thick, add water 1 tablespoon at a time. Too thin? Blend in a few more chickpeas or a spoonful of tahini.
I’ll be honest—my first hummus was a chunky, over-garlicked mess. But with these tips, you’ll get it right every time. The best part? Once you’ve nailed the technique, you can riff on flavors endlessly. Just remember: smoothness comes from patience, not just ingredients!
Variations & Adaptations
The beauty of a homemade hummus trio is that you can switch things up for every season, diet, or flavor craving. Here are some fun ways to mix up your snack game:
- Spicy Sriracha Hummus: Blend 1-2 teaspoons of sriracha or your favorite hot sauce into the base. Top with sliced green onions and sesame seeds for a fiery twist.
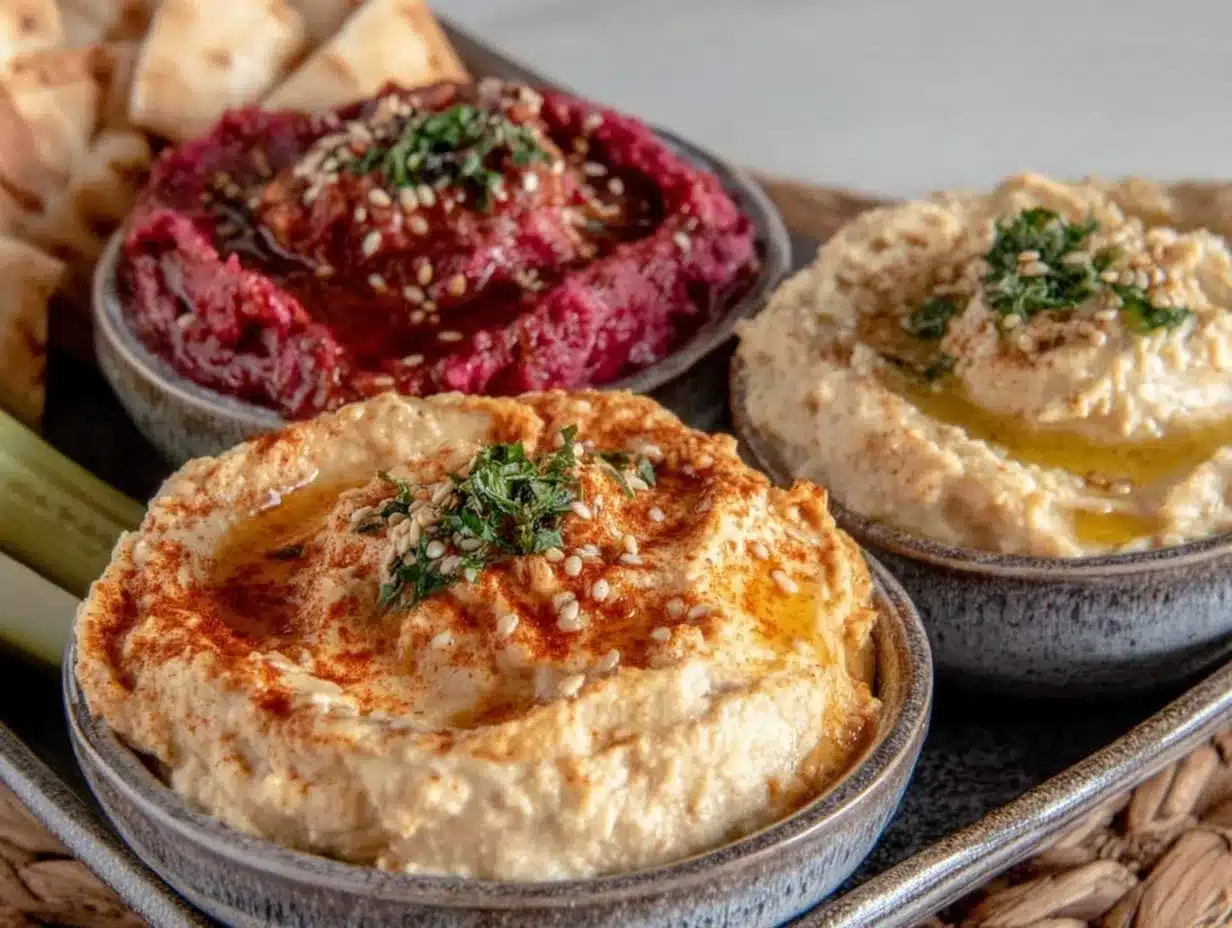
- Beet Hummus: Add 1/2 cup (75 g) cooked beetroot to your base hummus, plus a little extra lemon juice. The color is gorgeous—perfect for spring parties or adding “wow” to your Instagram board.
- Greek Yogurt Hummus: For a lighter, extra-creamy version, blend in 1/4 cup (60 g) plain Greek yogurt. It adds protein and a tangy note—great for lunchboxes.
- Different Beans: Swap chickpeas for white beans or black beans for a new flavor profile. I love using cannellini beans with basil and lemon for a Mediterranean spin.
- Nut-Free: Can’t do tahini? Use sunflower seed butter or even a little olive oil and water for creaminess. Just skip nuts altogether if needed.
- Low-Carb: Try steamed cauliflower instead of chickpeas for a lower-carb, veggie-packed dip. (It’s not classic hummus, but it’s surprisingly tasty!)
My personal favorite? A smoky chipotle hummus with a sprinkle of toasted pumpkin seeds on top—so good! And if you’re feeding a crowd with different needs, you can easily make one bowl spicy, one bowl herby, and one classic. Just divide the base and add your mix-ins. Hummus really is the choose-your-own-adventure of party dips!
Serving & Storage Suggestions
Homemade hummus is at its best served cool or at room temperature. I love piling the trio into pretty, shallow bowls and swirling the tops with the back of a spoon—drizzle with olive oil, sprinkle with smoked paprika, and finish with fresh herbs or even a few toasted pine nuts if you’re feeling fancy.
For parties, surround the bowls with fresh veggies (carrot sticks, cucumber rounds, bell pepper strips), warm pita triangles, or crunchy crackers. Hummus also makes an excellent sandwich spread or toast topper—add sliced avocado or tomato for a quick lunch.
To store, cover your hummus tightly and refrigerate for up to four days. The flavors actually deepen overnight! If it thickens in the fridge, stir in a splash of water or olive oil before serving. Hummus can be frozen for up to a month—just thaw overnight in the fridge and give it a good stir. For best flavor, avoid leaving hummus at room temperature for more than two hours (especially if it’s hot out).
Nutritional Information & Benefits
Each serving (about 3 tablespoons/50g) of this homemade hummus trio has roughly 100 calories, 4g fat, 3g protein, and 2g fiber. It’s naturally gluten-free, vegan, and packed with plant-based goodness. Chickpeas bring protein and fiber, tahini adds healthy fats and minerals, and olive oil provides a dose of heart-friendly monounsaturated fat.
Fresh herbs pack in antioxidants and vitamins, while lemon helps with iron absorption. If you’re watching sodium, just adjust the salt to your preference. Allergens to note: sesame (tahini) and, occasionally, cross-contamination in canned beans—always check labels if sensitive. From a wellness perspective, I love how this snack keeps me full and energized, without the sugar crash you get from most party dips!
Conclusion
There’s just something special about bringing a homemade hummus trio to the table—friends and family gather around, everyone finds a favorite, and you get to enjoy a healthy, flavorful snack that’s as fun to look at as it is to eat. This recipe is worth a spot in your regular rotation, whether you’re hosting a crowd or just want a fridge full of snack options that actually taste good.
Don’t be afraid to make it your own—add a little more lemon, try a new herb, or toss in a pinch of chili flakes. That’s the best part! Personally, I love this hummus trio for how easy it is to whip up and how much joy it brings to any gathering. If you give it a try, leave a comment below or share your flavor twists—I’m always excited to see what you come up with. Happy snacking, and here’s to many colorful, happy snack boards ahead!
FAQs About Homemade Hummus Trio Recipe
Can I make the hummus trio ahead of time?
Absolutely! You can prepare all three flavors up to three days in advance. Just store them in separate airtight containers in the fridge. Give each a stir before serving—add a splash of water or olive oil if needed.
What can I use instead of tahini?
If you don’t have tahini or need a nut-free option, try sunflower seed butter or even plain Greek yogurt. The flavor will be a bit different, but still delicious and creamy!
How do I get my hummus really smooth?
Start by blending tahini and lemon juice first, use ice-cold water, and blend the chickpeas for a full 2-3 minutes. Peeling chickpeas also helps if you have the patience.
Can I freeze homemade hummus?
Yes, hummus freezes well! Place it in a freezer-safe container, leaving a little space for expansion. Thaw overnight in the fridge and stir before serving—add a little water or olive oil if it thickens.
Is this hummus trio gluten-free and vegan?
Yes! This homemade hummus trio is naturally gluten-free and vegan as written. Just serve with gluten-free dippers if you have guests with allergies.
Pin This Recipe!

Homemade Hummus Trio Recipe – Easy Healthy Snack for Parties

This vibrant hummus trio features classic, roasted red pepper, and zesty lemon-herb flavors, making it a perfect healthy snack for parties, potlucks, or everyday munching. Creamy, customizable, and naturally gluten-free and vegan, it’s a crowd-pleaser that comes together in under 30 minutes.
- Prep Time: 15 minutes
- Cook Time: 10 minutes
- Total Time: 25 minutes
- Yield: 6 servings (about 2 cups total, 1/3 cup per serving) 1x
- Category: Appetizer
- Cuisine: Mediterranean
Ingredients
- 1 (15 oz) can chickpeas, drained and rinsed (or 1 1/2 cups cooked chickpeas)
- 2 tablespoons tahini (well-stirred)
- 2 tablespoons fresh lemon juice (about 1 medium lemon)
- 1 small garlic clove, minced
- 2–3 tablespoons cold water (ice cubes for ultra-creamy hummus)
- 2 tablespoons extra-virgin olive oil (plus more for drizzling)
- 1/2 teaspoon ground cumin
- 1/4–1/2 teaspoon salt, to taste
- Paprika and chopped parsley (for garnish, optional)
- For Roasted Red Pepper Hummus:
- 1/2 cup roasted red pepper (store-bought or homemade, drained well)
- 1/8 teaspoon smoked paprika
- Pinch of cayenne pepper
- For Lemon-Herb Hummus:
- 1/2 cup fresh mixed herbs (parsley, dill, cilantro, or basil, chopped)
- Zest of 1 lemon
- Extra lemon juice, to taste
Instructions
- Drain and rinse chickpeas in a fine-mesh sieve under cold water for 30 seconds. For extra-creamy hummus, peel chickpeas by gently pinching off the skins.
- In a food processor, blend tahini and lemon juice for 1 minute until pale and creamy.
- Scrape down the sides, add minced garlic, ground cumin, and salt. Blend for 30 seconds.
- Add drained (and peeled, if desired) chickpeas. Blend for 1 minute until thick and grainy.
- With the processor running, slowly drizzle in olive oil and cold water. Blend for 2-3 minutes until smooth and creamy, scraping down sides as needed. Add more water if too thick.
- Taste and adjust salt or lemon juice as needed.
- Divide the classic hummus into three bowls (about 2/3 cup each).
- For Roasted Red Pepper Hummus: Return one portion to the processor. Add roasted red pepper, smoked paprika, and cayenne. Blend until smooth and vibrant. Transfer to a bowl.
- For Lemon-Herb Hummus: Rinse processor bowl. Add another portion of hummus, chopped herbs, and lemon zest. Add extra lemon juice if desired. Blend until flecked with green. Transfer to a bowl.
- Classic Hummus: Stir and transfer the final portion to a bowl.
- Garnish each bowl with olive oil, paprika or smoked paprika, and fresh herbs or chopped roasted pepper.
- Serve immediately or refrigerate up to 4 days. Stir before serving; add water or olive oil if thickened.
Notes
For extra-smooth hummus, peel chickpeas and blend longer. Use ice-cold water for fluffier texture. Adjust salt and lemon to taste. Hummus flavors deepen after chilling. Can be made ahead and stored up to 4 days in the fridge or frozen for 1 month.
Nutrition
- Serving Size: About 3 tablespoons
- Calories: 100
- Sugar: 1
- Sodium: 150
- Fat: 4
- Saturated Fat: 0.5
- Carbohydrates: 12
- Fiber: 2
- Protein: 3
Keywords: hummus, trio, party snack, vegan, gluten-free, Mediterranean, healthy dip, roasted red pepper, lemon herb, classic hummus