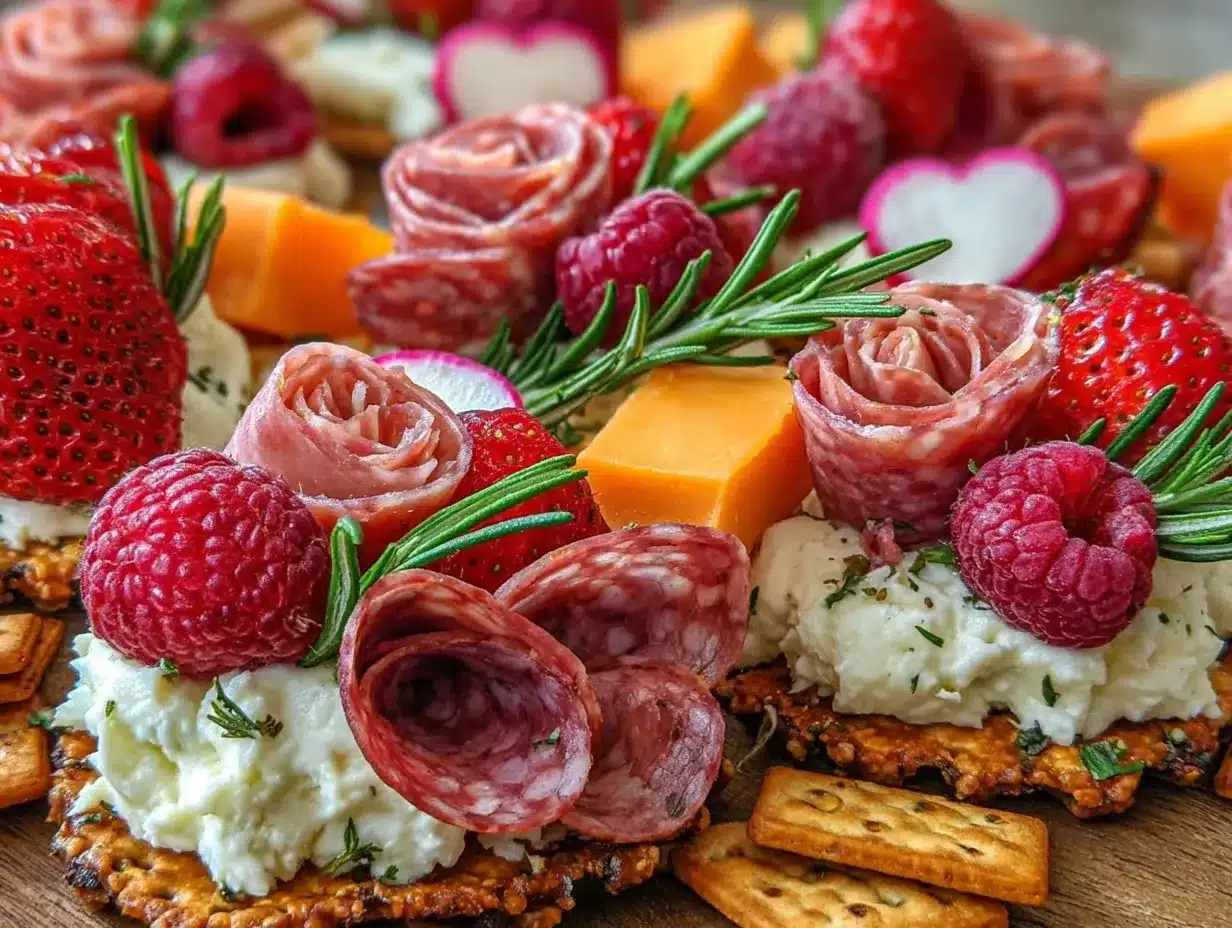
Picture this: the soft glow of string lights, laughter filling the air, and a table adorned with dazzling, bite-sized treats that are almost too pretty to eat. The aroma of smoked meats mingling with creamy cheeses and crisp veggies is enough to stop you in your tracks. Honestly, there’s something magical about hosting your best friends for Galentine’s Day, and let’s face it—these Perfect Galentine’s Mini Charcuterie Cups steal the show every single time.
The first time I whipped up these charcuterie cups, I wasn’t sure what to expect. I’d seen them on Pinterest, all decked out for parties, but never tried making them myself. It was a rainy Sunday and I was knee-high to a grasshopper, helping my grandma arrange snacks for her bridge club. Fast forward a few years, I found myself recreating that same sense of cozy togetherness with these mini masterpieces. The kind of moment where you pause, take a deep breath, and just smile because you know you’re onto something truly special.
My friends couldn’t stop snapping photos and sneaking bites before everyone arrived (and honestly, I can’t blame them). These charcuterie cups have become a staple for our gatherings—whether it’s an impromptu pajama party or a big Galentine’s bash. I wish I’d stumbled on this idea years ago, because it’s dangerously easy and brings pure, nostalgic comfort to any celebration. Whether you’re brightening up your Pinterest board or just searching for the perfect party appetizer, these cups have your back.
In the name of research (and a little self-indulgence), I’ve tested countless variations to get everything just right. They’re perfect for gifting, sharing, and making memories—honestly, they feel like a warm hug in appetizer form. You’re going to want to bookmark this one, trust me!
Why You’ll Love These Perfect Galentine’s Mini Charcuterie Cups
After years of hosting parties and experimenting with endless appetizer ideas, I can tell you these charcuterie cups are a game-changer. They’ve earned rave reviews from picky eaters, foodies, and even the “just here for the snacks” crowd. Here’s why you’ll love them:
- Quick & Easy: Comes together in under 30 minutes—just assemble, chill, and serve. Perfect for those last-minute get-togethers or when you want something impressive without fuss.
- Simple Ingredients: Everything here is a grocery store staple, no wild goose chases required. Most of these items are probably in your fridge or pantry already.
- Perfect for Celebrations: Whether it’s Galentine’s Day, a bridal shower, or a girls’ night in, these cups add a fun, elegant touch. They’re great as party appetizers, lunchbox treats, or even a chic snack board for movie night.
- Crowd-Pleaser: These mini charcuterie cups win over kids and adults alike. Individual servings mean no fighting over the last olive or wedge of cheese!
- Unbelievably Delicious: The balance of savory, creamy, and crunchy is pure comfort food. It’s the kind of snack that makes you close your eyes and savor every bite.
What sets my recipe apart? I use a layering technique (thanks, Grandma!) that keeps everything crisp and fresh, plus a secret drizzle of honey for a little sparkle. You can swap in your favorite meats or cheeses, and every cup is a mini work of art. I love that these cups are both flexible and foolproof—if you can stack snacks, you can make them!
This recipe isn’t just a cute idea—it’s an invitation to make every celebration feel special. Whether you’re impressing guests or just treating yourself, these charcuterie cups deliver comfort, flavor, and a pinch of party magic. After all, good food is meant to be shared and enjoyed with people you love.
What Ingredients You Will Need
This recipe uses simple, wholesome ingredients to deliver bold flavor and satisfying texture—without any complicated prep. Most of these are pantry staples or easily found at your local grocery store. Here’s what you need for the perfect charcuterie cups:
- For the Base:
- Mini disposable cups (8–10 oz, clear or decorative)
- Small cocktail napkins or cupcake liners (for lining)
- Meats:
- Thin-sliced salami (about 8 oz / 225g)
- Prosciutto or ham (about 8 oz / 225g)
- Turkey or roast beef slices (optional, for variety)
- Cheeses:
- Cheddar cubes (about 8 oz / 225g)
- Mozzarella balls (ciliegine, about 8 oz / 225g)
- Brie wedges (about 6 oz / 170g)
- Goat cheese crumbles (optional, adds tangy flavor)
- Crunchy Elements:
- Mini breadsticks or pretzel sticks
- Assorted crackers (small round or square)
- Pita chips or crostini (for extra crunch)
- Fresh Produce:
- Red and green grapes (washed and dried)
- Strawberries, halved (for color and sweetness)
- Cherry tomatoes (adds juicy pop)
- Cucumber slices (thin rounds for freshness)
- Olives (green or black, pitted)
- Pickles or cornichons (for tang)
- Extras & Accents:
- Honey or hot honey (for drizzling, optional)
- Assorted nuts (almonds, cashews, or pistachios)
- Dried apricots or figs (for a sweet-salty combo)
- Fresh herbs (rosemary, thyme, parsley—to garnish)
- Dark chocolate squares or kisses (for a playful finish)
Tips for Ingredient Selection: I love using Boar’s Head or Applegate meats for consistent quality, and Kerrygold cheddar always gets rave reviews. For produce, choose firm grapes and ripe strawberries—nothing mushy. If you’re going gluten-free, swap the crackers for rice crisps or seed crackers. Dairy-free cheese slices can be used for vegan cups (my friend swears by Violife brand for meltiness).
Honestly, the secret is variety and color. Mix and match textures and flavors, and let each cup show off your personality. In summer, swap out strawberries for blueberries or blackberries. For a winter spin, use dried cranberries and candied pecans. The options are endless!
Equipment Needed
You don’t need fancy tools to make these mini charcuterie cups, and that’s part of the charm! Here’s what I use:
- Mini disposable cups (8–10 oz, clear for pretty presentation)
- Small bamboo skewers or toothpicks (for stacking ingredients)
- Small tongs or forks (makes arranging easier)
- Cutting board and sharp knife (for prepping cheeses and veggies)
- Mini cupcake liners or cocktail napkins (lining the cups helps with cleanup)
- Serving tray or platter (for easy transport and presentation)
If you don’t have mini cups, you can use mason jars, small bowls, or even silicone muffin liners—whatever works! I’ve tried all sorts of containers, and clear cups always win for Pinterest-worthy photos. Toothpicks work fine if you’re out of skewers, and a butter knife will do for most cheese cuts (though a wire cheese slicer is a dream if you have one).
Maintenance tip: If you use reusable cups, give them a good soak in hot, soapy water. For bamboo skewers, I buy them in bulk—they’re affordable and compostable, so you don’t have to worry about waste. Honestly, budget-friendly options work just as well as the fancy stuff!
Preparation Method
Let’s assemble these Perfect Galentine’s Mini Charcuterie Cups step by step. Trust me, once you get going, you’ll be in a snack-stacking groove!
- Prep Your Ingredients:
- Wash and dry all fresh produce (grapes, strawberries, cherry tomatoes, cucumber slices).
- Slice cheeses into bite-sized cubes or wedges (about 1/2 inch / 1.2 cm pieces).
- Roll or fold meats into small rosettes or stacks for visual appeal.
- If using nuts or dried fruit, portion into small handfuls.
Tip: Keep everything chilled until you’re ready to assemble for maximum freshness.
- Layer the Base:
- Line each mini cup with a cocktail napkin or cupcake liner.
- Add a few crackers, pretzel sticks, or crostini to the bottom (about 2–3 pieces per cup).
Note: This creates a crunchy foundation and soaks up any juices from produce.
- Add Meats & Cheeses:
- Arrange 2–3 slices of meat in each cup (salami, prosciutto, ham).
- Stack 2–3 cubes/wedges of cheese beside or on top of the meat.
- Insert a skewer with a mozzarella ball and grape or tomato for height and color.
Warning: Don’t overpack—leave a little space for easy picking!
- Layer Fresh Produce:
- Add a few grapes, a strawberry half, and 1–2 cucumber rounds.
- Drop in a couple olives and pickles for tanginess.
Look for bright colors—red, green, gold—for extra visual pop.
- Top with Extras:
- Sprinkle a pinch of nuts or dried fruit over the top.
- Add a small sprig of fresh herbs (rosemary or thyme looks fancy and smells lovely).
- Place a chocolate square or kiss in each cup for a sweet surprise.
Optional: Drizzle a bit of honey or hot honey over the cheeses.
- Final Presentation:
- Arrange assembled cups on a serving tray or platter.
- Chill for 10–15 minutes if not serving right away—keeps everything crisp.
- Before serving, give each cup a gentle fluff to showcase all the layers.
Sensory cue: Everything should look vibrant, smell fresh, and feel inviting!
Efficiency Tip: Set up an assembly line—meats, cheeses, produce, extras—so you can fill several cups at once. If anything looks soggy, swap it out (nothing worse than a limp cracker). I’ve learned the hard way: keep wet items like tomatoes away from crunchy elements, and always taste a bite before serving guests!
Cooking Tips & Techniques
I’ve made these charcuterie cups for all kinds of parties and learned a few tricks along the way. Here are the pro tips that make all the difference:
- Balance Textures: Always include something crunchy, creamy, salty, and sweet. It’s the secret to a cup that everyone wants to finish.
- Keep Wet & Dry Separate: Place crackers, breadsticks, and chips above a napkin or liner, and keep juicy fruits and veggies on top or skewered. No one likes a soggy base!
- Stack Smart: Use skewers for height, and tuck smaller items like nuts and dried fruit around the edges for a full, abundant look.
- Work in Batches: I always prep ingredients first, then assemble all cups at once. Saves time and keeps things organized.
- Watch Your Portions: Overfilling cups makes them hard to eat and messy. It’s tempting to add “just one more thing,” but trust me—less is more.
- Personal Failures: The first time I made these, I put grapes on the bottom and ended up with cracker mush. Now, I keep produce on top and use sturdy crackers for the base.
- Timing: Assemble cups up to an hour before serving, then chill. Avoid making them too far ahead, or the textures will suffer.
- Consistency: Use similar ingredients in each cup for uniformity, but add one “surprise” element to keep things fun.
Honestly, these tips come from real, sometimes messy, experience. A little planning goes a long way for stress-free party prep. And if something goes wrong, just laugh it off—Galentine’s is about joy, not perfection!
Variations & Adaptations
One of the best things about these charcuterie cups is how adaptable they are. You can customize every detail to suit different diets, seasons, and tastes. Here are my favorite tweaks:
- Vegetarian Cups: Skip the meats and load up with extra cheeses, hummus, roasted red peppers, and marinated artichokes. My vegetarian friends always rave about this version!
- Gluten-Free Cups: Use rice crackers, seed crisps, or gluten-free pretzels. Swap out breadsticks for veggie sticks like carrot or celery.
- Vegan Cups: Use dairy-free cheese (like Violife or Miyoko’s), vegan deli slices, and plant-based dips. Layer in nuts, olives, and fresh veggies for color and crunch.
- Seasonal Twists: In summer, use fresh berries and basil. For winter, add dried cranberries and candied pecans. Spring cups look gorgeous with edible flowers!
- Flavor Preferences: For a spicy kick, add pepperjack cheese and hot honey. For sweet tooths, add more dried fruit and chocolate.
- Cooking Methods: If you want warm cups, include baked brie bites or warm pita chips. Just prep right before serving so nothing gets soggy.
- Allergen Swaps: Use nut-free elements for allergies, and swap olives for caper berries if you need a lower-sodium option.
Personally, I love adding a little local honey and pistachios for a sweet-savory combo. Don’t be afraid to get creative—these cups are meant to be playful and personalized. There’s no wrong way to build your perfect Galentine’s mini charcuterie cup!
Serving & Storage Suggestions
These charcuterie cups are best served slightly chilled, right out of the fridge. I like to arrange them on a pretty tray, then sprinkle a few extra herbs or edible flowers for wow factor. Honestly, they look gorgeous lined up for party photos—Pinterest gold!
Pair them with sparkling rosé, lemonade, or even a festive mocktail. They’re perfect alongside a cheese board, veggie platter, or some fun dips. For a full spread, add mini sandwiches or fruit skewers.
Storage: If you have leftovers, cover each cup with plastic wrap and refrigerate for up to 24 hours. The crackers may soften a bit, but the flavors meld together in a really tasty way. For longer storage, keep meats and cheeses separate, then assemble fresh before serving.
Reheating: No reheating needed, but if you include baked brie or warm pita chips, give them a quick spin in the microwave (10–20 seconds) before adding to cups.
The flavors develop and mingle over time, so even the next-day cups taste pretty darn delicious. Just avoid freezing—fresh is best for party bites like these!
Nutritional Information & Benefits
Each mini charcuterie cup (approx. 8 oz / 225g) provides an estimated:
- Calories: 250–350
- Protein: 12–18g (thanks to meats and cheeses)
- Carbs: 20–30g (mostly from crackers and fruit)
- Fat: 15–22g (from cheese, nuts, and meats)
Health Benefits: The grapes and strawberries add antioxidants and vitamins. Cheese provides calcium and protein, while nuts offer healthy fats. If you choose gluten-free or vegan options, you can easily tailor these cups to dietary needs.
Potential allergens: dairy, nuts, gluten, and deli meats—always check with guests before serving. Personally, I love that you can make these as light or indulgent as you want. Just swap ingredients to match your wellness goals. After all, celebrations are about joy and balance!
Conclusion
So, why are these Perfect Galentine’s Mini Charcuterie Cups worth making? They’re easy, adorable, and absolutely delicious—no culinary degree required. You can personalize every detail, share with your favorite people, and create party magic with minimal effort.
Whether you’re a charcuterie pro or a first-time snack stacker, these cups deliver flavor, fun, and a whole lot of heart. I love them because they remind me of family traditions and joyful gatherings. And honestly, nothing beats the smiles and happy chatter when everyone digs in.
If you try this recipe, please leave a comment below or tag me on Pinterest—I’d be thrilled to see your creations! Share with friends, adapt for your next celebration, and keep spreading the Galentine’s love. You’ve got this, and your party is about to be unforgettable!
FAQs
Can I make these charcuterie cups ahead of time?
Yes! You can assemble up to an hour before serving and keep them chilled. For best texture, add crackers and crunchy elements right before your guests arrive.
What’s the best way to transport these to a party?
Arrange cups in a deep tray or box, and cover loosely with plastic wrap. If you’re traveling far, keep cold ingredients on ice packs and assemble cups at the venue.
Can I make charcuterie cups vegetarian or vegan?
Absolutely! Use extra cheeses, veggie slices, hummus, and plant-based deli slices. Dairy-free cheese is a great option for vegan cups.
How can I avoid soggy crackers?
Place a cocktail napkin or cupcake liner at the bottom of each cup, and keep juicy items (like tomatoes or grapes) on top or skewered. Add crackers just before serving if possible.
What are some creative ways to decorate charcuterie cups?
Try edible flowers, colorful herbs, mini flags, or themed picks for holidays. Layer bright produce for eye-catching color—Pinterest loves it!
Pin This Recipe!

Perfect Galentine’s Mini Charcuterie Cups

These adorable mini charcuterie cups are the ultimate party appetizer—easy to assemble, endlessly customizable, and perfect for Galentine’s Day or any celebration. Each cup is packed with savory meats, creamy cheeses, crunchy snacks, and fresh produce for a fun, elegant bite-sized treat.
- Prep Time: 20 minutes
- Cook Time: 0 minutes
- Total Time: 20 minutes
- Yield: 8–10 cups
- Category: Appetizer
- Cuisine: American
Ingredients
- Mini disposable cups (8–10 oz, clear or decorative)
- Small cocktail napkins or cupcake liners (for lining)
- Thin-sliced salami (about 8 oz)
- Prosciutto or ham (about 8 oz)
- Turkey or roast beef slices (optional, for variety)
- Cheddar cheese cubes (about 8 oz)
- Mozzarella balls (ciliegine, about 8 oz)
- Brie wedges (about 6 oz)
- Goat cheese crumbles (optional)
- Mini breadsticks or pretzel sticks
- Assorted crackers (small round or square)
- Pita chips or crostini
- Red and green grapes (washed and dried)
- Strawberries, halved
- Cherry tomatoes
- Cucumber slices (thin rounds)
- Olives (green or black, pitted)
- Pickles or cornichons
- Honey or hot honey (for drizzling, optional)
- Assorted nuts (almonds, cashews, or pistachios)
- Dried apricots or figs
- Fresh herbs (rosemary, thyme, parsley—to garnish)
- Dark chocolate squares or kisses
Instructions
- Wash and dry all fresh produce (grapes, strawberries, cherry tomatoes, cucumber slices).
- Slice cheeses into bite-sized cubes or wedges (about 1/2 inch pieces).
- Roll or fold meats into small rosettes or stacks for visual appeal.
- Portion nuts or dried fruit into small handfuls if using.
- Line each mini cup with a cocktail napkin or cupcake liner.
- Add 2–3 pieces of crackers, pretzel sticks, or crostini to the bottom of each cup.
- Arrange 2–3 slices of meat in each cup.
- Stack 2–3 cubes/wedges of cheese beside or on top of the meat.
- Insert a skewer with a mozzarella ball and grape or tomato for height and color.
- Add a few grapes, a strawberry half, and 1–2 cucumber rounds.
- Drop in a couple olives and pickles.
- Sprinkle a pinch of nuts or dried fruit over the top.
- Add a small sprig of fresh herbs.
- Place a chocolate square or kiss in each cup.
- Optional: Drizzle a bit of honey or hot honey over the cheeses.
- Arrange assembled cups on a serving tray or platter.
- Chill for 10–15 minutes if not serving right away.
- Before serving, gently fluff each cup to showcase all the layers.
Notes
For best results, keep wet and dry ingredients separate—place crackers and crunchy items at the bottom, and juicy produce on top or skewered. Assemble cups up to an hour before serving and chill. Customize with your favorite meats, cheeses, and seasonal produce. For gluten-free or vegan options, swap crackers and cheeses as needed.
Nutrition
- Serving Size: 1 mini charcuterie c
- Calories: 300
- Sugar: 8
- Sodium: 650
- Fat: 18
- Saturated Fat: 8
- Carbohydrates: 25
- Fiber: 2
- Protein: 15
Keywords: charcuterie cups, party appetizer, Galentine’s Day, mini charcuterie, snack cups, cheese board, easy entertaining, finger food, girls night, bridal shower