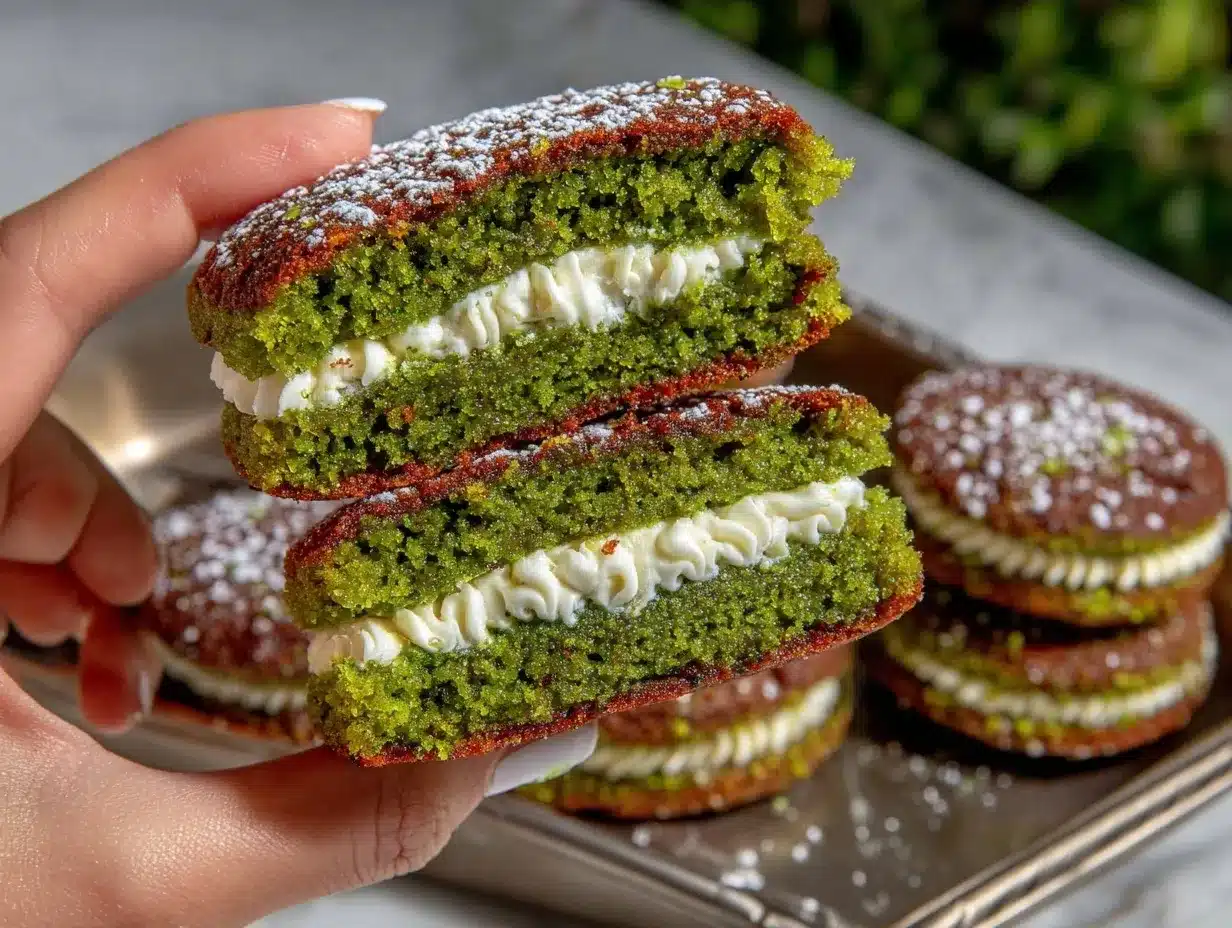
Picture this: you walk into your kitchen, and the sweet, buttery scent of cupcakes mingles with a hint of cocoa and vanilla. The oven glows warmly, casting a soft light over a dozen emerald-green cupcake tops rising into perfect domes. There’s something downright magical about the color—so bold, so cheerful, it almost feels like you’re baking a little luck into every bite. The first time I made these Fluffy Green Velvet Cupcake Sandwiches, I was instantly transported back to childhood St. Patrick’s Days. You know, the ones where everything seemed just a little more special because it was green (milk, eggs, even pancakes—my mom didn’t hold back!).
This recipe, I’ll admit, was born out of pure curiosity and a bit of nostalgia. Years ago, when I was knee-high to a grasshopper, my grandma used to make these pillowy, soft cupcake sandwiches for church bake sales. She always said, “If it’s green, it’s lucky!” (and honestly, people believed her). When I finally got my hands on her not-so-secret recipe, I decided to give it a St. Paddy’s twist—turning classic red velvet into a vibrant, fluffy green treat. The first batch was the kind of moment where you pause, take a deep breath, and just smile because you know you’re onto something truly special.
My family couldn’t stop sneaking these cupcake sandwiches off the cooling rack. Even my husband, who claims he’s “not a dessert person” (is that even real?), went back for seconds. I’ve tested this recipe more times than I can count—in the name of research, of course—and it’s become a staple for St. Patrick’s Day parties, school treats, and gifting to neighbors. These Fluffy Green Velvet Cupcake Sandwiches have a way of brightening up any occasion—perfect for potlucks, class parties, or just adding a pop of color to your Pinterest board. Seriously, they feel like a warm hug from a leprechaun, and you’re going to want to bookmark this one!
Why You’ll Love These Fluffy Green Velvet Cupcake Sandwiches
As someone who’s spent far too many late nights perfecting cupcakes (and occasionally eating the rejects), I can say these Fluffy Green Velvet Cupcake Sandwiches are the real deal. Here’s what makes them a must-bake for St. Patrick’s Day—or honestly, any day you want to bring a little joy and whimsy to your kitchen:
- Quick & Easy: These come together in under an hour, so you’re not stuck in the kitchen all day. Perfect when you’re juggling party prep, kids, or just want a sweet treat fast.
- Simple Ingredients: No fancy grocery trips needed. You probably have everything you need right in your pantry (and if you don’t, I’ve got easy swaps below).
- Perfect for Celebrations: Whether it’s a classroom party, potluck, or just an excuse to make something green, these always steal the show. They’re as cute as they are delicious.
- Crowd-Pleaser: Kids love the bright color, adults love the soft texture and not-too-sweet filling. I’ve never seen a plate come back with leftovers.
- Unbelievably Delicious: The flavor is classic velvet—subtle cocoa, vanilla, and that signature tang from buttermilk—while the filling is creamy, dreamy, and never too heavy.
What sets this recipe apart? It’s the texture—seriously, these are some of the fluffiest cupcakes you’ll ever taste. I use a special (but easy) mixing method to keep them ultra-light, and a hint of white vinegar for extra tenderness. And let’s face it, anything with a bold green hue is just more fun to eat. I’ve tested a few different green food colorings, and I’ll share my go-to brand down below so you get that perfect pop.
This isn’t just another cupcake recipe. It’s the kind of treat that makes you pause after the first bite, close your eyes, and just enjoy the moment. It’s comfort in cupcake form—fun, festive, and totally unforgettable. If you want to impress guests without a lot of stress, or just want the best St. Patrick’s Day treat on the block, these Fluffy Green Velvet Cupcake Sandwiches are exactly what you need.
What Ingredients You Will Need
This recipe uses simple, wholesome ingredients to deliver bold flavor and a pillowy-soft texture—no fancy stuff, just good old-fashioned baking magic. Most are pantry staples, and if you’re missing something, don’t worry—I’ve included my favorite substitutions. Here’s what you’ll need for the best green velvet cupcake sandwiches ever:
- For the Green Velvet Cupcakes:
- 1 1/2 cups (190g) all-purpose flour (I recommend King Arthur for consistent results)
- 1 cup (200g) granulated sugar
- 1 tablespoon unsweetened cocoa powder (Dutch-process or natural, both work—Hershey’s is my pick)
- 1/2 teaspoon baking soda
- 1/2 teaspoon salt
- 1 large egg, room temperature
- 1/2 cup (120ml) vegetable oil (canola or light olive oil works too)
- 1/2 cup (120ml) buttermilk, room temperature (see notes for a homemade substitute)
- 2 teaspoons vanilla extract (pure vanilla if you can swing it)
- 1 teaspoon white vinegar (adds tenderness)
- 1 tablespoon green food coloring (I use Americolor Leaf Green for that bright St. Paddy’s pop; Wilton also works well)
- For the Cream Cheese Filling:
- 4 ounces (113g) cream cheese, softened
- 2 tablespoons (28g) unsalted butter, softened
- 1 cup (120g) powdered sugar, sifted
- 1/2 teaspoon vanilla extract
- Pinch of salt
Ingredient Tips & Swaps:
- Buttermilk: If you don’t have it, just add 1/2 tablespoon lemon juice or white vinegar to a measuring cup, fill to 1/2 cup with milk, stir, and let sit for 5 minutes.
- Food Coloring: Gel colors give the best, brightest hue. Start with less than you think—you can always add more.
- Gluten-Free: Use a 1:1 gluten-free flour blend (like Bob’s Red Mill).
- Dairy-Free: Swap cream cheese and butter for plant-based alternatives (I like Kite Hill and Miyoko’s for best consistency).
- Egg-Free: Use a flax egg (1 tablespoon ground flaxseed + 2.5 tablespoons water, mixed and rested for 5 minutes).
Honestly, these ingredients come together in such a forgiving way. I’ve subbed in Greek yogurt for cream cheese once in a pinch, and it was still delicious. You can even add a handful of mini chocolate chips or a sprinkle of green sanding sugar if you’re feeling extra festive. The recipe is flexible, so don’t be afraid to make it your own!
Equipment Needed
You don’t need a ton of fancy tools to whip up these Fluffy Green Velvet Cupcake Sandwiches. Here’s what I use in my kitchen (plus a few budget-friendly alternatives):
- 12-cup muffin tin – Nonstick is ideal, but any standard pan works. Paper liners make cleanup a breeze.
- Mixing bowls – At least two: one for wet, one for dry. Glass or stainless steel—whatever you’ve got.
- Hand mixer or stand mixer – For the filling. If you don’t have one, a sturdy whisk and some elbow grease will do the trick.
- Measuring cups and spoons – Accurate measurements help with texture. I love my OXO set for durability.
- Rubber spatula – For folding and scraping (no batter left behind!).
- Wire rack – For cooling. If you don’t have one, just set cupcakes on a clean kitchen towel.
- Piping bag (optional) – For neat filling, but a zip-top bag with the corner snipped works, too.
I’ve made these with just a bowl and a wooden spoon when all my gadgets were dirty—you might need a little extra muscle, but it’s totally doable. For specialty tools, a basic muffin pan and hand mixer will serve you well for years (just don’t put nonstick pans in the dishwasher, they’ll last longer!). Budget tip: check thrift stores for baking pans—some of my best finds cost less than a cup of coffee.
How to Make Fluffy Green Velvet Cupcake Sandwiches
-
Prep Your Pan and Oven:
Preheat your oven to 350°F (175°C). Line a 12-cup muffin tin with paper liners or grease well with nonstick spray. (Trust me, green cupcakes like to stick!) -
Mix Dry Ingredients:
In a medium bowl, whisk together 1 1/2 cups (190g) flour, 1 cup (200g) sugar, 1 tablespoon cocoa powder, 1/2 teaspoon baking soda, and 1/2 teaspoon salt until well combined. -
Blend Wet Ingredients:
In a separate large bowl, whisk 1 large egg, 1/2 cup (120ml) oil, 1/2 cup (120ml) buttermilk, 2 teaspoons vanilla, 1 teaspoon vinegar, and 1 tablespoon green food coloring. It’ll look wild—don’t worry, that’s what you want! -
Combine Wet and Dry:
Add the dry ingredients to the wet, stirring gently with a spatula until just combined. Do not overmix; a few lumps are okay. (Overmixing = dense cupcakes. Learned that the hard way.) The batter should be thick but scoopable, and a deep, vibrant green. -
Fill and Bake:
Using a cookie scoop or spoon, fill each muffin cup about 2/3 full. Bake for 16-18 minutes, or until a toothpick inserted in the center comes out clean (mine are perfect at 17 minutes). The tops will spring back when lightly pressed. -
Cool Completely:
Let cupcakes cool in the pan for 5 minutes, then transfer to a wire rack to cool fully. (If you try to fill them while warm, the filling will melt—ask me how I know!) -
Make the Cream Cheese Filling:
In a mixing bowl, beat 4oz (113g) cream cheese and 2 tablespoons (28g) butter until smooth and fluffy, about 2 minutes. Add 1 cup (120g) sifted powdered sugar, 1/2 teaspoon vanilla, and a pinch of salt. Beat until creamy and light. -
Assemble the Sandwiches:
Once cupcakes are cool, gently slice each in half horizontally. Pipe or spread about 1 tablespoon of filling onto the bottom half, then top with the other half. Press gently to sandwich together. -
Decorate (Optional):
Sprinkle with green sanding sugar, edible glitter, or add festive sprinkles to the edges for extra pizazz! -
Chill or Serve:
For the neatest sandwiches, chill for 10-15 minutes before serving. This helps the filling set. But if you can’t wait (I usually can’t), go ahead and enjoy right away—they’re a little messier, but just as tasty!
Troubleshooting Notes: If cupcakes sink, check your oven temp—mine runs hot, so I use an oven thermometer. If your filling is runny, pop it in the fridge for 10 minutes to firm up before assembling. And if you overbake, don’t panic—the filling brings back moisture!
Cooking pipeline: Tips & Techniques for Fluffy Green Velvet Cupcake Sandwiches
There’s more to these cupcakes than just mixing and baking. Here are some personal strategies I’ve picked up over (many) batches—little tweaks and secrets that turn good cupcakes into truly fluffy green velvet cupcake sandwiches.
- Room Temperature Ingredients: I know it’s tempting to skip, but cold eggs or buttermilk will mess with your cupcake rise. Let them sit out for 30 minutes before starting.
- Don’t Overmix: Once you add flour, gently fold just until you can’t see dry streaks. Overmixing activates gluten, making cupcakes tough instead of tender. Been there, regretted that.
- Use Gel Food Coloring: Liquid food coloring can water down your batter. Gel gives you that brilliant green without thinning things out. A little goes a long way!
- Fill Muffin Cups Evenly: For uniform sandwiches, use a cookie scoop. If you don’t have one, an ice cream scoop or two spoons work in a pinch.
- Check for Doneness Early: Every oven bakes a little differently. Cupcakes are done when they spring back to a light touch, even if the toothpick isn’t spotless (a few crumbs are fine).
- Cool Completely Before Filling: I can’t stress this enough! Warm cupcakes will melt your cream cheese filling into a puddle. Patience pays off here.
- Make Filling Ahead: If you’re short on time, make the filling a day in advance. Keep it covered in the fridge, then let it soften for 10 minutes before spreading.
- For Perfectly Clean Cuts: Use a serrated knife to halve cupcakes. It helps prevent crumbling (just go slow and steady).
- Try Freezing Before Assembling: If your kitchen is warm, freeze cooled cupcakes for 10 minutes before slicing and filling. They’ll hold their shape better and make less mess.
Honestly, every batch teaches me something new. If you run into trouble, don’t sweat it—most mistakes are fixable with a little creativity (or extra filling!).
Variations & Adaptations
One of the best things about these Fluffy Green Velvet Cupcake Sandwiches is how customizable they are. Here’s how you can make them your own, whether you’re dealing with allergies, picky eaters, or just feeling creative:
- Gluten-Free: Use a 1:1 gluten-free flour blend. I’ve had great success with Bob’s Red Mill. The texture stays fluffy and the cupcakes hold together well.
- Dairy-Free: Swap the buttermilk for almond or oat milk (add 1/2 tablespoon vinegar or lemon juice). Use dairy-free cream cheese and butter—Kite Hill and Earth Balance are my picks. The flavor is still amazing, and nobody ever notices the difference!
- Chocolate Mint: Add 1/2 teaspoon peppermint extract to the batter and/or the filling. It turns these into a Thin Mint-inspired treat that’s super refreshing for spring.
- Red Velvet Remix: For Valentine’s Day or Christmas, swap green food coloring for red, pink, or even blue. The base recipe works with any color you like.
- Funfetti Style: Fold in 1/4 cup rainbow sprinkles to the batter before baking for a festive twist—kids go wild for these!
- Nut-Free: This recipe is naturally nut-free, but double-check your food coloring and fillings for hidden allergens if you’re baking for a crowd.
Personally, my favorite twist is adding a thin layer of raspberry jam with the cream cheese filling—just a teaspoon or two makes each bite tangy and sweet. If you’re feeling adventurous, try sandwiching with marshmallow fluff or peanut butter frosting. The possibilities are endless, and you never know when you’ll stumble on a new family tradition!
Serving & Storage Suggestions
These Fluffy Green Velvet Cupcake Sandwiches are best enjoyed at room temperature when the filling is soft and creamy but not runny. For a party, arrange them on a festive platter or tiered cake stand—add a sprinkle of green sugar or gold coins for extra St. Paddy’s Day flair. They’re adorable on a dessert table and totally Instagrammable (trust me, they get plenty of likes!).
Pair with cold milk, Irish coffee, or a cup of hot tea for the ultimate treat. If you’re serving at a party, I love to make a double batch—these disappear fast. They’re also great with fresh berries on the side or a scoop of vanilla ice cream for something really decadent.
To store, place assembled cupcake sandwiches in an airtight container in the fridge for up to 3 days. If you want to keep them longer, freeze unfilled cupcake halves for up to a month, then thaw and fill before serving. For best texture, let refrigerated cupcakes sit at room temp for 15-20 minutes before eating. The flavors actually deepen a bit overnight, and the filling sets up beautifully—so these are just as good (if not better) the next day.
Nutritional Information & Benefits
Each Fluffy Green Velvet Cupcake Sandwich (based on a batch of 12) has an estimated 210 calories, 9g fat, 30g carbohydrates, and 2g protein. The cupcakes are a sweet treat, yes, but with real buttermilk for a little calcium and a filling that’s not overly heavy, they’re a lighter take on classic velvet cake. There’s no artificial flavoring—just cocoa, vanilla, and real dairy for the best taste.
Dietary notes: These can be made gluten-free or dairy-free with simple swaps. They’re naturally nut-free, and you can adapt them for egg allergies as well. For anyone watching sugar intake, you can reduce the sugar by 2-3 tablespoons without losing texture.
In my house, dessert is all about balance—indulgence with a little common sense. These cupcakes feel special, but not over-the-top, and they always bring a little extra happiness to the table!
Conclusion
There’s just something joyful about baking (and eating) these Fluffy Green Velvet Cupcake Sandwiches. They’re a little whimsical, a lot delicious, and exactly the kind of treat that turns a regular day into a celebration. Whether you’re making them for St. Patrick’s Day, a birthday, or just because you want to see your family smile, these cupcake sandwiches are worth every minute.
Don’t be afraid to put your own spin on things—change the color, swap the filling, add a sprinkle of something fun. That’s the beauty of baking at home! Personally, I love this recipe because it reminds me of happy, green-filled childhood celebrations, and it’s become a tradition my whole family looks forward to every year.
If you try these, I’d love to hear how they turned out! Drop a comment below, share your creations on Pinterest, or let me know your favorite twist. Happy baking, and may a little luck always find you in the kitchen!
Frequently Asked Questions
Can I make these Fluffy Green Velvet Cupcake Sandwiches ahead of time?
Absolutely! You can bake the cupcake halves a day in advance and store them in an airtight container. Fill and assemble the sandwiches the day you plan to serve for best texture.
What’s the best way to get that bright green color?
Gel food coloring is your friend! Brands like Americolor or Wilton give the best, most vivid green without watering down your batter.
How do I make these gluten-free?
Just swap in a 1:1 gluten-free flour blend for the all-purpose flour. Everything else stays the same, and the texture is still super fluffy.
Can I freeze the cupcake sandwiches?
Yes—freeze the unfilled cupcake halves in a freezer bag for up to a month. Thaw, fill, and assemble when you’re ready to serve. Assembled sandwiches can be frozen, but the filling may get a little soft when thawed.
What if I don’t have buttermilk?
No worries! Mix 1/2 tablespoon lemon juice or vinegar with enough milk to make 1/2 cup. Let it sit for 5 minutes, and you’ve got a quick buttermilk substitute.
Pin This Recipe!

Fluffy Green Velvet Cupcake Sandwiches
These Fluffy Green Velvet Cupcake Sandwiches are a festive, pillowy-soft treat perfect for St. Patrick’s Day or any celebration. Classic velvet flavor with a creamy, not-too-sweet filling, they’re easy to make and guaranteed to bring a pop of color and joy to your table.
- Prep Time: 20 minutes
- Cook Time: 18 minutes
- Total Time: 38 minutes
- Yield: 12 cupcake sandwiches 1x
- Category: Dessert
- Cuisine: American
Ingredients
- 1 1/2 cups all-purpose flour
- 1 cup granulated sugar
- 1 tablespoon unsweetened cocoa powder
- 1/2 teaspoon baking soda
- 1/2 teaspoon salt
- 1 large egg, room temperature
- 1/2 cup vegetable oil
- 1/2 cup buttermilk, room temperature
- 2 teaspoons vanilla extract
- 1 teaspoon white vinegar
- 1 tablespoon green food coloring (gel preferred)
- 4 ounces cream cheese, softened
- 2 tablespoons unsalted butter, softened
- 1 cup powdered sugar, sifted
- 1/2 teaspoon vanilla extract
- Pinch of salt
Instructions
- Preheat oven to 350°F (175°C). Line a 12-cup muffin tin with paper liners or grease well with nonstick spray.
- In a medium bowl, whisk together flour, sugar, cocoa powder, baking soda, and salt.
- In a separate large bowl, whisk together egg, oil, buttermilk, vanilla extract, vinegar, and green food coloring.
- Add dry ingredients to wet ingredients and stir gently with a spatula until just combined. Do not overmix.
- Fill each muffin cup about 2/3 full with batter.
- Bake for 16-18 minutes, or until a toothpick inserted in the center comes out clean. Tops should spring back when lightly pressed.
- Let cupcakes cool in the pan for 5 minutes, then transfer to a wire rack to cool completely.
- For the filling: In a mixing bowl, beat cream cheese and butter until smooth and fluffy, about 2 minutes. Add powdered sugar, vanilla, and salt; beat until creamy and light.
- Once cupcakes are cool, slice each in half horizontally. Pipe or spread about 1 tablespoon of filling onto the bottom half, then top with the other half to make a sandwich.
- Decorate with green sanding sugar, edible glitter, or festive sprinkles if desired.
- Chill sandwiches for 10-15 minutes before serving for neatest results, or serve immediately.
Notes
For best results, use room temperature ingredients and gel food coloring for a vibrant green hue. Do not overmix the batter to keep cupcakes fluffy. Cupcakes can be made gluten-free or dairy-free with simple swaps. Chill assembled sandwiches for cleaner cuts and neater presentation. Store in an airtight container in the fridge for up to 3 days.
Nutrition
- Serving Size: 1 cupcake sandwich
- Calories: 210
- Sugar: 18
- Sodium: 180
- Fat: 9
- Saturated Fat: 4
- Carbohydrates: 30
- Fiber: 1
- Protein: 2
Keywords: green velvet, cupcake sandwiches, St. Patrick’s Day, cream cheese filling, easy dessert, festive cupcakes, velvet cake, party treats