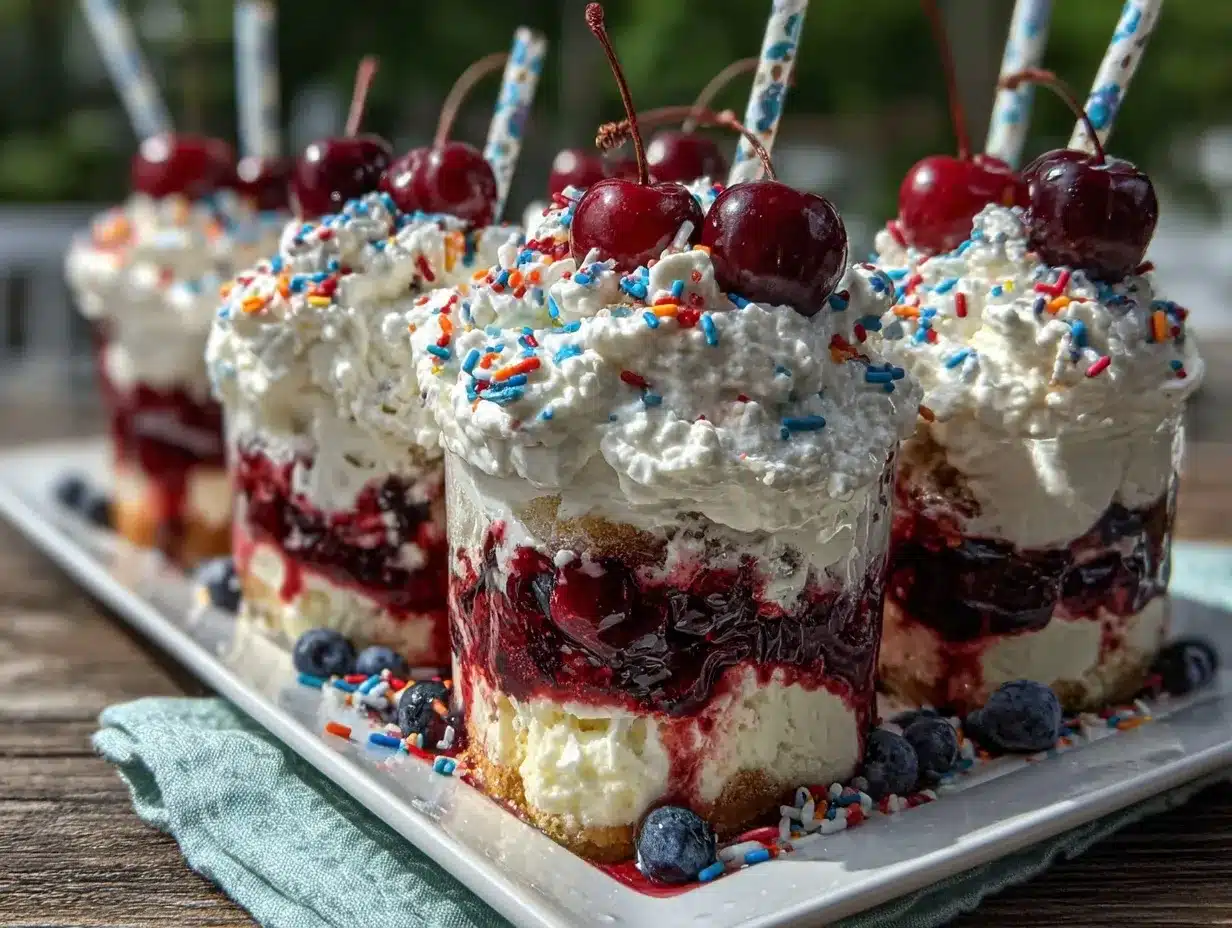
Let me just say, the first whiff of sweet vanilla and berry swirling through my kitchen when I whipped up these Dr. Seuss Red & Blue Pudding Parfaits was almost magical. The colors pop out at you in the most playful way—bright, bold reds and blues layered like something straight out of a storybook. The first time I made these, I was trying to create a fun dessert for my niece’s birthday party, and the kids literally squealed when they saw the parfaits lined up. You know that moment when you set something down and everyone gets quiet, then suddenly there’s a rush of excitement? That’s what happened. It’s the kind of moment where you pause, take a deep breath, and just smile because you know you’re onto something truly special.
I still remember being knee-high to a grasshopper, reading Dr. Seuss books with my grandma on rainy afternoons. These parfaits bring back all that nostalgia—whimsical, colorful, and just a little bit mischievous. Honestly, I wish I’d stumbled across this idea years ago. It’s dangerously easy to make, but it looks like something you’d find at the fanciest bake sale or a Pinterest-perfect party spread.
My family couldn’t stop sneaking spoonfuls off the tray (and I don’t blame them one bit). The layers are soft and creamy, the colors are cheerful—pure, nostalgic comfort. These parfaits are perfect for birthday parties, classroom treats, or anytime you want to add a splash of color to your table. Whether you’re hosting a Dr. Seuss-themed bash or just want to brighten up a rainy weekend, this is one dessert that’ll have everyone grinning. I tested this recipe multiple times (in the name of research, of course) and now it’s a staple for family gatherings, gifting, and even casual weekend fun. It feels like a warm hug, and honestly—you’re going to want to bookmark this one.
Why You’ll Love These Whimsical Dr. Seuss Red & Blue Pudding Parfaits
I’ve made these pudding parfaits for more parties than I can count, and every time, they steal the show. There’s just something about bold colors and creamy layers that makes people smile. I’ve tweaked and tested the recipe through plenty of busy weekends and birthday bashes, and it’s honestly my go-to when I need a dessert that’s both fun and fuss-free.
- Quick & Easy: These Dr. Seuss Red & Blue Pudding Parfaits come together in under 30 minutes—no baking, no complicated steps, just simple layering.
- Simple Ingredients: You won’t need any fancy stuff. The ingredients are all pantry staples or easy finds at your local grocery store.
- Perfect for Parties: Whether it’s a birthday, a classroom event, or just a sleepover, these parfaits are a hit. I’ve made them for everything from baby showers to book club get-togethers.
- Crowd-Pleaser: Kids and adults both love the creamy texture and playful colors. I’ve watched even the pickiest eaters happily dig in.
- Unbelievably Delicious: The mix of vanilla and berry flavors, with a hint of crunch from the cookie layer, creates the kind of comfort that makes you close your eyes after the first bite.
What sets this recipe apart? The technique is simple—layering colored pudding with crumbled cookies gives you that fun, striped look without any special equipment. I use a blend of instant vanilla pudding and berry-flavored gelatin for the colors, which keeps everything smooth and creamy. Plus, if you want to make it low-sugar or gluten-free, it’s easily adaptable. This dessert is more than just good—it’s a little burst of celebration in every spoonful. It’s comfort food reimagined: quick, bright, and so satisfying. Perfect for impressing guests without the stress, or for turning an ordinary day into something memorable.
What Ingredients You Will Need
This recipe uses simple, wholesome ingredients to deliver bold flavor and satisfying texture without the fuss. Everything you need is probably already in your kitchen, and if not, it’s easy to swap in alternatives. Here’s what you’ll need to make Dr. Seuss Red & Blue Pudding Parfaits for your next party:
- For the Red Layer:
- Strawberry gelatin, 1 (3 oz/85 g) box (or raspberry gelatin for a slightly tart twist)
- Boiling water, 1 cup (240 ml)
- Ice water, 1 cup (240 ml)
- For the Blue Layer:
- Blue raspberry gelatin, 1 (3 oz/85 g) box (or berry blue gelatin—both work well)
- Boiling water, 1 cup (240 ml)
- Ice water, 1 cup (240 ml)
- For the Pudding Layer:
- Instant vanilla pudding mix, 1 (3.4 oz/96 g) box
- Cold milk, 2 cups (480 ml) (whole milk for extra richness, or use almond milk for dairy-free)
- Optional: a few drops of red or blue food coloring to make layers extra vibrant
- For Crunchy Layers:
- Shortbread cookies or graham crackers, 1 cup (100 g), crushed (adds texture and a buttery flavor)
- Topping:
- Whipped cream, 1 cup (240 ml) (store-bought or homemade, your call!)
- Sprinkles in red and blue (optional, for extra whimsy)
Ingredient Selection Tips: For best results, I recommend Jell-O and Royal pudding brands—they always give me a smooth, consistent texture. If you want to go gluten-free, swap in gluten-free cookies for the crunchy layer. For a lower-sugar option, use sugar-free pudding and gelatin. In summer, fresh strawberries and blueberries make a lovely garnish on top! If you’re making these for a crowd, double the recipe and use mini cups for easy serving.
Substitutions: You can use Greek yogurt instead of pudding for a tangy, protein-rich layer, or swap coconut whipped cream for dairy-free needs. For a more natural color, try a few drops of beet juice for red and blueberry juice for blue. Honestly, there’s no wrong way to build these parfaits—the fun is in the layering!
Equipment Needed
- Parfait glasses or clear cups: I love using small mason jars or clear plastic cups for parties. It shows off the layers perfectly. If you don’t have parfait glasses, any clear container will do.
- Mixing bowls: At least two, one for each gelatin color and one for pudding.
- Whisk or electric mixer: A hand whisk works, but a mixer makes the pudding fluffy in seconds.
- Spoons: For layering and smoothing out each layer—one for each color to avoid mixing.
- Measuring cups and spoons: For precision (especially with gelatin and pudding mixes).
- Plastic wrap: If you’re prepping ahead, use this to cover the parfaits before chilling.
If you’re short on fancy parfait glasses, don’t sweat it—clear disposable cups are a budget-friendly lifesaver for big parties. I’ve used everything from wine glasses to tiny jam jars. For crushing cookies, a rolling pin and a zip-top bag work wonders (I’ve even used a potato masher in a pinch—no judgment!). Just wash mixing tools quickly between layers to keep colors bright. That’s a tip I learned the hard way after ending up with a slightly purple pudding once!
Preparation Method
- Prepare the Red Gelatin Layer:
- Empty the strawberry gelatin into a mixing bowl.
- Pour 1 cup (240 ml) boiling water over the gelatin and stir until dissolved (about 2 minutes).
- Add 1 cup (240 ml) ice water, stir to combine.
- Let cool for 10-15 minutes. Tip: If you want a firmer layer, chill in the fridge while preparing other layers.
- Prepare the Blue Gelatin Layer:
- Repeat the same process with blue raspberry gelatin: dissolve in 1 cup (240 ml) boiling water, stir, add 1 cup (240 ml) ice water.
- Let cool for 10-15 minutes.
- Prepare Vanilla Pudding:
- In a separate bowl, whisk together instant vanilla pudding mix and 2 cups (480 ml) cold milk for about 2 minutes.
- Let stand for 5 minutes until thickened.
- If you want to color the pudding, add a few drops of food coloring and stir well.
- Tip: Pudding should be smooth, not lumpy—if it’s too thin, refrigerate for another 5 minutes.
- Crush Cookies:
- Place cookies or graham crackers in a zip-top bag and crush with a rolling pin until you have coarse crumbs.
- Set aside for layering.
- Layer the Parfaits:
- Start with a spoonful of red gelatin at the bottom of each parfait glass.
- Add a layer of crushed cookies (about 1 tablespoon / 10 g per glass).
- Follow with a layer of vanilla pudding (about 2 tablespoons / 30 g).
- Repeat with blue gelatin, more cookies, and another layer of pudding.
- Continue layering until glasses are full or you run out of ingredients.
- Smooth each layer with the back of a spoon for neat stripes.
- If using food coloring, alternate colored pudding layers for extra wow factor.
- Tip: Chill parfaits for 30 minutes before serving for best texture.
- Top and Decorate:
- Add a generous dollop of whipped cream on top of each parfait.
- Sprinkle red and blue sprinkles or add fresh berries for extra whimsy.
- Serve chilled.
Preparation Notes: If you’re making these ahead, cover each glass with plastic wrap and refrigerate. The pudding and gelatin layers set up nicely overnight. If you run into runny pudding, whisk in an extra tablespoon of mix or chill a bit longer. The key is in the layering—don’t rush, and use a steady hand for those neat stripes. Trust me, I’ve made a few “abstract art” versions when I got impatient!
Cooking Tips & Techniques
Let’s face it, these Dr. Seuss Red & Blue Pudding Parfaits aren’t rocket science, but a few tricks make all the difference. I learned early on that the order of layering matters—always start with the firmer gelatin, then pudding, then cookies. If you go pudding first, the gelatin can seep down and mix, making the colors muddy (been there, done that!).
Chill each layer for 10 minutes before adding the next if you want crisp, defined stripes. For big batches, make all the pudding and gelatin in advance, then set up a little assembly line. Kids love helping with the layering—just expect a little mess and a lot of giggles.
Common mistakes? Over-mixing the pudding with food coloring can make it runny; just fold the color gently. If your cookies get soggy, add them right before serving or use a firmer cookie like shortbread. I once used graham crackers and let them sit overnight—they turned into a soft cake-like layer, which wasn’t bad, but not the classic crunch I wanted.
For multitasking, prep all the layers first, then do the assembly. If you’re serving a crowd, use mini cups and a cookie scoop for quick portioning. For consistent results, always measure ingredients—guesswork leads to uneven layers or bland pudding. And don’t be afraid to get creative! Swirl colors or add a surprise layer of fruit for extra fun. The best part? Even if the stripes aren’t perfect, the taste still wows every time.
Variations & Adaptations
One of my favorite things about these whimsical parfaits is how easily you can switch things up. Here are some fun twists I’ve tried (and loved):
- Dietary Variations: Make them gluten-free by using gluten-free cookies or granola. For dairy-free, swap almond milk in the pudding and use coconut whipped cream.
- Seasonal Flavors: In summer, swap out the gelatin for fresh pureed strawberries and blueberries, layered with vanilla yogurt instead of pudding. In winter, add a pinch of cinnamon to the cookies for a warm touch.
- Flavor Twists: Try chocolate pudding instead of vanilla for a richer parfait, or add a layer of lemon pudding for a zesty contrast.
- Cooking Methods: If you don’t have gelatin, use colored fruit purees thickened with a little cornstarch—it gives a natural look and taste.
- Personal Favorite: I once added a layer of mini marshmallows between the cookies and pudding—total hit with the kids!
- Allergen Substitutions: Use seed-based cookies for nut-free parties and double-check all labels if making for allergy-sensitive guests.
You can even make a giant trifle for a centerpiece or use tiny shot glasses for mini servings. Whatever the occasion, these parfaits are easy to adapt. I say, let your imagination run wild—just like Dr. Seuss would!
Serving & Storage Suggestions
Serve these Dr. Seuss Red & Blue Pudding Parfaits chilled for the best texture and flavor. I love presenting them in clear glasses on a bright tray—it’s a showstopper for any dessert table. Add a swirl of whipped cream and a sprinkle of colored sugar or edible glitter for extra party vibes.
Pair with simple snacks like cheese sticks or fruit kabobs for kids’ parties. For grown-ups, these go surprisingly well with sparkling lemonade or a light Moscato.
Storage: Parfaits keep well in the fridge for up to 2 days. Cover each glass with plastic wrap to prevent drying out. For longer storage, skip the whipped cream topping and add it just before serving. If you want to freeze, use freezer-safe containers—just let the parfaits thaw in the fridge for a few hours before enjoying. Reheat? Not needed—these are best cold!
Flavors deepen overnight, especially if the cookies soak up a bit of the pudding. Just watch the cookie layer—it can get soft, so add fresh crumbs if you want extra crunch at serving time.
Nutritional Information & Benefits
Each Dr. Seuss Red & Blue Pudding Parfait is about 220 calories, with roughly 6g fat, 34g carbohydrates, and 4g protein (assuming standard ingredients and serving size). If you use low-fat milk and sugar-free pudding, the calories drop even more!
Key ingredients like milk and fruit provide calcium and vitamin C. If you swap in Greek yogurt, you’ll add a boost of protein. Gluten-free and dairy-free adaptations are easy, making these parfaits suitable for most dietary needs. Allergens? Watch for dairy in pudding and whipped cream, and gluten in cookies. Always check labels if serving guests with allergies.
Personally, I like knowing that even party desserts can be made a little lighter. These parfaits aren’t just pretty—they’re a sweet treat you can feel good sharing!
Conclusion
If you’re looking for a dessert that’s big on color and even bigger on smiles, Dr. Seuss Red & Blue Pudding Parfaits are the way to go. They’re easy, adaptable, and absolutely adorable on any party table. I love how you can tweak the layers to suit any taste or event, and let’s be real—everyone loves a dessert that’s as fun to look at as it is to eat.
Don’t be afraid to get creative with the flavors, colors, or toppings. The best recipes are the ones you make your own. Personally, these parfaits always remind me of family, laughter, and those little moments that turn ordinary days into celebrations.
Give this recipe a try, then tell me in the comments how you adapted it for your own party! Share your photos, pin it to your boards, and spread the whimsy. Happy layering—and may your parties be as colorful as your desserts!
FAQs
Can I make these parfaits ahead of time?
Yes! Assemble the layers (except whipped cream and sprinkles) and refrigerate up to 24 hours. Add toppings just before serving for best texture.
What if I can’t find blue gelatin?
Try berry blue or blue raspberry flavors. If those aren’t available, mix a bit of natural blue food coloring into plain gelatin or pudding for a similar effect.
Are these parfaits gluten-free?
They can be! Just use gluten-free cookies or granola for the crunchy layer. Double-check all packaged ingredients for hidden gluten.
Can I use homemade pudding instead of instant?
Absolutely. Homemade pudding works great—just make sure it’s thick enough to layer without running. Chill it well before assembling.
How do I keep the layers neat and defined?
Chill each layer for 10 minutes before adding the next. Use the back of a spoon to gently smooth each layer. Patience pays off for those picture-perfect stripes!
Pin This Recipe!
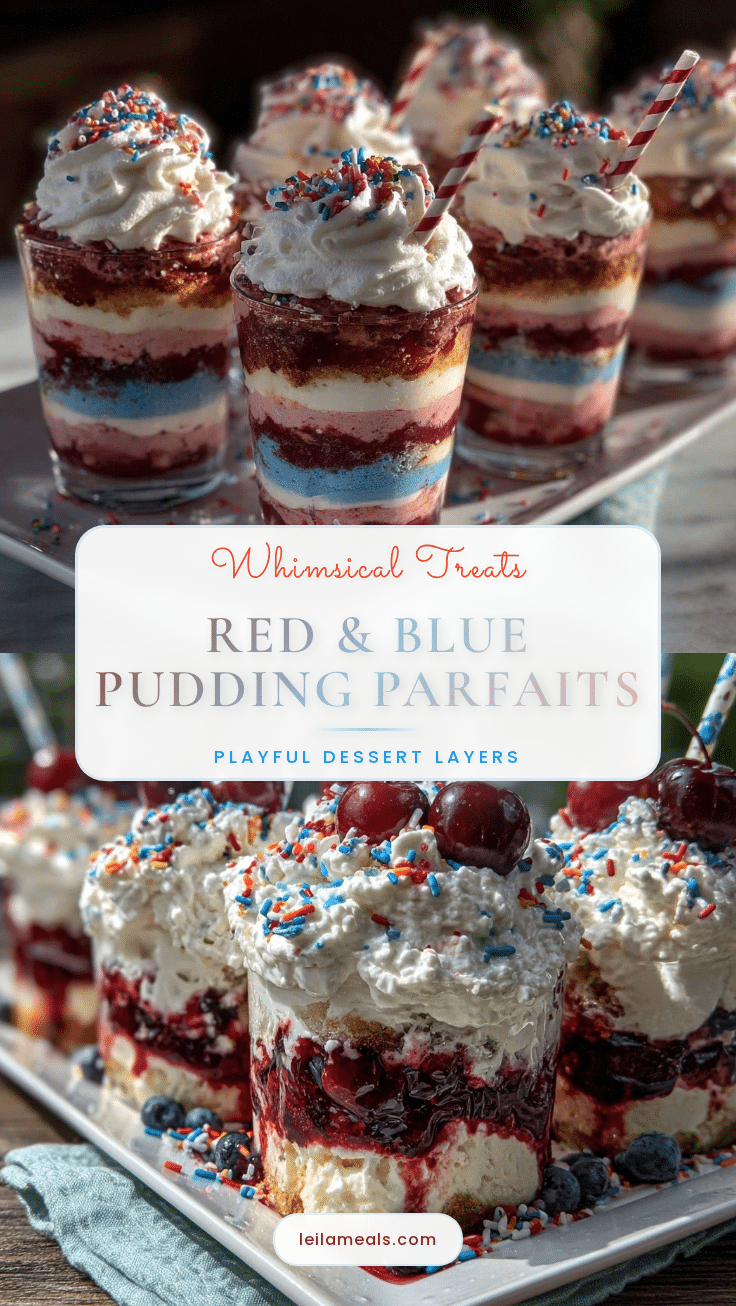
Dr. Seuss Red & Blue Pudding Parfaits for Parties
These whimsical parfaits feature vibrant red and blue gelatin, creamy vanilla pudding, and crunchy cookie layers, making them a playful and easy dessert for parties, birthdays, or any festive occasion. Quick to assemble and endlessly adaptable, they’re a guaranteed crowd-pleaser for kids and adults alike.
- Prep Time: 15 minutes
- Cook Time: 0 minutes
- Total Time: 30 minutes
- Yield: 6 servings 1x
- Category: Dessert
- Cuisine: American
Ingredients
- 1 (3 oz) box strawberry gelatin (or raspberry gelatin)
- 1 cup boiling water
- 1 cup ice water
- 1 (3 oz) box blue raspberry gelatin (or berry blue gelatin)
- 1 cup boiling water
- 1 cup ice water
- 1 (3.4 oz) box instant vanilla pudding mix
- 2 cups cold milk (whole milk or almond milk for dairy-free)
- Optional: a few drops of red or blue food coloring
- 1 cup shortbread cookies or graham crackers, crushed
- 1 cup whipped cream (store-bought or homemade)
- Red and blue sprinkles (optional)
- Fresh strawberries and blueberries for garnish (optional)
Instructions
- Prepare the red gelatin layer: Empty strawberry gelatin into a mixing bowl. Pour 1 cup boiling water over the gelatin and stir until dissolved (about 2 minutes). Add 1 cup ice water, stir to combine. Let cool for 10-15 minutes. For a firmer layer, chill in the fridge while preparing other layers.
- Prepare the blue gelatin layer: Repeat the same process with blue raspberry gelatin—dissolve in 1 cup boiling water, stir, add 1 cup ice water. Let cool for 10-15 minutes.
- Prepare vanilla pudding: In a separate bowl, whisk together instant vanilla pudding mix and 2 cups cold milk for about 2 minutes. Let stand for 5 minutes until thickened. If desired, add a few drops of food coloring and stir well.
- Crush cookies: Place cookies or graham crackers in a zip-top bag and crush with a rolling pin until you have coarse crumbs. Set aside for layering.
- Layer the parfaits: Start with a spoonful of red gelatin at the bottom of each parfait glass. Add a layer of crushed cookies (about 1 tablespoon per glass). Follow with a layer of vanilla pudding (about 2 tablespoons). Repeat with blue gelatin, more cookies, and another layer of pudding. Continue layering until glasses are full or you run out of ingredients. Smooth each layer with the back of a spoon for neat stripes. Alternate colored pudding layers for extra vibrancy if using food coloring. Ch…
- Top and decorate: Add a generous dollop of whipped cream on top of each parfait. Sprinkle red and blue sprinkles or add fresh berries for extra whimsy. Serve chilled.
Notes
For gluten-free parfaits, use gluten-free cookies or granola. For dairy-free, substitute almond milk and coconut whipped cream. Chill each layer for 10 minutes before adding the next for crisp stripes. Add cookies just before serving for extra crunch. Parfaits can be made ahead and refrigerated up to 24 hours (add whipped cream and sprinkles just before serving).
Nutrition
- Serving Size: 1 parfait glass (abo
- Calories: 220
- Sugar: 24
- Sodium: 220
- Fat: 6
- Saturated Fat: 3
- Carbohydrates: 34
- Fiber: 1
- Protein: 4
Keywords: Dr. Seuss dessert, pudding parfaits, party parfaits, red and blue dessert, kids party dessert, whimsical parfait, easy parfait recipe, birthday dessert, gelatin parfait, vanilla pudding parfait