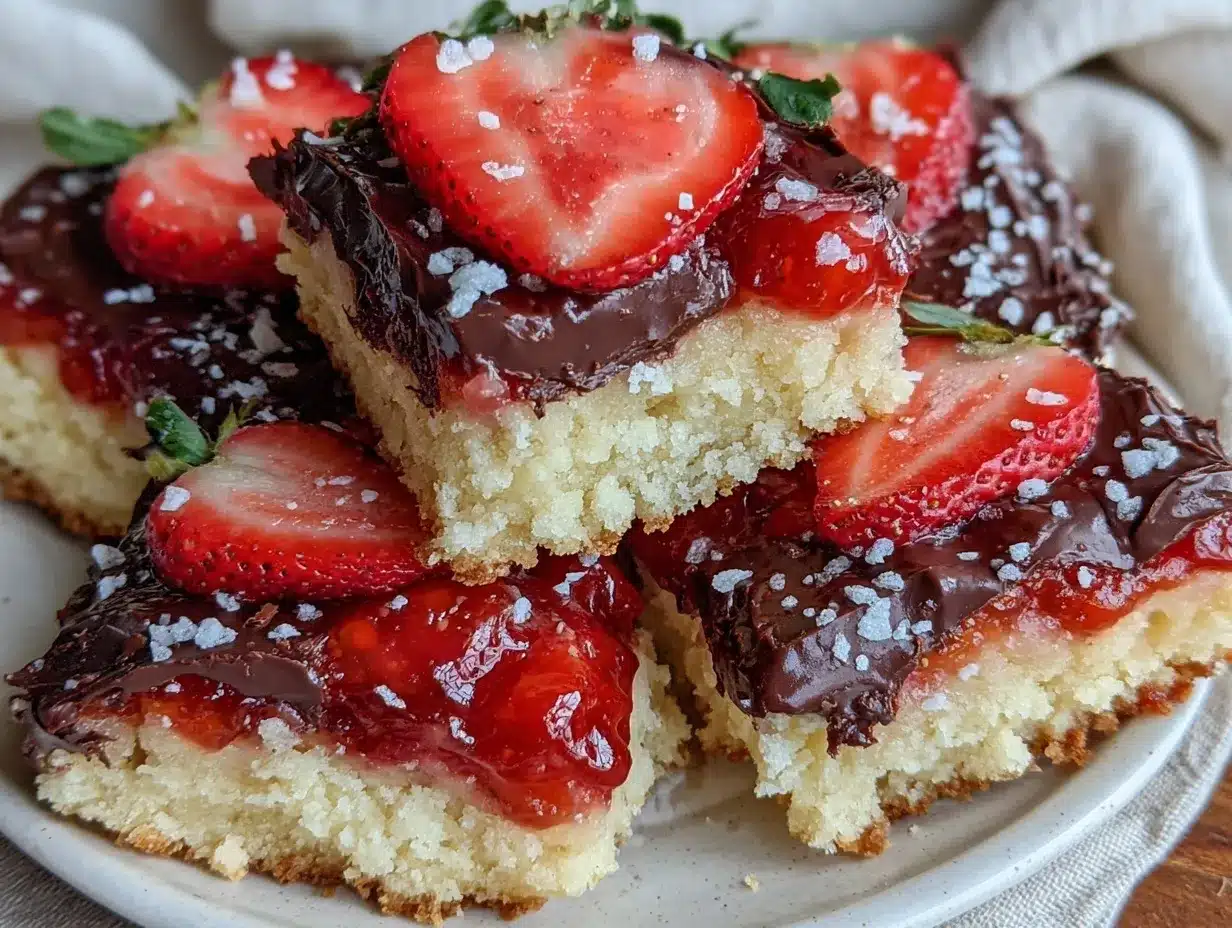
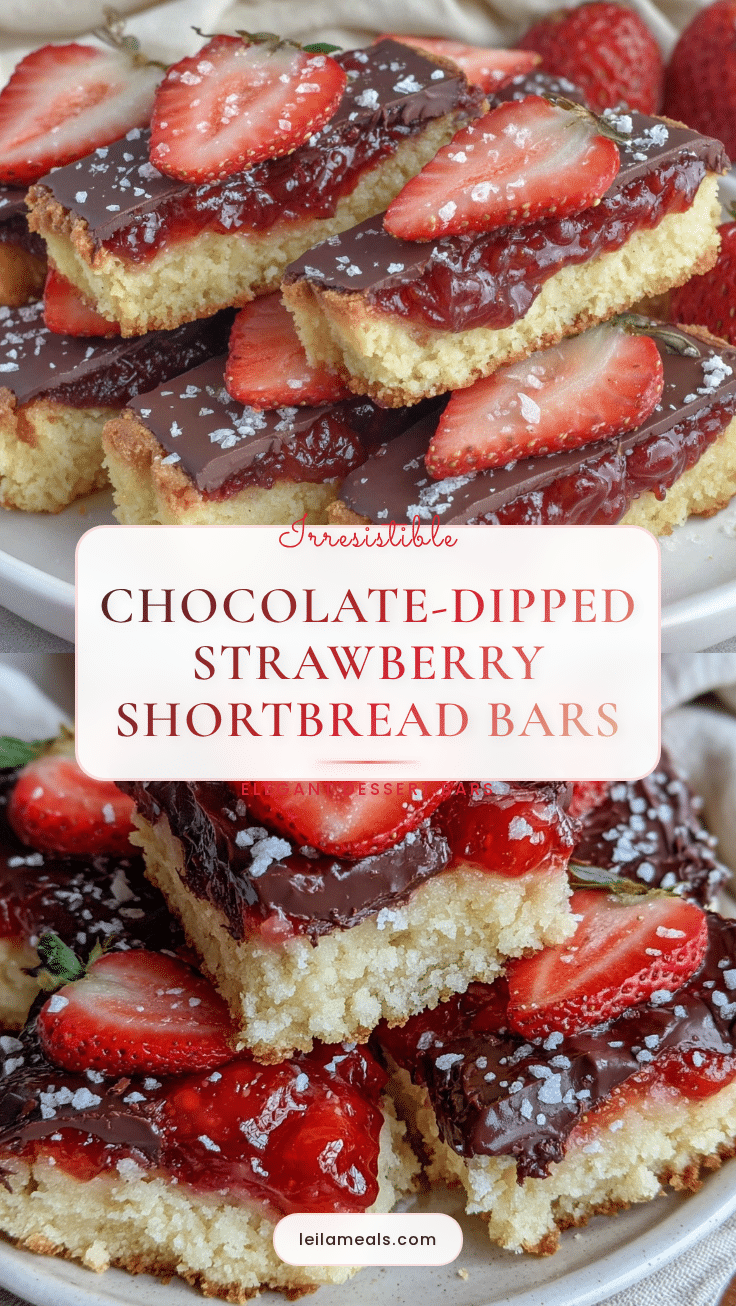
Introduction
Let me set the scene for you—the oven ticking away, the scent of buttery shortbread creeping into every corner of the kitchen, while strawberries simmer gently on the stove, filling the air with their sweet, jammy aroma. Then comes the moment when silky melted chocolate meets the cooled bars, and you just know your taste buds are in for a treat. Honestly, the first time I made these Chocolate-Dipped Strawberry Shortbread Bars, it was one of those “pause and grin” moments. The smell alone had my kids hovering, and the first bite? Pure bliss. You know, the kind of moment where you pause, take a deep breath, and just smile because you know you’re onto something truly special.
I stumbled onto this recipe years ago after a rainy weekend spent searching for a dessert that was both a little fancy and dangerously easy—something that could brighten up a dreary afternoon but wouldn’t have me fussing over complicated techniques. Growing up, my grandma used to bake classic shortbread every holiday, and those buttery bars became a family staple. But I wanted to take that nostalgia and add a twist—a layer of strawberry filling and a dip in rich chocolate. (Let’s face it, chocolate-dipped anything is always a hit!) The first batch disappeared off the cooling rack before I could even snap a photo. My family couldn’t stop sneaking them, and honestly, I can’t blame them.
These bars have since become our go-to for potlucks, birthday treats, and “just because” days. They’re perfect for gifting, for impressing guests, and yes, for brightening up your Pinterest dessert board. If you’re craving something that feels like a warm hug—decadent, comforting, and just a little bit fancy—you’re going to want to bookmark this one. I’ve tested them more times than I care to admit (in the name of research, of course), and they never fail to bring smiles all around.
Why You’ll Love This Recipe
If you’re anything like me, you’re always on the hunt for a dessert that checks all the boxes—easy, crowd-pleasing, and just plain delicious. These Chocolate-Dipped Strawberry Shortbread Bars are the kind of treat that makes people stop and ask for the recipe. I’ve been baking for years, and after plenty of trial and error, here’s why this recipe stands out:
- Quick & Easy: Comes together in under 45 minutes, which means you can whip up a batch even on a busy weeknight or when that last-minute sweet tooth strikes.
- Simple Ingredients: No fancy grocery runs required. Chances are, you’ve got everything you need sitting in your kitchen right now.
- Perfect for Any Occasion: These bars shine at potlucks, birthday parties, baby showers, or cozy weekends at home. They’re just as lovely plated for company as they are packed in a lunchbox.
- Crowd-Pleaser: Kids love the chocolate, grown-ups rave about the buttery shortbread, and honestly, the strawberry layer makes everyone swoon.
- Unbelievably Delicious: The combo of crumbly shortbread, sweet-tart strawberry, and smooth chocolate is next-level comfort food. It’s a bite that makes you close your eyes for a second and just savor.
What really sets this recipe apart is the technique: blending the shortbread until it’s just crumbly enough for that classic melt-in-your-mouth texture, and simmering the strawberries until they’re thick—but not too sweet. Dipping the cooled bars in chocolate makes them look (and taste) like bakery treats, but there’s no fancy equipment or skills required.
This isn’t just another shortbread recipe—this one’s loaded with memories, tested tips, and a personal twist that elevates it above the rest. It’s comfort food reimagined: still decadent, still comforting, but with a fresh, fruity layer and chocolate that makes every bite unforgettable. Whether you’re hoping to impress guests, spoil your family, or just treat yourself, this recipe delivers every time.
What Ingredients You Will Need
This Strawberry Shortbread Bars recipe leans on simple, wholesome ingredients to deliver bold flavor and that satisfying, crumbly texture without any fuss. Most are pantry staples, and the best part? They’re easy to swap or adjust to suit your tastes or dietary needs. Here’s what you’ll need:
- For the Shortbread Base:
- All-purpose flour (240g / 2 cups)—forms the classic, crumbly foundation
- Unsalted butter (226g / 1 cup), softened—adds richness and melt-in-your-mouth texture (I swear by Kerrygold for flavor)
- Powdered sugar (60g / 1/2 cup)—gives that delicate sweetness and fine crumb
- Vanilla extract (5ml / 1 tsp)—for subtle warmth (use real vanilla if you can, trust me)
- Salt (2g / 1/4 tsp)—balances all the flavors
- For the Strawberry Layer:
- Fresh strawberries (200g / 1 1/2 cups), hulled and diced—you can use frozen if that’s what you have (just thaw and drain first)
- Granulated sugar (50g / 1/4 cup)—helps the berries break down into a thick, jammy layer
- Lemon juice (15ml / 1 tbsp)—brightens up the filling and keeps it from being too sweet
- For the Chocolate Dip:
- Semi-sweet chocolate chips (170g / 1 cup)—or chopped chocolate bars (I like Ghirardelli or Guittard)
- Coconut oil (10ml / 2 tsp)—makes the melted chocolate silky smooth and glossy
- Optional:
- Freeze-dried strawberries, crushed—sprinkled on top for extra pop and crunch
- Sea salt flakes—a little sprinkle on the chocolate for a grown-up touch
Ingredient notes:
- If you need gluten-free, swap the flour for a 1:1 gluten-free blend (Bob’s Red Mill works well).
- Dairy-free? Use vegan butter sticks and dairy-free chocolate chips; I’ve tried Miyoko’s butter and it works great.
- Short on fresh berries? Raspberry preserves or strawberry jam will do in a pinch—just warm and spread thin.
- For a lower sugar option, you can cut the sugar in both layers by a third. The bars still turn out tender and tasty.
Honestly, these ingredients are the kind you’ll want to keep handy once you’ve tried this recipe. The flavor combos are simple, but wow—they’re magic together!
Equipment Needed
You don’t need much to whip up these Chocolate-Dipped Strawberry Shortbread Bars, which is part of their charm. Here’s what I use, plus a few tips:
- 8×8-inch (20×20 cm) baking pan—square pans work best for even bars. Glass or metal are both fine, just grease well.
- Parchment paper—makes for easy lifting and clean slicing. (Skip the buttered foil; it sticks!)
- Mixing bowls—one for the shortbread dough, one for the strawberry layer.
- Hand mixer or stand mixer—helps get that butter nice and fluffy (but a sturdy wooden spoon works if you’re old-school or saving electricity).
- Small saucepan—to simmer the strawberry mixture until thick.
- Microwave-safe bowl or double boiler—for melting chocolate smoothly.
- Sharp knife—for slicing neat bars. I run mine under hot water between cuts for cleaner edges.
- Spatula—makes spreading layers easier and prevents sticking.
If you don’t have parchment, lightly greased wax paper works in a pinch. And if you’re on a tight budget, a regular dinner knife will slice just fine (just go slow). I’ve baked these bars in everything from thrift-store pans to high-end bakeware, and honestly, they turn out great every time—just keep an eye on the edges so they don’t overbrown.
Pro tip: For easy clean-up, line your pan with parchment and leave some overhang on the sides. That way, you can lift the whole batch out to cool and slice. Trust me, it makes a difference!
Preparation Method
Ready to get baking? Here’s a step-by-step guide to making these decadent Chocolate-Dipped Strawberry Shortbread Bars. I’ve included time estimates, sensory cues, and a few “learned the hard way” tips!
- Preheat and Prep:
Preheat your oven to 350°F (175°C). Line your 8×8-inch (20×20 cm) pan with parchment, leaving an overhang on two sides. Lightly grease for extra insurance. - Make the Shortbread Dough:
In a large bowl, cream together 1 cup (226g) unsalted butter and 1/2 cup (60g) powdered sugar using a hand mixer (about 2 minutes, until light and fluffy). Add 1 tsp (5ml) vanilla extract and 1/4 tsp (2g) salt. Mix again. Gradually add 2 cups (240g) all-purpose flour, mixing just until a crumbly dough forms. (Don’t overmix—stop when you can press it together with your fingers and it holds.) - Press and Bake the Base:
Tip the dough into your prepared pan. Using clean hands or a spatula, press it into an even layer, reaching all corners. Prick the top all over with a fork (prevents bubbling). Bake for 20-25 minutes, until the edges are just golden and the top looks dry. Let cool in the pan while you make the filling. - Prepare the Strawberry Layer:
In a small saucepan, combine 1 1/2 cups (200g) diced strawberries, 1/4 cup (50g) granulated sugar, and 1 tbsp (15ml) lemon juice. Cook over medium heat, stirring often, until the berries break down and the mixture thickens (about 10 minutes). It should be jammy and spreadable—not runny. If using frozen berries, cook a few minutes longer. Let cool slightly. - Spread the Strawberry Filling:
Carefully spread the strawberry mixture over the cooled shortbread base. Go right to the edges, smoothing with a spatula. - Chill for Clean Slices:
Transfer the pan to the fridge for at least 30 minutes (or freezer for 15 if you’re impatient like me). This helps the filling set and makes slicing easier. - Slice the Bars:
Lift the bars out using the parchment overhang. Place on a cutting board and slice into 16 bars (4 rows by 4 rows). Wipe your knife between cuts for neat edges. - Melt the Chocolate:
In a microwave-safe bowl, combine 1 cup (170g) semi-sweet chocolate chips and 2 tsp (10ml) coconut oil. Microwave in 30-second bursts, stirring after each, until smooth and glossy. Or use a double boiler if you prefer. - Dip and Decorate:
Dip one end of each bar in melted chocolate, letting any excess drip off. Place on parchment to set. Sprinkle with crushed freeze-dried strawberries or sea salt, if desired. Let the chocolate firm up (about 15 minutes at room temp, or pop in the fridge for 5). - Enjoy!
Serve immediately or store for later. Bars will keep for up to 5 days in an airtight container.
Troubleshooting:
- If your shortbread seems too dry before baking, add 1-2 tsp milk or water.
- Strawberry layer too runny? Simmer a few extra minutes—it should look like thick jam.
- Chocolate not setting? Chill bars in the fridge to help it firm up faster.
Personal tip: I like to dip half the batch in chocolate and leave the others plain—perfect for picky eaters or those who want a lighter treat!
Cooking Tips & Techniques
There’s a bit of art to making these bars come out just right. Here’s what I’ve learned from years in the kitchen (and a few failed batches along the way).
- Room temp butter is key: If the butter’s too cold, the dough gets lumpy and won’t press smoothly. Too soft, and it’s greasy. I let mine sit out for 30-45 minutes.
- Don’t overmix the dough: You want a crumbly texture, not paste. Stop mixing as soon as it holds together when pressed.
- Jammy filling, not runny: Cook the strawberries until they’re thick enough to spread but not dry. Taste as you go—sometimes berries are sweeter, sometimes you need a touch more lemon.
- Chill before slicing: If you skip this step, the filling will ooze and the bars won’t hold their shape. It’s tempting to rush, but trust me, patience pays off.
- Chocolate dipping: Use coconut oil for shine and smoothness. If the chocolate seizes, a splash of oil will rescue it. I always melt in 30-second bursts to avoid burning.
- Consistency tips: For even bars, press the dough with a flat-bottomed glass for a smooth surface. And always wipe your knife between cuts for sharp lines.
- Timing: Multitask by prepping the strawberry layer while the shortbread bakes. That way, you’re not just standing around waiting.
If your bars crack when cutting, they’re probably too cold—let them sit for 5 minutes. If the chocolate smudges, let it set longer. I’ve made every mistake in the book, but with these tips, you’ll be serving up Pinterest-worthy treats every time.
Last bit of advice: don’t stress over perfection. The best bars are the ones you enjoy making!
Variations & Adaptations
One of the best parts about this recipe is how flexible it is. Here are a few tried-and-true ways to switch things up:
- Gluten-Free: Swap the all-purpose flour with a 1:1 gluten-free blend (I’ve used Bob’s Red Mill with great success). The texture stays crumbly and delicious.
- Dairy-Free: Use vegan butter and dairy-free chocolate chips. Coconut oil works as a binder for both layers, and I’ve had good luck with Miyoko’s butter.
- Berry Swap: Try raspberries or blueberries in place of strawberries for a tart twist. Mixed berry preserves make a great cheat if you’re short on time.
- Nutty Crunch: Stir 1/2 cup finely chopped pecans or almonds into the shortbread dough. Adds a lovely crunch and flavor.
- Citrus Zing: Add 1 tsp lemon zest to the strawberry layer for extra brightness. It really pops!
- Different Cooking Methods: If you don’t have an oven, you can press the dough into a toaster oven pan and bake as directed. Or try air frying at 320°F (160°C) for about 15 minutes (watch closely!).
- Allergen Substitutions: For egg-free, no changes needed (there are no eggs). For nut allergies, skip the optional nut add-ins and use seed-based toppings.
My personal favorite? A raspberry-chocolate version with extra sea salt on top. It’s a little bolder, and the tartness pairs perfectly with the sweet shortbread. Honestly, once you try these variations, you’ll find your own signature twist!
Serving & Storage Suggestions
These Chocolate-Dipped Strawberry Shortbread Bars shine brightest when served slightly chilled but not cold. I like to arrange them on a pretty platter, with the chocolate-dipped ends alternating for a striking visual. They pair beautifully with fresh berries, a scoop of vanilla ice cream, or even a steaming mug of coffee or tea.
For parties, slice into smaller pieces for bite-sized treats (perfect for buffet tables or dessert boards). If you’re gifting, tuck them into cellophane bags with a ribbon—trust me, they make adorable homemade gifts!
Storage is straightforward: keep bars in an airtight container in the refrigerator for up to five days. If you want to freeze, wrap them individually and store for up to two months. Thaw in the fridge overnight—don’t microwave, as the chocolate can melt unevenly.
Reheating isn’t usually needed, but if you want a softer bite, let bars sit at room temp for 10 minutes before serving. The flavors deepen over time, especially the strawberry layer, which gets a little more jammy and intense after a day or two.
Tip: If you stack bars, place parchment between layers to prevent sticking. (I learned this the hard way after a batch turned into a chocolatey puzzle!)
Nutritional Information & Benefits
Each bar is estimated to contain about 180 calories, 10g fat, 22g carbohydrates, and 2g protein, depending on the size and chocolate used. These bars are naturally egg-free and can be made gluten-free or dairy-free with simple swaps.
Key health benefits come from strawberries, which pack vitamin C, fiber, and antioxidants. Shortbread provides energy, and if you use dark chocolate, you get a little boost of heart-healthy flavonoids.
Allergen notes: May contain dairy, gluten, and coconut (if using coconut oil). Always check ingredient labels for your specific needs.
From a wellness perspective, I love that these bars offer a bit of fruit in every bite—so you can indulge with a little less guilt. They’re sweet, yes, but they’re also easy to adapt for lower sugar or allergy-friendly diets.
Conclusion
If you’re searching for a dessert that’s as beautiful as it is delicious, these Chocolate-Dipped Strawberry Shortbread Bars deserve a spot on your baking list. They’re easy enough for beginners, impressive enough for guests, and honestly, just plain fun to make. The combo of buttery shortbread, tangy strawberries, and rich chocolate feels like a warm, nostalgic hug—one you’ll want to share with everyone you know.
Don’t be afraid to customize—try new berries, sprinkle on some sea salt, or swap in your favorite chocolate. That’s the joy of baking, right? Making something that’s truly yours. These bars are a staple in my kitchen, and I hope they become one in yours too.
I’d love to hear how yours turn out! Drop a comment below with your favorite variation, pin to your Pinterest board, or share your own twist on social media. Happy baking—and enjoy every decadent bite!
FAQs
Can I use jam instead of fresh strawberries for the filling?
Absolutely! Just warm up 1/2 cup of your favorite strawberry jam and spread it over the cooled shortbread base. It’s a great shortcut when berries aren’t in season.
How do I keep the chocolate from cracking or looking dull?
Add a little coconut oil to the chocolate when melting. It keeps it glossy and helps prevent cracking as the bars set.
Can I make these ahead of time for a party?
Yes! You can make them up to two days in advance. Just store in the fridge and let them sit at room temp for 10 minutes before serving for best texture.
What’s the best way to slice the bars cleanly?
Use a sharp knife, run it under hot water, and wipe between cuts. Chilling the bars first helps, too.
Are these bars suitable for kids with nut allergies?
Yes—just skip any optional nut add-ins and check your chocolate for cross-contamination. The basic recipe is nut-free.
Pin This Recipe!
Chocolate-Dipped Strawberry Shortbread Bars

Decadent, buttery shortbread bars layered with jammy strawberry filling and dipped in silky chocolate. This easy dessert is perfect for potlucks, gifting, or a cozy treat at home.
- Prep Time: 15 minutes
- Cook Time: 35 minutes
- Total Time: 50 minutes
- Yield: 16 bars 1x
- Category: Dessert
- Cuisine: American
Ingredients
- 2 cups all-purpose flour (240g)
- 1 cup unsalted butter, softened (226g)
- 1/2 cup powdered sugar (60g)
- 1 teaspoon vanilla extract (5ml)
- 1/4 teaspoon salt (2g)
- 1 1/2 cups fresh strawberries, hulled and diced (200g) or frozen, thawed and drained
- 1/4 cup granulated sugar (50g)
- 1 tablespoon lemon juice (15ml)
- 1 cup semi-sweet chocolate chips (170g) or chopped chocolate bars
- 2 teaspoons coconut oil (10ml)
- Optional: freeze-dried strawberries, crushed
- Optional: sea salt flakes
Instructions
- Preheat oven to 350°F (175°C). Line an 8×8-inch baking pan with parchment paper, leaving an overhang on two sides. Lightly grease.
- In a large bowl, cream together butter and powdered sugar with a hand mixer for about 2 minutes until light and fluffy. Add vanilla extract and salt, mix again.
- Gradually add flour, mixing just until a crumbly dough forms. Do not overmix.
- Press dough evenly into prepared pan. Prick top all over with a fork. Bake for 20-25 minutes, until edges are golden and top looks dry. Let cool in pan.
- In a small saucepan, combine diced strawberries, granulated sugar, and lemon juice. Cook over medium heat, stirring often, until berries break down and mixture thickens (about 10 minutes). Let cool slightly.
- Spread strawberry mixture over cooled shortbread base, smoothing to edges.
- Chill pan in fridge for at least 30 minutes (or freezer for 15 minutes) to set filling.
- Lift bars out using parchment overhang. Slice into 16 bars (4 rows by 4 rows), wiping knife between cuts.
- In a microwave-safe bowl, combine chocolate chips and coconut oil. Microwave in 30-second bursts, stirring after each, until smooth and glossy. Alternatively, melt using a double boiler.
- Dip one end of each bar in melted chocolate, letting excess drip off. Place on parchment to set. Sprinkle with freeze-dried strawberries or sea salt if desired. Let chocolate firm up (about 15 minutes at room temp or 5 minutes in fridge).
- Serve immediately or store in an airtight container for up to 5 days.
Notes
For gluten-free, use a 1:1 gluten-free flour blend. For dairy-free, use vegan butter and dairy-free chocolate chips. Jam can be substituted for fresh strawberries. Chill bars before slicing for clean edges. Store in airtight container up to 5 days or freeze up to 2 months. Wipe knife between cuts for neat slices.
Nutrition
- Serving Size: 1 bar
- Calories: 180
- Sugar: 12
- Sodium: 60
- Fat: 10
- Saturated Fat: 6
- Carbohydrates: 22
- Fiber: 1
- Protein: 2
Keywords: shortbread bars, chocolate dipped, strawberry dessert, easy dessert, potluck recipe, kid friendly, egg free, nut free, homemade gift, summer dessert