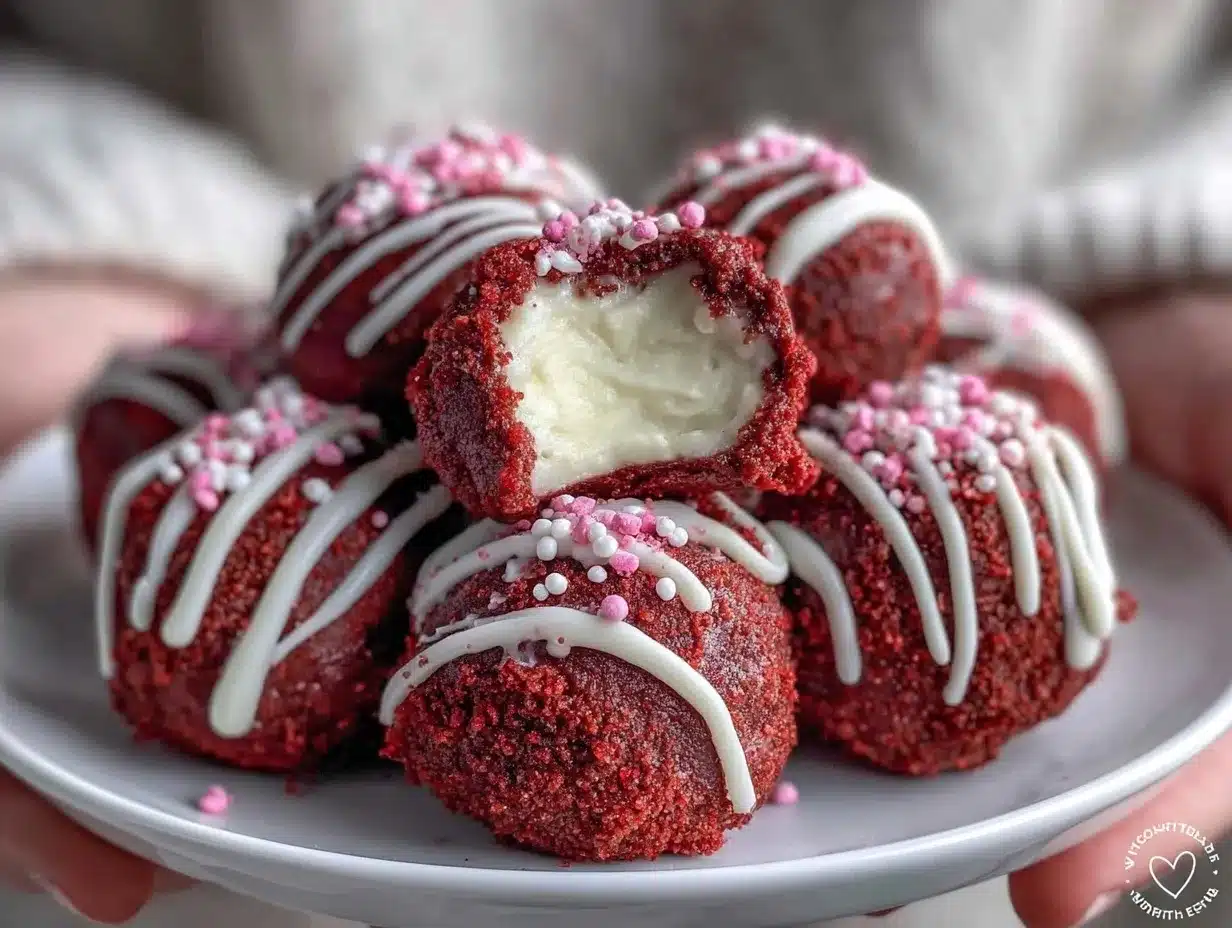
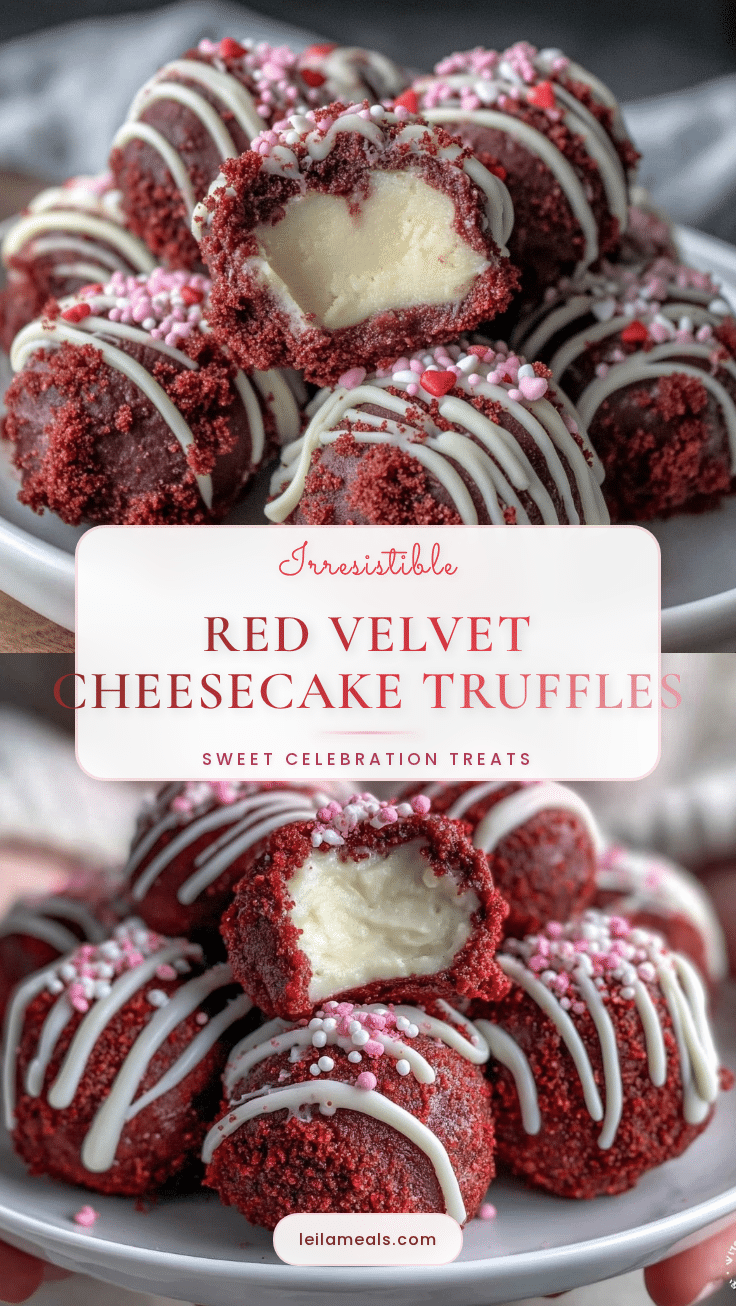
The smell of cocoa and cream cheese swirling together in my kitchen on a chilly February afternoon is, honestly, one of life’s little joys. Picture this: you walk in and the sweet, earthy scent of red velvet cake hits you—warm, nostalgic, and just a bit decadent. That first bite of a homemade red velvet cheesecake truffle (dusted with delicate white chocolate) is pure bliss. I still remember the first time I made these truffles—my hands covered in crumbs and the mixer humming away—when I popped one in my mouth, it was the kind of moment where you pause, take a deep breath, and just smile because you know you’re onto something truly special.
Years ago, when I was knee-high to a grasshopper, Valentine’s Day meant boxed chocolates and store-bought cookies. Now, sharing these red velvet cheesecake truffles has become our new tradition. My grandma used to say, “Nothing says love like something homemade,” and you know what, she was right. I stumbled upon this recipe during a rainy weekend, trying to recreate a treat from a local bakery that closed down. What I ended up with was, honestly, even better than the original. If only I’d known about this dangerously easy recipe back then!
Let’s face it, when these truffles cool on the rack, my family can barely wait. My partner sneaks them off the tray, and my kids leave little red velvet fingerprints everywhere (which, really, is the best kind of mess). They’re perfect for potlucks, gifting to friends, or just brightening up your Pinterest board with a pop of red. I’ve tested this recipe more times than I can count (all in the name of research, of course), and it’s become a staple for every Valentine’s gathering and birthday treat. It feels like a warm hug in truffle form—sweet, creamy, and totally irresistible. You’re going to want to bookmark this one.
Why You’ll Love This Recipe
Let me lay it out straight—these Red Velvet Cheesecake Truffles have earned their spot as my go-to Valentine’s treat, and here’s why:
- Quick & Easy: These truffles come together in under 45 minutes, which means you can whip them up even on a busy weekday or last-minute before a celebration.
- Simple Ingredients: No need for a fancy shopping trip. The recipe relies on pantry staples and a few fresh basics—you probably have most of them already!
- Perfect for Sharing: Whether you’re making them for your sweetheart, kids, coworkers, or a potluck, these truffles are designed to be shared. Their cute size means everyone gets a bite of love.
- Crowd-Pleaser: Kids gobble them up. Adults rave about their creamy center and rich flavor. Even picky eaters come back for seconds (I’ve seen it happen!).
- Unbelievably Delicious: The combo of red velvet cake, tangy cream cheese, and silky chocolate coating is next-level comfort—like the best part of a slice of cheesecake, wrapped up in a bite-size treat.
What sets this recipe apart? For starters, I use a bakery-style red velvet cake base and blend it with room-temperature cream cheese for the creamiest texture. This isn’t just another cake ball—it’s my best version, perfected after many family taste tests and a few (honestly funny) failures. The secret is in the balance: not too sweet, with that signature cocoa undertone. Plus, you can make them ahead, so there’s zero stress when serving guests.
This recipe isn’t just good—it’s the kind that makes you close your eyes after the first bite and sigh. It’s comfort food, but with a touch of romance and nostalgia. Whether you’re impressing someone special or making a regular Tuesday feel like Valentine’s, these truffles deliver happiness in every bite. Trust me, they’ll turn any moment into something memorable.
What Ingredients You Will Need
This recipe uses simple, wholesome ingredients to deliver bold flavor and satisfying texture without the fuss. Most of these are pantry staples, with a few fresh items for that classic red velvet cheesecake punch. Here’s the breakdown:
- For the Red Velvet Cake Base:
- Red velvet cake mix (1 standard box, about 15.25 oz / 432g)
- Eggs (2 large, room temperature)
- Vegetable oil (1/2 cup / 120ml)
- Water (1 cup / 240ml)
- For the Cheesecake Filling:
- Cream cheese (8 oz / 225g, softened to room temperature; I love Philadelphia for its creamy texture)
- Powdered sugar (1/2 cup / 60g, sifted for smoothness)
- Vanilla extract (1 tsp / 5ml; Nielsen-Massey is my go-to)
- For the Chocolate Coating:
- White chocolate chips (2 cups / 340g; Ghirardelli melts beautifully)
- Coconut oil (2 tsp / 10ml, helps the chocolate set smoothly)
- Red or pink sprinkles (optional, for decoration)
Ingredient Tips: Use full-fat cream cheese for a richer, silkier texture. If you’re avoiding dairy, try Daiya non-dairy cream cheese and dairy-free white chocolate chips. For gluten-free truffles, swap in a gluten-free red velvet cake mix (Betty Crocker’s gluten-free version works well). In summer, you can add a few fresh raspberries to the filling for a berry twist—just chop them finely and blend in.
If you don’t have coconut oil, a dab of butter works in a pinch. For the cake, homemade red velvet works too, but the box mix keeps it easy (and honestly, no one ever guesses!). I’ve tried several brands; Duncan Hines and Pillsbury both yield a moist, dense cake perfect for truffles. And if you want to cut some sugar, reduce the powdered sugar by half—the truffles will still taste fantastic.
Everything in this ingredient list is easy to find and swap if needed, which means you can customize these truffles to fit your pantry and your diet. That’s the beauty of a recipe built for real life!
Equipment Needed
You don’t need a full bakery setup to make these Red Velvet Cheesecake Truffles. Just a few kitchen basics and you’re good to go:
- Mixing bowls (medium and large, preferably glass or stainless steel)
- Hand mixer or stand mixer (makes blending the cream cheese a breeze)
- Baking sheet (standard size, lined with parchment paper for easy cleanup)
- Wire cooling rack (helps set the truffles after dipping)
- Forks or dipping tools (for coating in chocolate)
- Measuring cups and spoons (I prefer metal for accuracy)
- Rubber spatula (to scrape every bit of batter and filling)
- Microwave-safe bowl (for melting chocolate)
If you don’t have a mixer, you can use a sturdy whisk and a little elbow grease—it’ll just take longer. For dipping, toothpicks work if you don’t have fancy tools. Maintenance tip: always wash your wire rack right after use (chocolate hardens quickly!). Budget-friendly tip: parchment paper can be reused for several batches, and basic hand mixers are usually under $20 and last for years. I’ve made truffles with everything from grandma’s old hand mixer to a high-powered stand model—the results are always delicious.
Preparation Method
- Bake the Red Velvet Cake: Preheat your oven to 350°F (175°C). Grease a 9×13-inch (23x33cm) baking pan. In a large bowl, combine the red velvet cake mix, eggs, oil, and water. Mix until just combined—don’t overmix. Pour into the pan and bake for 25-30 minutes, or until a toothpick comes out clean. Cool completely (about 1 hour).
- Prepare the Cheesecake Filling: In a medium bowl, beat cream cheese, powdered sugar, and vanilla extract with a hand mixer until smooth and creamy (2-3 minutes). If the cream cheese is too cold, it’ll be clumpy—let it sit out to soften.
- Crumble the Cake: Once the cake is cool, crumble it into fine crumbs using your hands or a fork. You want an even texture—no big chunks. (Tip: Don’t rush this step. Big chunks will make the truffles lumpy.)
- Mix Cake and Cheesecake Filling: Add the cake crumbs to the cream cheese mixture. Use your hands or a spatula to blend until fully combined—a soft, sticky dough should form. If it’s too dry, add a tablespoon of cream cheese. Too wet? Add more crumbs.
- Shape the Truffles: Scoop 1 tablespoon (about 15g) of mixture and roll between your palms to form a ball (should be about 1 inch/2.5cm in diameter). Place on a parchment-lined baking sheet. Repeat until all mixture is used (you’ll get about 24 truffles).
- Chill: Freeze the truffles for 30 minutes. This helps them hold shape during dipping.
- Melt the Chocolate: In a microwave-safe bowl, combine white chocolate chips and coconut oil. Microwave in 20-second bursts, stirring after each, until smooth and melted (about 1-2 minutes). If chocolate seizes, add a tiny bit more oil.
- Dip Truffles: Using a fork or dipping tool, dunk each chilled truffle into the melted chocolate. Let excess drip off, then place back on the parchment-lined tray. Work quickly—chocolate sets fast on the cold truffles.
- Decorate: Immediately sprinkle red or pink sprinkles on top before chocolate sets. If you want a drizzle effect, melt some extra white chocolate and zigzag over the truffles once set.
- Set and Serve: Allow truffles to set at room temperature for 20 minutes or refrigerate for 10 minutes. Serve chilled or at room temperature.
Troubleshooting: If your truffles crack after dipping, it’s usually because they were too cold—let them sit out for 5 minutes before dipping. Chocolate not sticking? Make sure truffles aren’t wet on the outside. Efficiency tip: line two trays so you can dip in batches. Don’t worry if the chocolate isn’t perfectly smooth—imperfections are the hallmark of homemade treats!
Cooking Tips & Techniques
After making more batches of Red Velvet Cheesecake Truffles than I’d care to admit, I’ve picked up some handy tips:
- Use Room Temperature Ingredients: Cream cheese blends much smoother when it’s not fridge-cold. I once tried to rush it—lumpy filling every time.
- Don’t Overmix Cake Batter: Overmixing makes the cake tough, which leads to dense truffles. Stir just until combined.
- Freeze Before Dipping: If you skip the chilling step, truffles fall apart in the chocolate. Learned this the hard way, trust me.
- Work in Batches: Only take a few truffles out of the freezer at a time to dip, keeping the rest cold so they hold shape.
- Chocolate Melting Hack: Add a splash of coconut oil for shiny, smooth chocolate. If it gets thick, microwave for 10 seconds and stir.
- Multitasking: While the cake bakes, prep your cream cheese and melt chocolate. It saves time and keeps things moving.
- Consistency: For uniform truffles, use a cookie scoop. I used to eyeball it, but the scoop makes every one picture-perfect (and Pinterest-ready!).
Common mistakes? Overheating the chocolate (it seizes), skimping on chilling time, and under-mixing the filling. Honestly, I’ve had a few batches turn out misshapen, but they still tasted amazing. Don’t stress perfection—focus on flavor and fun. If you’re making these with kids, expect a little chaos and a lot of laughter. In the end, the little imperfections make them all the more special.
Variations & Adaptations
If you like switching things up (or need to accommodate allergies), here are some of my favorite ways to adapt Red Velvet Cheesecake Truffles:
- Gluten-Free: Use a gluten-free red velvet cake mix. Betty Crocker’s version is solid—no one can tell the difference.
- Dairy-Free: Substitute non-dairy cream cheese (like Kite Hill) and dairy-free white chocolate chips (Enjoy Life brand works well).
- Seasonal Twist: Mix in 1/4 cup (35g) finely chopped fresh raspberries into the filling for a springtime burst of flavor.
- Chocolate Lovers: Swap white chocolate for semi-sweet or dark chocolate coating. It’s a richer, less sweet finish.
- Nutty Variation: Stir 1/4 cup (30g) chopped pecans into the cake-cream cheese mixture for crunch.
- Funfetti: Add rainbow sprinkles to the filling for a birthday party vibe—my kids go wild for this!
For different cooking methods, you can bake the cake layer as cupcakes for easy portioning. If you want a boozy version for adults, add a splash of Chambord or Baileys to the filling (just a teaspoon). I once tried swirling in a little orange zest for a citrusy twist—so refreshing! Allergens? Avoid nuts and dairy as needed, and decorate with allergen-safe sprinkles. These truffles are endlessly customizable—just tweak to match your occasion or dietary needs.
Serving & Storage Suggestions
For best presentation, serve Red Velvet Cheesecake Truffles chilled on a pretty platter or cupcake liners. They look gorgeous arranged in heart shapes for Valentine’s Day or stacked in mason jars with ribbon for gifting. I love pairing them with fresh berries and a cup of coffee or sparkling wine for a festive touch.
If you’re entertaining, set out at room temperature (they hold up for 2 hours without melting). For storage, keep in an airtight container in the fridge for up to 5 days—they actually taste better after a day as the flavors meld. To freeze, place truffles in a single layer on a baking sheet, freeze until firm, then transfer to a zip-top bag. They’ll keep for up to 2 months. Thaw overnight in the fridge, then serve.
Reheating isn’t necessary, but if you want a softer center, let them sit out for 15 minutes before serving. The flavor deepens after a day or two, so making ahead is a smart move. Honestly, they’re just as good on day three as they are fresh, which makes them perfect for prep-ahead parties or gifting.
Nutritional Information & Benefits
Each Red Velvet Cheesecake Truffle (about 30g) packs roughly 120 calories, 7g fat, 15g carbs, and 2g protein. Key ingredients like cream cheese provide a little calcium and protein, while cocoa adds antioxidants (not that you need an excuse!).
For gluten-free or dairy-free diets, substitutions work well—just check your cake mix and chocolate labels. Allergens to watch for: wheat, dairy, and eggs. If you’re watching sugar, reduce the powdered sugar or use a sugar substitute. Personally, I love that these truffles offer portion control, and you can adjust the recipe to fit your wellness goals. They’re a treat, but one you can feel good about sharing.
Conclusion
If you’re craving a Valentine’s treat that’s easy, shareable, and absolutely delicious, Red Velvet Cheesecake Truffles are the answer. They combine classic red velvet flavor with creamy cheesecake goodness, wrapped in a chocolatey shell—what’s not to love?
Don’t be afraid to customize—add nuts, swap the chocolate, or toss in berries. This recipe is flexible, forgiving, and always a hit. I genuinely love making (and eating) these truffles because they bring people together and make every occasion a little brighter.
I’d love to hear how you make these your own! Drop a comment, share your spin, or snap a photo for Pinterest. Whether you’re gifting, sharing, or just treating yourself, here’s to sweet moments and homemade happiness. Go ahead—spread a little love, one bite at a time!
FAQs
Can I make Red Velvet Cheesecake Truffles ahead of time?
Absolutely! They actually taste better after a day in the fridge, and you can store them up to 5 days. Make them ahead for stress-free celebrations.
What’s the best way to melt chocolate for dipping?
Use a microwave-safe bowl, heat in 20-second bursts, and stir after each. Add a splash of coconut oil for smoothness. If you don’t have a microwave, use a double boiler on the stove.
Can I freeze these truffles?
Yes, freeze in a single layer until firm, then transfer to a zip-top bag. They’ll keep for up to 2 months. Thaw overnight in the fridge before serving.
How do I make these gluten-free?
Just use a gluten-free red velvet cake mix and check that your chocolate chips are gluten-free. All other ingredients are naturally gluten-free.
Can kids help make these truffles?
Definitely! Kids love rolling and decorating the truffles. Just supervise the dipping step since melted chocolate can be hot.
Pin This Recipe!
Red Velvet Cheesecake Truffles

These Red Velvet Cheesecake Truffles combine classic red velvet cake with creamy cheesecake filling, all wrapped in a smooth white chocolate shell. They’re easy to make, perfect for sharing, and a festive treat for Valentine’s Day or any special occasion.
- Prep Time: 15 minutes
- Cook Time: 30 minutes
- Total Time: 45 minutes (plus 1 hour cooling and 30 minutes chilling)
- Yield: 24 truffles 1x
- Category: Dessert
- Cuisine: American
Ingredients
- 1 box (15.25 oz) red velvet cake mix
- 2 large eggs, room temperature
- 1/2 cup vegetable oil
- 1 cup water
- 8 oz cream cheese, softened to room temperature
- 1/2 cup powdered sugar, sifted
- 1 tsp vanilla extract
- 2 cups white chocolate chips
- 2 tsp coconut oil
- Red or pink sprinkles (optional, for decoration)
Instructions
- Preheat oven to 350°F (175°C). Grease a 9×13-inch baking pan.
- In a large bowl, combine red velvet cake mix, eggs, oil, and water. Mix until just combined. Pour into prepared pan and bake for 25-30 minutes, or until a toothpick comes out clean. Cool completely (about 1 hour).
- In a medium bowl, beat cream cheese, powdered sugar, and vanilla extract with a hand mixer until smooth and creamy (2-3 minutes).
- Once cake is cool, crumble it into fine crumbs using your hands or a fork.
- Add cake crumbs to the cream cheese mixture. Blend until fully combined into a soft, sticky dough. If too dry, add a tablespoon of cream cheese; if too wet, add more crumbs.
- Scoop 1 tablespoon of mixture and roll between your palms to form a ball (about 1 inch in diameter). Place on a parchment-lined baking sheet. Repeat until all mixture is used (about 24 truffles).
- Freeze truffles for 30 minutes to help them hold shape during dipping.
- In a microwave-safe bowl, combine white chocolate chips and coconut oil. Microwave in 20-second bursts, stirring after each, until smooth and melted (about 1-2 minutes).
- Using a fork or dipping tool, dunk each chilled truffle into the melted chocolate. Let excess drip off, then place back on the parchment-lined tray.
- Immediately sprinkle red or pink sprinkles on top before chocolate sets. For a drizzle effect, melt extra white chocolate and zigzag over the truffles once set.
- Allow truffles to set at room temperature for 20 minutes or refrigerate for 10 minutes. Serve chilled or at room temperature.
Notes
Use room temperature cream cheese for a smooth filling. Freeze truffles before dipping to prevent them from falling apart. For gluten-free or dairy-free versions, substitute with appropriate cake mix and cream cheese. Truffles can be made ahead and stored in the fridge for up to 5 days or frozen for up to 2 months. Imperfections in the chocolate coating are normal and add homemade charm.
Nutrition
- Serving Size: 1 truffle (about 30g
- Calories: 120
- Sugar: 10
- Sodium: 90
- Fat: 7
- Saturated Fat: 4
- Carbohydrates: 15
- Protein: 2
Keywords: red velvet, cheesecake truffles, Valentine’s Day, easy dessert, no bake, cake balls, white chocolate, party treats, homemade gifts