Introduction
Let me paint a picture for you—the kitchen’s alive with the sizzle of beef, the pop of hot dogs, and the unmistakable aroma of chili bubbling away. You know, that mouthwatering scent that makes everyone start circling the stove before you’ve even finished prepping. The first time I whipped up these Savory Super Bowl Chili Dog Sliders was one of those magical game days where the energy in the house was absolutely electric.
I remember it so clearly: the TV was blasting, kids were running around in jerseys two sizes too big, and my cousin hollered from the living room, “Are those sliders ready yet?” I was testing this recipe (in the name of research, of course) and the whole family couldn’t keep their hands off the cooling rack. Honestly, these chili dog sliders have this way of making grown adults fight for the last bite—no joke.
There’s something about the combination of soft slider buns, smoky hot dogs, and deeply savory chili that feels like pure, nostalgic comfort—like you’re back in grandma’s kitchen, but with a modern twist for game day fun. I wish I’d stumbled onto this recipe years ago; it’s become a staple for family gatherings, Super Bowl parties, and even casual Friday nights when we want something dangerously easy but totally satisfying.
My family’s reaction? Let’s just say, not a single slider survived long enough for leftovers. These Savory Super Bowl Chili Dog Sliders are perfect for potlucks, tailgate parties, or those moments when you want to brighten up your Pinterest board with a recipe that’s got real crowd appeal. If you’re searching for that game day treat that’s a guaranteed hit, you’re going to want to bookmark this one. It feels like a warm hug on a cold night and, trust me, it’ll be the MVP of your party spread!
Why You’ll Love This Recipe
When I say these Savory Super Bowl Chili Dog Sliders are a game changer, I’m speaking from experience—years of hosting rowdy football gatherings, last-minute potlucks, and plenty of “please share that recipe” requests. There’s just something about them that makes people light up. Here’s why you’ll be hooked, too:
- Quick & Easy: These sliders come together in under 40 minutes (seriously!). Perfect when you’re juggling snacks and cheering on your team.
- Simple Ingredients: No need for a complicated shopping list—just everyday pantry staples and a pack of hot dogs. I love a recipe that doesn’t require a special trip.
- Perfect for Game Day: The ultimate finger food—no forks necessary. These are made for sharing, passing, and munching between plays.
- Crowd-Pleaser: Whether you’ve got picky eaters or a bunch of hungry sports fans, everyone loves the familiar flavors (and the fun presentation!).
- Unbelievably Delicious: The sliders are soft, saucy, and loaded with flavor—each bite is a burst of chili, gooey cheese, and smoky hot dog. It’s next-level comfort food that’ll make you close your eyes and sigh.
What really sets this recipe apart? It’s the homemade chili—thick, rich, and hearty, but easy enough that you won’t break a sweat. I blend a touch of smoked paprika and a dash of brown sugar for depth, and honestly, it makes the whole kitchen smell irresistible. You don’t have to settle for bland, canned chili here. Plus, the assembly is a breeze—slice, layer, bake, and boom: instant party!
This recipe isn’t just another slider—it’s my best version, backed by way too many taste tests (hey, someone had to do it). It’s the kind of thing you serve to impress guests without breaking a sweat, or just to treat yourself after a long week. There’s a reason it’s the first thing my family requests every Super Bowl. Savory Super Bowl Chili Dog Sliders are the real deal—and I’m betting you’ll make them again and again.
What Ingredients You Will Need
You’ll love how these Savory Super Bowl Chili Dog Sliders use familiar, affordable ingredients to deliver bold flavor. Most of what you need is probably already in your kitchen (no fancy stuff required), and you can swap a few things if you want to get creative. Here’s the breakdown:
For the Chili:
- 1 lb (450 g) ground beef (I recommend 80/20 for the best juicy texture)
- 1 small yellow onion, finely chopped
- 2 cloves garlic, minced
- 1 (15 oz / 425 g) can tomato sauce
- 1/2 cup (120 ml) beef broth (adds richness)
- 2 tbsp tomato paste
- 1 tbsp chili powder
- 1 tsp smoked paprika (gives a subtle smoky flavor—don’t skip!)
- 1/2 tsp ground cumin
- 1/2 tsp brown sugar (balances the acidity)
- Salt & pepper, to taste
For the Sliders:
- 12 slider buns (soft dinner rolls work perfectly—King’s Hawaiian is my go-to)
- 6 regular hot dogs, sliced in half lengthwise
- 1 1/2 cups (170 g) shredded cheddar cheese (sharp cheddar melts best)
- 2 tbsp unsalted butter, melted
- 1 tbsp yellow mustard (for brushing)
- 1 tbsp chopped fresh parsley (optional, for garnish)
Optional Toppings:
- Diced onions
- Sliced jalapeños
- Pickle chips
- Extra shredded cheese
Substitution Tips:
- Swap ground beef for ground turkey or plant-based meat for a lighter option.
- Use turkey or vegetarian hot dogs if you prefer.
- Substitute gluten-free slider buns for allergy-friendly sliders.
- Try pepper jack or mozzarella if you want to switch up the cheese flavor.
These ingredients come together for a savory, classic chili dog flavor that’s just right for game day parties. If you want to get creative, toss in some chopped bell peppers or a dash of hot sauce to the chili—totally up to you!
Equipment Needed
You don’t need a ton of fancy gadgets for Savory Super Bowl Chili Dog Sliders—just solid basics. Here’s what I use every time:
- Large skillet (for browning beef and simmering chili—cast iron gives the best flavor)
- Medium saucepan (if you prefer to simmer chili separately)
- 9×13-inch (23×33 cm) baking dish (glass or ceramic works fine; disposable pans are handy for parties)
- Sharp knife (for slicing hot dogs and buns)
- Cutting board (wood or plastic, whatever you like)
- Mixing spoon or spatula (I use a silicone one—it’s easy to clean)
- Small bowl (for melted butter and mustard)
- Pastry brush (optional, but makes buttering the buns quick and neat)
- Aluminum foil (for covering sliders if you want them extra soft)
If you don’t have a pastry brush, just use the back of a spoon for the butter and mustard. I sometimes use my trusty old Pyrex dish when I want extra crispy slider bottoms. And if you’re on a budget, any oven-safe pan will do the trick—just give it a quick spritz of cooking spray. I’ve used everything from my grandma’s vintage pan to dollar store trays, so don’t sweat the details!
Preparation Method
Ready to make some Savory Super Bowl Chili Dog Sliders? Here’s my step-by-step playbook—complete with timing, tips, and a few real-life notes from all my recipe tests.
-
Preheat your oven: Set it to 375°F (190°C). Give your baking dish a quick spray or butter rub to keep those buns from sticking.
(Tip: If you like a crispier base, use a metal pan.) -
Make the chili: In your large skillet over medium heat, brown the ground beef for 5-6 minutes, breaking it up as you go. Toss in the onion and garlic, cooking for another 2-3 minutes until fragrant.
(Sensory cue: the onions should be soft, and everything smells amazing.) -
Add chili ingredients: Stir in tomato sauce, beef broth, tomato paste, chili powder, smoked paprika, cumin, and brown sugar. Season with salt and pepper. Simmer uncovered, stirring occasionally, for 10-12 minutes until the chili thickens.
(Troubleshooting: If your chili looks watery, just simmer a few minutes longer.) -
Prep the slider buns: Slice the buns horizontally (don’t separate!), making a top and bottom slab. Place the bottom half in your baking dish.
(Efficiency tip: Use a serrated knife so you don’t squish the bread.) -
Layer the hot dogs: Place sliced hot dogs evenly across the buns. I like to tuck them in so each slider gets a full half-dog.
(Note: You can use cocktail franks for mini sliders.) -
Spoon on the chili: Spread half the chili over the hot dogs, making sure it’s evenly distributed.
(Tip: Press gently so the chili doesn’t spill off the sides.) -
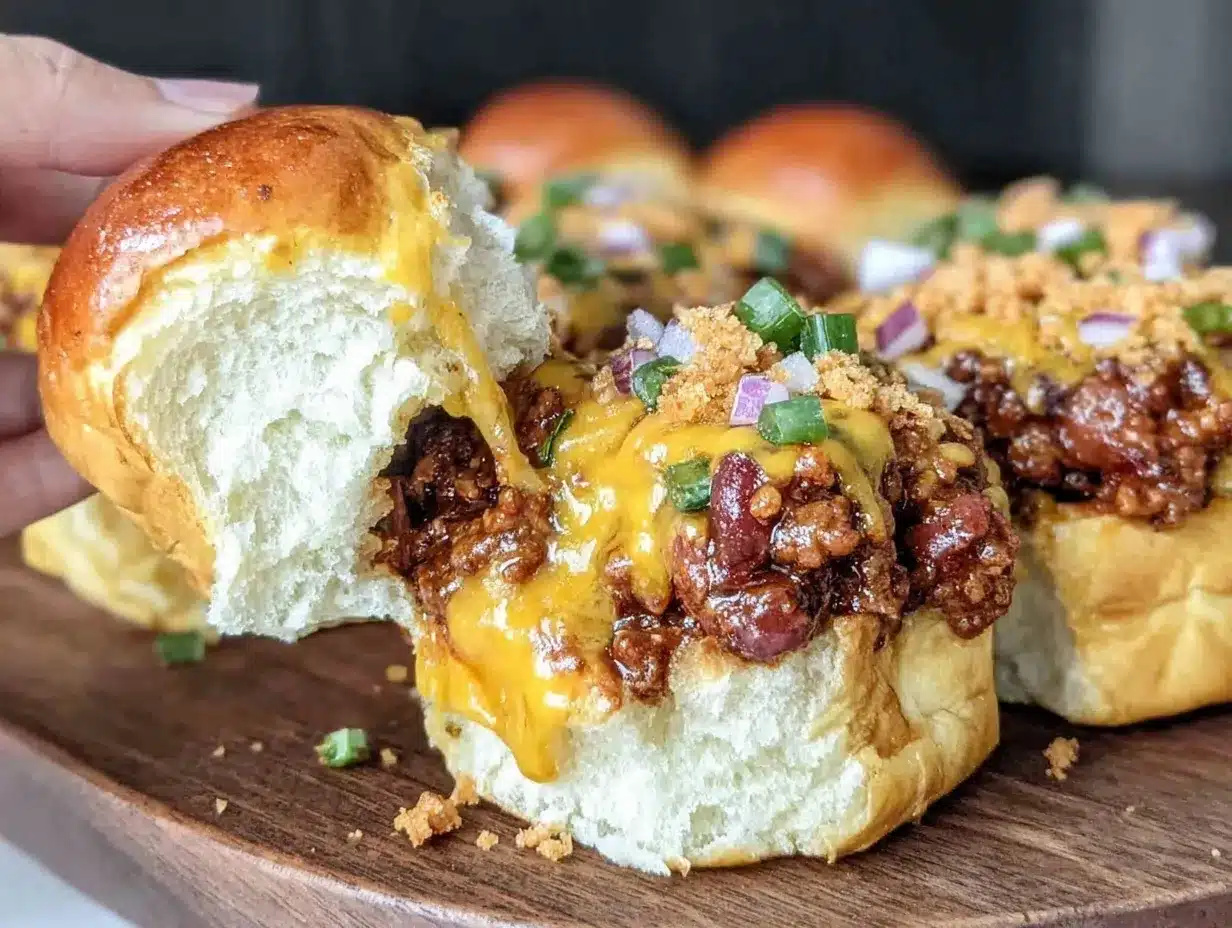
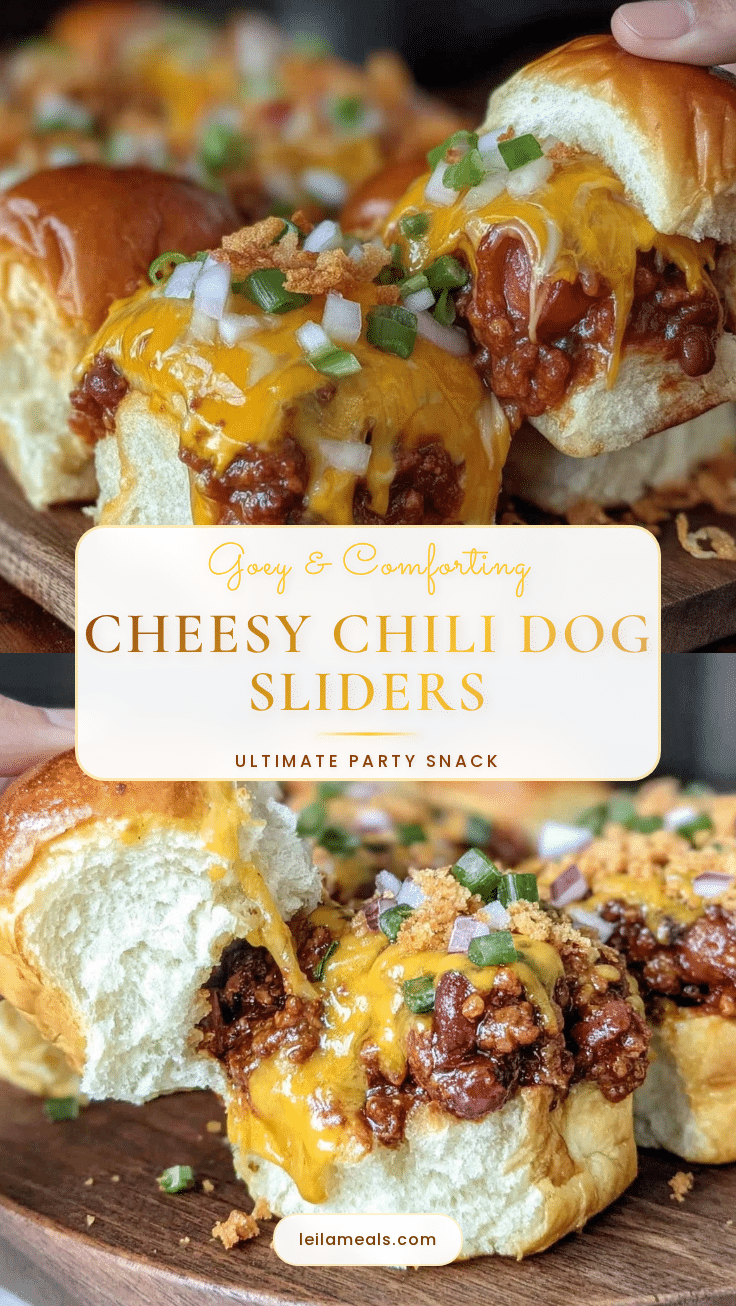
Add cheese: Sprinkle shredded cheddar over the chili layer. Don’t be shy—cheese is the glue here!
(Warning: Overfilling can make sliders messy, but honestly, that’s half the fun.) -
Top and brush: Place the top half of buns over everything. In a small bowl, mix melted butter and mustard. Brush this over the buns for flavor and golden color.
(Personal tip: Add a sprinkle of parsley or poppy seeds if you like a little flair.) -
Bake: Cover the dish loosely with foil and bake for 15 minutes. Remove foil and bake for another 7-10 minutes until the tops are golden and cheese is bubbly.
(Sensory cue: You’ll see cheese oozing out the sides and smell buttery, toasted bread.) -
Serve: Let the sliders cool for 5 minutes before slicing into individual portions. Garnish with extra parsley or diced onions if you want.
(Efficiency tip: Use a sharp spatula to lift sliders—less mess, more fun.)
If you run into any issues (sliders sticking, chili too thick, buns getting soggy), don’t panic! More cheese can fix almost anything, and letting them cool slightly makes them easier to handle. These steps are tried-and-true from many game day parties—just relax and enjoy the process!
Cooking Tips & Techniques
Making Savory Super Bowl Chili Dog Sliders is pretty straightforward, but I’ve picked up a few tricks over the years that keep things stress-free and delicious. Here’s what I wish I’d known from day one:
- Layering is key: Spread chili evenly so every slider gets a good balance of meat, sauce, and cheese. If you stack too much in one spot, things get messy fast.
- Don’t overbake: Sliders only need about 20-25 minutes total. If you bake too long, buns dry out (been there, done that—learned the hard way).
- Hot dog tips: For extra flavor, grill or pan-sear the hot dogs before slicing. They get a smoky edge that’s just so good.
- Cheese matters: Pre-shredded cheese works, but I prefer grating it myself—melts smoother and tastes richer.
- Chili consistency: If your chili looks runny, simmer longer or add a tablespoon of tomato paste. Too thick? Splash in a little broth.
- Timing: Make the chili ahead of time and refrigerate—it actually tastes better after the flavors meld. You can assemble sliders just before baking.
- Multitasking: While chili simmers, prep your buns and slice your dogs. Use downtime to set up your snack table or whip up a quick dip.
- Recipe success: The real secret? Don’t stress about perfection. Some sliders will be messier than others, and honestly, that’s part of the charm. People love grabbing a cheesy, saucy slider off the tray—it’s informal and fun!
I’ve had my fair share of “oops” moments—like soggy buns or burnt cheese—but every batch teaches you something. Stick with these tips, and you’ll be the game day hero!
Variations & Adaptations
The best thing about Savory Super Bowl Chili Dog Sliders is how easy they are to customize. Whether you’ve got dietary needs or just want to play with flavors, here are some tried-and-true twists:
- Vegetarian Version: Use plant-based ground meat and veggie dogs. Substitute vegetable broth in the chili. My sister swears by the Beyond Meat version—honestly, it’s just as tasty!
- Spicy Kick: Add diced jalapeños to the chili, or swap regular cheddar for pepper jack cheese. A little drizzle of sriracha on top kicks things up a notch.
- Low-Carb Adaptation: Use keto-friendly rolls or lettuce wraps instead of buns. Opt for turkey dogs and skip the brown sugar in the chili.
- Seasonal Twist: In summer, add a handful of fresh corn kernels to the chili. In winter, toss in a pinch of cinnamon for warmth.
- Allergen Swaps: Dairy-free cheese works fine, and gluten-free buns are widely available. If you need nut-free, just double-check your hot dog and cheese labels.
My personal favorite? I sometimes swap the cheddar for smoked gouda and add a dash of chipotle powder in the chili. It’s got a rich, smoky flavor that’s honestly addictive. However you adapt these sliders, they’ll keep everyone at your party happy!
Serving & Storage Suggestions
These Savory Super Bowl Chili Dog Sliders are best served hot and fresh from the oven—trust me, the gooey cheese and warm buns are irresistible that way. Lay them out on a big platter or cutting board, sprinkle with parsley, and let folks grab their own. They pair perfectly with potato chips, crunchy coleslaw, or a simple green salad.
If you want to get fancy, serve sliders alongside icy cold root beer or a pitcher of lemonade. For adults, a crisp lager or pale ale really complements the chili flavor.
Got leftovers? Pop sliders in an airtight container and store in the refrigerator for up to 3 days. To reheat, just wrap in foil and warm in a 350°F (175°C) oven for 10-12 minutes. You can freeze baked sliders, too—just thaw in the fridge overnight and reheat as above. Flavors deepen over time, so they’re often even tastier the next day!
One note: buns can get a bit soft after freezing, but a quick broil fixes that right up. I sometimes make a double batch, freeze half, and save myself work for next week’s movie night.
Nutritional Information & Benefits
Each Savory Super Bowl Chili Dog Slider (based on 12 sliders per batch) delivers about 220 calories, 12g protein, 15g carbs, and 11g fat. The chili packs in extra iron and B vitamins from the beef, plus some fiber from tomato sauce and onions.
If you’re watching your sodium, opt for low-salt broth and buns. Using lean ground meat or turkey dogs lowers saturated fat. Gluten-free and dairy-free adaptations are easy here, too—just switch the buns and cheese as needed.
Allergen note: contains wheat, dairy, and may contain soy (in some hot dogs). Always check ingredient labels if you’re serving guests with allergies.
From a personal wellness angle, I love how this recipe lets you sneak in veggies, swap proteins, and control your ingredient quality. It’s hearty comfort food, but you can easily lighten it up for everyday meals.
Conclusion
When it comes to game day food, Savory Super Bowl Chili Dog Sliders are the kind of recipe you’ll make on repeat. They’re quick, easy, and loaded with flavor—plus, they bring everyone together in the best way. Whether you’re hosting a Super Bowl bash, bringing snacks to a potluck, or just craving something cozy, these sliders hit the spot.
Don’t be afraid to mix things up—add your favorite toppings, try a new cheese, or tweak the chili. Cooking is meant to be fun, and this recipe is forgiving (and tasty) every time. Personally, I love how these sliders turn any party into a memory—kids, adults, and even picky eaters can’t resist.
If you try these Savory Super Bowl Chili Dog Sliders, drop a comment below and let me know how they went! Share your own twists or tag me if you post them on Pinterest. Here’s to good food, great games, and the kind of recipes you’ll come back to again and again. Go team!
FAQs
Can I make Savory Super Bowl Chili Dog Sliders ahead of time?
Yes! You can prepare the chili and assemble the sliders up to a day in advance. Refrigerate, then bake fresh for best results.
What hot dog brand works best for these sliders?
Any brand you love will work, but I usually go with Nathan’s or Hebrew National for their classic snap and flavor.
Can I freeze leftover sliders?
Absolutely! Store in an airtight container and freeze for up to 2 months. Thaw overnight and reheat in the oven for best texture.
How do I keep the buns from getting soggy?
Spread chili evenly and avoid overfilling. Baking uncovered for the last few minutes helps crisp the tops and prevent sogginess.
Are these sliders suitable for kids?
Definitely! Kids love the familiar flavors, and you can leave off spicy toppings if needed. They’re perfect for little hands and big appetites!
Pin This Recipe!
Savory Super Bowl Chili Dog Sliders

These easy, crowd-pleasing chili dog sliders feature soft buns, smoky hot dogs, homemade chili, and gooey cheddar cheese—perfect for game day parties, potlucks, or casual family nights. Quick to assemble and packed with nostalgic comfort, they’re guaranteed to be the MVP of your party spread.
- Prep Time: 15 minutes
- Cook Time: 25 minutes
- Total Time: 40 minutes
- Yield: 12 sliders 1x
- Category: Appetizer
- Cuisine: American
Ingredients
- 1 lb ground beef (80/20 recommended)
- 1 small yellow onion, finely chopped
- 2 cloves garlic, minced
- 1 (15 oz) can tomato sauce
- 1/2 cup beef broth
- 2 tbsp tomato paste
- 1 tbsp chili powder
- 1 tsp smoked paprika
- 1/2 tsp ground cumin
- 1/2 tsp brown sugar
- Salt & pepper, to taste
- 12 slider buns (soft dinner rolls, e.g., King’s Hawaiian)
- 6 regular hot dogs, sliced in half lengthwise
- 1 1/2 cups shredded cheddar cheese
- 2 tbsp unsalted butter, melted
- 1 tbsp yellow mustard
- 1 tbsp chopped fresh parsley (optional, for garnish)
- Optional toppings: diced onions, sliced jalapeños, pickle chips, extra shredded cheese
Instructions
- Preheat your oven to 375°F (190°C). Grease a 9×13-inch baking dish with butter or nonstick spray.
- In a large skillet over medium heat, brown the ground beef for 5-6 minutes, breaking it up as it cooks.
- Add the chopped onion and minced garlic; cook for another 2-3 minutes until the onion is soft and fragrant.
- Stir in tomato sauce, beef broth, tomato paste, chili powder, smoked paprika, cumin, and brown sugar. Season with salt and pepper. Simmer uncovered, stirring occasionally, for 10-12 minutes until the chili thickens.
- Slice the slider buns horizontally (keeping them attached), creating a top and bottom slab. Place the bottom half in the prepared baking dish.
- Arrange the sliced hot dogs evenly over the buns.
- Spoon half the chili evenly over the hot dogs.
- Sprinkle shredded cheddar cheese over the chili layer.
- Place the top half of the buns over the cheese and hot dogs.
- In a small bowl, mix melted butter and mustard. Brush this mixture over the tops of the buns. Sprinkle with parsley if desired.
- Cover the dish loosely with foil and bake for 15 minutes. Remove foil and bake for another 7-10 minutes, until the tops are golden and cheese is bubbly.
- Let the sliders cool for 5 minutes before slicing into individual portions. Garnish with extra parsley or diced onions if desired.
Notes
For extra flavor, grill or pan-sear the hot dogs before assembling. Make the chili ahead for deeper flavor. Use gluten-free buns and dairy-free cheese for allergy-friendly sliders. Don’t overbake to keep buns soft. Let sliders cool slightly before slicing for easier serving. Customize with your favorite toppings or cheese.
Nutrition
- Serving Size: 1 slider
- Calories: 220
- Sugar: 3
- Sodium: 480
- Fat: 11
- Saturated Fat: 5
- Carbohydrates: 15
- Fiber: 1
- Protein: 12
Keywords: chili dog sliders, Super Bowl appetizers, game day food, party sliders, easy chili dogs, crowd-pleaser, finger food, comfort food