Let me paint you a picture: the first time I made these Chocolate-Covered Strawberry Protein Balls, the sweet aroma of cocoa and fresh strawberries filled my kitchen, and I swear the anticipation was almost unbearable. There’s something about that mix—rich chocolate, fragrant berries, and a hint of vanilla—that makes your mouth water before the first bite even lands. You know, the kind of moment where you pause, take a deep breath, and just smile because you know you’re onto something truly special.
Years ago, when I was knee-high to a grasshopper, my grandma used to make strawberry jam from scratch. She’d let me lick the spoon, and I’d always wish she’d dip it in chocolate. Fast forward to a rainy weekend not long ago, I found myself craving that nostalgic combo but wanting something a little more wholesome (and, let’s face it, protein-packed to keep me going through the afternoon slump). That’s when I stumbled upon the idea for these protein balls—dangerously easy, irresistibly tasty, and totally guilt-free.
Honestly, my family couldn’t stop sneaking them off the cooling rack (and I can’t really blame them). Even my picky eater declared them “better than cookies”—a win in my book. There’s just something about that chocolate shell cracking to reveal a soft, strawberry-speckled center that makes your heart happy. Trust me, these are perfect for potlucks, after-school snacks, or even brightening up your Pinterest board. I tested these over and over (in the name of research, of course), and now they’re a staple for family gatherings and gifting. If you’re searching for a snack that feels like a warm hug with every bite, you’re going to want to bookmark this one.
Why You’ll Love This Recipe
If you’re anything like me, you want a snack that’s reliable, easy, and actually tastes good—no chalky protein bars here. These Chocolate-Covered Strawberry Protein Balls have become my go-to for busy days, lazy Sundays, and everything in between. Here’s why you’ll absolutely love this recipe (and why it’s a step above the rest):
- Quick & Easy: Comes together in under 30 minutes, so you can whip up a batch even when you’re short on time.
- Simple Ingredients: No need for fancy grocery runs—most of these are already in your pantry or fridge.
- Perfect for Any Occasion: Great for healthy snacking, post-workout fuel, lunchboxes, or even dessert for your next get-together.
- Crowd-Pleaser: Kids and adults both love the chocolate-strawberry combo (and honestly, who wouldn’t?).
- Unbelievably Delicious: The texture is soft and chewy inside with a satisfying chocolate crunch on the outside. It’s comfort food in a bite-sized package.
What really sets these apart? It’s the balance—sweet strawberries blended with creamy protein powder, finished with a perfectly snappy chocolate shell. I use a trick I picked up from a pastry chef friend: adding a pinch of sea salt to the chocolate coating intensifies the flavor and makes each bite pop. Plus, unlike some recipes that skimp on the fruit, there’s plenty of real strawberry here for a fresh, authentic taste (not just some vague “fruit flavor”).
This isn’t just another protein ball—it’s the one that makes you close your eyes after the first bite and smile. It’s a healthier twist on a classic treat, and honestly, it’s my secret weapon for making snack time special. Whether you’re looking to impress guests, treat your family, or just spoil yourself, these protein balls deliver every time—no stress, just pure, sweet satisfaction.
What Ingredients You Will Need
This recipe uses simple, wholesome ingredients to deliver bold flavor and a satisfying texture without any fuss. Most of what you’ll need are pantry staples, and you can swap a few things depending on what you have on hand or dietary needs. Here’s what goes into these Chocolate-Covered Strawberry Protein Balls:
- For the protein ball base:
- Rolled oats (old-fashioned, not quick oats; adds heartiness and binding)
- Vanilla protein powder (I recommend Orgain or Garden of Life for best texture—whey or plant-based both work)
- Almond flour (for a tender, nutty bite—swap with oat flour if needed)
- Natural almond butter (creamy, unsalted; helps bind and adds richness)
- Honey or pure maple syrup (for sweetness and stickiness—maple syrup is great for vegan option)
- Freeze-dried strawberries, crushed (bold real strawberry flavor without sogginess—use fresh chopped strawberries for a softer texture, but freeze-dried is my go-to for shelf stability)
- Vanilla extract (pure, not imitation; brings out the strawberry flavor)
- Pinch of salt (balances sweetness and heightens flavor)
- For the chocolate coating:
- Dark chocolate chips (70% cacao or higher for rich flavor; I like Enjoy Life or Ghirardelli)
- Coconut oil (just a teaspoon; helps the chocolate set with a shiny finish)
- Flaky sea salt (optional, but highly recommended for that pro touch)
If you’re gluten-free, use certified gluten-free oats and swap almond flour for sunflower seed flour. Dairy-free folks, stick with plant-based protein powder and dark chocolate free of milk solids. For nut allergies, sunflower seed butter works beautifully in place of almond. I’ve even tossed in a few chia seeds for crunch sometimes—honestly, this recipe is flexible!
In summer, swap freeze-dried berries for fresh or even a spoon of strawberry jam. If you prefer a lower-sugar snack, use monk fruit sweetener or omit honey/maple syrup and add a splash of milk to bring the dough together. The best part? You can customize these Chocolate-Covered Strawberry Protein Balls to suit your cravings and pantry stock, and they’ll still turn out delicious.
Equipment Needed
You don’t need a fancy kitchen to whip up these protein balls, which is a huge relief. Here’s what I use (and a few tips for making do with what you have):
- Mixing bowls (medium and small; glass or stainless steel both work—plastic is fine too)
- Measuring cups and spoons (for accuracy; I always double-check with a digital scale for best results)
- Wooden spoon or spatula (for mixing—sometimes I just use clean hands for final shaping, which works best for sticky dough)
- Blender or food processor (optional; I use mine to crush the freeze-dried strawberries or blitz the oats if I want a smoother texture)
- Baking sheet lined with parchment paper (for chilling and coating the balls)
- Microwave-safe bowl (for melting chocolate—alternatively, a double boiler on the stove)
- Fork or dipping tool (for dunking balls in melted chocolate)
If you don’t have a food processor, just crush the strawberries in a zip-top bag with a rolling pin—works like a charm. For the chocolate, microwaving in 20-second bursts prevents burning (learned that one the hard way!). And if you’re on a budget, thrift store bowls and spoons do the trick—I still use my grandma’s old utensils, and they haven’t let me down yet.
Preparation Method

-
Prep the strawberry base: In a medium bowl, combine 1 cup (100g) rolled oats, 1/2 cup (60g) almond flour, and 1/2 cup (15g) vanilla protein powder. Mix together with a wooden spoon until evenly distributed.
(Tip: If you prefer a finer texture, pulse oats in a food processor for 10 seconds.) -
Add the flavor: Toss in 1/2 cup (20g) crushed freeze-dried strawberries, 1/4 cup (60g) creamy almond butter, 3 tablespoons (45ml) honey or maple syrup, 1 teaspoon (5ml) vanilla extract, and a pinch of salt. Stir everything until a sticky dough forms.
(Warning: If dough is too dry, add 1-2 teaspoons milk of choice; if too wet, sprinkle in extra oat flour.) -
Shape the balls: Scoop out tablespoons of dough (about 20g each) and roll between your palms into smooth balls—should make 14-16 balls. Place on a parchment-lined baking sheet.
(Sensory cue: Dough should feel moist but not sticky. If it sticks, wet your hands lightly with water.) -
Chill for firmness: Pop the tray in the freezer for 15 minutes. This helps the balls firm up and makes coating easier.
(Troubleshooting: If your kitchen is warm, chill for up to 30 minutes.) -
Melt the chocolate: In a microwave-safe bowl, combine 3/4 cup (120g) dark chocolate chips and 1 teaspoon (5ml) coconut oil. Microwave in 20-second bursts, stirring until smooth and glossy.
(Prep note: Chocolate should be pourable but not runny.) -
Coat the balls: Using a fork or dipping tool, dunk each ball into the melted chocolate, letting excess drip off. Set back on the parchment. Sprinkle with flaky sea salt if desired.
(Tip: Work quickly before chocolate sets. Reheat if needed.) -
Set the coating: Return balls to the fridge for 10-15 minutes until chocolate hardens.
(Sensory cue: Chocolate should be firm with a slight shine.) -
Enjoy! Serve cold or at room temperature. Store leftovers in an airtight container in the fridge.
(Personal tip: They taste even better the next day as flavors meld.)
Cooking Tips & Techniques
Let’s face it—protein balls can be hit or miss. After many batches (some too dry, some too sticky, one batch melted together in the summer heat), I’ve picked up a few tricks that make this Chocolate-Covered Strawberry Protein Balls recipe foolproof.
- Don’t skip chilling: Chilling the balls before coating is crucial. It keeps them from falling apart in the chocolate and helps the shell set evenly.
- Use good chocolate: Cheap chocolate chips can taste waxy and won’t melt as smoothly. Splurge for a higher-cacao option—you’ll taste the difference.
- Keep hands clean and cool: Warm hands melt the dough. If you’re rolling a lot, rinse hands in cold water occasionally.
- Multitasking tip: While the balls chill, melt the chocolate and prep a spot in the fridge for setting. It saves you time and keeps things moving.
- Consistency matters: If the dough feels crumbly, don’t panic. Add a tiny splash of milk or extra almond butter. Err on the side of sticky—the oats will absorb moisture over time.
- Lesson learned: Once, I skipped the coconut oil in the chocolate and ended up with a dull, streaky coating. That little bit really helps the chocolate set with a snap!
- Double up: Make a double batch if you have a crowd. They store well and disappear fast—no joke!
Honestly, mistakes happen, but these tweaks save the day. I’ve burned the chocolate (trust me, microwaving in short bursts is the way to go), forgotten the salt, and even made a batch with peanut butter instead of almond. Every time, it’s a learning moment, and now you get the benefit of all those kitchen adventures.
Variations & Adaptations
One of my favorite things about these Chocolate-Covered Strawberry Protein Balls is how easy they are to customize. Here are a few tried-and-true variations that keep snack time exciting:
- Nut-Free: Swap almond butter for sunflower seed butter and almond flour for oat or sunflower seed flour. Tastes just as good—great for lunchboxes at nut-free schools.
- Vegan: Use maple syrup instead of honey and a plant-based protein powder. Make sure your chocolate chips are dairy-free (most dark chocolates fit the bill).
- Low-Carb: Substitute rolled oats with finely ground flaxseed or coconut flour, and use sugar-free chocolate chips. Monk fruit sweetener can replace honey/maple syrup.
- Seasonal Flavor: Try swapping strawberries for freeze-dried raspberries or blueberries. In winter, add a pinch of cinnamon and a handful of chopped pecans for a cozy twist.
- Extra Crunch: Toss in 2 tablespoons (20g) chia seeds or toasted hemp seeds for added texture and nutrition.
Personally, I love making a batch with peanut butter and swapping the strawberries for dried cherries—kind of like a PB&J meets chocolate truffle! If you want to skip the chocolate coating, roll the balls in cocoa powder or shredded coconut for a quick finish. There’s no wrong way to enjoy these, so don’t be afraid to get creative based on what you have or what you’re craving.
Serving & Storage Suggestions
These protein balls are best served chilled, straight from the fridge, which keeps the chocolate shell snappy and the center fudgy. If you’re sharing at a party or potluck, pile them high on a pretty plate or in a mason jar—people love the grab-and-go vibe.
Pair with a glass of cold milk, hot coffee, or a fruity smoothie for a balanced snack. They’re also perfect alongside yogurt and fresh fruit for a breakfast treat, or tucked into a lunchbox for a midday pick-me-up.
For storage, keep them in an airtight container in the fridge for up to 7 days. If you want to freeze them, layer with parchment paper in a freezer-safe bag and store up to 2 months. To thaw, pop them in the fridge overnight (or just eat straight from the freezer—my kids love them that way!).
If you notice condensation after taking them out, let them sit uncovered for a few minutes before serving. Honestly, the flavors deepen and meld after a day or two—so don’t be afraid to make ahead for meal prep or gifting.
Nutritional Information & Benefits
Each Chocolate-Covered Strawberry Protein Ball packs about 100 calories, 5g protein, 7g carbs, and 6g healthy fats (depending on your specific ingredients). You get the muscle-building benefits of protein powder, heart-healthy fats from almond butter, and antioxidant-rich strawberries in every bite.
Oats provide fiber for lasting energy, while dark chocolate brings flavonoids for a hint of wellness. The recipe is naturally gluten-free if you use certified oats, and can be made dairy-free and vegan. Nut-free swaps are easy too—so you can share with just about anyone.
Allergens to watch: nuts (from almond flour/butter), dairy (if using whey protein or milk chocolate), and gluten (from regular oats). Honestly, it’s a snack that fits most dietary needs while satisfying your sweet tooth and fueling your day—I feel good giving these to my kids and sneaking a few for myself!
Conclusion
If you’re searching for a snack that’s easy, delicious, and wholesome, these Chocolate-Covered Strawberry Protein Balls are your answer. They’ve earned a permanent spot in my kitchen, thanks to their irresistible flavor, fuss-free prep, and crowd-pleasing charm.
Don’t be afraid to play around with flavors and ingredients—make them your own! Whether you’re making a batch for friends, packing lunchboxes, or just treating yourself, these little bites deliver pure joy, one chocolatey, strawberry-filled ball at a time.
I love that they combine nostalgia and nutrition in a way that feels special (without being complicated). Give them a try, and let me know how you customize yours—share your creations, drop a comment, or tag me on Pinterest! Here’s to healthy snacking that never feels like a compromise. Enjoy every bite!
Frequently Asked Questions
Can I use fresh strawberries instead of freeze-dried?
Yes, but fresh strawberries will make the dough softer and a bit wetter. If you use fresh, chop them small, and add an extra tablespoon of oats or almond flour to help bind the mixture.
How do I make these protein balls nut-free?
Use sunflower seed butter instead of almond butter, and swap almond flour for oat or sunflower seed flour. The flavor will change slightly, but the texture stays great.
Can I skip the chocolate coating?
Absolutely! Roll the balls in cocoa powder, shredded coconut, or chopped nuts for a quick finish. The chocolate shell adds crunch, but they’re delicious without it too.
What’s the best way to store these protein balls?
Keep them in an airtight container in the fridge for up to 7 days. For longer storage, freeze them and thaw as needed—perfect for meal prep!
Are these Chocolate-Covered Strawberry Protein Balls gluten-free?
Yes, if you use certified gluten-free oats and gluten-free protein powder. Always check labels if you’re sensitive to gluten.
Pin This Recipe!
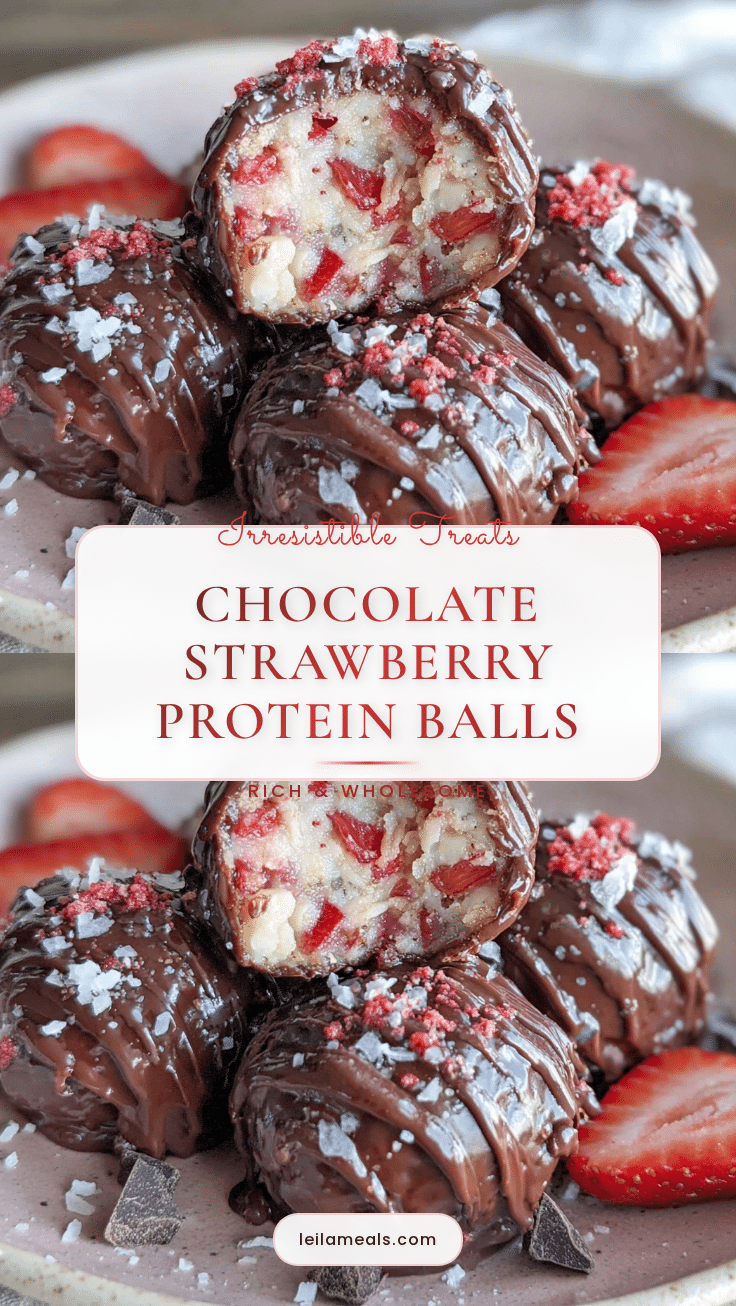
Chocolate-Covered Strawberry Protein Balls

These Chocolate-Covered Strawberry Protein Balls are a quick, healthy snack featuring a chewy strawberry-speckled center wrapped in a snappy dark chocolate shell. Packed with protein and wholesome ingredients, they’re perfect for meal prep, gifting, or satisfying your sweet tooth guilt-free.
- Prep Time: 15 minutes
- Cook Time: 0 minutes
- Total Time: 30 minutes
- Yield: 14-16 balls 1x
- Category: Snack
- Cuisine: American
Ingredients
- 1 cup rolled oats (old-fashioned, not quick oats)
- 1/2 cup vanilla protein powder (whey or plant-based)
- 1/2 cup almond flour (or oat flour for nut-free)
- 1/4 cup natural almond butter (creamy, unsalted; or sunflower seed butter for nut-free)
- 3 tablespoons honey or pure maple syrup
- 1/2 cup freeze-dried strawberries, crushed (or 1/2 cup fresh chopped strawberries for softer texture)
- 1 teaspoon vanilla extract
- Pinch of salt
- 3/4 cup dark chocolate chips (70% cacao or higher, dairy-free if needed)
- 1 teaspoon coconut oil
- Flaky sea salt (optional, for topping)
Instructions
- In a medium bowl, combine rolled oats, almond flour, and vanilla protein powder. Mix until evenly distributed.
- Add crushed freeze-dried strawberries, almond butter, honey or maple syrup, vanilla extract, and a pinch of salt. Stir until a sticky dough forms. If too dry, add 1-2 teaspoons milk of choice; if too wet, add extra oat flour.
- Scoop out tablespoons of dough (about 20g each) and roll into smooth balls. Place on a parchment-lined baking sheet.
- Chill the tray in the freezer for 15 minutes (up to 30 minutes if your kitchen is warm) to firm up the balls.
- In a microwave-safe bowl, combine dark chocolate chips and coconut oil. Microwave in 20-second bursts, stirring until smooth and glossy.
- Using a fork or dipping tool, dunk each ball into the melted chocolate, letting excess drip off. Place back on the parchment and sprinkle with flaky sea salt if desired.
- Return balls to the fridge for 10-15 minutes until the chocolate hardens.
- Serve cold or at room temperature. Store leftovers in an airtight container in the fridge.
Notes
For best results, chill the balls before coating in chocolate. Use high-quality chocolate for a smooth shell. If dough is too dry, add a splash of milk; if too sticky, add more oats or almond flour. Store in the fridge for up to 7 days or freeze for up to 2 months. Easily adapt for nut-free, vegan, or low-carb diets. Flavors deepen after a day—great for make-ahead snacks.
Nutrition
- Serving Size: 1 protein ball
- Calories: 100
- Sugar: 4
- Sodium: 40
- Fat: 6
- Saturated Fat: 2
- Carbohydrates: 7
- Fiber: 2
- Protein: 5
Keywords: protein balls, healthy snack, chocolate covered, strawberry, gluten-free, meal prep, no bake, vegan option, nut-free option, high protein