This cake is honestly the kind of thing that happens when you’re staring into your pantry at 10 PM with a serious sweet tooth and zero patience for complicated baking. I made it three times in one week last month — the first time was an accident, the second was to prove the first wasn’t a fluke, and the third was because I couldn’t stop thinking about that perfect, creamy slice waiting for me in the fridge. Each time, something tiny shifted — a different brand of cookies, a slightly thicker layer of pudding — and each time, it somehow got better.
By the fifth time I made this Easy 5-Ingredient Neapolitan Dream Cake, I had stopped measuring things precisely and started going entirely by feel. That’s when I knew it was a keeper. Not because it was fancy or complicated, but because it was forgiving. It didn’t care if I was precise. It just wanted to be made.
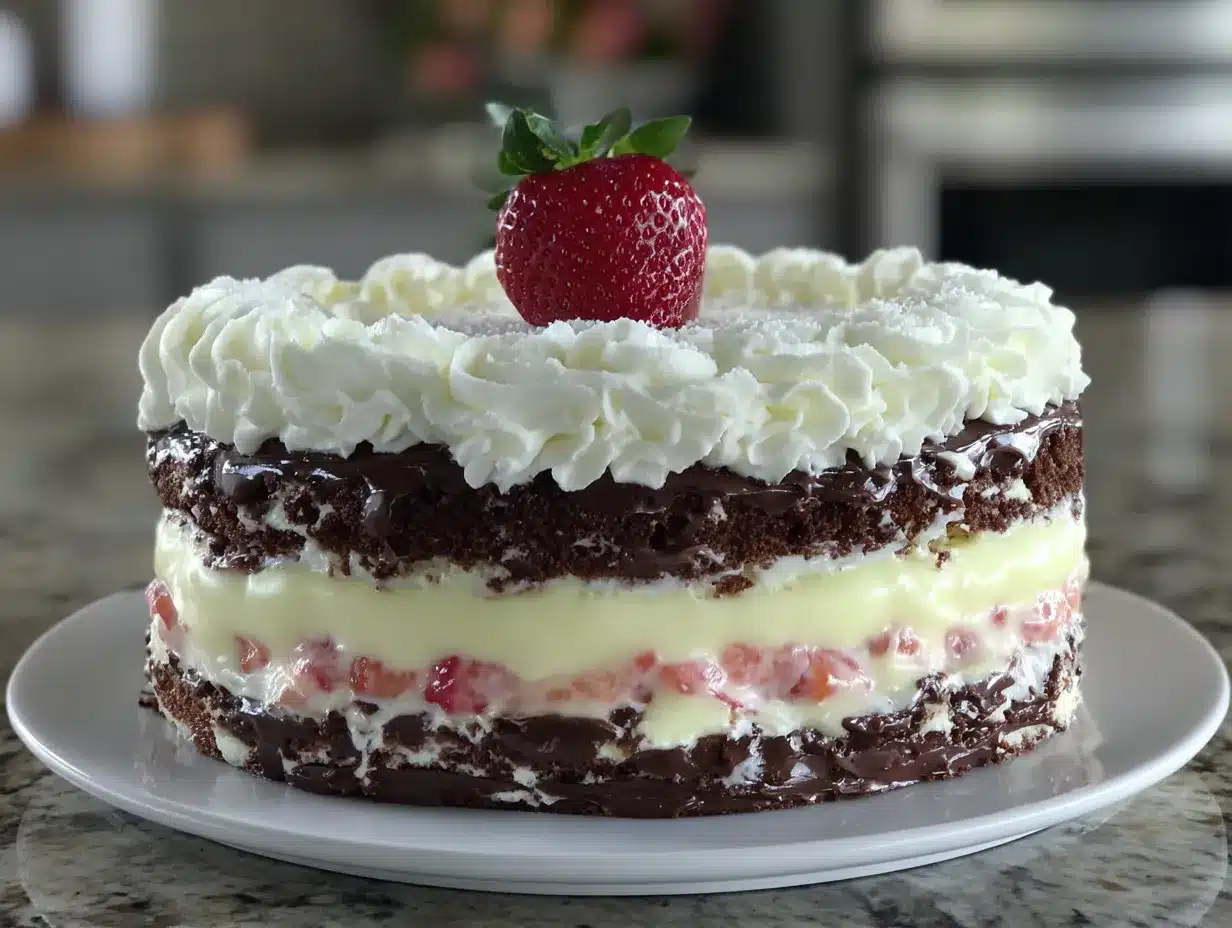
There’s something about a no-bake dessert that feels almost rebellious, you know? Like you’re getting away with something. This one layers the classic flavors of strawberry, vanilla, and chocolate into a chilled, creamy cake that slices cleanly and tastes like you spent hours on it. But you didn’t. And that’s the whole point.
Why You’ll Love This Recipe
I’ve tested this cake more times than I care to admit, and every single batch reinforced why it deserves a permanent spot in your dessert rotation. Let me break it down for you.
- Only 5 Ingredients — No weird extracts, no specialty flours, no hunting down obscure items. Just real, recognizable ingredients you probably already have.
- No-Bake Magic — Zero oven time. None. Your kitchen stays cool, and you don’t have to worry about overbaking or underbaking anything.
- Make-Ahead Friendly — This cake actually gets better after a day in the fridge. The layers meld together, the texture firms up perfectly, and the flavors deepen.
- Crowd-Pleasing Colors — The pink, white, and chocolate layers make for a stunning presentation that looks way more complicated than it is.
- Kid-Friendly to Make — My niece helped me assemble the last batch, and she felt like a pastry chef. No hot surfaces, no sharp tools, just layering and spreading.
What sets this apart from other no-bake cakes is the texture. Most no-bake desserts turn into a sad, soggy mess after a few hours. Not this one. The cookie base stays firm enough to hold the layers, the pudding sets up beautifully, and the whipped topping keeps everything light and airy. I tested it with different brands of cookies and pudding mixes to find the combo that holds its structure best, and I’m sharing that exact formula with you.
What Ingredients You Will Need
This recipe relies on five simple ingredients doing exactly what they’re supposed to do. No substitutes, no fuss — just honest ingredients that work together beautifully.
- 1 (14.3 oz) package chocolate sandwich cookies (like Oreos, not double-stuffed — the regular ones crush better and hold the crust together more evenly)
- 1/2 cup (1 stick) unsalted butter, melted (I use Land O’Lakes; the butter binds the cookie crumbs without making them greasy)
- 2 (3.4 oz) packages instant vanilla pudding mix (Jell-O brand works best here; the texture sets up firmer than store brands)
- 3 cups cold whole milk (2% works in a pinch, but whole milk gives the pudding that rich, creamy body that holds the layers together)
- 1 (8 oz) container frozen whipped topping, thawed (Cool Whip is my go-to; it stays stable longer than homemade whipped cream in this application)
For the strawberry layer, you’ll need about 1/3 cup of strawberry jam or preserves — not technically counted as a separate ingredient since it’s a simple addition, but don’t skip it. The jam gives that distinct Neapolitan flavor without requiring fresh strawberries that might weep and ruin the texture. I prefer Bonne Maman brand for its thick consistency and real fruit pieces.
One thing I learned the hard way — don’t use sugar-free pudding mix for this. The texture doesn’t set up the same way, and the cake ends up too soft to slice cleanly. Trust me on this one.
Equipment Needed
You don’t need a fancy kitchen setup for this cake. Here’s what you’ll actually use:
- 9×9 inch square baking dish (or an 8×8 if you want thicker layers — just adjust the layering slightly)
- Food processor or zip-top bag and rolling pin (for crushing cookies; I prefer the food processor for even crumbs)
- Medium mixing bowl (for the crust mixture)
- Large mixing bowl (for the pudding)
- Whisk (a sturdy one — the pudding needs a good minute of whisking to thicken properly)
- Rubber spatula (for folding and spreading layers evenly)
- Measuring cups and spoons
If you don’t have a food processor, just put the cookies in a sturdy zip-top bag and go at them with a rolling pin. It’s oddly therapeutic. I’ve done it both ways, and honestly, the bag method gives you more control over the crumb size — some people prefer a few slightly bigger chunks for texture.
Preparation Method
Let’s walk through this step by step. I’ll include all the little details I wish someone had told me the first time.
- Make the crust. Pulse the entire package of chocolate sandwich cookies in your food processor until you get fine, even crumbs. You should have about 2 cups of crumbs. Pour them into a medium bowl, add the melted butter, and stir with a fork until every crumb is coated. The mixture should look like wet sand and hold together when you press it in your fist. Press this mixture firmly into the bottom of your 9×9 dish. Use the bottom of a measuring cup to really pack it down — this is what keeps your crust from crumbling when you cut the cake later. Pop it in the fridge while you make the filling.
- Make the pudding base. In your large mixing bowl, whisk together both packages of instant vanilla pudding mix and the 3 cups of cold whole milk. Whisk vigorously for about 2 minutes — the mixture will start thick and then suddenly get very thick. You’ll feel the resistance in the whisk. Let it sit for 5 minutes to fully set up. This waiting period is crucial; I’ve rushed it before and ended up with runny layers that wouldn’t hold.
- Fold in the whipped topping. Take your thawed whipped topping and gently fold it into the thickened pudding. Use a rubber spatula and make broad, sweeping motions — cut through the center, scrape the bottom, fold over the top. You want it completely combined but not deflated. The mixture should be light, fluffy, and pale cream in color. This is your blank canvas for the Neapolitan layers.
- Divide and flavor the layers. Scoop out about 1/3 of the pudding mixture into a separate bowl. This will be your strawberry layer. Add the 1/3 cup of strawberry jam to this portion and fold it in until the color is even — it should turn a soft pink. Leave the remaining 2/3 of the mixture plain for your vanilla layer. For the chocolate layer, you won’t need to add anything — the chocolate cookie crust provides that flavor contrast beautifully.
- Layer the cake. Spread the strawberry pudding mixture evenly over the chilled cookie crust. Use the back of a spoon to reach the edges and corners. Pop the dish in the fridge for 15 minutes — this helps the strawberry layer set slightly before you add the next one. After 15 minutes, carefully spread the plain vanilla pudding mixture over the strawberry layer. Smooth it out gently so you don’t disturb the pink layer underneath. Refrigerate for at least 4 hours, but overnight is truly best. The longer it sits, the cleaner your slices will be.
- Finish and serve. Before serving, you can add a thin layer of extra whipped topping on top if you want, or just leave it as is. I sometimes sprinkle crushed chocolate cookies on top for crunch. Slice with a sharp knife, wiping the blade clean between cuts for the prettiest presentation.
Cooking Tips & Techniques
After making this cake more times than I can count, I’ve collected a few hard-won lessons that’ll save you from my mistakes.
Let the crust chill longer than you think. I know the recipe says 15 minutes, but if you have the time, let it sit in the fridge for 30 minutes. The butter firms up more, and the crust holds together much better when you cut into it. My first cake crumbled everywhere because I was impatient.
Don’t overmix the pudding. Once the pudding mix is fully dissolved and the mixture starts to thicken, stop whisking. Overmixing can break down the starches and prevent the pudding from setting properly. You want it thick but not stiff.
Room temperature matters. If your kitchen is warm, work quickly. The pudding mixture will start to soften, and the layers won’t set as cleanly. I made the mistake of assembling this on a hot summer afternoon without air conditioning, and the layers kind of melted into each other. Still tasted amazing, but it wasn’t pretty.
Use a hot knife for clean slices. Run your knife under hot water, dry it off, then slice. The heat helps the knife glide through the layers without dragging. Wipe the blade clean between each cut. This is the difference between a messy slice and a picture-perfect one.
Make it the day before. This cake genuinely improves overnight. The flavors meld, the texture firms up, and the crust softens just enough to be easy to cut but still holds its shape. If you’re serving this for a special occasion, make it the night before and thank me later.
Variations & Adaptations
One of the best things about this cake is how adaptable it is. Here are some variations I’ve tried and loved.
- Chocolate lovers version. Swap the vanilla pudding for chocolate pudding, and use chocolate cookie crumbs in the crust. You’ll get a triple-chocolate Neapolitan that’s dangerously good. I made this for a friend’s birthday, and it disappeared in 10 minutes.
- Gluten-free option. Use gluten-free chocolate sandwich cookies for the crust. Most brands work well, just check the texture — some are crumblier than others. The rest of the ingredients are naturally gluten-free.
- Fresh fruit twist. Instead of strawberry jam, layer fresh sliced strawberries or raspberries on top of the cookie crust before adding the pudding layers. The fruit adds a bright, fresh pop that contrasts beautifully with the creamy pudding. Just make sure to pat the berries dry so they don’t make the crust soggy.
- Individual servings. Assemble the layers in small mason jars or dessert cups for a grab-and-go treat. This is perfect for picnics or potlucks. Just layer the crumbs, strawberry pudding, and vanilla pudding in each cup, then refrigerate. No slicing required.
- Peanut butter version. Add a layer of peanut butter between the crust and the strawberry pudding. Melt about 1/2 cup of creamy peanut butter and drizzle it over the crust, then proceed with the layers. The salty peanut butter against the sweet strawberry and vanilla is incredible.
If you’re looking for another no-bake treat that comes together just as easily, you should try my Easy No-Bake Chocolate Peanut Butter Granola Bars — they’re perfect for when you want something sweet but need it to be portable.
Serving & Storage Suggestions
This cake is best served cold, straight from the fridge. I like to let it sit out for about 5 minutes before slicing — just enough to take the chill off without losing the structure.
For presentation, I top each slice with a dollop of fresh whipped cream and a few fresh strawberry slices. The contrast of the bright red fruit against the creamy layers is gorgeous. A drizzle of chocolate syrup never hurts either.
This cake pairs beautifully with a cup of coffee or a cold glass of milk. If you’re feeling fancy, serve it alongside a Cozy Pumpkin Spice Cold Brew for a fall-themed dessert spread.
Storage: Cover the dish tightly with plastic wrap or foil and store in the refrigerator for up to 5 days. The cake actually holds up remarkably well — the crust stays firm, and the pudding layers don’t weep or separate. I’ve kept leftovers for a full week, and they were still delicious.
Freezing: You can freeze this cake for up to 2 months. Wrap the entire dish in plastic wrap, then a layer of foil. Thaw overnight in the refrigerator before serving. The texture remains surprisingly good after freezing, though the crust might be slightly softer. I’ve frozen individual slices wrapped in plastic wrap for quick desserts — just grab one from the freezer and let it thaw in the fridge.
Nutritional Information & Benefits
Let’s be real — this is a dessert, and it tastes like one. But here’s the breakdown per slice (based on 9 servings):
- Calories: Approximately 350-380 per slice
- Fat: 18g
- Carbohydrates: 48g
- Protein: 5g
- Sugar: 32g
The good news? You’re getting some calcium from the milk and a small amount of protein from the dairy. The strawberry jam adds a touch of fruit, and the cookie crust provides a little fiber. But honestly, this cake is about joy, not nutrition. It’s the kind of dessert you make when you want to treat yourself and the people you love.
If you’re watching your sugar intake, you can use sugar-free pudding mix and a sugar-free jam, but as I mentioned earlier, the texture might be slightly different. I’d rather have a smaller slice of the real thing than a bigger slice of something that doesn’t taste as good.
For a lighter option that still satisfies your sweet tooth, try my Healthy Blueberry Maple Overnight Oats — they’re creamy, sweet, and perfect for meal prep.
Conclusion
This Easy 5-Ingredient Neapolitan Dream Cake is proof that you don’t need a dozen ingredients or hours in the kitchen to create something truly special. It’s the kind of dessert that feels like a secret — simple enough to throw together on a Tuesday, pretty enough to serve at a dinner party, and delicious enough that everyone will ask for the recipe.
I love that this cake doesn’t take itself too seriously. It’s playful with its pink and white layers, nostalgic with its Neapolitan flavor combo, and completely forgiving of any mistakes you might make. The first time I made it, I forgot to chill the crust and ended up with a slightly messy but still delicious cake. The second time, I used too much jam and the strawberry layer was almost too pink. Both times, the cake disappeared.
So go ahead — make this cake your own. Swap the flavors, adjust the layers, experiment with toppings. That’s the beauty of a simple recipe. It’s a starting point, not a rulebook.
I’d love to hear how yours turns out! Drop a comment below with your favorite variation, or tag me in your photos if you share them online. Happy layering, friends.
Frequently Asked Questions
Can I use homemade whipped cream instead of Cool Whip?
You can, but homemade whipped cream is less stable and might cause the layers to soften faster. If you go that route, stabilize it with a tablespoon of powdered sugar and a teaspoon of vanilla extract. The cake will still taste amazing, but it won’t hold its structure as long.
Do I have to use strawberry jam, or can I use fresh strawberries?
Fresh strawberries work, but they release moisture as the cake sits, which can make the layers watery. If you want to use fresh berries, slice them thin and pat them dry with paper towels before layering. I’ve done both, and I prefer jam for its consistent texture and concentrated flavor.
Can I make this in a different size dish?
Absolutely. A 9×13 pan will give you thinner layers and more servings — just reduce the crust by about 1/4 and adjust the layering accordingly. An 8×8 pan will give you thicker, more dramatic layers. Just keep an eye on the chilling time; thicker layers need a bit longer to set.
How far in advance can I make this cake?
You can make it up to 2 days ahead of time. The flavors actually improve after 24 hours. If you’re making it for a party, assemble it the night before and let it chill overnight. Just cover it tightly so it doesn’t pick up any fridge odors.
Can I use a different flavor of pudding?
Yes! Chocolate pudding for a richer dessert, cheesecake pudding for a tangy twist, or butterscotch for something completely different. Just keep the ratio the same — two boxes of instant pudding to 3 cups of milk. The possibilities are endless.
Pin This Recipe!
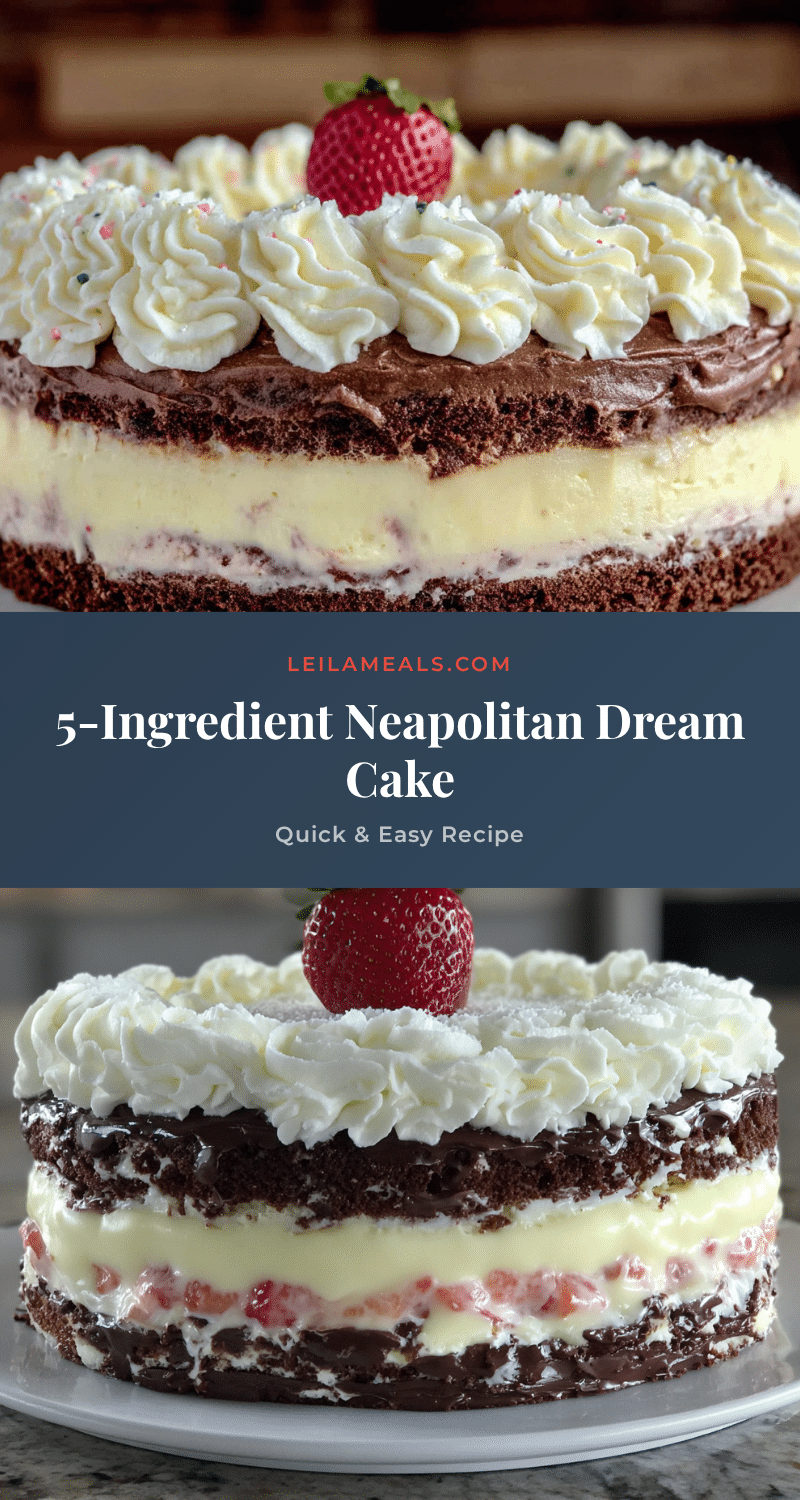
Easy 5-Ingredient Neapolitan Dream Cake
A no-bake dessert with layers of strawberry, vanilla, and chocolate flavors, made with just five simple ingredients. Perfect for a quick, crowd-pleasing treat that looks impressive with minimal effort.
- Prep Time: 20 minutes
- Cook Time: 0 minutes
- Total Time: 4 hours 20 minutes (includes chilling)
- Yield: 9 servings 1x
- Category: Dessert
- Cuisine: American
Ingredients
- 1 (14.3 oz) package chocolate sandwich cookies (like Oreos, not double-stuffed)
- 1/2 cup (1 stick) unsalted butter, melted
- 2 (3.4 oz) packages instant vanilla pudding mix (Jell-O brand recommended)
- 3 cups cold whole milk
- 1 (8 oz) container frozen whipped topping, thawed (Cool Whip recommended)
- 1/3 cup strawberry jam or preserves (optional, for strawberry layer)
Instructions
- Make the crust: Pulse the entire package of chocolate sandwich cookies in a food processor until fine crumbs form. Pour into a medium bowl, add melted butter, and stir until every crumb is coated. Press firmly into the bottom of a 9×9 inch baking dish. Refrigerate while making the filling.
- Make the pudding base: In a large mixing bowl, whisk together both packages of instant vanilla pudding mix and 3 cups of cold whole milk. Whisk vigorously for about 2 minutes until thickened. Let sit for 5 minutes to fully set.
- Fold in the whipped topping: Gently fold the thawed whipped topping into the thickened pudding using a rubber spatula until completely combined and fluffy.
- Divide and flavor the layers: Scoop out about 1/3 of the pudding mixture into a separate bowl. Add 1/3 cup strawberry jam and fold until evenly pink. Leave the remaining 2/3 plain for the vanilla layer.
- Layer the cake: Spread the strawberry pudding mixture evenly over the chilled cookie crust. Refrigerate for 15 minutes. Then carefully spread the plain vanilla pudding mixture over the strawberry layer. Refrigerate for at least 4 hours, preferably overnight.
- Finish and serve: Before serving, optionally add a thin layer of extra whipped topping on top. Slice with a sharp knife, wiping the blade clean between cuts.
Notes
For best results, let the crust chill for 30 minutes instead of 15. Don’t overmix the pudding. Use a hot knife for clean slices. The cake improves overnight. Avoid sugar-free pudding mix as it won’t set properly.
Nutrition
- Serving Size: 1 slice (1/9 of cake
- Calories: 365
- Sugar: 32
- Sodium: 380
- Fat: 18
- Saturated Fat: 10
- Carbohydrates: 48
- Fiber: 1
- Protein: 5
Keywords: no-bake cake, Neapolitan dessert, easy dessert, 5-ingredient dessert, no-bake dessert, strawberry vanilla chocolate cake